Empire Industries CI33SW User manual

Type
User manual
INSTALLATION AND CARE GUIDE
www.empire-industries.com
INSTALLATION AND CARE GUIDE
1
127,&(6
v 'RQRWFKDQJHRUPRGLI\WKHSURGXFWLQDQ\ZD\
'RLQJVRPD\FRPSURPLVHWKHSURGXFWVVWUXFWXUDOLQWHJULW\DQGZLOOYRLGWKHZDUUDQW\
v ,QVWDOODWLRQLQVWUXFWLRQVPXVWEHIROORZHG
$Q\GLYHUVLRQVIURPWKHLQVWDOODWLRQVPD\ULVNSURSHUW\GDPDJHDQGZLOOYRLGWKHZDUUDQW\
v ,I\RXDUHXQIDPLOLDUZLWK6LQNLQVWDOODWLRQSOHDVHFRQVXOWDSURIHVVLRQDO
,PSURSHULQVWDOODWLRQFRXOGUHVXOWLQGDPDJHWRWKHSURGXFWRUWKHFDELQHW
,03257$17
v 2EVHUYHDOOVWDWHDQGORFDOEXLOGLQJFRGHV
v &DUHIXOO\UHDGDOOLQVWDOODWLRQDQGFDUHLQVWUXFWLRQEHIRUHSURFHHGLQJ
v 'XHWRWKHPDQXIDFWXULQJSURFHVVHDFKVLQNZLOOYDU\VOLJKWO\GLPHQVLRQDOO\
v )DUPKRXVHVLQNVPD\UHTXLUHFXVWRPFDELQHWU\:HUHFRPPHQGFRQVXOWLQJDQH[SHULHQFHG
FDELQHWPDNHUIRUDVVLVWDQFH3URYLGLQJWKHFDELQHWPDNHUZLWKWKHDFWXDOVLQNWREHLQVWDOOHGZLOO
HQVXUHDFXVWRP¿W
MATERIALS INCLUDED:
1 - cast iron farmhouse sink
7RROV5HTXLUHG (recommended to be installed by a professional)
MATERIALS 5(48,5(':
-[FXWWRILWLQFDELQHW
SO\ZRRG
INSTALLATION AND CARE GUIDE
2
PRIOR INSTALLING THE SINK
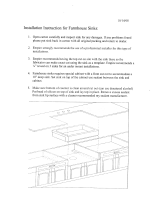
Farmhouse sinks may require custom cabinetry. We
recommend consulting an experienced cabinet maker
for assistance. Providing the cabinet maker with the
actual sink that is to be installed will ensure a custom t.
Depends on your desired size of the cabinets, you may
or may not need to modify the side panel to t the sink.
Allow clearance for the water supply lines, drains and a
garbage disposal, if applicable. Build a support frame or
install supporting shelf and brackets from front to back
along the inner sides of the cabinet. The
frame must support the weight of the sink and all
attachments.
The support frame should be positioned so that when
installed, the sink is in line and level with the top of the
cabinet.
DURING THE SINK INSTALLATION
No template is provided since each sink will vary
dimensionally. After centering the sink, trace the outline
of the sink on the counter-top with a pencil to use as a
guide for the cutout. Remember to allow clearance for
any faucets and/or back splashes. Cut the counter-top
accordingly.
Test t the sink in the opening that was created in the
previous steps. The entire weight of the sink should be
supported by the support frame.
Verify that the sink is in line and level with the top of the
cabinet. Use shims, if needed, to level the sink.
Set the sink and apply your sealant to ll in any gaps
below the sink front, and between the sink and counter-
top. Hold the sink in place to secure. Place the counter-
top onto the sink and remove any excess sealant from
all surfaces
www.empire-industries.com
INSTALLATION AND CARE GUIDE
3
PRIOR INSTALLING THE SINK
Step 1:
Determine the ideal location of your farmhouse kitchen sink.
Step 2:
Measure and cut the cabinet to fit the kitchen sink. See Figure 1.
NOTE:
Empire recommends to install the sink under the counter.
If you want to install flush or semi-recessed, be sure to adjust
the height and length of the cabinet cut in Figure 1.
Step 3: Cut 2 pieces of 2 x 4 beams to fit inside the cabinet.
See Figure 2 and Figure 3.
NOTE: It is recommended that you screw the beams with wood glue and
screws.
See Figure 2 and Figure 3.
Figure 1.
Figure 2.
www.empire-industries.com
INSTALLATION AND CARE GUIDE
4
Figure 3.
Step 4: Attach the beams into place with wood glue.
Allow enough time for the glue to dry (follow product
recommendation).
Step 5: Fasten the 2 x 4 beams with wood screws into the cabinet.
See figure 3.
NOTE: Step 6 is recommended to ensure that that the bottom of the sink
has enough support. This step is optional.
Step 6: Cut and fit a
3
/
4
" thick plywood board that will sit on top of the beams.
Step 7: Cut-out the sections where your drain and faucet lines will be.
These will depend on the type of installation you chose
(Under-the-counter, flush-mount, semi-recessed). See Figure 4.
Step 8: fit the board on top of the beams and verify that it is leveled.
If not leveled, adjusted with shims. See Figure 4.
Step 9: Secure the board to the beams with wood. Verify the the board is still
leveled.
Figure 4.
www.empire-industries.com
INSTALLATION AND CARE GUIDE
5
Figure 5.
Figure 6.
Step 10: Place the sink over the plywood. Check that the drain and faucet-line
cut-outs line-up correctly. Confirm that the sink is leveled and adjust if
not. See Figure 5 (sink shown for illustration only).
Step 11: Place the countertop over the cabinet and kitchen sink. Verify that
The sink is installed properly.
NOTE: This completes the sink installation. Follow the directions of the
countertop to complete your installation
www.empire-industries.com
INSTALLATION AND CARE GUIDE
www.empire-industries.com
INSTALLATION AND CARE GUIDE
6
INSTALLATION RECOMMENDATION
We recommend under-mount sink installation. Semi-recess or Drop-In installation are not recommended. Ensure there
is adequate room for the faucet and back splash installations.
PRODUCT CARE AND MAINTENANCE
Porcelain enamel is a hard, glass-like surface that is not easily scratched and is extremely durable.
Cast iron sinks have a porcelain enamel surface that is fused to cast iron under high temperatures
and is one of the best heat resistant coatings available.
Cast iron sinks are incredibly durable but if the incorrect cleaners are used, small pits or scratches
may occur over time that can trap dirt in the porcelain.
Avoid abrasive cleaners which can damage your sink.
Porcelain enamel can be chipped if it sustains a very hard blow.
Cast iron sinks have a very long life span and will typically last a long time.
Repairing a chipped porcelain sink requires a strong repair material with a trusted bonding agent.
If your sink is chipped, we recommend the services of a professional to repair the damaged area.
General Care Tips:
Test cleaning product on small, discrete area prior to applying to entire surface.
Wipe surfaces frequently with dry, soft, non-abrasive and lint-free towel.
Do not allow liquids and moisture to accumulate on the surface of products.
  • Page 1 1
  • Page 2 2
  • Page 3 3
  • Page 4 4
  • Page 5 5
  • Page 6 6

Empire Industries CI33SW User manual

Type
User manual

Ask a question and I''ll find the answer in the document

Finding information in a document is now easier with AI