Page is loading ...

1Copper Drop-In Sink Installation Instructions
COPPER DROP-IN SINK
INSTALLATION INSTRUCTIONS
Before installing, read entire Drop-In Sink Installation Instructions. Observe all local building and safety codes.
For this installation it is assumed that the countertop has been cut to the dimensions of the sink. We recommend
consulting a professional if you are unfamiliar with this type of installation, Signature Hardware accepts no liability for
any damages to the oor, walls, plumbing or for personal injury during installation.
Unpack and inspect the product for any shipping damages. If you nd damages, do not install. Contact Customer
Service at 1-866-855-2284. If you need assistance or have questions while installing your sink, contact Customer
Service.
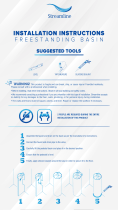
TOOLS AND MATERIALS:
INSTALLATION
1. Lower the sink into the sink cutout on the counter to conrm the sink will t properly. The perimeter of the sink rim
should connect with the counter while the sink bowl should sit completely inside the counter.
Tip: For easier installation, install the drain and faucet before attaching the sink to the counter.
2. Remove the sink and run a bead of neutral cure silicone sealant around the sink cutout to seal the rim against
moisture and leaks.
3. Carefully lower the sink back into the cutout and press the sink rmly into the sealant. Make sure that the sink is level
and properly aligned.
4. With the sink in place, tighten the mounting clips (if included) on the underside of the sink.
5. Wipe away any excess sealant around the rim of the sink with a damp cloth.
DRAIN INSTALLATION
1. Apply a bead of silicone sealant to the base of the strainer ange.
2. Place the ange in the drain opening in the kitchen sink.
3. If your drain has a disposer ange, use the directions supplied with the garbage disposer to attach the disposer and
complete your installation. For drains with strainer baskets, slide the rubber gasket and friction washer up the
strainer ange to the bottom of the sink.
4. Thread the lock nut onto the drain assembly. Hand-tighten and make sure that the drain is properly aligned. When
ready, nish tightening with a basin wrench to secure the drain.
5. Secure the P-trap to the strainer ange with the provided compression nut and ferrule.
Neutral Cure Silicone Sealant Damp Cloth Level
Thread Sealant Basin Wrench

2Copper Drop-In Sink Installation Instructions
MATERIAL DESCRIPTION AND CARE
Copper sinks are specially designed for both durability and beauty. Created with a single sheet of heavy gauge copper,
our copper sinks have no internal welds, strengthening the structure and preventing leakage.
Copper sinks will patina with time and normal use, creating a much sought-after living nish. Because of copper’s natural
composition, cleaning is easy. Simply rinse after each use to rid the surface of any soap or dirt and wipe dry. Apply wax,
such as Table Top Wax, at least once every 15-20 days to keep your copper sink in its original condition and prevent the
natural aging process. For a more thorough cleaning, wash occasionally with dish soap and a sponge.
Do not use copper or silver cleaners, or any abrasive or harsh chemicals on your copper sink. Avoid contact with hot
pots or pans, as this may cause distortion due to copper’s low melting temperature.
/