Page is loading ...

TELUS Satellite TV
HD PVR
User guide

Table of contents
Welcome ......................................................................5
Important safety instructions
.........................................................6
Safety tips
.....................................................................7
Your guide to TELUS Satellite TV
.....................................................8
Where to find information on your account . . . . . . . . . . . . . . . . . . . . . . . . . . . . . . . . . . . . . . . . . . . . . . 8
About Satellite TV reception
. . . . . . . . . . . . . . . . . . . . . . . . . . . . . . . . . . . . . . . . . . . . . . . . . . . . . 8
Connecting to your home phone. . . . . . . . . . . . . . . . . . . . . . . . . . . . . . . . . . . . . . . . . . . . . . . . . . . 8
Screensaver
. . . . . . . . . . . . . . . . . . . . . . . . . . . . . . . . . . . . . . . . . . . . . . . . . . . . . . . . . . . . 8
Your TELUS HD Personal Video Recorder (PVR)..........................................9
Connecting your system ..........................................................11
Your remote control
.............................................................14
Connection and setup
...........................................................16
Setting up to display in HD . . . . . . . . . . . . . . . . . . . . . . . . . . . . . . . . . . . . . . . . . . . . . . . . . . . . . 16
Connecting to your TELUS Satellite TV antenna
. . . . . . . . . . . . . . . . . . . . . . . . . . . . . . . . . . . . . . . . . . 16
Connecting your home phone
. . . . . . . . . . . . . . . . . . . . . . . . . . . . . . . . . . . . . . . . . . . . . . . . . . . 17
Attaching a remote antenna
. . . . . . . . . . . . . . . . . . . . . . . . . . . . . . . . . . . . . . . . . . . . . . . . . . . . 17
Connecting an external hard drive ...................................................18
Attaching an external hard drive . . . . . . . . . . . . . . . . . . . . . . . . . . . . . . . . . . . . . . . . . . . . . . . . . . .18
Archiving programming to your external hard drive
. . . . . . . . . . . . . . . . . . . . . . . . . . . . . . . . . . . . . . . . . 19
Managing your recordings on your external hard drive
. . . . . . . . . . . . . . . . . . . . . . . . . . . . . . . . . . . . . . . 19
Using your TELUS Satellite TV service ................................................20
Using the menu. . . . . . . . . . . . . . . . . . . . . . . . . . . . . . . . . . . . . . . . . . . . . . . . . . . . . . . . . . .20
Using text fields
. . . . . . . . . . . . . . . . . . . . . . . . . . . . . . . . . . . . . . . . . . . . . . . . . . . . . . . . . . .22
Improving receiver control
. . . . . . . . . . . . . . . . . . . . . . . . . . . . . . . . . . . . . . . . . . . . . . . . . . . . . 23
Setting up your remote to control other devices
. . . . . . . . . . . . . . . . . . . . . . . . . . . . . . . . . . . . . . . . . . 26
Controlling an A/V receiver
. . . . . . . . . . . . . . . . . . . . . . . . . . . . . . . . . . . . . . . . . . . . . . . . . . . . . .30
Switching between TV and device volume control
. . . . . . . . . . . . . . . . . . . . . . . . . . . . . . . . . . . . . . . . . . 31
Using the onscreen guide
. . . . . . . . . . . . . . . . . . . . . . . . . . . . . . . . . . . . . . . . . . . . . . . . . . . . . 32
Using the browse banner
. . . . . . . . . . . . . . . . . . . . . . . . . . . . . . . . . . . . . . . . . . . . . . . . . . . . . .33
Using search
. . . . . . . . . . . . . . . . . . . . . . . . . . . . . . . . . . . . . . . . . . . . . . . . . . . . . . . . . . . . 34
Using search history
. . . . . . . . . . . . . . . . . . . . . . . . . . . . . . . . . . . . . . . . . . . . . . . . . . . . . . . . .35
Finding a program by its theme
. . . . . . . . . . . . . . . . . . . . . . . . . . . . . . . . . . . . . . . . . . . . . . . . . . . 35

Table of contents
Timers and Personal Video Recorder (PVR) ............................................36
Pausing live TV . . . . . . . . . . . . . . . . . . . . . . . . . . . . . . . . . . . . . . . . . . . . . . . . . . . . . . . . . . . 36
Reversing, fast-forwarding and skipping
. . . . . . . . . . . . . . . . . . . . . . . . . . . . . . . . . . . . . . . . . . . . . . 36
Using slow motion and frame-by-frame. . . . . . . . . . . . . . . . . . . . . . . . . . . . . . . . . . . . . . . . . . . . . . .37
Recording live TV . . . . . . . . . . . . . . . . . . . . . . . . . . . . . . . . . . . . . . . . . . . . . . . . . . . . . . . . . .37
Watching a recording
. . . . . . . . . . . . . . . . . . . . . . . . . . . . . . . . . . . . . . . . . . . . . . . . . . . . . . . .38
Recording while watching live TV
. . . . . . . . . . . . . . . . . . . . . . . . . . . . . . . . . . . . . . . . . . . . . . . . . .38
Recording options
. . . . . . . . . . . . . . . . . . . . . . . . . . . . . . . . . . . . . . . . . . . . . . . . . . . . . . . . . 39
Timers and recordings
. . . . . . . . . . . . . . . . . . . . . . . . . . . . . . . . . . . . . . . . . . . . . . . . . . . . . . . 39
Timer frequency
. . . . . . . . . . . . . . . . . . . . . . . . . . . . . . . . . . . . . . . . . . . . . . . . . . . . . . . . . . 40
Timer priorities
. . . . . . . . . . . . . . . . . . . . . . . . . . . . . . . . . . . . . . . . . . . . . . . . . . . . . . . . . . . 40
Timer options
. . . . . . . . . . . . . . . . . . . . . . . . . . . . . . . . . . . . . . . . . . . . . . . . . . . . . . . . . . . .40
Recording using timers
. . . . . . . . . . . . . . . . . . . . . . . . . . . . . . . . . . . . . . . . . . . . . . . . . . . . . . .40
Special considerations when using timers
. . . . . . . . . . . . . . . . . . . . . . . . . . . . . . . . . . . . . . . . . . . . . . 41
Using the daily schedule
. . . . . . . . . . . . . . . . . . . . . . . . . . . . . . . . . . . . . . . . . . . . . . . . . . . . . . 41
Setting up an automatic timer
. . . . . . . . . . . . . . . . . . . . . . . . . . . . . . . . . . . . . . . . . . . . . . . . . . . 42
Setting up a manual timer
. . . . . . . . . . . . . . . . . . . . . . . . . . . . . . . . . . . . . . . . . . . . . . . . . . . . . 43
Deleting a timer
. . . . . . . . . . . . . . . . . . . . . . . . . . . . . . . . . . . . . . . . . . . . . . . . . . . . . . . . . . .44
Setting up a Vu! Pass timer
. . . . . . . . . . . . . . . . . . . . . . . . . . . . . . . . . . . . . . . . . . . . . . . . . . . . .45
Pay Per View (PPV) and On Demand .................................................46
Ordering a PPV event. . . . . . . . . . . . . . . . . . . . . . . . . . . . . . . . . . . . . . . . . . . . . . . . . . . . . . . .46
Reviewing PPV purchases
. . . . . . . . . . . . . . . . . . . . . . . . . . . . . . . . . . . . . . . . . . . . . . . . . . . . . 47
On Demand – great movies 24/7 . . . . . . . . . . . . . . . . . . . . . . . . . . . . . . . . . . . . . . . . . . . . . . . . . .47
Flexible viewing options. . . . . . . . . . . . . . . . . . . . . . . . . . . . . . . . . . . . . . . . . . . . . . . . . . . . . . .47
How to order On Demand
. . . . . . . . . . . . . . . . . . . . . . . . . . . . . . . . . . . . . . . . . . . . . . . . . . . . . 48
Favourites lists .................................................................49
Editing favourites lists. . . . . . . . . . . . . . . . . . . . . . . . . . . . . . . . . . . . . . . . . . . . . . . . . . . . . . . .49
Naming favourites lists
. . . . . . . . . . . . . . . . . . . . . . . . . . . . . . . . . . . . . . . . . . . . . . . . . . . . . . . 50
Selecting a favourites list
. . . . . . . . . . . . . . . . . . . . . . . . . . . . . . . . . . . . . . . . . . . . . . . . . . . . . . 51
Locks........................................................................52
Creating your password . . . . . . . . . . . . . . . . . . . . . . . . . . . . . . . . . . . . . . . . . . . . . . . . . . . . . . 53
Changing your password
. . . . . . . . . . . . . . . . . . . . . . . . . . . . . . . . . . . . . . . . . . . . . . . . . . . . . .53
Locking and unlocking your receiver
. . . . . . . . . . . . . . . . . . . . . . . . . . . . . . . . . . . . . . . . . . . . . . . . 54
Locking by ratings
. . . . . . . . . . . . . . . . . . . . . . . . . . . . . . . . . . . . . . . . . . . . . . . . . . . . . . . . . 54

Table of contents
Locking by channel. . . . . . . . . . . . . . . . . . . . . . . . . . . . . . . . . . . . . . . . . . . . . . . . . . . . . . . . .55
Locking or unlocking Pay Per View channels
. . . . . . . . . . . . . . . . . . . . . . . . . . . . . . . . . . . . . . . . . . . . 56
Hiding adult content
. . . . . . . . . . . . . . . . . . . . . . . . . . . . . . . . . . . . . . . . . . . . . . . . . . . . . . . . 57
Locking or unlocking the front panel
. . . . . . . . . . . . . . . . . . . . . . . . . . . . . . . . . . . . . . . . . . . . . . . . 58
Call Display on your TV ...........................................................59
Call Display screens. . . . . . . . . . . . . . . . . . . . . . . . . . . . . . . . . . . . . . . . . . . . . . . . . . . . . . . . .59
Turning Call Display on and off
. . . . . . . . . . . . . . . . . . . . . . . . . . . . . . . . . . . . . . . . . . . . . . . . . . . 59
Viewing your Call Display history
. . . . . . . . . . . . . . . . . . . . . . . . . . . . . . . . . . . . . . . . . . . . . . . . . . 60
Receiver customization ...........................................................61
Changing languages for descriptive video . . . . . . . . . . . . . . . . . . . . . . . . . . . . . . . . . . . . . . . . . . . . . 61
Using closed captioning
. . . . . . . . . . . . . . . . . . . . . . . . . . . . . . . . . . . . . . . . . . . . . . . . . . . . . . 62
Using Dolby Digital surround sound
. . . . . . . . . . . . . . . . . . . . . . . . . . . . . . . . . . . . . . . . . . . . . . . . 63
Changing the onscreen channel order
. . . . . . . . . . . . . . . . . . . . . . . . . . . . . . . . . . . . . . . . . . . . . . . 64
Changing the onscreen guide display
. . . . . . . . . . . . . . . . . . . . . . . . . . . . . . . . . . . . . . . . . . . . . . . .64
Resetting to factory defaults
. . . . . . . . . . . . . . . . . . . . . . . . . . . . . . . . . . . . . . . . . . . . . . . . . . . . 65
Scheduling receiver updates
. . . . . . . . . . . . . . . . . . . . . . . . . . . . . . . . . . . . . . . . . . . . . . . . . . . . 65
Enabling inactivity standby
. . . . . . . . . . . . . . . . . . . . . . . . . . . . . . . . . . . . . . . . . . . . . . . . . . . . . 66
Troubleshooting tools ............................................................67
First steps . . . . . . . . . . . . . . . . . . . . . . . . . . . . . . . . . . . . . . . . . . . . . . . . . . . . . . . . . . . . . 67
Troubleshooting tables
. . . . . . . . . . . . . . . . . . . . . . . . . . . . . . . . . . . . . . . . . . . . . . . . . . . . . . . 67
Resetting your receiver
. . . . . . . . . . . . . . . . . . . . . . . . . . . . . . . . . . . . . . . . . . . . . . . . . . . . . . . 69
Diagnostics
. . . . . . . . . . . . . . . . . . . . . . . . . . . . . . . . . . . . . . . . . . . . . . . . . . . . . . . . . . . . .69
Point dish and check switch
. . . . . . . . . . . . . . . . . . . . . . . . . . . . . . . . . . . . . . . . . . . . . . . . . . . . 69
Device code tables..............................................................70
Frequently Asked Questions (FAQs)
..................................................76
Technical FAQs
................................................................78
How to contact TELUS . . . . . . . . . . . . . . . . . . . . . . . . . . . . . . . . . . . . . . . . . . . . . . . . . . . . . . . 78
TELUS Satellite TV Terms of Service .................................................79
Index
........................................................................84

55
Welcome
Congratulations on choosing TELUS Satellite TV
™
. You’ve opened up a whole new world of possibilities
for your TV viewing. Now you can say goodbye to planning around your shows and hunting for videos
at the store.
With hundreds of digital channels, including lots in HD, creating your ideal programming package is
easy. There are theme packs, international channels, premium sports packages, and premium movie
packages featuring the latest blockbuster movies.
And, you finally get full control of your TV viewing. Your TELUS TV
®
Personal Video Recorder (PVR) gives
you the power to pause, replay and record
*
live TV with just the press of a button.
High Definition (HD) TV delivers the best picture and the best viewing experience. You will see more
detail and enjoy a sharper, clearer and more vibrant picture than you would with standard definition TV.
Watch your favourite shows in true widescreen and see 45% more of the picture compared to standard
definition. Plus, enjoy rich, resonant sound through 5.1 Dolby
®
Digital surround sound.
TELUS Satellite TV also gives you digital features that regular TV can’t offer. Take advantage of the
Interactive Programming Guide that lets you instantly find your shows by date, time and theme.
There are a host of other great features including Call Display
on your TV, 45 commercial-free music
channels and Pay Per View (PPV) with a huge selection of videos, including Hollywood blockbusters,
kids’ programming, sports and special events.

6
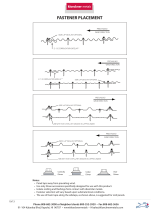
Important safety instructions
1
Do not use this device near water.
2 Clean only with a dry cloth.
3 Do not block any ventilation openings. Install in accordance with the instructions.
4 Do not install near any heat sources such as radiators, heat registers, stoves or other devices (including amplifiers) that produce heat.
5 Do not defeat the safety purpose of the polarized or grounding-type plug. A polarized plug has 2 blades with one wider than the other.
A grounding-type plug has 2 blades and a third grounding prong. The wide blade or the third prong are provided for your safety. If the
provided plug does not fit into your outlet, consult an electrician for replacement of the obsolete outlet.
6 Protect the power cord from being walked on or pinched, particularly at plugs, convenience receptacles, and the point where they exit
from the device.
7 Use only attachments/accessories specified.
8 Unplug this device during lightning storms or when unused for long periods of time.
9 Refer all servicing to qualified service personnel. Servicing is required when the device has been damaged in any way, such as the power
supply cord or plug is damaged, liquid has been spilled or objects have fallen into the device, the device has been exposed to rain or
moisture, does not operate normally, or has been dropped.
1
Ground clamp
2
Ground block
3
Grounding conductors
(NEC Section 810-21)
4
Satellite dish
5
Coaxial cable from satellite dish
6
Electric service equipment
7
Group clamps
8
Power service grounding electrode system
(NEC Art. 250, Part H)
5
2
8
6
3
4
1
7
Apparatus shall not be exposed to dripping or splashing and no objects
filled with liquids, such as vases, shall be placed on the apparatus.

7
Safety tips
Unplug the receiver from the AC power outlet before cleaning
The use of accessories or attachments not recommended by the receiver manufacturer will void the Limited Warranty
Do not place the receiver in an enclosure such as a cabinet without proper ventilation
Do not stack the receiver on top of or below other electronic devices
Operate the receiver using only the type of power source indicated on the marking label. Unplug the receiver power cord by gripping
the power plug, not the cord.
Do not overload wall outlets or extension cords, as this can result in a risk of fire or electrical shock
Never insert objects of any kind into the receiver through openings, as the objects may touch dangerous voltage points or short out parts.
This could cause fire or electrical shock.
Make sure the outdoor parts of the antenna system are grounded in accordance with local, state, federal and National Electrical Code
(NEC) requirements
Do not locate the antenna near overhead light or power circuits, or where it can fall into such power lines or circuits. When installing
the antenna, take extreme care to avoid touching such power lines or circuits, as contact with them can be fatal.
Do not attempt to service the receiver yourself, as opening or removing covers may expose you to dangerous voltage, and will void
the Limited Warranty. Refer all servicing to authorized service personnel.
Use an outlet that contains surge suppression or ground fault protection. For added protection during a lightning storm, or when
the receiver is left unattended and unused for long periods of time, unplug the power cord from the wall outlet, disconnect the lines
between the receiver and the antenna, and disconnect the phone line. This will provide some protection against damage caused
by lightning or power line surges.

8
This guide explains everything you need to know about your new TELUS Satellite TV service. It will help you understand how it works,
ensure you make the most of all the exciting features, and provide you with handy tips for troubleshooting.
Where to find information on your account
To check your TELUS Satellite TV account or to make changes to your programming package, please call 310-MYTV (6988).
About Satellite TV reception
Satellite TV uses satellites in orbit over the earth to deliver television and audio programming. The satellites stay aligned over one place
on the surface of the earth, so once your satellite dish is aimed, it won’t have to move to follow them.
Weather interference
Heavy rain, snow or dense cloud cover can sometimes reduce the satellite signal, which may interrupt your service. Your service will
return after the weather condition has passed. The TELUS installer will aim the satellite dish during installation to get the strongest signal
and help prevent rain and snow from causing interruptions.
Solar interference
Twice a year, as the sun orbits the earth, the sun moves to a position behind the satellite. This event occurs during a few days at
the beginning of each spring and fall. During these brief periods, you won’t be able to access your programming. This will only last
a few minutes.
Connecting to your home phone
Your satellite receiver is equipped with a standard telephone jack and must be connected to an active home phone line. Once connected,
you can order Pay Per View events and channels using your remote control, use the Interactive TV weather features, and access other
services from TELUS Satellite TV such as onscreen Call Display (see full instructions on Connect Your home phone on page 17).
Screensaver
Whenever the receiver is turned off using your remote control or front panel power button, you’ll see the TELUS logo moving around
your TV screen. This feature is included to assure you that the connections between your receiver and TV haven’t been lost.
Press
or the power button on the front panel of your receiver to resume watching programming.
Your guide to TELUS Satellite TV
Quick tip
Turning your receiver off when you’re not watching
TV will ensure your software is kept up-to-date.

9
Front view
Use this as a reference for all of the functions and connections of your receiver.
Your TELUS HD Personal Video Recorder
(
PVR
)
1
2
3 4
98
765
1
Smart card door – Slot for smart card for future use
2
Arrows – Moves selection up, down, left or right
3
Power – Turns receiver power on/off
4
Info – Displays program information
5
Infrared port – Receives signals from your remote control
6
USB port – Connects to your external hard drive
7
Select – Selects highlighted item
8
System info – Displays the System Information screen
9
Menu – Displays the main menu screen

10
Your TELUS HD PVR
Back view
876
1 2 3 4 5
109
1
Remote antenna – Connects to UHF antenna for remote control
2
Ethernet port – Not currently enabled
3
RCA video/audio (out) – These connections are ideal for VCRs and older TVs; the audio
ports can be used independently if other video connections have been used
4
Optical audio (out) – This is an all digital audio connection, ideal for audio receivers
5
Phone jack – Connects to your telephone line
6
Satellite in – Connects to your satellite signal
7
USB port – Connects to your external hard drive
8
HDMI (out) – HDMI is the highest fidelity HD connection that contains both audio and
video signals; use for HD TVs
9
Component video (out) – Component video cables can be used for high quality signals
to either HD or non-HD TVs
10
S-Video (out) – S-Video is preferred for older TVs

11
Connecting your system
Best setup
Use this if you are connecting
with an HDMI cable.
Great setup
Use this if you are connecting
with RCA cables.
This chapter is the perfect place to find out how to connect the receiver to your TV and stereo equipment. You’ll find the following information
particularly helpful if you decide to move your receiver or if you get a new TV, VCR or DVD player.
Connecting your audio and video
Connect the audio and video outputs on your receiver to the audio and video inputs on your TV.
HDMI cable
An HDMI connection provides the highest quality audio and video to your HDTV through one cable. It supports both video and digital
surround sound. This is the connection to use if you are setting up HD.
1 Connect an HDMI cable between your TV and receiver.
2 Turn on your receiver and TV using the front panel buttons.
3 Confirm that you are getting a picture from the receiver. Consult your TV’s user guide if you need to change the audio/video input on your TV.
4 If you don’t see a picture, see Troubleshooting tables on page 68. In most cases, connecting the HDMI cable will optimize your TV’s display
settings. However, your TV may require selecting a different format to display from the receiver during setup.
5 Turn up the volume on your TV to confirm you have sound. If you don’t, your system may require you to connect RCA cables between your
receiver and TV.
RCA cables

12
Connecting your system
Great setup
Use this if you are connecting
with an S-Video cable.
Best setup
Use this if you are connecting
with component video
cables.
Connecting your video
Connect the video outputs on your receiver to the video inputs on your TV.
Component video cables
A component cable provides high quality video to your HDT V.
1 Connect the component cable between your receiver and TV.
2 If you don’t see a picture, change the resolution setting on your receiver.
3 Turn the volume up on your TV to confirm you have sound. If you don’t, check to ensure the component cables are properly connected.
S-Video cable

13
Connecting your system
Best setup
Use this if you are connecting
surround sound through an
A/V receiver with an optical
cable.
A/V receiver
Great setup
Use this if you are connecting
through an A/V receiver with
RCA cables.
A/V receiver
Connecting your audio
Connect the audio outputs on your receiver to the audio inputs on your TV or A/V receiver.
A/V receiver with an optical cable
A/V receiver with RCA cables

14
Your remote control
Tired of multiple remotes? The TELUS Satellite TV remote is universal and works with most TVs, DVD players, VCRs and A/V receivers.
For information on programming your remote, please see pages 26 to 31.
Quick tip
Because your remote
is UHF, you don’t need
to point it directly at the
receiver; you can even
hide the receiver behind
a panel in a TV stand.
SAT
Switches your remote to satellite mode
TV
Switches your remote to TV mode
POWER
Turns the device(s) you’re controlling on and off
VCR
Switches your remote to VCR mode; also works on DVD players
AUX
Switches your remote to auxiliary mode such as a DVD player or A/V receiver
TV
Turns your TV on and off
MENU
Displays the main menu
TV/ VIDEO
Scrolls through available TV or video input sources
PAGE UP
PAGE DOWN
Moves channel listings up or down one page at a time on the
onscreen guide
VOLUME UP
VOLUME DOWN
Decreases and increases volume
MUTE
Turns all sound on and off
GUIDE
Displays the onscreen guide
MOVE
SELECTION
Moves channel selection up and down; also navigates up, down, left or
right through menus and guides
THEMES
Searches for programs using themes
BROWSE
Searches what’s on other channels while you continue to watch your
program
SELECT
Selects highlighted item
RECALL
Returns to the previous channel
INFO
Displays the description of the selected program
VIEW LIVE TV
Returns to viewing live TV
PVR
Displays the list of recorded programs
SKIP BACK
Skips back 10 seconds
SKIP FWD
Skips forward 30 seconds
BACK
Reverses your recorded program, live TV or VCR/DVD
PAUSE
Pauses your recorded program, live TV or VCR/DVD
FWD
Advances your recorded program or VCR/DVD
STOP
Stops your recorded program or VCR/DVD
PLAY
Plays your recorded program or VCR/DVD
RECORD
Records live TV on your PVR
iTV
Directs you to Channels On
FORMAT
Formats the picture width of the program you’re viewing
SEARCH
Displays the search menu
Please note that , ,
and are not currently enabled.

15
Your remote control
Low battery warning
When you see a low battery warning message on your screen, the batteries in your remote control need to be replaced. Your remote
uses 4 AAA batteries. When you need to replace them, insert new batteries into the back panel on the bottom of your remote.
Quick tip
If your remote control doesn’t seem to be working very well (for example, you have to
press
more than once to turn the
receiver on or off), it’s a good indication that the batteries are getting weak.
Quick tip
When you’re in SAT mode and you switch to another device, a pop-up window alerts you that the remote control is no longer
controlling your receiver.

16
Connection and setup
Setting up to display in HD
If you have subscribed to HD programming, use the following steps to select the desired HDTV format.
1 Press to open the main menu.
2 Use to highlight System Setup and press
.
3 Use to highlight HDTV Setup and press
.
4 Use to highlight the HD Format Settings that match the format that your TV supports and press
.
5 Use to highlight the Aspect Ratio option that matches your TV and press
. You can choose between the following options:
6 Press to highlight Done and press
.
7 If required, set up your HDTV to display in the format you desire. Some HDTVs will automatically adjust to the resolution setting on your receiver.
Connecting to your TELUS Satellite TV antenna
Before you can begin connecting your receiver to your TELUS Satellite TV antenna, you must first complete the previous sections on
connecting your TV to the receiver.
1 Connect 2 RG-6 coaxial cables between the Satellite In 1 and Satellite In 2 ports on the receiver’s back panel to 2 available ports on
either the switch or LNBF in your existing system.
2 Press to open the main menu, highlight System Setup, then Installation, and then Point Dish to display the Point Dish screen
on the TV.
3 Select Check Switch. Select Te s t .
4 The receiver begins performing the check switch tests. When it’s finished, the installation summary screen displays.
5 Make sure that the information on the installation summary screen identifies your system correctly and shows all transponders for all
satellites in your system.
6 Select OK to go to the Point Dish screen.
7 Select Cancel to exit the point dish menu. At this point, the receiver may start downloading software. If it does, follow the onscreen
instructions and don’t use the receiver until the process is complete. Otherwise, press
. After a few minutes, you should be
able to view your programming.
16:9 is the setting for widescreen HDTV display. 4:3 #1 is the setting to use on a 4:3 TV that uses
vertical compression. When displaying a 16:9 feed, the
picture will show black bars on the top and bottom of
the screen.
4:3 #2 is the setting to use on a 4:3 TV that does not
have internal vertical compression. When displaying a
16:9 feed, the picture will appear tall and skinny.

17
Connection and setup
Connecting your home phone
You must keep your receiver connected to your home phone to order Pay Per View (PPV) events, use the interactive weather features,
or use other services with your remote.
You may be able to use a wireless phone jack; however, this may not support all the features such as onscreen Call Display.
If you have subscribed to TELUS High Speed or equivalent you may have to install a DSL filter to successfully connect with TELUS Satellite TV.
Call 310-MYTV (6988) to order your free filter.
Phone system setup
Connect a phone cable from the back of the receiver to an active home phone wall jack.
You must also set up the receiver for your home phone and set a prefix if you need one to make an outside call. For most installations,
all you need to do is set the home phone system type. The default setting of no prefix will allow correct dialing.
1 Press to open the main menu.
2 Use to highlight System Setup and press
.
3 Use to highlight Installation and press
.
4 Use to highlight Phone System and press
.
5 Navigate to To u c h To n e or Rotary Phone in the phone type list and press
.
6 Navigate to No Prefix or Prefix Code in the outside line prefix list and press
.
7 If you selected No Prefix press to select Done and press
.
8 If you selected Prefix Code: using the number buttons on your remote, enter the exact sequence you dial to obtain an outside phone line.
9 Press to highlight Done and press
.
Attaching a remote antenna
Before you can use the UHF Pro remote, you need to attach the remote antenna to the receiver’s antenna input – you’ll find this on the
back panel of the receiver. If you need extra tips, please see Adjusting the remote antenna on page 24.

18
Attach an external hard drive to your TELUS HD PVR to store even more of your favourite shows.
When purchasing an external hard drive, check that it meets these specifications:
7200 RPM
Between 40 GB and 1.0 TB of capacity
Holds a single hard drive (enclosures holding 2 disks are not supported)
Plugs into an AC power outlet
USB 2.0 connection
No sleep mode (cannot power down when idle)
Attaching an external hard drive
1 Connect your external hard drive to the USB port on the back of the receiver.
2 Navigate to Yes and press
to format the drive.
3 Navigate to Yes and press
to proceed with formatting. This will result in the loss of all previous data on the external hard drive.
4 The external hard drive will begin formatting and your receiver will automatically restart. This process will take approximately 5 minutes.
Your external hard drive is now attached and ready for use.
Connecting an external hard drive
Quick tip
3.5" external hard drives are more likely to meet the specifications than
2.5" external hard drives, which are designed more for portable use.

19
Connecting an external hard drive
Archiving programming to your external hard drive
1 Press to open the main menu.
2 Use to highlight Multimedia and press
.
3 Use to highlight External Hard Drive and press
.
4 Highlight Archive Recordings and press
.
5 Navigate to the programming list and select the shows you wish to archive to your external hard drive.
6 Highlight Archive and press
. The programs will now be moved to the external hard drive.
You can return to live TV as your programs are being transferred. A pop-up window will appear to confirm when the transfer is complete
.
Managing your recordings on your external hard drive
Managing recordings on your external hard drive is the same as viewing and deleting recordings on your PVR. Use the following steps to
select the external hard drive, then manage your recordings as described in the Timers and PVR section on page 19.
1 Press to open the main menu.
2 Use to highlight Multimedia and press
.
3 Use to highlight External Hard Drive and press
.
4 Highlight Manage My Recordings and press
.
5 Navigate to the recordings list and select the shows you wish to manage.
Quick tip
You can quickly access recordings on your external hard drive by pressing
.

20
Using your TELUS Satellite TV service
Using the menu
The menu makes using the receiver and selecting programs quick and easy. Use the menu to switch between features such as
search, locks, daily schedule, preferences and more.
Surf zones
TELUS Satellite TV channels are organized by surf zones. That way, categories like sports, news or lifestyle are all grouped together
so you can easily surf through your favourite channels.
Navigating
Use the following buttons on the remote control:
Opens the main menu, then opens any of the other menus from the main menu
Opens the onscreen guide
Opens the Themes & Search menu
Displays the browse banner
Closes a menu and returns to watching a program
Scrolls through the menu; when a menu option or onscreen guide item is
highlighted, it becomes green
Channels Surf zone
10 –91 Descriptive video
10 0 –187 French language programming including PPV
19 6 – 2 9 8
Digital standard and U.S. Superstations
299–382 Movies, including PPV
388–479 Sports
500–599 News, learning, family and music
600–660 Lifestyle and variety
697–730 International programming
747– 782 Mature programming, including PPV
901–988 Radio
1000
English On Demand Movies
1030–1283 High Definition: Networks and U.S. Superstations
1251–1283 High Definition: Movies
1400 –1534 High Definition: Sports
1564–1726 High Definition: News, learning, family
1800 French On Demand Movies
1802–1891 High Definition: French programming
1933 High Definition programming
/