Page is loading ...

QAM 16 EM
Operating instructions
MADE IN GERMANY
0901815 V2

2
Table of Contents
Page
1. Hazards and safety instructions 3
2. General Information 5
3. Description 5
4. Scope of delivery 5
5. Input circuit 5
6. Assembling 6
6.1 Grounding 6
7. Installation 7
7.1. QAM 16 EM Default setting of the input 7
7.2 Input Level 8
7.3 Output Level 8
8. General programming 9
8.1 Software Installation 9
8.1.1 Installation of the driver 9
8.1.2 Installation of the programming software 10
8.2 Programming of the device parameters 10
8.2.1 Input parameters 11/12
8.2.2 Output parameters 13/14
8.3 Storage of the programs 15
8.3.1 Storage of the settings 15
8.3.2 Load settings 15
8.3.3 Program via LAN 16
8.3.4 Setting up the headend 17
8.3.5 Settings for remote control over Internet 18
8.3.6 Proxy settings 18
8.3.7 Editing the headend settings 19
8.3.8 Selecting headend for programming 19
8.4 Diagnosis 20
8.5 LED-analysis/interpretation 20
8.6 Firmware Update 21
8.6.1 CPU (µ-Controller) 21
8.6.2 FPGA (QAM-Modulator) 21
9. Application examples 22
9.1 QAM 16 EM 22
10. Technical data 23/24
11. New functionality „Password“ 25/26
12. Default setting 26
13. Service call 27

3
1. Hazards and safety instructions
Before working with the basic unit QAM 16 EM please make sure
you read the following safety rules carefully!
Power supply and power cord
The device must be operated only at a power supply with a voltage
of 230 V / 50 Hz.
Connection cable
Place the connection cable always trip proof !
Replace the power cord only with an original power cord.
Potential equalization / grounding
Proper grounding and installation of the device must be carried out according to EN 60728-11 / VDE
0855-1 regulations.
Operation without grounding or potential equalization of equipment is not allowed.
Humidity and placement location
The device must not be exposed to dripping or splashing water. If water condensation occurs, one
must wait until the device is completely dry. The device must be installed on a vibration-free location.
Ambient temperature and heat effect
The maximum allowable ambient temperature is 45 ° C.
The ventilation holes of the device must NOT be covered under any circumstances. Too much heat or
heat accumulation affect the life of the device and can be a source of danger.
To prevent heat buildup and to ensure good ventilation, the device must be mounted horizontally (eg.
on a wall). The device must not be mounted above, on top, or near heat sources (e.g radiators, heating
plants), where the device is exposed to heat radiation or oil vapors. The installation must be done only
in rooms that ensure compliance with the permissible ambient temperature range, even under
changing climatic conditions.
If the device exceeds the maximum operating temperature, it automatically switches to a
reduced power consumption. The device is out of function during that time.
Once the temperature has reached again the allowable range, it automatically switches back
on.
Warning:
When installed in rooms such as storage or attic one should pay particular attention on compliance
with the ambient temperature. Because of the danger of fire due to overheating or lightning strike, it is
recommendable to install the device on a noncombustible surface. Combustible surfaces are wood
beams or bars, wood boards, plastic materials, etc.
Conditions to ensure electromagnetic compatibility (EMV ?)
All covers, screws and connectors must be securely mounted and tightened, contact springs must not
be bent or oxidized.

4
Opening the case
ATTENTION
Device’s case opening and repairs must be performed only by authorized personnel. First to be done
is to pull the network plug.
Replacing of fuses must be done only with fuses of same type, value and melting characteristics.
No maintenance work during storms
ATTENTION
This module contains ESD components! (ESD = Electrostatic Sensitive Device). An
electrostatic discharge is an electrical current pulse, which can flow also through an
electrically insulated material, when triggered by large voltage difference.
To ensure the reliability of ESD components, it is necessary to consider their most important handling
rules:
Electrostatic sensitive components can be processed only on electrostatic protected area (EPA)!
Pay attention permanently to potential equalization (equipotential bonding)!
Use wrist straps, approved footwear for personnel grounding!
Avoid electrostatically chargeable materials such as normal PE, PVC, polystyrene!
Avoid electrostatic fields >100 V/cm !
Use only labeled and defined packing and transportation materials!
Damage caused by faulty connections and / or improper handling are excluded from
any liability.
Waste disposal
Electronic equipment is not household waste but should be properly disposed on electrical and
electronic equipment waste - in accordance with Directive 2002/96/EC OF THE EUROPEAN
PARLIAMENT AND COUNCIL.
Please take this device at the end of its use for proper disposal at the designated public collection
points.
WEEE-Reg.-Nr. DE 51035844

5
2. General Information
The QAM 16 EM devices are modern, compact transmodulators, which transfer the SAT transponder
DVB-S / S 2 (16 x QPSK / 8PSK) into DVB-C (16 x QAM). The simple and quick installation,
configuration and programming, enables an unproblematic operation. The QAM 16 devices convert
digital SAT signals into QAM signals so that they can be fed into cable networks. It is possible to
transfer 16 transponders of different satellites. Thus, a transfer of SD and HD programs over all
transponders is possible, regardless whether they are encrypted or unencrypted.
3. Description
The QAM 16 converts random DVB-S or DVB-S2 Transponder (QPSK/ 8PSK) in DVB-C channels
(QAM). The output frequency range is 112-860 MHz, individually adjustable. This frequency range can
be fed into an existing coaxial distribution network. It is not relevant whether it is a network with a star,
tree or mixed structure.
Subscribers are able to receive all programs present at the selected transponders with a commercial
DVB-C receiver or TV with integrated DVB-C tuner. It is irrelevant whether the individual programs in
SDTV or HDTV, will be broadcast as a pay-TV or free to air signals.
Programming is done via a laptop / PC. This is connected via the included USB cable to the USB
socket. Programming of QAM 16 via a graphical user interface is easy and quick.
4. Scope of delivery
1 x QAM 16 EM
1 x Power cable
1 x USB-cable
1 x USB-Stick (Programming software)
1 x Operating instructions
1 x Installation accessories
1 x Drilling template
1 x LAN patch cable
5. Input circuit
With the 4 in 16 matrix, four SAT-IF freely selectable signals can be switched to the 16 tuners.
Here a transponder is selected and converted into a freely selectable output frequency between
112 – 860 MHz.
If more than 4 SAT-IF polarizations are needed, it´s possible to pull the cable from the matrix and
connect the new polarization direct with the tuner.
If some transponder from one polarization needed, then it´s possible to build in a splitter in the wholes
top of the housing.

6
6. Assembling
The assembly of QAM 16 must be made in a well ventilated area. The ambient temperature must
not exceed 45°C. It is necessary to ensure that air can circulate through the ventilation holes. A
minimum distance of min. 15 cm must be maintained around the device so that air can circulate
freely. For the
assembly or for work on the cabling, the power cord should be pulled.
6.1 Grounding
The device must be grounded according to the EN 60728-11.
- Cable insulation of the grounding wire ( 4mm
2
) should be stripped about 15 mm.
- Push the stripped end under the ground screw and tighten the screw.
15cm
15cm

7
7. Installation
Connect the various levels of the four satellite inputs (SAT 1, SAT 2, SAT 3, SAT 4)
It is possible to connect levels of different LNB's.
The LNB voltage is fixed at the inputs 1 and 4.
The power consumption of the connected LNB's should not exceed 250mA per input.
Please note that a digital-compatible Quattro LNB (e.g. Polytron OSP AP 94) is used.
If the LED of the LNB supply is not lit, the LNB supply is interrupted or disturbed.
Please consider!
Total allowed power consumption of all connected LNBs cannot amount to more than 500mA.
7.1 QAM 16 EM Default setting of the input
The inputs and outputs of the device are programmed from factory with a standard frequency
assignment. (see paragraph 13).
To receive the pre-ASTRA transponders, the SAT inputs must be connected as in the picture below.
Preprogrammed assignment

8
7.2 Input level
To ensure a good reception, make sure that the level at the inputs is between 50 and 80 dBµV.
When receiving digital signals, it is more beneficial to have a lower level rather
than a too high level.
At too high input levels an attenuator should be used.
7.3 Output level
The output level is 90 dBmV at delivery. This can be changed by using the programming device (see
section 9.2.2).
A reduced to 20 dBmV output level is applied at the TEST jack.
Test
-20 dB
OUT
112-862 MHz
LAN
USB

9
8. General programming
After connecting the power cord, the device runs through an internal routine and all 16 channels are
set to the previously stored data.
During this time the status LED next to the USB jack blinks green.
Only after the status LED has turned on continuously on green or orange a connection between the
headend and laptop / PC is possible.
Connect the device only after the
Software Installation on the PC.
8.1 Software Installation
Download the software package from the homepage www.polytron.de (satc12_Vxxx.zip) and
unzip it in a desired path (z. B. C:\ QAM16).
The software can be loaded also from the supplied USB- Stick.
8.1.1 Installation of the driver
Start Instal_driver.cmd
Follow the instructions on the screen.
For some initial installations the following dialog may appear. That depends on your operating system.
Perform the following instructions and make the selections for the selectable fields:
No, not this time
Next
Automatically install software
Next
USB

10
The installation of the driver software is now finished.
8.1.2 Installation of the programming software
Install the software in the desired folder by launching the program „Setup.exe“.
Follow the instructions on the screen.
Close the screen at the end of the installation.
After the installation of the programming software on the PC, the QAM device
can be connected to the PC using the USB cable.
8.2 Programming of the device parameters
Start the program SATC12
Left click on top on Menu
Following menu items are available:
Program-Menu
Diagnostic
Firmware-Update
Exit
If this notice is displayed:
Continue the installation
The software was
installed for the following
hardware
Finish

11
In „Program-Menu“ all settings of input and output parameters are made. After calling the menu
each of the 16 channels are retrieved and the corresponding parameters settings are displayed.
For better clarity, the menu is split between three pages 2 times 6 channel
and 1 time x 4channel.
.
At the top part of the menu, the device data is displayed, such as type, serial number, hardware version
and software versions for the CPU and FPGA.
With the menu item „Settings“, it is possible to save
or load an existing programming.
See section 9.3
8.2.1 Input parameters
IN > Selection of the input signal source
QAM 12 EM
Sat-IF level from SAT 1
to SAT 4 or the direct
input at tuner with SAT

12
The desired transponder data shall be entered in the menu fields.
This data can be found on the homepage of the satellite operators e.g. www.Astra.de,
www.eutelsat.com , etc.
TP > Transponder frequency
Enter transponder frequency
LO > LNB Oscillator frequency
AUTO is automatically set
on the needed frequency.
The frequency values 09750 ,
10600 or OTHER can
c be also selected.
SR > Symbol rate
Enter symbol rate
Search > Search
After pressing the button
Search the data is
accepted accepted and the
desired transponder set.
If the tuner finds the
transponder,
Tuner Locked is displayed
on top.
Reception conditions
The quality of the input signal can be evaluated with the bit error rate BER and
signal to noise ratio SNR .
These are dependent on the quality of the reception conditions and the SAT signals.
Recommendation: bit error rate BER should be ≤1e-6
bv
For signal to noise ratio, SNR the following displayed guidelines
apply.
The corresponding values of the FEC (forward error correction)
shall be taken from tables of the satellite operators.
If for example the transponder has an FEC of 5/6,
the SNR display should be min. 9 dB.
FEC gut sehr gut
1/2 5-7dB 8-11dB
2/3 7-9dB 10-13dB
3/4 8-10dB 11-14dB
5/6 9-11dB 12-15dB
7/8 10-12dB 13-16dB
good
very
good

13
8.2.2 Output parameters
OP > Operating Mode
Normal > Normal operation
Single > single carrier for
level measurement
with an analogue
antenna
measurement
instrument
Zero > digital channel with
content 0.
(constant level
without fluctuations)
BW > Band width
Select bandwidth according to
output frequency between
7 MHz and 8 MHz
SR > Symbol rate
Up to 7.200 kiloSymbole/ sec.
It is dependent on the selected
QAM-Mode
(usual setting in cable
networks:
256 QAM / SR 6.900).
Only the possible Symbol rates
will be accepted.
F > Output frequency
Frequency freely selectable
It is recommended
to keep the TV-Standard
channe channel spacing. Eingestellt
wird die
Frequency of the channel
center. (e.g. channel 21, 410-
478 MHz, set 474 MHz)
QM > QAM-Mode
Settings of the possible
QAM-Mode (16, 32, 64, 128,
256) are dependent on the
data rate of the input
transponder. Only the possible
QAM- Mode will be displayed.
SP > Spektrum
Normal > Normal operation
Invers > signal can be
inverted in its spectral range.
The inverting is necessary
only in exceptional cases.

14
On OFF > shutdown
output channel
If not all 16 output
channels are occupied,
each channel can be
individually turned off with
OFF .
ATT > output level
The output level at the output
is 90dBµV and for each
channel can be attenuated to
12 dB in 1dB steps.
Set > accept programming parameters
After setting all the parameters press the Set button.
With this all the settings will be accepted.
Repeat steps for other operating channels.
Note: The DVB-C / QAM receiver must be programmed
according to the set parameters (search).

15
8.3 Storage of the programming
It is possible to save an existing programming on a PC or to download it from a PC. Thus, an archiving of
programming configurations can be performed. This simplifies the work with QAM 16.
Open the main program with the menu item
Settings
8.3.1 Storage of the settings
Use the menu item
Save Settings
to save the programming on the PC.
A path name and a file name should be entered.
(e.g. object)
8.3.2 Load settings
Use the menu item
Load Settings
to load an existing programming from
PC to QAM 16.
Select the desired file name from corresponding path
and open it.
The data is automatically loaded.

16
8.3.3 Program via LAN
QAM 16 EM have as standard setting the
IP-address: 192.168.1.227
If the equipment is used in a network with a
different network address, the IP-address of
QAM 16 must be accordingly adapted.
This change shall be made under the menu Item
LAN-Settings.
Example:
The network operated PC has following settings:
IP-address: 192.168.010.068 Subnet mask: 255.255.255. 0
Network part Host part Network part Host part
The IP address of the QAM16 respectively QAM16 EM
may differ only in the last block (host part) compared
to the connected PC. You are not allowed to use the
numbers 0 , 255, and all already used numbers!
Example of IP address: 192.168.010.100
With Save all changes are saved.
Caution !!
The IP addresses listed are meant only as an example.
All addresses must be adapted to the local network.
Should this information is not known, the responsible
IT specialist should be contacted!
The storage status is displayed by the progress bar.
This process can take up to one minute.
After it finished close the program and remove the USB cable.
The QAM 16 EM are now connected to the network.
All PCs on the network can use the software "SATC12" to access
QAM 16 EM.

17
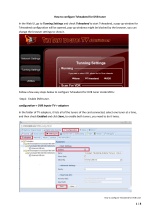
8.3.4 Setting up the headends
Start the program SATC12
- under Control menu activate
LAN-Control
- select Edit Headends for the
connection settings of QAM16
- Select Add New in the user interface.
- The following menu fields are enabled to enter data:
Enter the name of the equipment (free text) Polytron
Enter the location name (free text) Langwiesenweg
Enter the IP address of the controlled
headend. 192.168.1.227
At delivery: 192.168.1.227
Enter the port of the controlled headend. 10001
At delivery: 10001
Press Save button to save
the headend data.
Follow the same procedure for creating additional headends.

18
8.3.5 Settings for remote control over Internet
The following settings may vary, depending on the router model. Please follow the
instructions in your manual.
Walkthrough:
1. Each headend has its own IP address, assigned in an address range (e.g.
192.168.1.XXX). The port can remain the same for all (e.g. 10001).
2. Set the forwarding port on the router. Assign to each headend its external port.
3. If the broadband connection has a static IP, a dynamic DNS must be used.(e.g.
www.dyndns.com). This gives your headend an explicit address with which you can
always access it (e.g. kopfstelle.dyndns.com).
8.3.6 Proxy Settings
If the PC is behind a Proxy server, choose
the menu item Proxy Settings .
Under „Proxy Settings“ menu enter the address and
the port of the Proxy Server.

19
8.3.7 Editing the headends settings.
Select headend.
Press Modify to change the settings of
the selected headend.
Press Delete to delete the selected headend.
8.3.8 Selecting headend for programming.
Select menu item Select Active Headend
In the next coming window double click on
the desired headend to dial in.
Headend is dialed.
Program Menü is automatically opened.
Programm headend written in the
manual of QAM16.
8.4 Diagnosis

20
Header menu display:
Actual Operating Temperature: aprox. actual environment temperature
Total Operating Hours: total number of operating hours
Maximum operating Temperature: maximum measured environment temperature
Critical Operating Hours: number of operating hours at over 45°C environment temperature
The reported temperatures correspond to the actual value only for professional, vertical installations and a
closed housing cover.
The „Diagnose“ menu is
used for service purposes
and may be useful for error
analysis on the telephone
Hotline +49(0)7081-1702-
12.
With REFRESH you can
update the displayed data.
If one of the fields is displayed in red, an error has occured.
8.5 LED-Analysis/Interpretation
LNB green: 12V LNB- voltage
off: no LNB- voltage (short circuit?)
Tuner green continuous:Tuner logged
green blinking: Tuner not logged
FPGA green: configured, operational
off: error
ASI green: interfaces o.k.
off: error
RF green: output o.k.
off: error
Status green: all tuners logged, operational
orange different functions in
programming
/