Page is loading ...

Use with 10 bolt 30686 base rails ONLY. Base Rails are not included with this kit.
Center Bolt Kit 32059 (sold separately) must be used when towing with a
26K hitch, Goose Neck, or Maneuvering System.
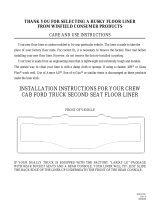
Parts Diagram
Figure: 1
20
TOOLS
3/16" drill
17/32" drill
21/32” drill
1-5/16” drill
1/2" Socket & Open End Wrench
5/8” Socket & Open End Wrench
Torque Wrench
"C" Clamps
Hardware Torque Values:
1/2” to 75 lb-ft
5/8” to 150 lb-ft
Caution: You must remove backing paper on rubber insulator pads to properly install. Once backing paper is
removed and the rubber pads are installed; it is PERMANENT and cannot be removed. ONLY Install on the
brackets and base rails. DO NOT install rubber insulator pads on the truck bed.
Do NOT use with base rail # 31323.
Dealer /
Installer:
Provide a copy of these Instructions to the end user of this product. These Instructions provide important
operating and safety information for proper usage of this product. Demonstrate the proper use of the
product with the end user. Have the end user demonstrate that they understand the proper use of the
product.
End User:
Read and follow all instructions included in this manual. Ask your Dealer / Installer for assistance if you do
not understand the proper use of the product. Never remove any decals from the product.
WARNING! Never exceed the
towing capacity of the tow vehicle.
Ford F150 4 Bolt Custom
Installation Bracket Kit.
Assembly, Installation, Operation and
Maintenance Instructions
P/N: 32858

CAUTION:
Check for obstructions before drilling. Failure to do so could result in damaged fuel or brake
lines, structural members, etc. HUSKY TOWING PRODUCTS does its best to communicate tow
vehicle manufacturer changes; however, it is ultimately the responsibility of the installer to
prevent damage due to installation.
1. The following instructions should be used to mount the fifth wheel. Care and attention to detail will ensure a
quick quality installation. Check parts against parts list to become familiar with parts in kit. (See Fig. 1)
2. Lower or removal of spare tire will give more room. Remove wheel well liner to allow access to truck frame.
WARNING:
If the truck is raised, be sure that the truck is properly blocked and restrained to prevent the truck
from falling. Failure to do so may result in the truck suddenly falling, causing death or serious
injury.
3. Do NOT install mounting rails over plastic bed liners. Plastic bed liners must be cut out of the way. Base rails
may be installed on spray in liner. Note: Consult installer for recommended curing time.
4. Use only the supplied bolts, nuts and washers to install this kit. All bolts and nuts are Grade 5 unless specified
otherwise.
5. Specific instructions for most commonly used vehicles are included. Each frame bracket must be bolted to the
vehicle frame with two bolts.
6. Measurements are given from Rear Edge of truck bed to rear edge of the base rail closest to the Rear Edge of
truck for most vehicle applications (See Fig. 2).
7. Apply the base rail insulator strips(#9) on the bottom of each end of rail correctly to protect aluminum bed from
corrosion as shown in fig.1 & 5A. Be sure to cover the entire bottom of the base rail with the base rail insulators.
Center hitch between fender wells and make sure rails are square. Adjust position of rails until both diagonal
measurements are the same. (See Fig. 2 & 3). Position the 5th wheel uprights between the bed rails so that the
tabs in the base of each upright will fit into the slots in the ends of the bed rails. Secure the uprights in place
with the rail hitch pins and hair pins supplied with the 5
th
wheel installation kit. Securely attach 5th wheel cross
member to uprights. On most applications, the 5th wheel assembly should be positioned so that it is
approximately centered over the truck axle and between the wheel wells on the bed floor.
CAUTION:
These instructions are guidelines only. Actual installation is the responsibility of the installer and
the owner. Always measure truck and trailer before installing hitch to be sure that there is
clearance at the cab and at the bumper to allow for turns.
NO. DESCRIPTION QTY NO. DESCRIPTION QTY
1 DRIVER SIDE REAR BRACKET 1
11
5/8” FLAT WASHER(1.25” O.D.) 4
2 PASSENGER SIDE REAR BRACKET 1 12 5/8" LOCK WASHER 4
3 PASSENGER SIDE FRONT BRACKET 1 13 5/8" -11 GR5 HEX NUT 4
4 DRIVER SIDE FRONT BRACKET 1 14 1/2"-13 X 1-
3/4", GR5 CARRIAGE BOLT
8
5 5/8"-11 UNC X 3.5" HEX HEAD BOLT 4 15
1/2” CARRIAGE BOLT SPACER ,1”X3”
8
6
5/8” FLAT WASHER(1.75” O.D.)
4
16
1/4" SPACER PLATE
4
7
NYLON TUBE,1.3” OD
4 17 1/2" FLAT WASHER 8
8
SPACER ,TUBE
4 18 1/2" LOCK WASHER 8
9
BASE RAIL INSULATOR
4 19 1/2"-13 UNC HEX NUT 8
10
BRACKET INSULATOR
4
20 Pull Wire (1/2”) 2

9. Place rubber bracket insulator (#10) between bottom face of bed and top face of all brackets (#1, #2, #3 & #4)
as shown in fig. 5A & 5B. Do NOT remove the backing paper YET. You may need to adjust the position later in
Step 15.
10. Install frame brackets (#1, #2, #3 & #4) using appropriate hardware and tighten hand tight.
• Insert the head of the pull wire (#20) through the 1-1/2” diameter hole on the side of the truck frame and out
through the hole “2” & “3” (shown in fig.3) on the side of the frame.
• Slide the spacer (#15) over the head of the bolt leader and attach the ½” x 1-3/4” carriage bolt (#14).
• Push the hardware up into the frame through the large access hole on the side of frame.
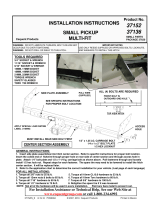
8. Drill 4 holes identified in Fig. 2. (Hole location will vary for individual vehicle applications.) Drill all holes with
3/16" drill .Always use sharp drill bits. A 3/16" pilot hole will greatly speed drilling larger holes.
Use the 3
rd
slot
from the end of the
base rail to drill hole
for 5/8” bolt in both
rail locations.
Diagonal measurements
must be the same both
directions as shown.
Rear edge of truck bed
(10 Bolt Base Rails # 30686)
26-1/2” 5-1/2’ BOX
26-1/2” 6-1/2’ BOX
26-1/2” 8’ BOX
22”
Figure: 2
Use the 3
rd
slot
from the end of the
base rail to drill hole
for 5/8” bolt in both
rail locations.
Forward
Aluminum Truck Bed
Front
Of
Truck
Drilled hole 1 &
carriage bolt(#14)
Drilled hole 4 &
carriage bolt(#14)
Hole 2 in frame &
carriage bolt(#14)
Hole 3 in frame &
carriage bolt(#14)
Base rail
Driver Side
frame Shown
Base rail
Center Line
of truck axle
Figure: 3
Pull hardware
through this hole
Base Rail
Insulator
Bracket Insulator
Front Bracket
Rear Bracket

WARNING:
DO NOT lubricate threads. It may cause bolt failure.
CAUTION:
Check for obstructions before drilling. Failure to do so could result in damaged fuel or brake
lines, structural members, etc. HUSKY TOWING PRODUCTS does its best to communicate tow
vehicle manufacturer changes; however, it is ultimately the responsibility of the installer to
prevent damage due to installation.
• With the other end of the pull wire (#20), thread it through the spacer plate (#16) then through the back side of
the frame brackets. gently pull on the end of the pull wire (#20) so that the hardware moves through the frame
and into position in the frame bracket. ( see fig.4A & 4B). Bolt in “hole 3” will directly pass through bracket,
there is NO spacer plate (#16) between frame and bracket (see fig.4B).
• Install the 1/2” flat washer (#17) , 1/2” lock washer (#18) and ½” hex nut (#19) hand tighten.
11. Drill “hole 1” and “hole 4” using 17/32” drill as shown location in fig.3. Do NOT drill through both walls of frame.
Drill only through wall of frame to which bracket is mounted.
12. Using pull wire, pull ½” carriage bolt (#14) through hole on the side of frame and out to Hole 1 & 4 .Bolt in “Hole
1” will pass through spacer plate which is placed between outer face of frame and inner side of bracket (fig.4A).
Pull it so that the hardware moves through the frame and into position in the frame bracket (see fig.4A). Bolt in
“hole 4” will directly pass through bracket, there is no spacer plate between frame & bracket (see fig.4B).
Install the 1/2” flat washer (#17) , 1/2” lock washer (#18) and ½” hex nut (#19) hand tighten.
CAUTION:
It is important that 17/32" drill be used for holes in chassis frame as rib neck bolts
may break if too small a hole is used and neck may not grip if too large a hole is used.
½” Carriage Bolt(#14)
Driver Side Front Bracket Shown
Frame Wall
(Frame section view)
Driver Side Front
Bracket (#4)
½” Flat Washer(#17),
½” Lock Washer(#18),
½” Hex Nut(#19)
Spacer Plate(#15)
Spacer Plate(#16)
Figure: 4A
½” Carriage
Bolt(#14)
Spacer Plate(#15)
½” Flat Washer(#17),
½” Spring Washer(#18),
½” Hex Nut(#19)
Driver Side Rear
Bracket(#1)
Driver Side Rear Bracket Shown
Frame Wall
(Frame section view)
Figure: 4B

17. To correct the location of the second mounting rail, place one leg’s tab of unassembled fifth wheel into already
installed base rail and position the other rail by inserting other tab in to rail . both rail must be in center of truck
bed width .This will place base rail in correct positioned make sure that 5
th
wheel has secure fit.
Note: If more than one hitch product will be used with the rails then both should be used at the
same time to align the second rail. This will ensure that one product does not compromise the fit
of the other.
18. Repeat Step 14 to secure second rail with bed and bracket.
19. Torque all 1/2” hardware to 75 ft-lbs. and 5/8” hardware to 150 ft-lbs. First torque the mounting rails to the frame
brackets and then torque the frame brackets to the truck frame.
20. Reinstall spare tire and wheel well liner if removed.
14. Temporarily insert 5/8”x 3.5” hex head bolt (#5) through 5/8 flat washer (#6), rail, spacer tube (#8), nylon
tube(#7) and brackets. Use a marker to mark the location of the 5/8” hardware on the brackets. This will help
align the center of the rubber insulator (#10) in the next step.
13. Check that the 3/16” drilled holes align with slots of all brackets (#1,#2,#3,#4) .and enlarge them with a 1-5/16"
drill. Place spacer tube (#8) & nylon tube (# 7) above bracket through bed on drilled location as shown in
figure.5A . Nylon tube (#7) must be properly placed to prevent contacts between spacer tube(#7) and truck
bed. Place base rails over drilled position as shown in fig.2 & 5A
Bracket Insulator (#10)
Bracket
Driver Side Shown
Figure: 5B
Front Driver Side Shown
Figure: 5A
Base Rail
Insulator(#9)
Base Rail Insulator (#9)
Spacer Tube (#8)
Nylon Tube (#7)
Aluminum Truck Bed
Bracket Insulator(#10)
Base Rail
Bracket
5/8 Flat Washer(1.75 OD)(#6)
5/8 Hex Head Bolt(#5)
Front
Of
Truck
15. Remove the 5/8”x 3.5” hex head bolt (#5) through 5/8 flat washer (#6), rail ,spacer tube (#8) ,nylon tube (#7)
and brackets. Apply the rubber insulator (#10) to the bracket. Align the hole in the rubber insulator to the marks
on the brackets. Fold the extra material of the rubber insulator around the front and rear edges of the brackets
as best as possible. Secure it with 5/8” flat washer (#11) 5/8” lock washer (#12) and 5/8” hex nut (#13).
16. Reinstall the 5/8” x 3.5” hex head bolt (#5) through 5/8 flat washer (#6), rail, spacer tube (#8), nylon tube (#7)
and brackets. Secure them with 5/8” flat washer (#11) 5/8”, lock washer (#12) and 5/8” hex nut (#13).

Warranty Terms:
5 Year Limited Warranty:
This warranty applies solely to Husky 5
th
Wheel Installation Kit manufactured by LKQ Specialty Products
Group for Husky Towing Products.
Husky Towing Products and LKQ Specialty Products Group make no guarantees or warranties for
products not manufactured by LKQ Specialty Products Group Such products are covered solely under
any applicable warranty of the manufacturer. It is always recommended that the operating instructions and
guarantee instructions provided by the manufacturer are followed.
LKQ Specialty Products Group warrants its products to be free from manufacturing and material defects
to the original purchaser for the length of warranty stated above from the date of retail purchase. If any
products are found to have a manufacturing or material defect, the product will be replaced or repaired at
the option of Husky Towing Products and LKQ Specialty Products Group with proof of purchase by the
original purchaser. The original purchaser shall pay all transportation and shipping costs associated with
the return of the defective product and the defective product shall become the property of LKQ Specialty
Products Group.
The Warranty applies to LKQ Specialty Products Group products used for individual and recreational
purposes. Commercial usage of the LKQ Specialty Products Group products limits the warranty to 90-
days from date of purchase.
The Warranty applies only to LKQ Specialty Products Group products which are found to be defective in
manufacturing or material. This warranty does not apply to normal wear and tear of the finished placed on
LKQ Specialty Products Group products.
Husky Towing Products and LKQ Specialty Products Group are not responsible for any labor costs
incurred for removal or replacement of the defective product.
Husky Towing Products and LKQ Specialty Products Group are not responsible for repair or replacement
of any product under the limited warranty where the product was improperly installed, misapplied, altered,
abused, neglected, overloaded, misused or damaged as a result of an accident, including any use of the
product not in accordance with all product operating and safety instructions.
Without limiting the generality of the foregoing, Husky Towing Products and LKQ Specialty Products
Group shall under no circumstances be liable for any incidental or consequential loss or damage
whatsoever arising out of, or in any way relating to any such breach of warranty or claimed defect in, or
non-performance of the products. Some states do not allow the exclusion or limitation of incidental or
consequential damages, so the above exclusion or limitation may not apply to you.
This limited warranty gives you specific legal rights, and you may also have other rights that vary from
state to state.
Rely on
premium trailer hitches & towing by Husky Towing if you’re looking for quality and efficiency.
/