
mIoT Captis Installation Guide May 2019
1 Rev 2.0
Installation Guide
Captis Metrum & Elster V100

mIoT Captis Installation Guide May 2019
2 Rev 2.0
Contents
Introduction.............................................................................................................................................. 3
Captis Technical Information................................................................................................................... 3
Captis Metrum ..................................................................................................................................... 3
Installation ............................................................................................................................................... 4
Before you begin ................................................................................................................................. 4
What is in the Captis Box? .................................................................................................................. 4
Installing the Captis ................................................................................................................................. 5
Terminating the device ............................................................................................................................ 5
Mounting the Captis ............................................................................................................................ 6
Register and configure the Captis ....................................................................................................... 8
Connection Tests .......................................................................................................................... 16
Troubleshooting .................................................................................................................................... 17
Servicing................................................................................................................................................ 18
Battery Replacement ......................................................................................................................... 18
Safety .................................................................................................................................................... 18
Electromagnetic Radiation – Human Exposure ................................................................................ 18

mIoT Captis Installation Guide May 2019
3 Rev 2.0
INTRODUCTION
The Captis cellular data logger has been developed to fill measurement requirements across a broad
range of applications and remote locations.
The Captis Metrum has the following features:
• The device measures 90 x 75 x 50 mm and weighs less than 500g.
• Is designed to interface with existing mechanical water meter via a pulse pick up unit.
• It is battery operated and does not require an external power supply.
• It operates within the LTE-M and NB-IoT coverage areas on Telstra’s IoT network.
• The enclosure is IP68 rated.
CAPTIS TECHNICAL INFORMATION
CAPTIS METRUM
1x Pulse Input Passive Suitable for Reed SW + Open Collector +
Dry Contact
Maximum Frequency 500Hz
Sensor Minimum Open Resistance 1.25MΩ
Sensor Maximum Closed Resistance 60kΩ
Physical Size 90mm x 75mm x 50mm
Weight Less than 500g
IP Rating IP68
Figure 1 Captis dimensions front view
Figure 2 Captis dimensions top view

mIoT Captis Installation Guide May 2019
4 Rev 2.0
INSTALLATION
BEFORE YOU BEGIN
Before starting this installation, you will need the following items:
• The contents of the Captis box.
• The water meter that will be connected to the Captis
• A 3mm Allen key and small flat blade screwdriver
• An internet-connected device, such as a phone or tablet.
WHAT IS IN THE CAPTIS BOX?
In the Captis box you will find:
• Captis data logger
• Cable Cover and screw
• Attachment Band and screw
• Activation Magnet
Used to wake up and reset the device.
Figure 4 Captis showing magnet being
used to wake device

mIoT Captis Installation Guide May 2019
5 Rev 2.0
INSTALLING THE CAPTIS
Applicable to Telstra Digital Water Metering and Hardware Only customers.
Asses installation
site for accessibility
Attach the
Captis to the
water meter
Register the
Captis device to
the Cloud
Platform
Test sensor
connection and data
transmission
Complete
installation
Figure 5 Steps to install the Captis
To successfully install the Captis you must perform the following steps. Each step is described in
more detail in the following sections.
1. Mount the Captis Metrum to the Elster V100 water meter
2. Register the Captis on the cloud platform.
3. Test the wiring, sensor and cellular connection.
4. Complete the physical installation after testing.
TERMINATING THE DEVICE
The Elster V100 T Probe Sensor comes prewired to the Captis Metrum Device. The T Probe is
connected using the below Cable Colours.
Colour
Description
Metrum Pulse – (Black)
Elster Pulse Detection
Metrum Pulse + (White)
Elster Pulse Detection
Metrum Switch + (Red)
Cable Cut Detection
Metrum Switch - (Blue)
Cable Cut Detection

mIoT Captis Installation Guide May 2019
6 Rev 2.0
MOUNTING THE CAPTIS
The Captis Metrum is designed to seamlessly integrate with Elster’s V100 water meter, and can be
simply installed following these steps:
1. Pass the supplied mounting band around the V100 and secure with the supplied screw and
a 3mm Allen Key.
2. Carefully remove the black pick up
protection cap from the shown location
3. Insert the V100 pickup- attached to the
Captis Metrum Device- into the pickup
location.
continued over page...
Pick up protection
cap location

mIoT Captis Installation Guide May 2019
7 Rev 2.0
4. Clip the Metrum housing onto the Band.
5. Place the supplied Cable cover over the pickup and Metrum cable entry and secure the
cover with the provided screw and a small flat blade screwdriver.
6. Wake the device using the included
activation magnet.

mIoT Captis Installation Guide May 2019
8 Rev 2.0
REGISTER AND CONFIGURE THE CAPTIS
Applicable to Telstra Digital Water Metering customers only.
Before registering the Captis, you must:
• Connect the Captis device to the water meter
1. Login to the Cumulocity cloud platform using an internet connected device such as a tablet
or mobile phone.
2. Create the Captis device in the Cumulocity system by entering the serial number found on
the label of the device you are installing.
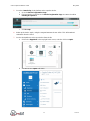
a. Go to the Devices menu. Click Registration then click Register Device.
b. Click General Device Registration.
Figure 6 Registering the Captis overview
Note: The Captis device does not have to be installed in its final location before registration.
If the device’s final location is difficult to reach, you can perform all the registration and some of
the testing before installing it.
Tip: If you have issues with registering your device, contact Telstra at 1800 620 345.

mIoT Captis Installation Guide May 2019
9 Rev 2.0
c. Enter the serial number from the label of the Captis.
d. If this device is part of a group, select that group from the drop-down menu.
e. Click Next to register the device.

mIoT Captis Installation Guide May 2019
10 Rev 2.0
3. A magnet is provided with the Captis. Place the magnet between the two LEDs on the label
for 3-5 seconds. The device will wake up and attempt to connect to the network.
4. Check the STATUS and CELLULAR LEDs to confirm that the device is powered, and a
network connection has been established. The STATUS LED will flash on and off once. The
CELLULAR LED will flash but should stabilise to a solid orange light within 2 minutes.
If the STATUS LED does not flash, re-try the magnet between the LEDs. If this still does not
work, see Troubleshooting for more suggestions.
If the CELLULAR LED does not stop flashing within 2 minutes, this indicates connection
issues and/or poor signal strength. If an external antenna is used, reposition it to a more open
location away from metal objects. If an internal antenna is used, see if the device can be
mounted in another location.
Hold the magnet between the LEDs once again to wake-up the device and inspect the
CELLULAR LED.
See Troubleshooting for more information if you are still having problems.
Both lights will go out when transmission is completed.

mIoT Captis Installation Guide May 2019
11 Rev 2.0
5. Go to the Cumulocity cloud platform and accept the device.
a. Go to the Device Registration Page.
b. Find your device in the list on the Device Registration Page. Its status should be
Pending Acceptance.
c. Click Accept.
6. Wake up the device again, using the magnet between the two LEDs. This will download
credentials from the cloud.
7. On the cloud platform, select your device from the list.
a. Click on the App Menu in the top right hand corner, and then click on Captis.
b. You will see the Captis sub-menu.

mIoT Captis Installation Guide May 2019
12 Rev 2.0
c. Select Captis Configuration from the Captis sub-menu.
8. Configure the device to suit your requirements in the Sensor Tab.

mIoT Captis Installation Guide May 2019
13 Rev 2.0
Digital In 1
Enable Enable function of the Switch Input. If Cable Cut Detection is
required, this should be left as Enable
Type This is for the Type of the input, either Pulse or Switch. Since the
Metrum is shipped pre-wired, Digital In 1 should be left as Pulse.
Pulse Scale Factor This is the K Factor of the Meter (how many L per Pulse) e.g. 2 Pulse
per L would be 0.5 (in the Pulse Scale Factor) and 5 Pulses per L
would be 5 (in the Pulse Scaling factor.
Pulse Units The unit of measurement that will be Displayed in Cumulocity,
generally this is set to Litres or L
Offset The current meter reading should be entered here
Flash LED This feature allows the Status LED to flash when a Pulse is received
Digital In 2
Enable Enable function of the Switch Input. If Cable Cut Detection is
required, this should be left as Enable
Type This is for the Type of the input, either Pulse or Switch. Since the
Metrum is shipped prewired, Digital In 2 should be left as Switch.
Flash LED This feature allows the Status LED to flash when a Switch is received

mIoT Captis Installation Guide May 2019
14 Rev 2.0
9. If Required, an Alarm can be set up if the Pickup Cable has been cut or damaged. Under the
Alarm Tab, there is the ability to set up various alarms.
For the Switch Input:
- Switch should be selected from the Sensor Type
- Sensor Channel is 2
- Setpoint 0 (Open Circuit)
- Hysteresis of 0
- Trigger set to Equal To
continued over page...

mIoT Captis Installation Guide May 2019
15 Rev 2.0
In the Action List, it is preferable to use the Email (with the email address to be input into the
‘Email’ section directly above these settings) and the Send Logged actions for the Metrum.
10. Once the Setup has been completed, simply press Save and the operation will be saved
under the Control Tab.
11. Wake up the device, using the magnet.
This will download the Configuration from Cumulocity.

mIoT Captis Installation Guide May 2019
16 Rev 2.0
Testing the Captis
The final steps in registering the Captis are to confirm that the sensors are working, and the cellular
signal is adequate.
To test the Captis before you install it, you must:
1. Perform the Connection tests to make sure the sensor is wired correctly, and that the data is
transmitted to Cumulocity.
2. Install the device.
3. Perform the Connection tests again to make sure the final
location has adequate signal for data transmission.
If the installation location of the Captis is easy to reach:
1. Install the device.
2. Perform the Connection tests.
CONNECTION TESTS
Check that the connection between the device and the sensor is functional and that there is adequate
cellular signal for the Captis to work as required.
1. Activate your sensor to create a few recordable events. How you do this will depend on the
sensor.
2. Wake up the Captis using the magnet. The device will then transmit the recorded data to the
cloud platform.
3. Find the device you are testing on the cloud platform. Check that the data has been
transmitted, it is accurate, and no alarms have been recorded.
a. Go to App Menu > Captis.
b. Click on the device you are testing.
c. Select Measurements
If the data has been submitted correctly, the registration and installation are a success. If the data
does not appear, see the Troubleshooting section below.
Note: If the installation location of the Captis is difficult to reach, you can perform the sensor
connection and data transmission tests before you install the device in its final location. This
makes it easier to fix any wiring or connection issues

mIoT Captis Installation Guide May 2019
17 Rev 2.0
TROUBLESHOOTING
Symptom
Meaning
What to do
Status LED flashing then solid
Device is on/ awake
Device is working as it should, leave
device to collect data
Cellular LED flashing then solid
Device connected to
LTE network
Device is working as it should, leave
device to collect data
Status LED won’t turn on after
using the magnet
The device battery may be
depleted, or a device fault may
have occurred
Use a different device and contact
the supplier
Cellular LED flashing for more
than 2 minutes
Signal is obstructed
Ensure there are minimal physical
and metallic obstructions between
the device and the signal
Contact the supplier if issue persists
Site has very low or no
network coverage and not
suitable for installation
Alternate flashing between
Cellular LED and Status LED
No Cellular registration
(connection to the network) is
being achieved.
Check with the Telstra coverage map
to ensure the site is covered.
If the area is covered, use a different
device and contact the supplier.
Sensor connection not working
(not flashing the LED after LED
flash turned on in Captis
Configuration Toolset)
Connection wired incorrectly
Confirm that the Elster V100 T Probe
Sensor is properly attached to the
Elster V100
Contact support if issue persists
Sensor readings not uploading
to/ appearing in Cumulocity
Sensor not triggering
Ensure the sensor can be triggered
by checking that the Elster V100 T
Probe Sensor is securely installed in
the meter.
Contact support if issue persists
No cellular signal
Check Status and Cellular LED.
If flashing, complete troubleshooting
for a flashing Cellular LED.
Contact support if issue persists

mIoT Captis Installation Guide May 2019
18 Rev 2.0
SERVICING
BATTERY REPLACEMENT
The battery should only be replaced by an authorised party with a Captis approved battery. Other
types of battery will either not provide enough power to function properly or cause damage to the
device and/or battery and/or user. Warranty becomes void when a non-approved battery is used.
CAUTION: RISK OF FIRE OR EXPLOSION IF BATTERY IS
REPLACED BY AN INCORRECT TYPE
Please go to http://recyclingnearyou.com.au/batteries to find a location for recycling the spent battery.
The battery type is single use lithium-thionyl chloride (Li-SOCl2).
SAFETY
ELECTROMAGNETIC RADIATION – HUMAN EXPOSURE
Warning: This device has a Maximum Permissible Exposure
(MPE) radius of 20cm.
It is the installer’s and end customer’s responsibility to ensure that no person has any body parts
within 20cm of the device or antenna while device is transmitting. Device is transmitting when the
‘Cellular’ LED is lit.
NOTE: Lithium batteries are considered dangerous goods for transportation purposes
regardless of the state of charge.
-
 1
1
-
 2
2
-
 3
3
-
 4
4
-
 5
5
-
 6
6
-
 7
7
-
 8
8
-
 9
9
-
 10
10
-
 11
11
-
 12
12
-
 13
13
-
 14
14
-
 15
15
-
 16
16
-
 17
17
-
 18
18


mIoT Captis Pulse Lite Installation guide
- Type
- Installation guide
- This manual is also suitable for
Ask a question and I''ll find the answer in the document
Finding information in a document is now easier with AI
Other documents
-
Inseego TR100 Tracker Quick start guide
-
 Hemisphere GPS Crescent V100 Series User manual
-
Seeed SenseCAP S2100 - LoRaWAN® Data Logger/DTU Template
-
Elster evoQ4 Installation And Operational Manual
-
Honeywell EK205-M User manual
-
Apogee 10545 Instructions Manual
-
-
-
-
ADS PrimeLog User manual
