Bracket installation is based on the direction of door action and the type of door frame, e.g. narrow frame doors, frameless
glass doors, inswing doors, etc.
Dimensions & Accessories
New Mounting Plate
Butt Splice (IDC) Connector
Using crimper or pliers and
pressing the header of
connector down to even
position.
Guide Pin
Sexnut bolt
Washer
Rubber Washer
hex-socket
head screw
Anti-tamper Cap
Armature Plate
Magnet
Screw
Mounting Plate
Specification
Operating Voltage
Current Draw
Operating Temperature
Relay Rating
Holding Force
Lock Surface Temperature
Lifetime Test
Weight
Waterproof Rating
-10~55°C(14~131°F)
ambient temperature ±20˚C
IPX7
over 200,000 times
Single Voltage: 12 or 24 VDC
Dual Voltage: 12/24 VDC
Single Voltage: 0.5A/12 VDC
Dual Voltage:0.5A/12VDC
0.5A/20VDC/10W
1200 lbs (approx. 545 kg)
or 0.25A/24VDC
0.25A/24VDC
5.1Kg
GL1200-FS
62
4
0
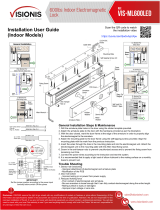
Installation on Right- and Left-hand Open Doors
Electromagnetic Lock Installation Instruction
Waterproof Series
Technical Specification
Thickness of 10 mm with enhanced sturdiness to secure
the magnetic lock
Reverse the maglock to adapt it for the door action.
o
u
t
s
w
i
n
g
o
u
t
s
w
i
n
g
Connecting Diagram
Trouble Shooting
2 Wire Leads
5 Wire Leads
4 Wire Leads
6 Wire Leads
7 Wire Leads
Model
Power Input
Bond sensor
output
Diagram
Solution
1. Make sure the wires are properly connected.
2. Make sure the power supply unit works well.
3. Make sure the relay is connected to the N.C. contact.
1. See if the armature plate is deformed.
2. Make sure to insert the rubber washer between the armature plate and the bracket.
3. See if the surfaces of the armature plate and the magnetic lock are clean.
1. Check if the voltage selection is correct.
2. Check the power voltage at the terminals.
Remove any diode installed across the magnetic lock.
Make sure the armature plate and the magnetic lock are aligned face-to-face.
Problem
Possible Cause
Door does
not lock
Low holding
force
Sensor output
is not
functioning
No power
Poor contact between electromagnet
and armature plate
Low voltage or incorrect voltage
setting
A secondary diode was installed
across the electromagnet lock
Misalignment between the armature
plate and electromagnet lock
Control Device
N.C contact or Access Relay
Control Device
N.C contact or Access Relay
Wire Leads
(Power input is polarity free)
Control Device
N.C contact or Access Relay
Red
Black
Power
Supply
Control Device
N.C contact or Access Relay
Power
Supply
Blue
Blue
White N.C.
Black COM.
Red N.O.
K
L
GL1200-FS-IOTB-12
GL1200-FS-IOTB-24
GL1200M-FS-IOTB-12
GL1200M-FS-IOTB-24
GL1200-FS-IOTB
GL1200R-FS-IOTB
GL1200M-FS-IOTB
Copyright © 2011 All Rights Reserved. P-MU-WP-GL1200-FS Ver. A Publish: 2011.07.27
with 2 m cables
Voltage Selection:12VDC
Red
White
Black
Green
Power
Supply
Power
Supply
Voltage Selection:24VDC
Red
White
Black
Green
Power
Supply
Voltage Selection:12VDC
Red
White
Black
Green
Power
Supply
Control Decive
N.C. contact Access Relay
Blue COM.
Yllow N.O.
Voltage Selection:24VDC
Red
White
Black
Green
Power
Supply
Control Decive
N.C. contact Access Relay
Blue COM.
Yllow N.O.
Voltage Selection:12VDC Voltage Selection:24VDC
Red
White
Black
Green
Power
Supply
Control Decive
N.C. contact Access Relay
Brown N.C.
Blue COM.
Yllow N.O.
Red
White
Black
Green
Power
Supply
Control Decive
N.C. contact Access Relay
Brown N.C.
Blue COM.
Yllow N.O.

Template
Door leaf
Door frame
Template
Fold the template 90° along the
dotted line.
Template
Close the door. Stick the template
on upper free-moving corner of the
door leaf, as close to the corner of
the door frame as possible.
Mark the positions of the holes
as shown on the template for
securing the magnetic lock and
armature plate.
Drilling Instruction
Hollow door
frame
L-GL1200FS-IOTB bracket for
outswing doors and narrow door
frames
LZ-GL1200FS-IOTB bracket for
inswing doors
Optional Brackets
Insert the caps into the screw
holes in the magnetic lock.
Add rubber washers Close the door and test the
holding force. Adjust the gap
between the armature plate and
the magnetic lock by adding or
removing the washers or by
tightening the armature plate.
The rubber washer is used to
adjust the angle of the armature
plate when it is attracted by the
magnetic lock to achieve the
maximum holding force.
Drill a 8 mm hole.
Enlarge the hole to
12.7 mm by a sexnut
bolt from the outside.
Hollow Metal Door
Drill a 8 mm hole.
Enlarge the hole to
12.7 mm and 36 mm
deep by a sexnut bolt
from the outside.
Solid Wooden Door
Drill a 6.8 mm
hole and tap a
M8x1.25P thread.
Reinforced Door
M8 x1.25P
12.7mm 8mm
outdoor
outdoor
outdoor
G
Outswing
Rubber Washer
Install the armature plate as shown in the diagram. (Different
dimensions of holes on different door constructions.) Hammer the
guide pins into the holes in the armature plate (see diagram 11).
Fasten the mounting plate with
screws. Then fasten the magnetic
lock with hex-socket head crews
and blind nuts.
Drill the holes into the marks made
previously.
Door leaf
Door frame
Hex-socket head
screw
Armature plate
Guide pin
Regular Installation
o
u
t
s
w
i
n
g
Door
leaf
outswing
Fit L-GL1200FS-IOTB bracket on
sliding doors and frames.
Door action
Inswing Inswing
Fit Z-500N bracket to the inswing
LZ bracket for inswing doors (Surface Mount)
Note:
The magnetic lock must face-to-
face align with the armature plate
or the holding force will decrease
by 25%.
Make sure the faces of the
magnetic lock and the armature
plate are clean, intact and no
rust.
Regularly wipe the surface
of the magnetic lock with
anti-rust oil.
Do not apply power wires
and signal wires in the same
cable or conduit.
The magnetic lock is fail-safe.
It requires a UPS to supply
power to keep the door
locked during power failure.
Remove any diode and
varistor to prevent the door
from delayed opening.
The magnetic lock and wires
must not be exposed. Install
LZ bracket for inswing
doors.
Power Supply
Control Device
Assemble the Z bracket. Note
that the bracket is movable.
Insert the guide pins into the
armature plate.
Install the L bracket to the
mounting position on the
door frame. Make sure the
door can be freely opened.
Door frame
Fasten the magnetic lock to
the L bracket with hex-socket
head screws.
Fasten armature plate to Z
bracket. The rubber washer
must be placed between the
armature plate and the bracket.
Adjust and fasten the Z bracket.
Close the door and test the
holding force. Adjust the gap
between the armature plate and
the magnetic lock by adding or
removing the washers or by
tightening the armature plate.
After the armature plate and
the magnetic lock stick to each
other, adjust the Z bracket to fit
the door frame.
Close the door and connect
to the power.
H
Outdoor
Outdoor
Assemble Z bracket. Note
that the bracket is movable.
8
6
Drill holes as shown on
template and fit blind nuts
into holes. Fit maglocks with
hex-socket head screws.
template
5
7
Insert caps into screw holes
in maglock.
4
Inswing
Power
Power
Insert guide pins into
armature plate (to fix it).
power
outdoor
After maglock attracts
armature plate, fit Z
bracket to door leaf.
Fasten armature plate to
Z bracket. Add plastic
washers between bracket
and armature plate.
Close door and connect
to the power.
Adjust and fasten upper part
of Z bracket. Close door and
test holding force. Adjust the
gap between armature plate
and maglocks by adding or
removing washers or tightening
the armature plate.
outdoor
power
Z bracket for inswing doors (Face Mount)
/