DURKOPP ADLER 581 User manual

Type
User manual

This manual is also suitable for

559, 580, 581
Anbauanleitung Lichtschranke,
Teilesatz 0580 591524
Fitting lnstructions light barrier,
Kit 0580 591524
Teile-Nr./Part No.:
0791 580709
Inhaltsverzeichnis/Table of Contents
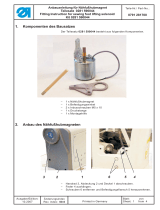
1 Komponenten des Teilesatzes .......................................................................................................... 3
2 Lichtschranken montieren ................................................................................................................. 3
2.1 Lichtschranken vormontieren ..................................................................................................... 4
2.2 Lichtschrankenleitung verlegen .................................................................................................. 6
2.3 Adapter montieren, Adapterleitung verlegen und Lichtschranken anschließen ........................... 8
2.4 Reflexfolie montieren ............................................................................................................... 10
2.5 Lichtschranken ausrichten ....................................................................................................... 11
2.6 Lichtschranken über die Software einschalten ......................................................................... 12
3 Nähen ............................................................................................................................................. 12
1 Components of the kit ..................................................................................................................... 15
2 Assembling the light barriers ........................................................................................................... 15
2.1 Preassembling the light barriers ............................................................................................... 16
2.2 Laying the light barrier cables .................................................................................................. 17
2.3 Assembling the adapter, laying the adapter cable and connecting the light barriers ................. 19
2.4 Assembling the reflecting foil ................................................................................................... 21
2.5 Aligning the light barriers ......................................................................................................... 22
2.6 Activating the light barriers via the software ............................................................................. 23
3 Sewing ............................................................................................................................................ 23
559, 580, 581
Anbauanleitung Lichtschranke,
Teilesatz 0580 591524
Fitting lnstructions light barrier,
Kit 0580 591524
Teile-Nr./Part No.:
0791 580709
04/2015 01.0 Printed in Germany 15/24
WARNING
Danger of electric shock from live parts!
Serious injuries to life and limb.
The light barrier may be assembled only by qualified specialists.
Switch off the machine and pull the power plug.
Make sure the power plug cannot be accidentally plugged back in.
1 Components of the kit
The kit 0580 591524 is designed for machines of the class 580 or 581.
With the kit, it is possible to recognize automatically different types of lapels and jacket front edges.
Check whether the scope of delivery is correct.
Part No. Quantity Description
0580 591360 1 Holder
0580 591370 1 Bolt
0580 591380 1 Bolt
0798 120401 1 Cable clip, self-adhesive
9202 002077 2 Cylinder head screw M4x10
9203 003077 4 Cylinder head screw M3x12
9204 201757 2 Fillister head screw M4x30
9815 920026 2 Light barrier with connections
9815 920027 5 Reflecting foil, 25x25 mm, self-adhesive
9330 000067 4 Washer A3,2
9840 121001 6 Cable tie
9870 580030 1 Adapter
2 Assembling the light barriers
559, 580, 581
Anbauanleitung Lichtschranke,
Teilesatz 0580 591524
Fitting lnstructions light barrier,
Kit 0580 591524
Teile-Nr./Part No.:
0791 580709
04/2015 01.0 Printed in Germany 16/24
2.1 Preassembling the light barriers
Fig. 1
(1) Adapter
Fig. 2
(2) Light barrier
(3) – Bolt
(4) Fillister head screw
(5) Holder
(6) Fillister head screw
(7) Light barrier with connection
(8) – Bolt
(9) Cable tie, self-adhesive
1. Attach the bolts (3) and (8) to the holder (5) by using the fillister head screws (4)
and (6).
2. Attach the light barriers (2) und (7) to the bolts by using the 4 cylinder head screws.
3. Run the cables of the light barriers alongside the holder and fix them using the
cable ties.
559, 580, 581
Anbauanleitung Lichtschranke,
Teilesatz 0580 591524
Fitting lnstructions light barrier,
Kit 0580 591524
Teile-Nr./Part No.:
0791 580709
04/2015 01.0 Printed in Germany 17/24
Fig. 3
(11) Holder
(13) Holder
(14) Light barrier with connection
(15) Cable clip, self-adhesive
1. Remove both lower screws of the head cover.
2. Attach the preassembled holder (11) to the machine head by using the 2 longer
cylinder head screws (10) and (12).
Make sure that the connecting cables of the light barrier run underneath the
holders (13).
3. Fix the clip (15) onto the sewing head and insert the cable.
2.2 Laying the light barrier cables
Fig. 4
(2) Handwheel
(3) Tension plate
1. Unscrew the handwheel (2).
2. Unscrew the housing (1).
3. Unscrew the tension plate (3).
559, 580, 581
Anbauanleitung Lichtschranke,
Teilesatz 0580 591524
Fitting lnstructions light barrier,
Kit 0580 591524
Teile-Nr./Part No.:
0791 580709
04/2015 01.0 Printed in Germany 18/24
Fig. 5
Fig. 6
(4) Light barrier cable
(5) Supply line
(6) Ring
1. Run the light barrier cable (4) alongside the supply line (5) of the control panel and fix
it with cable ties.
2. Run the cable (4) into the sewing head, coil up the excess cable to a ring (6) and tie it
to the supply line (5).
559, 580, 581
Anbauanleitung Lichtschranke,
Teilesatz 0580 591524
Fitting lnstructions light barrier,
Kit 0580 591524
Teile-Nr./Part No.:
0791 580709
04/2015 01.0 Printed in Germany 19/24
2.3 Assembling the adapter, laying the adapter cable and connecting the
light barriers
Fig. 7
Fig. 8
(1) Adapter
(2) – Plug
(3) – Plug
(4) Light barrier cable
(5) Cable harness
1. Lift the supply line X120b off the control.
2. Connect the plug (3) of the adapter into the bush X120B and tighten it.
3. Push the supply line X120b into the plug (2) of the adapter and tighten it.
4. Run the light barrier cable (4) to the machine and attach it to the cable harness (5)
with cable ties.
559, 580, 581
Anbauanleitung Lichtschranke,
Teilesatz 0580 591524
Fitting lnstructions light barrier,
Kit 0580 591524
Teile-Nr./Part No.:
0791 580709
04/2015 01.0 Printed in Germany 20/24
Fig. 9
Fig. 10
(6) Light barrier cable
(7) Plugs
1. Run the light barrier cable (6) inside the sewing head to the top.
2. Connect the plugs (7) in the sewing head.
The controller recognizes the right and left light barrier automatically.
Hence you do not need to pay attention to this when connecting the plugs.
Fig. 11
(8) Housing
(9) Handwheel
(10) Tension plate
1. Reassemble housing (8), handwheel (9) and tension plate (10).
559, 580, 581
Anbauanleitung Lichtschranke,
Teilesatz 0580 591524
Fitting lnstructions light barrier,
Kit 0580 591524
Teile-Nr./Part No.:
0791 580709
04/2015 01.0 Printed in Germany 21/24
2.4 Assembling the reflecting foil
Fig. 12
Fig. 13
(1) Leading edge of the cloth carrier plate
(2) – Left reflecting foil
(3) Clamping plate cutout
(4) – Right reflecting foil
Reflecting foil, left side
1. Stick on the left reflecting foil (2) so that its lateral distance to the clamping plate
cutout (3) is 1 mm and the distance between its front edge and the leading edge of the
cloth carrier plate (1) is 138 mm.
Reflecting foil, right side
1. Stick on the right reflecting foil (4) so that its lateral distance to the clamping plate
cutout (3) is 21 mm and the distance between its front edge and the leading edge of
the cloth carrier plate (1) is 138 mm.
559, 580, 581
Anbauanleitung Lichtschranke,
Teilesatz 0580 591524
Fitting lnstructions light barrier,
Kit 0580 591524
Teile-Nr./Part No.:
0791 580709
04/2015 01.0 Printed in Germany 22/24
2.5 Aligning the light barriers
Fig. 14
(3) Holder
The light barrier beam must point to the centre of the reflecting foil.
Switch off the surrounding light sources for testing or use a white cardboard to check the position of the
light barrier beam in a horizontal and vertical direction.
Horizontal alignment
1. Loosen the screw (2).
2. Turn the bolt (1) as needed.
3. Tighten the fillister head screw (2).
Vertical alignment
1. Move the holder (3) carefully.
559, 580, 581
Anbauanleitung Lichtschranke,
Teilesatz 0580 591524
Fitting lnstructions light barrier,
Kit 0580 591524
Teile-Nr./Part No.:
0791 580709
04/2015 01.0 Printed in Germany 23/24
2.6 Activating the light barriers via the software
Fig. 15
To operate the light barriers, you have to activate it via the software:
1. Switch on the light barrier mode in the operator level of the menu system
(see Operating Instructions).
2. Activate 2 buttonholes in a sequence (see Operating Instructions, Sequential mode).
3 Sewing
Sewing a regular lapel
Fig. 16
(2) – Right reflecting foil
1. Insert the sewing material (1) so that the right reflecting foil (2) is uncovered.
The program for the cutting and sewing of a regular lapel is automatically
recognized.
559, 580, 581
Anbauanleitung Lichtschranke,
Teilesatz 0580 591524
Fitting lnstructions light barrier,
Kit 0580 591524
Teile-Nr./Part No.:
0791 580709
04/2015 01.0 Printed in Germany 24/24
Sewing a peak lapel
Fig. 17
(4) Sewing material
1. Insert the sewing material (4) so that the left reflecting foil (3) is uncovered.
The program for the cutting and sewing of a peak lapel is automatically
recognized.
When sewing the buttonholes on the front edge of a jacket both reflecting foils are covered.
  • Page 1 1
  • Page 2 2
  • Page 3 3
  • Page 4 4
  • Page 5 5
  • Page 6 6
  • Page 7 7
  • Page 8 8
  • Page 9 9
  • Page 10 10
  • Page 11 11
  • Page 12 12
  • Page 13 13
  • Page 14 14
  • Page 15 15
  • Page 16 16
  • Page 17 17
  • Page 18 18
  • Page 19 19
  • Page 20 20
  • Page 21 21
  • Page 22 22
  • Page 23 23
  • Page 24 24

DURKOPP ADLER 581 User manual

Type
User manual
This manual is also suitable for

Ask a question and I''ll find the answer in the document

Finding information in a document is now easier with AI

in other languages