Page is loading ...

CHK1048-1105 (PK06592)
SAVE THESE INSTALLATION INSTRUCTIONS FOR FUTURE REFERENCE
AND IN THE EVENT YOU NEED TO ORDER A REPLACEMENT PART.
RECORD THE MODEL#___________________GLASS____________FINISH__________
FROM THE PRODUCT LABEL ON THE PACKAGE
IF YOU NEED REPLACEMENT PARTS OR HAVE INSTALLATION QUESTIONS,
PLEASE CALL OUR CUSTOMER SERVICE REPRESENTATIVES.
WHEN CALLING FROM USA, CALL 800-355-5397
MONDAY - FRIDAY 8:30am - 4:00pm EASTERN TIME.
WHEN CALLING FROM CANADA, CALL 888-304-4388
MONDAY - FRIDAY 8:00am - 5:00pm EASTERN TIME.
Installation Instructions
Shower Enclosures: Heavy Frameless Pivot Door

SHOWER
ENCLOSURE
14
15
16
9
14
15
16
9
4
14
3
1
10
11
11
* if needed
OUTSIDE
12
10
10
5
10
10
18
10
13
or
8
7
2
20
6
21
Top Glass Clamp
(Pre-installed)
Bottom Glass Clamp
(Pre-installed)

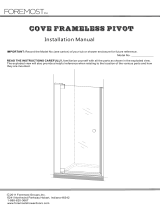
If you need replacement parts, do not return the Shower Enclosure
to the store, call us toll free for an immediate, courteous response.
When ordering replacement parts, please specify
the Model Number, Item Number & Part Description
To help identify the proper parts, please refer to the last page for Illustrations of Parts.
Assembly hardware is shown throughout the Installation Instructions,
at actual size, for ease of identification.
Additional Screws and Wall Anchors are included
in the Parts Bag for your convenience.
5/64 ALLEN WRENCH
17
* If necessary (Check SPECIFICATIONS TABULATION)
** Handle shown may differ from the one supplied with your model
19
Part Description Qty.
1 Door 1
2 Bottom Track 1
3 Pivot Wall Channel 1
4
Magnetic Jamb
1
5 Adjustable Wall Channel 1
6 *
Wall Filler (If Applicable)
1
7
Drip Shield
1
8 Seal Strip 1
9 Pivot Bracket 2
10
Wall Anchor
8
11 #10 x 1 1/4" lg. Flat Head Screws 5
12 #10 x 2 1/4" Long Screw 3
13 #10 x 1 1/4" Long Screw 3
14 #8 x 3/8" Long Screw
5
15
Nylon Bushing
2
16
#8 x 3/16" Long Set Screw
2
17 5/64 Allen Wrench 1
18
Glass Clamp Sweep
1
19 Track and Door Install Block 2
20 **
Handle Set
1
21 Adjustable Top Cap (Set) 1
Item #

Wall Filler Required
If Opening is Between
25 1/2” to 26 1/2”
29 1/2” to 30 1/2”
32 1/2” to 33 1/2”
35 1/2” to 36 1/2”
A - Safety glasses.
B - Measuring tape.
C - Pencil.
D - Hack saw (with 32 teeth per inch blade).
E - Miter Box or Square.
F - Level.
G - Electric Drill.
H - Center punch.
I - Drill bit, 1/8” (for installation on a fiberglass
enclosures)
Drill bit, 1/4” masonry (for installation on
ceramic tiles or marble)
J - Power screwdriver or a #2 phillips screwdriver.
K - #2 phillips screwdriver
L - Caulking gun
M - 5/64” Allen Wrench (included)
Pivot Door
Width Dimension
24”
27”
30”
33”
Fits in the Following Opening
(Minimum - Maximum)
23 3/4” to 26 1/2”
27 3/4” to 30 1/2”
30 3/4” to 33 1/2”
33 3/4” to 36 1/2”
SPECIFICATIONS TABULATION
Unpacking:
Care should be taken when unpacking your Shower Enclosure. Place the Door in an upright, safe location to avoid
damage.
Cleaning:
Never use scouring powder, pads or sharp instruments on metal work or Door.
We recommend the use of a squeegee after
each shower to eliminate water spots on the inside of the Door.
An occasional wiping down of the Door and anodized aluminum parts with a mild detergent, diluted in water, is all that is
needed to keep your Shower Enclosure looking brand new.
Carefully read the Installation Instructions BEFORE
you start. This will enable you to become familiar with the installation
sequences and the required tools.
Tools Required
For installation of your Shower Enclosure, you will need the following tools:
Materials Required
For installation of your Shower Enclosure, you will need the following materials:
A - Masking tape.
B - Silicone sealant.

Please note; the hinge side of the Door should be OPPOSITE the
Shower Head when possible.
Use these sketches as a guide to determine which side of the
Shower Enclosure your Door should hinge.
Please note, this Shower Enclosure Door only swings OUTWARD.
Be sure to allow enough room for it to open.
WARNING : SAFETY GLASSES SHOULD BE WORN AT ALL TIMES.
Shower head on RIGHT,
hinge Door on LEFT.
Shower head on LEFT,
hinge Door on RIGHT.
For some fiberglass Shower Enclosures,
the ends of the Bottom Track may need to
be “rounded” by filing to fit.
Measure the finished wall-to-wall distance, DIMENSION D,
in the center of the Shower Enclosure Ledge.
If a steel tape is used, be sure to add the width of the
case to the measurement.
Subtract 1/16” from DIMENSION D, this is your Track
Dimension.
At this point, re-measure the wall-to-wall distance,
DIMENSION D, and re-check subtraction, to be certain of
the correct Track Dimension.
“MEASURE TWICE, CUT ONCE”
Measure the “Track Dimension” along the length of the
Bottom Track. Carefully cut the Bottom Track.
Please note, to obtain the best results, use a 32-teeth
per inch Hacksaw blade and a Miter Box.
D
IMENSION
D
LEDGE
2
1

HIGH SIDE
After applying Silicone Sealant to Bottom Track, position Bottom
Track in center of Shower Enclosure Ledge with the HIGH SIDE
located towards the outside, as shown in SKETCH 3B.
SKETCH 3A
Ledge
Bottom Track
HIGH SIDE
Outside
3
Shower Enclosure
SKETCH 3B
Ledge
8”
Remove the Release Film from the bottom of the Track and Door
Install Blocks.
Install the Track and Door Install Blocks over the Bottom Track,
placing them approximately 8” from each end of the Bottom Track, as
shown in SKETCH 3C.
Please note, the Track and Door Install Blocks serve two purposes:
They hold the Bottom Track in position during the installation process
and they help support the weight of the Glass Door while it is installed.
These blocks will be removed after Installation is completed.
SKETCH 3C
8”
Track and Door
Install Blocks
SHOWER
ENCLOSURE
Apply a Bead of Silicon Sealant along length of Bottom Track in the
groove on the underside of the Bottom Track as shown in SKETCH 3A.
Apply a bead of Silicone
Sealant at this location
Silicone
OUTSIDE
Ledge
Track and Door
Install Block
RELEASE FILM

1/2”
SKETCH 4C
3
SKETCH 4A
3
8
8
SKETCH 4B
3
8
SKETCH 4D
BOTTOM
8
3
16
9
14
14
ACTUAL SIZE #8 X 3/8”
LONG SCREW
16
ACTUAL SIZE #8 X 3/16”
SET SCREW
Left-side hinging shown.
Reverse for Right-side hinging.
Measure and cut the Seal Strip 1” shorter than the Pivot
Wall Channel.
Please note, the Seal Strip may be Factory Installed. If so, remove
only enough of the Seal Strip in order to cut off the excess.
Do Not Fully Remove Seal Strip to Cut.
Slide the Seal Strip into the Pivot Wall Channel, as shown in
SKETCH 4A.
Rubbing liquid soap on the bottom of the Seal Strip can make it
slide easier into the Pivot Wall Channel.
Please note,
the Seal Strip is molded at a slight angle. The Seal
Strip must be installed angled inward, as shown in SKETCH 4B.
Position Seal Strip 1/2” from end of Pivot Wall Channel, as shown
in SKETCH 4C.
4
Please note, DO NOT use a power
screwdriver, use a #2 phillips head
screw driver.
WARNING: DO NOT OVER TIGHTEN.
Mate the Pivot Bracket to the bottom of the Pivot Wall Channel and
secure with a #8 x 3/8” long Screw, as shown in SKETCH 4D.
Use a #2 Phillips Head Screw Driver to tighten.
Then insert a #8 x 3/16” Set Screw and tighten with the 5/64” Allen
Wrench provided, as shown in SKETCH 4D.

5 6
5
12
ACTUAL SIZE #10 X 1 1/4” long SCREW
USED WITHOUT WALL FILLER
13
ACTUAL SIZE #10 X 2 1/4” long SCREW
USED WITH WALL FILLER
SKETCH 5E
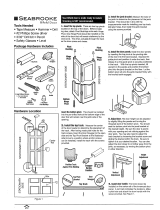
Drill mounting holes at marked locations.
When mounting to ceramic tile, use a 1/4”
masonry drill bit. Nick the ceramic tile surface at the
mounting hole locations with a center punch.
After drilling, insert Wall Anchors.
When mounting to a fiberglass enclosure, use a
1/8” drill bit. Wall Anchors are not required.
Secure Pivot Wall Channel to wall with #10 x 1 1/4”
long Flat Head Screws.
Secure Adjustable Wall Channel to wall with #10 x 1
1/4” long Screws.
Please note, if according to the SPECIFICATION
TABULATION, a Wall Filler is necessary, position
the Wall Filler against the wall behind the Adjustable
Wall Channel, as shown in SKETCH 5E.
Secure both to wall with #10 x 2 1/4” long Screws.
Wall Filler Requirements:
Only use Wall Filler (6) if DIMENSION D measurement
falls within 1” of maximum opening as listed in the
SPECIFICATION TABULATION.
Example: On Pivot Door 27”, if DIMENSION D was
between 29-1/2” and 30-1/2” then the Wall Filler is
required.
When using the Wall Filler, #10 x 2-1/4” long Screws
MUST be used instead of the #10 x 1-1/4” long
Screws.
Insert the Magnetic Jamb into the Adjustable Wall
Channel, as shown in SKETCH 5F.
Secure with #8 x 3/8” long Screws. Do not tighten at
this time. This will be completed at final adjustment.
Position the Pivot Wall Channel behind the HIGH SIDE of the Bottom
Track, as shown in SKETCH 5A.
Using a level to make sure it’s plumb, mark the hole locations with
a pencil, as shown in SKETCH 5C.
Remove Pivot Wall Channel.
Please note, the Magnetic Jamb & Adjustable Wall Channel may
be partially assembled. If so, remove felt pad and screw and
separate for installation.
Position the Adjustable Wall Channel on the Bottom Track at the
second “STEP”, as shown in SKETCH 5B.
Using a level to make sure it’s plumb, mark hole locations with a
pencil, as shown in SKETCH 5D.
Remove Adjustable Wall Channel.
11
ACTUAL SIZE #10 X 1 1/4” long FLAT HD SCREW
.
14
ACTUAL SIZE #8 X 3/8”
LONG SCREW
SKETCH 5A SKETCH 5B
HIGH SIDE HIGH SIDE
Outside
Second
“STEP”
Ledge Ledge
3 5
Outside
SKETCH 5C
Pivot Bracket
must be on
bottom.
WIDE SIDE OF PIVOT WALL CHANNEL MOUNTS TOWARDS OUTSIDE.
10
11
3
2
19
LEVEL
Pencil
10
13
12
5
2
19
LEVEL
OR
SKETCH 5D
Pencil
Inside
Enclosure
SKETCH 5F
4 5 6

14
ACTUAL SIZE #8 X
3/8” LONG SCREW
16
ACTUAL SIZE #8 X 3/16”
SET SCREW
DOOR INSTALLATION
6
15
BOTTOM OF DOOR
VIEWED FROM INSIDE
SHOWER ENCLOSURE.
Pivot Pin
9
19
2
9
14
16
3
Pivot Pin
Begin at the bottom Pivot Bracket location.
Insert a Nylon Bushing into bottom Pivot Bracket, as shown in
SKETCH 6A.
The following step may require the help of a second person
to help support the weight of the door.
Insert the Pivot Pin on the bottom Glass clamp into Nylon
Bushing, as shown.
Please note, after the the Pivot Pin is inserted, the door may
be rotated to the closed position so that the bottom of the
door rests on the Track and Door Install Blocks.
TOP OF DOOR
To Secure the TOP of DOOR, slide Nylon Bushing onto the
Pivot Pin, as shown in SKETCH 6B.
Guide the Pivot Bracket down so that it mates with the Pivot
Wall Channel and at the same time captures the Nylon
Bushing on the Pivot Pin.
Secure the Pivot Bracket to the Pivot Wall Channel with a
#8 x 3/8” Screw using a #2 Phillips Head screwdriver.
Then insert the #8 x 3/16” Set Screw and tighten with the
5/64” Allen Wrench provided.
Remove Track and Door Install Blocks.
Please note, DO NOT use a power screwdriver.
Use a #2 Phillips Head screwdriver and
the 5/64” Allen Wrench provided.
WARNING: DO NOT OVER TIGHTEN.
15
SKETCH 6A
SKETCH 6B
VIEWED FROM INSIDE
SHOWER ENCLOSURE.

SKETCH 7C
SKETCH 7B
Please note, DO NOT use a power screwdriver.
Use a #2 phillips head screw driver.
WARNING: DO NOT OVER TIGHTEN.
14
3/16”
4
5
1
Door adjustments are made with the Adjusting Screw on
the Glass Clamps, as shown in SKETCH 7A.
Use a Phillips Head Screwdriver to adjust.
Turn clockwise to move door out.
Turn counter-clockwise to bring door in.
For proper operation, there should be a 3/16” gap between the
Door and Magnetic Jamb, as shown in SKETCH 7B.
Additional adjustments are made with the slots in the Magnetic
Jamb, as shown in SKETCH 7C.
Once it’s properly adjusted, tighten ALL Screws.
VIEWED FROM INSIDE
SHOWER ENCLOSURE,
DOOR SHOWN OPEN.
SKETCH 7A
8
Install Handle per Installation Instructions included in Handle packag.
DOOR ADJUSTMENT
7
C
L
O
C
K
W
I
S
E
C
O
U
N
T
E
R
-
C
L
O
C
K
W
I
S
E

Attach the Seal Strip to the bottom of the door, as shown in
SKETCH 9A.
Then attach the Glass Clamp Sweep as shown SKETCH 9B.
VIEWED FROM
INSIDE OF SHOWER
ENCLOSURE.
SKETCH 11A
SILICONE SEALANT
11
Apply Silicone Sealant along seams where Wall Jambs
meet walls and Bottom Track meets shower sill, as shown in
SKETCH 11A.
If Wall Filler is used, apply Silicone Sealant on seam
between Wall Filler and Adjustable Wall Channel.
Install the Top Caps as shown below.
If you have not used the Wall Filler, install parts A
& B, as shown in SKETCH 10A.
If you have used the Wall Filler, install parts A &
C, as shown in SKETCH 10B.
SKETCH 9A
SKETCH 9B
INSIDE
I
NSIDE
OUTSIDE
OUTSIDE
Make Sure that
Sweep is facing
towards the
inside of the
shower, as
shown.
Make Sure that
Sweep is facing
the inside of the
shower.
9
Also, fill gaps with Silicone
Sealant at all adjusting screw
locations on the Adjustable
Wall Channel, as shown.
10
SKETCH 10B
SKETCH 10A
A
B
A
B

10
Wall Anchor
11
#10 x 1 1/4” lg. Flat
Head Screw
13
#10 x 1 1/4” lg. Pan Head Screw
14
#8 x 3/8” lg. Screw
12
17
#10 x 2 1/4” lg. Pan Head Screw
16
#8 x 3/16” lg.
Set Screw
5/64 Allen
Wrench
Use this with Wall Filler
Use this without Wall Filler
ASSEMBLY HARDWARE
2
Bottom Track
3
Pivot Wall Channel
7
Drip Sheild
5
Adjustable
Wall Channel
4
Magnetic Jamb
6
Wall Filler
8
Seal Strip
9
Pivot Bracket
15
Nylon Bushing
18
Glass Clamp Sweep
19
Door and Track Install Block
ILLUSTRATION OF PARTS
19
Adjustable Top Cap - 3 Piece Set
For use with Magnetic Jamb For use with Adjustable Wall Channel For use with Wall Filler
A B C
/