Page is loading ...

1
MAR 2016CP12047
Framed
Pivoting
Shower Door Kit
For easy installation of your unit you will need to:
• READ ALL the instructions completely before beginning.
• READ ALL warnings, care, and maintenance information.
• Purchase the correct water supply components.
Consult your local plumbing codes prior to installation.
Distributed by:
Liberty Hardware Manufacturing Corporation
140 Business Park Drive
Winston-Salem, NC 27107
©2016 LHMC, A Masco Company
Made in China
For More Information Call: 1.800.964.4850
INSTALLATION GUIDE

CAUTION:
Risk of injury.
DO NOT
attempt to cut tempered glass.
CAUTION:
Use work gloves to protect against sharp edges and corners.
CAUTION: DO NOT
set the glass panel on concrete or other hard surface.
CAUTION: Open toe shoes like sandals or flip flops should not be worn when installing tub or shower doors.
NOTE:
• Shower opening dimensions: Due to variability of enclosures and wall construction, exact width dimensions may vary.
– 32" Pivot door: 30-1/8" minimum to 32-1/8" maximum.
– 34" Pivot door: 32-1/8" mimimum to 34-1/8" maximum.
• Walls must be within 3/8" (10 mm) of plumb.
• Cover tub or shower drain with rag or tape to avoid loss of small parts.
• Follow the silicone sealant manufacturer's instructions for application and curing time.
CARE AND CLEANING
For regular cleaning use ONLY mild detergents or warm, soapy water. Use ONLY non-abrasive cloth or sponge. ALWAYS rinse surfaces
after cleaning.
Before cleaning this product with cleaning products, test a small, inconspicuous area.
CAUTION: Manufacturer does not recommend the use of cleaning products that contain any of the following chemicals. Use of
products containing these chemicals can cause the products to crack or discolor and will void the warranty.
• Naphtha
• Hydrogen Peroxide Solution (common household peroxide)
• Toluene
• Ethyl Acetate
• Lye (common in drain cleaner)
• Acetone
For further inquiries, contact customer service at 1-800-964-4850.
THREE YEAR LIMITED WARRANTY
Liberty Hardware plumbing products are warranted to be free of defects in material and workmanship for three years from date of purchase.
Liberty Hardware will, at its election, repair, replace or make appropriate adjustment where Liberty Hardware determines that such defect
occurred during normal usage within three (3) years after purchase. Liberty Hardware is not responsible for removal, installation costs, or
incidental or consequential losses. Labor charges and/or damage incurred in installation, repair, or replacement of the product, as well as
any other kind of loss or damage, are excluded. This warranty is not transferable. This warranty does not cover damage or defects relating
to misuse, abuse, negligence, normal wear and tear, accident, acts of God, repairs or alterations not authorized by Liberty Hardware, or
improper installation, storage or handling.
To obtain warranty service, contact Liberty Hardware either through your Dealer, Plumbing Contractor, Home Center, or by writing Liberty
Hardware Attn.: Customer Solutions, 140
Business Park Drive, Winston-Salem, NC 27107, USA, or by calling 1-800-964-4850 from within
the USA. Proof of purchase (original sales receipt) from the original consumer purchaser must be made available to Liberty Hardware for all
warranty claims.
DISCLAIMER:
IMPLIED WARRANTIES INCLUDING THAT OF MERCHANTABILITY AND FITNESS FOR A PARTICULAR PURPOSE ARE EXPRESSLY LIMITED
IN DURATION TO THE DURATION OF THIS WARRANTY.
LIBERTY HARDWARE AND/OR SELLER DISCLAIM ANY LIABILITY FOR SPECIAL, INCIDENTAL OR CONSEQUENTIAL DAMAGES.
Some states/provinces do not allow limitations on how long an implied warranty lasts, or the exclusion or limitation of special, incidental or
consequential damages, so these limitations and exclusions may not apply to you. This warranty gives you specific legal rights. You may
also have other rights which vary from state/province to state/province.
BEFORE YOU START
2

Illustrated Parts Breakdown
NO. QTY PART DESCRIPTION
#1 1 Adjustable Pivot Jamb
#2 2 Adjustable Pivot Jamb Bracket
#3 1 Slip Jamb Male
#4 1 Slip Jamb Female
with Magnetic Jamb Seal
#5 1 Pivot Strike Rail
#6 2 Door Top/Bottom Rail
#7 1 Door Side Rail
#8 1 Dam Strip
#9 1 Handle Outside
#10 1 Handle Inside (with Holes)
#11
1
Plastic Water Diverter and Gasket
#13 1 Pivot Bushing (Top)
#14 1 Pivot Bushing (Bottom)
#15 2 Pivot Pin
#16 2 Spanner Washer
#17 2 Kep Nut
#18 6 #8 x 1 1/2″ PH SMS Screw
#19 6 Screw Anchor
#20 3 #6 x 3/8ʺ “B”-Point Screw
N
O. QTY DPART ESCRIPTION
#22 2 #6 x 1-1/2” Flat Head Tapping Screw
#23 2 Magnetic Jamb Seal
#24 6 #8 x 1/2ʺ FH SMS Screw
18
13
17
16
15
7
18
18
18
12
25
8
17
6
5
4
3
15
16
14
24
24
24
2
1
19
19
19
2
24
24
24
6
18
18
19
23
20
20
9
20
10
22
22
19
19
23
3
(For shower head nozzle on left)
11

In this instruction booklet we will walk you through the
installation of your new shower door.
DO NOT REMOVE your old shower door until you
check your new shower door kit for all the proper
parts. Make sure that you have all the proper tools
required to assemble your new shower door.
Use this check list.
• Phillips Screwdriver
• Level
• Electric Drill
• 1/8” Drill Bit (for fiberglass stall)
• 3/16” Masonry Drill Bit (for tile stall)
• 7/64” Drill Bit
• 7/16” Open End Wrench
• Pliers
• Pencil
• Hammer
• Tin Snips
• Caulking Gun and one Tube of Clear Silicone
• Tape Measure
• Safety Glasses
CAUTION: Wear safety glasses whenever drilling or
cutting. Handle the Door panel carefully. The corners
of the panel can damage tile and floor covering.
Tempered glass cannot be cut.
STEP 1
Checking Contents of
Shower Door Package
DO NOT use a razor blade to cut open the paper wrapping
as you may scratch the contents. Use the IPB Drawing to
help you locate the following parts:
No. Qty. Description
(#1) 1 Adjustable Pivot Jamb
(#2) 2 Adjustable Pivot Jamb Bracket
(#3) 1 Slip Jamb Male
(#4) 1 Slip Jamb Female with
Magnetic Jamb Seal
(#8) 1 Dam Strip
(#9) 1 Handle Outside
(#10) 1 Handle Inside (with Holes)
(#11) 1 Plastic Water Diverter & Gasket
(#13) 1 Pivot Bushing (Top)
(#14) 1 Pivot Bushing (Bottom)
(#15) 2 Pivot Pin
(#16) 2 Spanner Washer
(#17) 2 Kep Nut
(#18) 6 #8 x 1 1/2” PH SMS Screw
(#19) 6 Screw Anchor
(#20) 3 #6 x 3/8” “B”-Point Screws
(#22) 2 #6 x 1-1/2” Flat Head Tapping Screw
(#24) 6 #8 x 1/2” FH SMS Screw
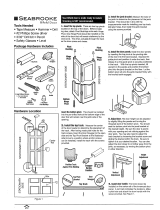
STEP 2 Removing the Existing
Enclosure
A. Remove existing shower door and all existing
parts to that door assembly. Remove all screw
anchors from the wall. Remove silicone sealant
or tub caulking and any other contaminants from
shower.
STEP 3 Installing the
Adjustable Pivot Jamb
NOTE: The wall opposite the shower head and controls
will be the pivot side. Some situations may require
the door to pivot on the same side as the shower
head and controls.
A. Using the Tape Measure, find the center of the
shower dam. Make a mark where the center is
on both ends of the dam. (See
Figure 1).
Dam Centerline
Figure 1
Dam Centerline
4
If you find that any parts are damaged or missing,
refer to the parts list and IPB Drawing and contact
Liberty Hardware's Customer Service Department at
1-800-345-3358. NOTE: Views and directions given
in these instructions – left, right, front, back, etc. –
are from outside the enclosure, facing the shower.

Locate the Adjustable
Pivot Jamb (#1), the
Adjustable Pivot Jamb
Brackets (#2) and six
#8 x 1/2” FH SMS
Screws (#24).
C. Secure the Adjustable
Pivot Jamb Brackets
(#2) to the Adjustable
Pivot Jamb (#1) with the
#8 x 1/2” FH SMS Screws
(#24). Tighten the bottom
three screws complete-
ly. Tighten the top three
screws only half way.
D. Locate the Pivot Bush-
ing (Bottom) (#14) and
press it into the Bottom
Adjustable Pivot Jamb
Bracket (#2) plate hole
(See Figure 2).
E. Align the center of the Pivot Bushing (Bottom)
(#14) with the mark on the shower dam. Use a
Level against the Adjustable Pivot Jamb (#1) to
align it straight up and down (See Figure 3). Using
a Pencil, mark the wall through each of the three
pre-drilled holes in the side of the Adjustable
Pivot Jamb (#1). Remove the Adjustable Pivot
Jamb (#1).
F. Using either a 1/8” Drill Bit (for a fiberglass
enclosure) or a 3/16” Ma
sonry Drill Bit (for
tile/marble), drill holes where you made the marks.
If installing in a tile/marble enclosure, gently
tap a Screw Anchor (#19) into each hole.
DO NOT use the Screw Anchors for a
fiberglass enclosure.
G. Position the Adjustable Pivot Jamb (#1) and use
three #8 x 2
1/2” PH SMS Screws (#18) to secure
the Adjustable Pivot Jamb (#1) to the wall.
STEP 4 Installing the Slip
Jamb Male
A. Locate the Slip Jamb Male (#3) and three
#8 x 1
1/2” PH SMS Screws (#18).
B. Place the Slip Jamb Male (#3) at the centerline
mark on the shower dam opposite the Adjustable
Pivot Jamb (#1) as shown in Figure 3. Use the
Level to align the Slip Jamb Male (#3) straight up
and down. Use the pencil tip in each of the pre-
drilled holes in the Slip Jamb Male (#3) to mark the
wall. Set the Slip Jamb Male (#3) aside.
C. Using either a 1/8” Drill Bit (for a fiberglass
enclosure) or a 3/16” Masonry Drill Bit (for tile/
marble) drill holes where you made the pencil
marks. If installing in a tile/marble enclosure, gently
tap a Screw Anchor (#19) into each hole. DO NOT
use the Screw Anchors (#19) for a fiberglass
enclosure.
D. Position the Slip Jamb Male (#3) and use three
#8 x 1
1/2” PH SMS Screws (#18) to secure the
Slip Jamb Male (#3) to the wall.
STEP 5 Installing the Slip
Jamb Female
A. Locate the Slip Jamb Female (#4) (comes with
Magnetic Jamb Seal (#23) pre-installed) and three
#6 x 3/8” “B”-Point Screws (#20).
B. Place the Slip Jamb
Female (#4) over the
Slip Jamb Male (#3)
with the Magnetic Jamb
Seal (#23) facing OUT,
towards you as
you look
into the shower. Use the
Level to adjust the Slip
Jamb Female (#4) ver-
tically. DO NOT secure
at this time.
Female (#4) over the
Slip Jamb Male (#3)
with the Magnetic Jamb
Seal (#23) facing OUT,
towards you as you look
into the shower. Use the
Level to adjust the Slip
Jamb Female (#4) ver-
tically. DO NOT secure
at this time.
Figure 4
Figure 3
Level the Slip
Jamb Male
Level the Adjustable Pivot Jamb
B.
Figure 2
Adjustable
Pivot Jamb
Bracket
Adjustable
Pivot Jamb Bracket
Pivot
Bushing
(Bottom)
5

STEP 6 Installing the Pivot Pin
Assemblies
A. Locate the Pivot
Pins (#15), Span-
ner Washers (#16),
Kep Nuts (#17)
and Pivot Bushing
(Top) (#13).
B. Loosely assemble
the two Pivot
Assemblies: Pivot
Pin (#15), Spanner
Washer (#16) and
Kep Nut (#17).
Place the square
head of a Pivot Pin
(#15) into each
pivot slot of the
Door Top and
Bottom Rails (#6)
on the door panel.
Slide the Pivot Pin (#15) toward the narrow end
of the pivot slot in the Door Top and Bottom Rails
(#6) and hand tighten.
STEP 7 Installing the Door
NOTE: Installing the door may be slightly easier with
another person to assist you.
A. Carefully lift the door and set the bottom Pivot
Pin (#15) into the Pivot Bushing (Bottom) (#14).
Holding the door panel in place, set the Pivot
Bushing (Top) (#13) over the top Pivot Pin (#15)
(See Figure 5).
B. Lift the top Adjustable
Pivot Jamb Bracket
(#2) and align the top
Pivot Pin (#15) and
Pivot Bushing (Top)
(#13) with the hole in
the top Adjustable
Pivot Jamb Bracket
(#2). Lower the Adjust-
able Pivot Jamb Brack-
et (#2)
onto the Pivot
Pin (#15) and Pivot
Bushing (Top) (#13)
and tighten the three
top screws.
C. Close the door and
adjust it so that there
is a 1/8” gap along the entire length of the door
on the strike side. Use the 7/16” wrench to
tighten the Kep Nuts (#17) at the top and bottom
of the door, maintaining the 1/8” gap.
D. Standing inside the shower, use the 7/64” Drill
Bit to drill holes through the Slip Jamb Female
pre-drilled holes and into the Slip Jamb Male.
Secure the Slip Jamb Female (#4) to the Slip
Jamb Male (#3) with three #6 x 3/8”
“B”-Point Screws (#20) (See Figure 4 on page five).
Note: Once installed, if you find that the door will
not stay closed, the magnet needs to be turned
around. Remove the Magnetic Jamb Seal (#23)
and reinsert it the other way.
not stay closed, the magnet needs to be turned
around. Remove the Magnetic
Jamb Seal (#23)
and reinsert it the other way.
STEP 8
Installing the Plastic Water
Diverter and Gasket
A.
B.
Carefully slide the water diverter and gasket onto the
bottom of the door panel. See Fig. 6
Figure 5
Pivot Jamb
Bracket
Top
Pivot
Bushing
Door
Panel
Pivot Jamb
Bracket
Figure 4
13
17
16
15
15
Inside Shower
Water Diverter
and Gasket
Figure 6
16
17
6
Locate the plastic water diverter and gasket (#11).
Measure the bottom of the Door Panel. Reduce
this measurement by 1- 1/4" and carefully cut with
tin snips or large scissors. This will allow the door
to close against the Slip Jamb and the magnetic
seal (#4).

7
C. Make sure that the top surface of the shower
dam is completely clean of oil, dust, debris or
other contaminants. Apply a small 1/4" to 3/8"
bead of 100% silicone to the underside of the
Dam Strip (#8). Wipe away excess silicone
immediately. Follow sealant manufacturer for
proper use and clean-up recommendations.
STEP 11 Silicone Sealing the
Enclosure
A.
NOTE:
STEP 9 Installing the Handles
A. Locate the Handle Outside (#9), Handle Inside
(with Holes) (#10).
B. Use the #6 x 1-1/2
" Flat Head Tapping Screws
to attach the Handles to the Pivot Strike Rail
(#5). Screw heads should be inside the shower.
STEP 10 Installing the Dam Strip
A. Locate the Dam Strip (#8). Notice that one end
has been pre-cut to fit the shape of the Adjustable
Pivot Jamb Bracket (#2).
B. From the outside of the shower enclosure insert
the Dam Strip (#8) to meet the Adjustable Pivot
Jamb Bracket (#2). Cut the other end of the Dam
Strip (#8) straight to fit up against the Slip Jamb
Female (#4) (See Figure 7).
Figure 7
Outside Shower
Dam Strip
Straight cut
Notched end abuts
Jamb Bracket
Using clear Silicone, seal all edges, both interior
and exterior where the Adjustable Pivot Jamb (#1),
Adjustable Pivot Brackets (#2), Slip Jamb Female
(#4) and Dam Strip (#8) meet and where they meet
the tile or fiberglass.
Silicone sealant must cure for 24 hours before you
use your new enclosure. Silicones may vary. Please
follow manufacturer's instructions for safety, cleaning
and disposal recommendations.

8
/