Page is loading ...

GB
We move people.
OPERATING MANUAL
ACTIVE WHEELCHAIR,
FX ONE Model 1.150

2
Contents
Introduction .................................................................................................. 5
Acceptance .................................................................................................... 6
Adjustment ................................................................................................... 6
Handling the wheelchair ............................................................................. 6
Specifi cations ........................................................................................................6
Use .........................................................................................................................7
Auxiliary drives .....................................................................................................7
Overview ....................................................................................................... 8
Driving ........................................................................................................... 9
Safety information ...............................................................................................9
Supplementary user/safety information .............................................................9
Brake ............................................................................................................ 11
Pressure Brake ....................................................................................................12
Locking the pressure brakes .........................................................................12
Releasing the pressure brakes ......................................................................12
Butterfl y-Brake ...................................................................................................13
Locking the Butterfly-brake .........................................................................13
Releasing the Butterfly-brake ......................................................................13
Foot plate .................................................................................................... 14
Adjusting the angle of the footplates ........................................................15
Adjusting the depth of the footplates ........................................................15
Arm supports .............................................................................................. 16
Swivelling up the arm support .....................................................................16
Inserting the arm support ............................................................................16
Swivelling the arm support inward .............................................................17
Inserting the arm support ............................................................................17
Adjusting the arm support to the wheel circumference ...........................18

3
Seat .............................................................................................................. 19
Seat belt .........................................................................................................19
Adjusting the seat depth ..............................................................................19
Adjustment of seat inclination ....................................................................19
Adjusting the seat height .............................................................................20
Back support ............................................................................................... 21
Folding over the back support .....................................................................21
Folding up the back support ........................................................................21
Fitting the back belt .....................................................................................22
Adjusting the back support angle ...............................................................23
Wheels ......................................................................................................... 24
Drive wheels .......................................................................................................24
Quick release axle .........................................................................................24
Handrims ........................................................................................................25
Spoke guard ..................................................................................................26
Steering wheels ..................................................................................................26
Steering wheel position ................................................................................26
Centre of gravity ................................................................................................27
Wheel camber .....................................................................................................28
Adjusting the wheel camber ........................................................................28
Toe-in ................................................................................................................... 29
Set toe-in with attached drive wheels ........................................................29
Fine adjustment ............................................................................................29
Seat belt ...................................................................................................... 30
Fastening the seatbelt with buckle .............................................................30
Adjustment of belt length ...........................................................................30
Support castor ............................................................................................ 31
Swinging the support castors .......................................................................31

4
Loading and transportation ...................................................................... 32
Safety information ........................................................................................32
Transport in vehicles .....................................................................................32
Transport security ..........................................................................................32
Safety information ........................................................................................33
Transport in handicapped transport automobile ............................................34
Product liability instructions .........................................................................35
Safety information ........................................................................................35
Service ......................................................................................................... 36
Cleaning and maintenance ...............................................................................36
Upholstery and covers ..................................................................................36
Plastic parts ....................................................................................................36
Finish ..............................................................................................................36
Chassis ............................................................................................................37
Disinfection .........................................................................................................37
Reinstallment ......................................................................................................37
Flat tyre ...............................................................................................................38
Changing the tyres ........................................................................................38
Adjusting the brakes ..........................................................................................39
Fine adjustment of the pressure brakes ......................................................39
Maintenance ....................................................................................................... 40
Inspection ............................................................................................................ 40
Maintenance instructions ..................................................................................41
List of annual maintenance work .....................................................................44
Repair ..................................................................................................................45
Customer Service ................................................................................................45
Spare parts ..........................................................................................................45
Disposal ..........................................................................................................45
Technical data ............................................................................................. 46
Tools .....................................................................................................................49
Tightening torque for screwed connections ....................................................49
Meaning of the labels on the wheelchair ........................................................50
Notes ............................................................................................................ 51
Guarantee ................................................................................................... 54

5
INTRODUCTION
We thank you for the confi dence you
have placed in our company by choos-
ing a wheelchair from this series.
The model 1.150, fulfi ls the wish for
mobility and more independence by
way of a new styling of the proven
MEYRA technology.
With all equipment and their accesso-
ries the wheelchair offers die respec-
tive adaptation to your disability.
Like any other vehicle, a wheelchair is
a technical aid. It requires explanation,
a little care and holds dangers when
used improperly. The correct handling
must therefore be learned.
This operating manual is intended for
use in conjunction with the booklet
safety instructions for < mechanical
wheelchairs > to help you to familiar-
ise yourself with the operation of the
wheelchair and to prevent accidents.
☞ Note:
This operating manual is valid for
model 1.150 with all equipment
versions and accessories. It will
therefore contain sections that do
not apply to your model.
!
Attention:
Read and observe the following
documentation belonging to the
children's wheelchair before fi rst
operation:
– this operating manual,
– the safety information < Mechani-
cal wheelchairs >.
☞ Note:
Before fi rst operation children,
together with their parents or a
supervisor or attendant, also have
to read and observe this operating
manual as do:
– the safety information < Mechani-
cal wheelchairs >.

6
ACCEPTANCE
All products are checked for faults
in the factory and packed in special
boxes.
☞ Note:
However, we request that you
check the vehicle for possible
transport damage immediately on
receipt – preferably in the presence
of the carrier.
☞ Note:
The packaging of the wheelchair
should be stored for a further
transport that might become nec-
essary.
ADJUSTMENT
Our specialist workshop supplies your
wheelchair ready for use and adjusted
to suit your special requirements.
☞ Note:
The tools required for adjustments
and maintenance is listed under
chapter < Technical Data >.
HANDLING THE WHEEL-
CHAIR
Specifi cations
The FX-one wheelchair, model 1.150
was developed for adults and adoles-
cents. Three frames are available:
– short,
– medium,
– long.
The wheelchair solely serves to trans-
port one person in the seat and not as
a hauling aid, transporters or similar.

7
Use
Through its constructive advantages
the wheelchair can universally be
implemented on hard surfaces and
therefore an allround-wheelchair:
– for indoors (e.g. apartment, day
care),
– outdoors (e.g. in parks),
– as a companion on tours (e.g. in a
bus or train).
The wheelchair offers manifold adapt-
abilities to individual vital statistics.
The wheelchair should be adapted
to your needs by a specialist dealer
before the fi rst use. The adaptation
will take into account the driving ex-
perience, the physical limits of the
user and the main place of use of the
wheelchair.
!
Attention:
Always have adaptation and ad-
justment work carried out by a
specialist dealer.
Auxiliary drives
Before attaching auxiliary drives the
following notes have to be consid-
ered:
!
Attention:
Attachment of auxiliary drives may
only be done on wheelchair mod-
els cleared for these.
– The list of wheelchair models cleared
for auxiliary drives can be acquired
at any authorised dealer.

1
2
3
4
5
6
7
1
2
3
4
8
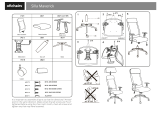
OVERVIEW
The overview shows the most important components of the wheelchair.
➀ Stabiliser brace – back support
➁ Arm support
➂ Handrims
➃ Drive wheel
➀ Backrest
➁ Arm support
➂ Seat belt/seat cushion
➃ Butterfl y-brake
➄ Footplate
➅ Steering wheel
➆ Push handle

9
DRIVING
Alignment of the driving behaviour
and the personal abilities is to be car-
ried out together with your specialist
dealer or therapist and is achieved af-
ter a short acquaintance period, test
drive.
!
Attention:
Drive with extreme caution during
these fi rst trips!
• Observe the section < driving train-
ing > in the safety instructions <
Mechanical wheelchairs >!
Safety information
!
Attention:
Please follow all instructions in the
safety information < Mechanical
wheelchairs >.
• A directly opposed change of direc-
tion from backward motion with-
out steering into a forward motion
with simultaneously inward swivel-
ling steering wheels has the effect
of a full stop.
• Applying a safety belt prevents
falling out toward the front.
Supplementary user/safety
information
• Clean, passive lighting is required
for driving in public traffi c.
• Do not throw or drop parts belong-
ing to the wheelchair! – Detach-
able parts like e.g. side elements
and drive wheels have to be used
properly To guarantee their func-
tion.
• Removable parts, e.g. side ele-
ments and drive wheels must be
checked for correct locking before
starting to drive. Drive wheels with
defective linchpin (quick-fi t) axles
can detach from the wheelchair
during the drive.
• By adding on or removing acces-
sories/components the dimensions
and weight of the wheelchair
change which can affect the driv-
ing behaviour.

10
• Never leave children/adolescents in
wheelchairs unsupervised.
• Always approach small obstacles,
e.g. steps or curbs, slowly and at a
right angle (90°) until the steering
wheels almost touch the obstacle.
Briefl y stop the wheelchair and
then drive over the obstacle.
• Keep well clear of rail grooves, rails
and gully covers or similar sources
of danger. If not possible, cross such
obstacles at a right-angle (90°).
• Maintain a suffi cient safety dis-
tance between the wheelchair and
drops, steps and obstacles. This
distance must allow enough time
to react and enough distance to
brake/turn.
• Always reduce the speed before a
curve. A sharper curve requires a
lower speed. Never lean outwards
in a curve.
• Tyres are made of a rubber mix-
ture and can leave permanent or
diffi cult-to-remove marks on some
surfaces (e.g. plastic, wooden or
parquet fl ooring, carpets, mats).
• To prevent damages due to cor-
rosion do not use ore store the
wheelchair in damp rooms.
Recommendation for driving in
twilight or darkness
• Avoid as far as possible driving on
roads or bicycle paths during dark-
ness. Wear light-coloured clothing
that can be seen at a distance.

1
2
11
BRAKE
By locking the brakes the wheelchair
is to secured against unintentional
rolling off (parking brake).
The locking brake belongs to the most
important safety features of a wheel-
chair and is available as a pressure
brake (1) or butterfl y/brake (2).
!
Attention:
Please observe the maintenance
instructions as well as instructions
in the section < General safety in-
structions > and < Brakes > in the
safety instructions < Mechanical
wheelchairs >.
• The wheelchair loaded with the
user may not let itself be pushed in
with the brakes engaged.
• In order to prevent an unintention-
al curve while braking the wheel-
chair on slopes, both brakes are to
be activated simultaneously.
– Depending on the inclination of
the road a sideward tilting has to
be reckoned with.
• Do not support the body on the
lateral brake levers.
• The brake performance reduces
with
– tyre profi le is worn
– tyre pressure is too low
– tyres are wet.
!
Attention:
Arrange an immediate repair of
the brakes by your specialist work-
shop if the braking performance
reduces.
• Do not park wheelchairs with PU
tyres with activated pressure or
butterfl y-brakes. – Deformations in
the running surface may remain.
• If possible propel the wheelchair
over the handrims. – Perhaps dan-
ger of jamming in the area of the
brake!

2
1
12
Pressure Brake
A metered braking from driving
speed (operating brake) is possible
with the brake levers (1) of the pres-
sure brakes.
Service brake
Press the two brake levers evenly only
slightly to the front, this brakes the
wheelchair in a metered fashion.
Locking the pressure brakes
To secure the wheelchair against any
unintentional rolling, press both brake
levers forward all the way (1).
☞ Note:
It should not be possible to push
the wheelchair forward when both
brakes are locked.
Releasing the pressure brakes
Pull both brake levers back all the way
(2).

1
2
13
Butterfl y-Brake
Locking the Butterfl y-brake
To secure the wheelchair against any
unintentional rolling, press both brake
levers forward all the way (1).
☞ Note:
It should not be possible to push
the wheelchair forward when both
brakes are locked.
Releasing the Butterfl y-brake
Pull both brake levers back all the way
(2).

2
1
14
FOOT PLATE
A footplate is available (fi g. 1) that
can be adjusted in height, angle and
depth to the individual requirements.
Adjusting the height of the footplate
– Screw out the attachment screws
(2) on both sides.
– Position the footplate (1) accord-
ingly in the desired height.
– Reinsert and tighten the attach-
ment screws (2).

3
3
15
Adjusting the angle of the foot-
plates
The footplate can be steplessly adjust-
ed in angle.
– Loosen the screws (3).
– Press the footplate in to the de-
sired angle. – In doing so observe
the ground clearance.
– Retighten the screws (3).
Adjusting the depth of the foot-
plates
The footplate can be repositioned in
depth for further positions or turned
by 180°.
– Dismantle the screwed connections
(3).
– Reposition the footplate in depth
into the corresponding hole of the
footplate bracket.
– Reassemble the screwed connec-
tions (3).
– If necessary adjust the angle of the
footplate (1).

1
2
3
16
ARM SUPPORTS
The arm supports (1) serve at the same
time as arm support, clothes guard
and wind guard.
!
Attention:
No not grab between the frame
and arm support. – Danger of
squashing!
• Do not lift the wheelchair using
the side elements.
• The wheelchair should only be used
with the arm supports assembled!
Swivelling up the arm support
– Pull the arm support with a lit-
tle forward pressure out of the
bracket (clamping mechanism) and
swivel it upwards (2).
!
Attention:
Removed side elements must
be carefully replaced before the
wheelchair is used again!
Inserting the arm support
– Clamp the arm support with a little
pressure as far as possible into the
arm support bracket (3).
☞ Note:
Check the correct clamping of the
arm supports.

4
5
3
17
Swivelling the arm support in-
ward
The arm supports must be swivelled in
front of the back support (4) in order
to be folded forward (5).
– Pull the arm support with a little
pressure forward out of the brack-
et (clamping mechanism) and swiv-
el it inward in front of the back
support (4).
Inserting the arm support
– Swivel the arm support outward
and clamp with a little pressure as
far as possible into the arm support
bracket (3).
☞ Note:
Check the correct clamping of the
arm supports.

4
X
6
3
7
18
Adjusting the arm support to the
wheel circumference
The distance X to the arm support
running parallel to the wheel diame-
ter (X) is to be aligned to the selected
wheel position.
!
Attention:
The distance X between the driving
wheel and the arm support should
be as small as possible (approx. 1
cm). – Danger of crushing!
– Remove drive wheel (see Drive
wheels section).
– Dismantle the screwed connections
(6).
– Position the arm support bracket
(3) to the equalising wheel circum-
ference.
– Assemble screw connections (6).
The arm support can be adjusted in
height at the back support.
☞ Note:
If the simple adjustment is not suf-
fi cient (e.g. with 25“-wheels) the
arm support can be repositioned in
height.
– For this disassemble the rear screws
(7). Reposition the arm support in
height and reassemble the screws
(7).
☞ Note:
After alignment to the wheel cir-
cumference check the functions of
the arm support.

1
2
3
4
19
SEAT
Seat belt
The seatbelt (1) is screwed onto the
seat tubes.
Adjusting the seat depth
!
Attention:
If an adjustment of the seat depth
is necessary contact your specialist
dealer.
Adjustment of seat inclination
The seat can be adjusted in angle.
– Loosen the clamping screw (2) as
well as the screw (3) on each side.
– Disassemble the screwed connec-
tion (4) on each side.
– Position the vertical support tube
parallel on each side according to
the desired angle.
– Reassemble the screwed connec-
tion (4) on each side.
– Retighten the screws (3) as well
as the clamping screw (2) on each
side.
☞ Note:
It might be required to adjust the
angle of the back support after
such an adjustment, view chapter
< Adjusting the angle of the back
support >.

5
4
20
Adjusting the seat height
The seat height can be adjusted to the
individual requirements.
Front adjustment:
– Dismantle the attachment screws
(5) on each side.
– Position the steering wheels par-
allel according to the desired
height.
– Reassemble the attachment screws
(5) on each side.
Rear adjustment:
– Disassemble the screwed connec-
tion (4) on each side.
– Position the vertical support tube
parallel on each side according to
the desired height and seat angle.
– Reassemble the screwed connec-
tion (4) on each side.
/