Page is loading ...

The Motivation.
OPERATING MANUAL
POLARO II
Model 1.745
MULTIFUNCTION-WHEELCHAIR
GB

2
Contents
Foreword ....................................................................................................... 6
Acceptance .................................................................................................... 7
Overview ....................................................................................................... 8
Model: 1.745 .........................................................................................................8
Handling the wheelchair ............................................................................. 9
Use .........................................................................................................................9
Driving ................................................................................................................... 9
Safety information ...............................................................................................9
Supplementary user/safety information ...........................................................10
Folding/Transport ...............................................................................................11
Folding/Unfolding ..............................................................................................11
Folding the wheelchair .................................................................................11
Carrying the wheelchair ...............................................................................12
Unfolding the wheelchair ............................................................................12
Loading and transportation ..............................................................................13
Safety information ........................................................................................13
Transport in vehicles .....................................................................................13
Transport security ..........................................................................................13
Transport in handicapped transport automobile ............................................14
Brakes .......................................................................................................... 16
Safety information ........................................................................................17
Brake lever for user .......................................................................................18
Drum brake for attendant ...........................................................................19
Locking the drum brakes ..............................................................................19
Leg supports .......................................................................................................21
Calf strap ........................................................................................................21
Folding up the footplates ............................................................................22
Turning the leg supports to the side ..........................................................22
Remove the leg supports ..............................................................................23
Attaching the leg supports ..........................................................................23
Height adjustment of the footplates ..........................................................24
Angle adjustable footplates .........................................................................24

3
Height-adjustable leg support ..........................................................................25
Folding up the footplates ............................................................................25
Swivelling off and removal of the leg supports .........................................25
Attaching the leg supports ..........................................................................26
Height adjustment of the leg support ........................................................26
Height adjustment of the footplates ..........................................................27
Depth adjustment of the calf cushion .........................................................27
Height adjustment of the calf cushion ........................................................27
Arm supports .............................................................................................. 28
Swivelling up the arm support .....................................................................28
Remove the arm support ..............................................................................29
Inserting the arm support ............................................................................30
Height adjustable arm support Code 107 ...................................................31
Back support ............................................................................................... 32
Angle adjustment via gas spring .................................................................32
Back cushion .......................................................................................................33
Remove the back cushion .............................................................................33
Mount the back cushion ...............................................................................34
Back support belt ...............................................................................................35
Adjustable back .............................................................................................35
High back support .........................................................................................36
Seat cushion ................................................................................................ 36
Seat width ................................................................................................... 37
Push bar ....................................................................................................... 38
Push handles ............................................................................................... 39
Height adjustment ........................................................................................39
Removing the push handles .........................................................................40
Inserting the push handles ...........................................................................40
Headrest ...................................................................................................... 41
Adjustment of the headrest .........................................................................41

4
Wheels ......................................................................................................... 42
Drive wheels .......................................................................................................42
Quick release axle .........................................................................................42
Handrims ........................................................................................................43
Steering wheels ..................................................................................................43
Tyres .....................................................................................................................43
Support wheels .......................................................................................... 44
Adjusting the support castor .......................................................................44
Correct support castors length .....................................................................44
Individual adjustment ............................................................................... 45
Seat height /Seat angle ......................................................................................45
Driving wheel position .................................................................................46
Steering wheel position ................................................................................46
Seat belt ...................................................................................................... 47
Fastening the seatbelt with buckle .............................................................47
Adjustment of belt length ...........................................................................47
Service ......................................................................................................... 48
Cleaning and maintenance ...............................................................................48
Upholstery and covers ..................................................................................48
Plastic parts ....................................................................................................48
Finish ..............................................................................................................48
Chassis ............................................................................................................49
Disinfection .........................................................................................................49
Reinstallment ......................................................................................................49
Flat tyre ...............................................................................................................50
Changing the tyres ........................................................................................50
Adjusting the brakes ..........................................................................................51
Fine adjustment of the pressure brakes ......................................................51
Adjusting the drum brakes ..........................................................................52
Maintenance ....................................................................................................... 53
Inspection ............................................................................................................ 53
Maintenance instructions ..................................................................................54
List of annual maintenance work .....................................................................57

5
Repair ..................................................................................................................58
Customer Service ................................................................................................58
Spare parts ..........................................................................................................58
Disposal ..........................................................................................................58
Technical data ............................................................................................. 59
Tools .....................................................................................................................62
Tightening torque for screwed connections ....................................................62
Meaning of the labels on the wheelchair ........................................................63
Notes ............................................................................................................ 64
Guarantee ................................................................................................... 66

6
FOREWORD
We thank you for the confi dence you
have placed in our company by choos-
ing an electric wheelchair from the se-
ries POLARO.
A wheelchair is a technical aid. It re-
quires explanation, a little care and
holds dangers when used improperly.
The correct handling must therefore
be learned.
These operating manual are intended
for use in conjunction with the safety
instructions < Mechanical wheelchairs
> to help you to familiarise yourself
with the handling of the wheelchair
and to prevent accidents.
☞ Note:
☞ Please note that the illustrated
equipment variants can deviate
from your model.
☞ The tools required for adjustments
and maintenance is listed under
chapter < Technical Data >.
!
Attention:
Read and observe this manual be-
fore fi rst operation:
– this operating manual,
– the safety information < Mechani-
cal wheelchairs >.
☞ Note:
Children should read this operat-
ing manual as well as the safety in-
structions for < Mechanical wheel-
chairs > before fi rst operation
together with their parents, resp.
a supervisor or attendant.

7
ACCEPTANCE
All products are checked for faults
in the factory and packed in special
boxes.
☞ Note:
Nevertheless, immediately after re-
ceiving it – best while the delivery
agent is still available –, we ask you
to check your wheelchair for dam-
ages that might have occurred dur-
ing the transport.
Please arrange the following if you
believe damage occurred during
transport:
a) Draw up a Damage report – the
carrier is required to do this.
b) Draw up a Letter of subrogation –
you assign to the supplier all claims
resulting from this damage.
c) Send back the Bill of lading, the
Damage report and the Letter of
subrogation to us.
We are unable to accept any claims
for compensation if you fail to ob-
serve these instructions or notify us
of damage after the goods have been
accepted.
☞ Note:
The packaging of the wheelchair
should be stored for a further
transport that might become nec-
essary.

8
7
6
4
321
6
5
4
3
2
1
9
10
5
8
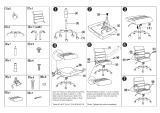
OVERVIEW
Model: 1.745
The overview shows the most important components and operating equip-
ment.
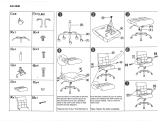
Pos. Description
1 Lever for back support angle ad-
justment
2 Lever for height adjustment of
the leg support
3 Steering wheel
4 Quick release axle
5 Foot pedal tube/Tilting aid as
well as insert tube for support
castor
6 Wheel adapter
Pos. Description
1 Push bar
2 Headrest
3 Back cushion
4 Arm support
5 Seat cushion
6 Leg support
7 Footplate
8 Drive wheel
9 Handrims
10 Toggle joint brake/Pressure
Brake

9
Driving
The fi ne-tuning to optimise the driv-
ing behaviour of the wheelchair with
the personal situation is to be done by
your specialist dealer or therapist.
The adaptability offers suffi cient driv-
ing comfort as well as a high operat-
ing safety.
Safety information
▲
Please follow all instructions in the
safety information < Mechanical
wheelchairs >.
▲ A directly opposed change of direc-
tion from backward motion with-
out steering into a forward motion
with simultaneously inward swivel-
ling steering wheels has the effect
of a full stop.
▲ Fastening the seat belt prevents
the user from falling out toward
the front.
HANDLING THE WHEEL-
CHAIR
Use
The wheelchairs of the Polaro model
series is a placing and positioning
wheelchair, designed especially for
the private environment and for sen-
ior care.
With all equipment and their accesso-
ries the wheelchair offers die respec-
tive adaptation to your disability.
The wheelchair is delivered complete-
ly assembled.
The wheelchair should be adapted
to your needs by a specialist dealer
before the fi rst use. The adaptation
will take into account the driving ex-
perience, the physical limits of the
user and the main place of use of the
wheelchair.
!
Attention:
Always have adaptation and ad-
justment work carried out by a
specialist dealer.

10
Supplementary user/safety
information
▲
Clean, passive lighting is required
for driving in public traffi c.
▲ Do not throw or drop parts belong-
ing to the wheelchair! – Removable
parts such as arm supports and leg
supports should be handled cor-
rectly to ensure lasting perform-
ance. To guarantee their function.
▲ Removable parts, e.g. arm supports
and leg supports, must be checked
for correct locking before the start
of each drive. Drive wheels with
defective linchpin (quick-fi t) axles
can detach from the wheelchair
during the drive.
▲ By adding on or removing acces-
sories/components the dimensions
and weight of the wheelchair
change which can affect the driv-
ing behaviour.
▲ Tyres are made of a rubber mix-
ture and can leave permanent or
diffi cult-to-remove marks on some
surfaces (e.g. plastic, wooden or
parquet fl ooring, carpets, mats).
▲ To prevent damages due to cor-
rosion do not use ore store the
wheelchair in damp rooms.
▲ Never leave children/adolescents in
wheelchairs unsupervised
▲ Always approach small obstacles,
e.g. steps or curbs, slowly and at a
right angle (90°) until the steering
wheels almost touch the obstacle.
Briefl y stop the wheelchair and
then drive over the obstacle.
▲ Keep well clear of rail grooves, rails
and gully covers or similar sources
of danger. If not possible, cross such
obstacles at a right-angle (90°).
▲ Maintain a suffi cient safety dis-
tance between the wheelchair and
drops, steps and obstacles. This
distance must allow enough time
to react and enough distance to
brake/turn.
▲ Always reduce the speed before a
curve. A sharper curve requires a
lower speed. Never lean outwards
in a curve.

1
11
Folding/Transport
Folding/Unfolding
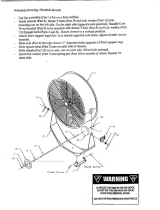
Folding the wheelchair
Your wheelchair can be folded in a
few moments without tools being re-
quired (1)
1. If necessary remove the leg sup-
ports or fold up both footplates.
– If necessary remove the calf strap.
☞ Therefore observe chapter < Leg
supports >.
2. Take off seat cushion.
☞ Therefore observe chapter < Seat
cushion >.
3. Remove the arm supports if neces-
sary.
☞ Therefore observe chapter < Arm
support >.
4. Swivel the push bar down (if avail-
able).
☞ Therefore observe chapter < Push
bar >.
5. Take off back cushion.
☞ Therefore observe chapter < Back
support >.
– Remove the adjustable back strap
if necessary.
☞ Therefore observe chapter < Back
support >.
6. Bent the back strap toward the
back (if existent).
7. Pull the seat straps in the front and
back upward at the middle (1).

1
2
12
Carrying the wheelchair
Your wheelchair can be carried with-
out diffi culty when folded.
Fold the wheelchair, therefore view
chapter < Folding the wheelchair >.
From the front push one lower arm
under the upward folded seat belt.
Place other hand underneath the rear
seat fold for support.
Lift the wheelchair to horizontal posi-
tion.
Unfolding the wheelchair
Tip the wheelchair slightly to one side
in order to make the unfolding easier.
At the side resting on the fl oor, press
the seat tube down to the end stop
(1).
☞ Note:
☞ You may need to press down both
seat tubes with the hands in order
to do this.
☞ Observe that the seat tube sits se-
curely on the support surface (2).

13
Loading and transportation
Safety information
▲ For the transport in vehicles, you
must leave the wheelchair and sit
in a suitable seat in the vehicle. The
transportation of persons in wheel-
chairs is prohibited. – The wheel-
chair is not designed to withstand
the forces which are generated in
accidents, which exposes the user
to considerable risks.
Transport in vehicles
The following items may be necessary
due to lack of space for the transport
in vehicles.
▲ Remove the leg supports.
▲ Removing the head support.
▲ Detach drive wheels.
The parts detached for the transport
must be carefully stowed and care-
fully attached again before the next
journey!
☞ Note:
☞ During reassembly, ensure that
each part is correctly installed and
securely fastened. Check that com-
ponents are correctly positioned.
☞ Check the correct seating of the
components.
Transport security
Carry out the following steps when
the wheelchair is located in the trans-
port vehicle:
– Operate parking brakes.
– Any parts that have been disman-
tled from the wheelchair should be
stored safely in a protected place.
– Remove bags, walking sticks and
other items not belonging to the
wheelchair and stow these safely.
– Secure the wheelchair by way of
elastic straps.
Only fasten the elastic belts to parts of
the car envisaged for this purpose and
to the frame tubes of the wheelchair!
▲ Do not use the side elements, foot-
plates or push bar to rig the wheel-
chair. Only use permitted fastening
material.
☞ Suitable fi xing points can usually
be found in the car and in the ve-
hicle operating manual.
☞ Before transporting the wheelchair,
ask your car dealer how to secure it
without risk to the existing fi xtures
or other safety fi ttings!

14
Transport in handicapped
transport automobile
Should transport in an electric vehicle
be inevitable, it must feature a retain-
ing system according to DIN 75078
part 2. Should you require a retain-
ing system please contact a specialist
dealer.
The transport vehicle (handicapped
transport vehicle) needs to have the
equipment for transporting wheel-
chairs according to DIN 75078 Part 1.
This norm describes a „power-knot-
system“. With this system the unit
wheelchair and user is secured in a
handicapped transport vehicle. The
system is divided into two compo-
nents:
– Personal retaining system (PRS)
– Wheelchair retaining system
(WRS)
The retaining system should fulfi l the
following technical requirements:
– Strap course of the PRS in the area
of the pelvis and shoulder with as
little as possible risk of injuries of
inner organs.
– Simple, clear and quick operation
through the driving service and
good accessibility within the trans-
port vehicle.
The power-knot-system is a fi rm, ret-
rofi ttable element on the wheelchair,
on which the PRS and WRS merge.
These requirements are fulfi lled by a
4-point-system that consists of 2 front
standardised latches for spanning re-
actor and 2 rear standardised latches
for spanning retractor and lap seat
belt.
The lap seat belt must be length ad-
justable and fi t with a latch to con-
nect with the receptacle of the vehicle
shoulder strap.
The standardised latches are on the
one side connected to the wheelchair
and on the other hand with the span-
ning loops or hole grid of permitted
strap reactors that are countersunk
into the fl oor of the vehicle according
to DIN 75078 part 1.
The restraint system only offers suf-
fi cient safety in regular traffi c situa-
tions (sharp braking manoeuvres and
similar) but not during collisions out-
side of the normative testing values.
Especially not during a boot crash.
☞ Note:
The headrest on the wheelchair
serves as a support for the posture
of the head, not as a transport se-
curity. Therefore a handicapped
transport vehicle-fi rm headrest is
necessary!
!
Attention:
Angle adjustable back supports are
to be set vertically.
• Tipped seats are to be set horizon-
tal.
• Height adjustable seats are to be
put into the basic position

15
Product liability instructions
☞ Transport in the wheelchair with a
handicapped transport automobile
(BTW) is done at own risk!
☞ We do not accept liability for dam-
ages or other possessions that oc-
curred through the transport in a
handicapped transport automo-
bile.
Safety information
☞ When transporting a person, make
sure that there are no objects
jammed underneath the straps!
– Thus you avoid painful pressure
points
☞ As far as possible use a vehicle-in-
stalled seat during transportation.
☞ Only transport the wheelchair in
driving direction.
☞ The driver, resp. the attendant is
responsible for the professional
securing of the wheelchair in the
BTW.
☞ For professional transport in a BTW
the wheelchair and person have to
be placed on the therefore deter-
mined space and secured with the
corresponding securing system.
☞ Loose object are to be stored se-
curely.
Special safety instructions for
shell seats
!
Attention:
The power knot on children's seats
and generally for shell provisions
(incl. RECARO-system) serves solely
for securing the wheelchair inside
the handicapped transport vehi-
cle!
• Only use seats that have been
cleared by the manufacturer for
the transport in a handicapped ve-
hicle.
☞ It must be guaranteed that hip- and
shoulder strap lie tight around the
user. Otherwise the person might
slide out underneath the belt in
case of an emergency.
☞ Securing of the person must be
achieved with a strap that is inte-
grated into the seat or shell.

3
1
2
16
BRAKES
The parking brakes are part of the
most important safety elements of a
wheelchair. This function is provided
by toggle joint brake/pressure brakes
or air pressure independent drum
brakes.
!
Attention:
Please observe the maintenance
instructions as well as instructions
in the section < General safety in-
structions > and < Brakes > in the
safety instructions < Mechanical
wheelchairs >.
The wheelchair is equipped with two
brake levers each of the knee-lever
brake/pressure brake for the user (1).
2 drum brake levers are additionally
available for the attendant (2).
!
Attention:
For optimal braking effect the
drum brake (3) is to be kept free of
grease, oil, gunge and dust.
– Danger of accidents!
• When activating and locking only
one brake lever on slopes the free
wheel rolls downhill around the
braked wheel.
– Depending on the inclination of
the road a sideward tilting has to
be reckoned with.
• If possible propel the wheelchair
over the handrims. – Perhaps dan-
ger of jamming in the area of the
brake!

1
17
Safety information
▲ The wheelchair loaded with the
user may not let itself be pushed in
with the brakes engaged.
▲ Any decrease in brake perform-
ance must be repaired immediately
by your specialist workshop.
▲ In order to prevent an unintention-
al curve while braking the wheel-
chair on slopes, both brakes are to
be activated simultaneously.
▲ Do not lean on the sideward brake
levers (1)
!
Attention:
The braking effect depends upon:
– the condition of the tyres,
– the condition and attachment of
the brakes,
– the brake adjustment,
– the road condition.
☞ Note:
After changing the drive wheels
the brake is to be checked for
faultless function and in necessary
adjusted.
!
Attention:
Do not leave wheelchairs with
puncture proof (PU) tyres over
longer periods of time with the
pressure brakes engaged. – This
can cause accidents during regu-
lar braking due to some remaining
deformation in the surface.

1
1
18
Brake lever for user
With the brake levers for the driver a
metered braking of the driving speed
(operating brake) is possible.
By locking the brakes the wheelchair
is to secured against unintentional
rolling off (parking brake).
Service brake
Press the two brake levers evenly only
slightly to the front, this brakes the
wheelchair in a metered fashion.
Parking brake
Press both brake levers forward as
far as possible (1). The brakes engage
and the wheelchair can no longer be
pushed (parking brake).
Loosen the parking brake
Pull both brake levers back as far as
possible (2).

2
1
3
4
19
Drum brake for attendant
A metered braking from driving speed
(operating brake) is possible with the
brake levers of the drum brakes.
By locking this brake the wheelchair
is to be secured against unintentional
rolling off (parking brake).
Locking the drum brakes
Pull both brake levers evenly to secure
the wheelchair against unintentional
rolling away.
Press the latch (1) forward.
Release the brake lever. – Depending
on the adjustment the latch engages
in the fi rst (2) or second (3) locking po-
sition and activates the brake.
☞ Note:
– The wheelchair loaded with the
user may not let itself be pushed in
with the brakes engaged.
– If the third locking position (4) is
required to activate the brake, it
must be readjusted by a specialist
workshop.

1
2
20
Loosen the drum brakes
Pull both brake levers (1) until the
latches (2) automatically jump out of
the lock.
Release both brake levers. – The park-
ing brakes are release and the wheel-
chair ready to go.
!
Attention:
For driving the front and rear brake
levers must be disengaged.
☞ Note:
The braking effect depends upon:
– the condition of the tyres,
– the condition and attachment of
the brakes,
– the brake lever adjustment,
– the road condition.
!
Attention:
The braking effect decreases with:
– worn brake pads,
– loose brake lever,
– defective drum brakes.
• If the effect of the brake lessens
immediately have them readjusted
in a specialist workshop.
/