Page is loading ...

USER GUIDE
TALKSWITCH 24-CA
v3.21

Copyright Information
TalkSwitch. Copyright 2005. All Rights Reserved.
Reproduction, adaptation or translation without prior written permission is
prohibited, except as allowed under the copyright laws.
Information in this user guide is subject to change without notice and does not
represent any commitment on the part of TalkSwitch. No part of this user guide may
be reproduced or transmitted in any form or by any means, electronic or mechanical,
including photocopying, recording, or information storage and retrieval systems, or
translated to another language, for any purpose other than the licensee’s personal
use and, as specifically allowed in the licensing agreement, without the express
written permission of TalkSwitch.
Second Edition, May 2005.
CT.TS005.021.EN
TalkSwitch is a division of Centrepoint Technologies Inc.

Table of Contents
1.0 Installing TalkSwitch
1.1 What’s included with TalkSwitch . . . . . . . . . . . . . . . . . . . . . . . . . . . . . . . . . .1
1.2 Front Panel Descriptions . . . . . . . . . . . . . . . . . . . . . . . . . . . . . . . . . . . . . . . .2
1.3 Back Panel Descriptions . . . . . . . . . . . . . . . . . . . . . . . . . . . . . . . . . . . . . . . .3
1.4 Plugging into the Back Panel . . . . . . . . . . . . . . . . . . . . . . . . . . . . . . . . . . . .4
1.4.1 Attaching telephone lines to TalkSwitch line jacks . . . . . . . . . . . .4
1.4.2 Attaching phones to TalkSwitch extension jacks . . . . . . . . . . . . . .4
1.4.3 Connecting Devices to the Music and PA Jacks . . . . . . . . . . . . . .5
1.4.4 Connecting TalkSwitch to a PC . . . . . . . . . . . . . . . . . . . . . . . . .6
1.4.4.1 USB connection . . . . . . . . . . . . . . . . . . . . . . . . . . .6
1.4.4.2 Serial connection . . . . . . . . . . . . . . . . . . . . . . . . . .6
2.0 Configuring TalkSwitch
2.1 Installing the TalkSwitch Configuration Software . . . . . . . . . . . . . . . . . . . . . . .7
2.2 Running the TalkSwitch Configuration Software . . . . . . . . . . . . . . . . . . . . . . .8
2.3 Configuration . . . . . . . . . . . . . . . . . . . . . . . . . . . . . . . . . . . . . . . . . . . . . . .9
2.3.1 System Information . . . . . . . . . . . . . . . . . . . . . . . . . . . . . . . . .12
2.3.1.1 Administration . . . . . . . . . . . . . . . . . . . . . . . . . . .12
2.3.1.2 Telephone Lines . . . . . . . . . . . . . . . . . . . . . . . . . .13
2.3.1.3 Line Hunt Groups . . . . . . . . . . . . . . . . . . . . . . . .15
2.3.1.4 Fax Information . . . . . . . . . . . . . . . . . . . . . . . . . .16
2.3.1.5 Local Extensions . . . . . . . . . . . . . . . . . . . . . . . . . .17
2.3.1.6 Remote Extensions . . . . . . . . . . . . . . . . . . . . . . . .18
2.3.1.7 Extension Ring Groups . . . . . . . . . . . . . . . . . . . . .20
2.3.1.8 On-hold/Ringback . . . . . . . . . . . . . . . . . . . . . . . .22
2.3.2 Voicemail . . . . . . . . . . . . . . . . . . . . . . . . . . . . . . . . . . . . . . . .23
2.3.2.1 Local Extension Voicemail . . . . . . . . . . . . . . . . . . .23
2.3.2.2 Remote Extension Voicemail . . . . . . . . . . . . . . . . .25
2.3.2.3 General Voicemail . . . . . . . . . . . . . . . . . . . . . . . .28
2.3.2.4 Global Settings . . . . . . . . . . . . . . . . . . . . . . . . . .31
2.3.3 Call Handling . . . . . . . . . . . . . . . . . . . . . . . . . . . . . . . . . . . . .33
2.3.3.1 Modes . . . . . . . . . . . . . . . . . . . . . . . . . . . . . . . .33
2.3.3.2 Auto Attendant . . . . . . . . . . . . . . . . . . . . . . . . . . .34
2.3.3.3 Telephone Lines . . . . . . . . . . . . . . . . . . . . . . . . . .39
2.3.3.4 Local Extensions — Call Cascade . . . . . . . . . . . . .42
2.3.3.5 Remote Extensions — Call Cascade . . . . . . . . . . .44
2.3.3.6 Extension Ring Groups — Call Cascade . . . . . . . .46

2.3.4 Call Back/Call Bridge . . . . . . . . . . . . . . . . . . . . . . . . . . . . . . .47
2.3.4.1 Auto Call Back . . . . . . . . . . . . . . . . . . . . . . . . . .50
2.3.4.2 Prompted Call Back . . . . . . . . . . . . . . . . . . . . . . .53
2.3.4.3 Call Bridge . . . . . . . . . . . . . . . . . . . . . . . . . . . . .56
2.3.5 Options . . . . . . . . . . . . . . . . . . . . . . . . . . . . . . . . . . . . . . . . .57
2.3.5.1 Audio Controls . . . . . . . . . . . . . . . . . . . . . . . . . .57
2.3.5.2 Manual Transfer . . . . . . . . . . . . . . . . . . . . . . . . . .58
2.3.5.3 Miscellaneous . . . . . . . . . . . . . . . . . . . . . . . . . . .59
2.3.5.4 Troubleshooting . . . . . . . . . . . . . . . . . . . . . . . . . .62
3.0 Using TalkSwitch
3.1 In the Office — Receiving calls with or without the Auto Attendant . . . . . . . .67
3.1.1 Receiving calls using the Auto Attendant . . . . . . . . . . . . . . . . . .67
3.1.2 Receiving calls without the Auto Attendant . . . . . . . . . . . . . . . .68
3.2 In the Office — Making and Receiving Calls . . . . . . . . . . . . . . . . . . . . . . . .68
3.2.1 Making calls from a Local Extension . . . . . . . . . . . . . . . . . . . . .68
3.2.2 Receiving calls at a Local Extension . . . . . . . . . . . . . . . . . . . . .68
3.2.3 Placing calls on Hold at a Local Extension . . . . . . . . . . . . . . . .69
3.2.4 Transferring calls . . . . . . . . . . . . . . . . . . . . . . . . . . . . . . . . . . .69
3.2.5 Call Park — Parking and retrieving callers . . . . . . . . . . . . . . . .70
3.2.5.1 Parking a caller . . . . . . . . . . . . . . . . . . . . . . . . . .70
3.2.5.2 Parking a caller using Auto Park . . . . . . . . . . . . . .71
3.2.5.3 Retrieving a parked call . . . . . . . . . . . . . . . . . . . .71
3.2.5.4 Using Call Park with the External Paging option . . .71
3.2.6 Call Queue — Queuing and retrieving callers . . . . . . . . . . . . .71
3.2.6.1 Queuing calls to a single extension . . . . . . . . . . . .71
3.2.6.2 Queuing callers to an Extension Ring Group . . . . .72
3.2.7 Using the TalkSwitch Call Waiting feature . . . . . . . . . . . . . . . . .72
3.2.8 Conference calling with TalkSwitch . . . . . . . . . . . . . . . . . . . . . .73
3.2.9 Using Phones connected in parallel to TalkSwitch . . . . . . . . . . .74
3.2.10 External modem telephone line access . . . . . . . . . . . . . . . . . . .75
3.3 Out of the Office — Receiving Calls through Call Forwarding . . . . . . . . . . .75
3.3.1 The three ways to forward calls . . . . . . . . . . . . . . . . . . . . . . . .75
3.3.2 Transferring calls from a Remote Extension . . . . . . . . . . . . . . . .76
3.3.3 Screening options for forwarded calls . . . . . . . . . . . . . . . . . . . .76
3.4 Using the TalkSwitch Voicemail System . . . . . . . . . . . . . . . . . . . . . . . . . . . .77
3.4.1 Activating Voice mailboxes . . . . . . . . . . . . . . . . . . . . . . . . . . . .78
3.4.2 Retrieving Messages/Accessing a Voice mailbox . . . . . . . . . . . .78
3.4.3 Pager and Cell Phone notification . . . . . . . . . . . . . . . . . . . . . .80
3.5 Music-on-Hold . . . . . . . . . . . . . . . . . . . . . . . . . . . . . . . . . . . . . . . . . . . . .80
3.6 Mode Switching Options . . . . . . . . . . . . . . . . . . . . . . . . . . . . . . . . . . . . . .81
3.7 Out of the Office — Making Calls with Call Back and Call Bridge . . . . . . . .82
3.7.1 Using Call Bridge . . . . . . . . . . . . . . . . . . . . . . . . . . . . . . . . . .82
3.7.2 Using Call Back . . . . . . . . . . . . . . . . . . . . . . . . . . . . . . . . . . .83
3.8 Upgrading the TalkSwitch Firmware . . . . . . . . . . . . . . . . . . . . . . . . . . . . . . .84

Appendices
Appendix A — Help & Troubleshooting . . . . . . . . . . . . . . . . . . . . . . . . . . . . . . .89
Appendix B — Using TalkSwitch with Telephone Company Calling Services . . . . .97
Appendix C — Quick Commands and DTMF Functions . . . . . . . . . . . . . . . . . .101
Appendix D — Safety Precautions and Regulatory Information . . . . . . . . . . . . .105
Appendix E — TalkSwitch One Year Warranty . . . . . . . . . . . . . . . . . . . . . . . . .109
Appendix F — Return Policy . . . . . . . . . . . . . . . . . . . . . . . . . . . . . . . . . . . . . .113
Appendix G — Specifications . . . . . . . . . . . . . . . . . . . . . . . . . . . . . . . . . . . . .115
Appendix H — TalkSwitch and Power Interruptions . . . . . . . . . . . . . . . . . . . . . .117
Glossary . . . . . . . . . . . . . . . . . . . . . . . . . . . . . . . . . . . . . . . . . . . . . . . . . . . . . . . . . . .119


1.1 What’s included with TalkSwitch
The TalkSwitch products come shipped with the following items:
1. The TalkSwitch Unit
2. AC Power Adapter (Warning: never use any other Power Adapter other than
the one provided with the TalkSwitch.)
3. USB cable
4. 6' RJ-11 Telephone Cable – (2)
5. Software CD (This contains the configuration software and documentation)
6. Quick Reference Cards – (Local Extension Use)
7. TalkSwitch Start Guide
8. TalkSwitch Memory Card (optional purchase)
If any of these items are missing, please contact your reseller.
The TalkSwitch Line jacks are sensitive to high voltage spikes from lightning. If you live
in an area where electrical storms occur regularly, we recommend that you protect
TalkSwitch by plugging the telephone cords coming from the TalkSwitch line jacks to a
surge protection device connected to the incoming telephone lines.
When you first receive TalkSwitch and live in an area with cold temperatures, do not
plug TalkSwitch into a power outlet until the system has warmed to room temperature.
Otherwise condensation could build up on the electronics and cause damage when
powered up.
1
11.0 Installing TalkSwitch
Installing
TalkSwitch

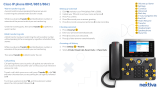
1.2 Front Panel Descriptions
TalkSwitch’s front panel consists of a power button (“Power”) and 5 LED lights that
do more than let you know TalkSwitch is plugged in and turned on.
What do the LED lights tell you?
LED light State Description
Line 1 On Solid Line 1 is currently in use.
Pulsing Slowly The Line 1 caller is on hold.
Flickering Line 1 is ringing.
Quick Pulse Line 1 is engaged by another device on the line.
Line 2 On Solid Line 2 is currently in use.
Pulsing Slowly The Line 2 caller is on hold.
Flickering Line 2 is ringing.
Quick Pulse Line 2 is engaged by another device on the line.
Power / Data On Solid TalkSwitch is powered on.
Flickering The PC connected (via Serial or USB) to
TalkSwitch is either sending or retrieving
information from TalkSwitch.
Pulsing Slowly Global Message Waiting Indicator (optional).
Line 3
*
On Solid Line 3 is currently in use.
Pulsing Slowly The Line 3 caller is on hold.
Flickering Line 3 is ringing.
Quick Pulse Line 3 is engaged by another device on the line.
Line 4
*
On Solid Line 4 is currently in use.
Pulsing Slowly The Line 4 caller is on hold.
Flickering Line 4 is ringing.
Quick Pulse Line 4 is engaged by another device on the line.
For more details on Line LED Error codes, see Troubleshooting — Appendix A
*
Line 3 and 4 lights apply to TalkSwitch 48 models
2 TalkSwitch User Guide

1.3 Back Panel Descriptions
Before connecting all your phones and lines to TalkSwitch, you may want to
proceed with configuring the unit first. (See section 2.1) This will minimize the
disruption time for your telephone lines while setting up the system.
1.3.1 The TalkSwitch 24
Jacks/Ports What to plug in
MUSIC Plug in a radio, CD player, PC soundcard or any other
device that emits an audio signal if you wish to use
TalkSwitch's Music-on-Hold feature. This is a 1/8" (3.5
mm) phono jack. Mono cables are recommended.
PA Connect to a P.A. system if you wish to use the external
paging feature. This is a 1/8" (3.5 mm) phono jack.
Mono cables are recommended.
E1, E2, E3, E4 Plug in any analog device that uses a standard (RJ-11)
telephone jack, such as: telephones, answering
machines, fax machines, internal or external PC
modems. Once these devices are plugged in TalkSwitch
will recognize them as Ext. 111, Ext. 112, Ext. 113, or
Ext. 114. Consider connecting the receptionist’s phone to
Extension 114 as this will allow for calls to be received or
made through Line 1 of TalkSwitch.
L1/L2, L2 This is where you plug in your telephone lines (RJ-11).
If you have 2 lines out of 1 phone jack, you can plug into
the L1/L2 jack. Use a surge protector if you live in an
area prone to lightning strikes.
USB Use the USB port if your PC supports USB connectivity. If
you use the USB port, you cannot use the serial port
simultaneously.
31.0 Installing TalkSwitch

SERIAL* You can use a serial cable (RS232) that connects
TalkSwitch to your PC. If you use the serial port you
cannot use the USB port simultaneously. *Serial cables
are not supplied with the TalkSwitch unit.
POWER Plug the supplied AC Power Adapter in here. Rating:
16VAC 1.1 A output. Do not use any other power adapter
as this may cause damage.
MEMORY SLOT Memory expansion slot (located on side). Used to
expand internal memory for voicemail and Auto
Attendant messages. TalkSwitch Memory cards can be
purchased from your local TalkSwitch reseller. Simply
place the memory card in the slot and TalkSwitch will
automatically detect and start using the extra memory
within 20 seconds.
The ‘PF’ box in between E4 and L1/L2 represents power failure support. In the event
of a power failure or loss of power to TalkSwitch, Extension 114 will be able to receive
calls and make calls on Line 1.
1.4 Plugging into the Back Panel
1.4.1 Attaching telephone lines to TalkSwitch line jacks
You can connect your telephone lines from the wall jack(s) to the TalkSwitch Line
jacks with the phone cables provided. Take note of which telephone line is connected
to which Line Jack on TalkSwitch - this information will be used in the configuration
section. In order to minimize disruption to your business, you may want to configure
TalkSwitch first before connecting it to your lines and phones.
We recommend that you connect surge protectors between TalkSwitch and your
telephone lines to protect against lightning damage.
1.4.2 Attaching phones to TalkSwitch extension jacks
You can connect any analog device (regular telephone, cordless phone, fax machine,
answering machine, modem) to TalkSwitch's extension jacks. Multiple devices can be
connected to each extension jack by ‘chaining’ them together or using a line splitter.
4 TalkSwitch User Guide

To Attach a Single Line Corded or Cordless Telephone, Fax Machine or Answering
Machine:
Connect your single line analog telephone or fax machine to one of TalkSwitch’s
extension jacks E1 to E4 just as you would if you were plugging them into a
standard telephone wall jack.
To Attach a Two-line Telephone:
Option #1 (Use it as one TalkSwitch extension.)
Disregard the telephone’s Line 2 jack (plug-in). Connect the telephone’s Line 1
plug-in to any one of TalkSwitch’s extension jacks. You will still be able to access
both telephone lines in the same manner as if you were using a single line
telephone attached to TalkSwitch.
Option #2 (Use it as two TalkSwitch extensions.)
You could use your two-line telephone as two separate TalkSwitch extensions.
Connect the telephone’s Line 1 and Line 2 plug-ins to two separate extension
jacks.
Most two-line phones have separate plug-ins for two incoming telephone lines (Line 1
and Line 2). If your two-line telephone does not have separate plug-ins, you can use
a “Line 1/Line 2” line splitter to separate the two lines.
DDoowwnnllooaadd tthhee QQuuiicckk GGuuiiddee aatt
wwwwww..ttaallkksswwiittcchh..ccoomm ffoorr mmoorree ddeettaaiilleedd eexxaammpplleess oonn ccoonnnneeccttiinngg mmuullttii--lliinnee pphhoonneess..
To Attach an Internal or External Modem:
Simply plug the modem’s telephone cable into one of TalkSwitch’s extension
jacks. Your modem is now a TalkSwitch extension and will be able to access all
lines and take advantage of TalkSwitch’s call routing features.
If you don’t want to change your dial up settings for the modem, you will need
to enable Direct Line Access for the extension associated to the modem. See
section 2.3.1.4 for more details on configuring Direct Line Access.
1.4.3 Connecting Devices to the Music and PA Jacks
The Music jack is designed to support any audio source (CD player, radio, tape player,
sound card etc.) for playing music or messages to callers while on hold. Simply
connect the audio source via its headphone output to the Music jack. The Music jack
requires a 1/8'' (3.5mm) phono connector. If you have more than one TalkSwitch
connected to a LAN, you will need to provide audio to all the Music jacks on each
TalkSwitch.
51.0 Installing TalkSwitch

The PA jack can be connected to a PA System for external paging or to an
amplification system to screen voicemail or to use as a line simulator. The PA jack
requires a 1/8'' (3.5mm) phono connector. If you have more than one TalkSwitch
connected to a LAN, you will need to provide a connection from each TalkSwitch to
the PA system.
1.4.4 Connecting TalkSwitch to a PC
There are two ways to connect TalkSwitch 24CA directly to your PC for configuration
— USB or Serial
USB: Use the provided USB cable to connect TalkSwitch to an available USB
port on your PC or USB hub.
Serial*: Use a serial cable (RS232) to connect TalkSwitch to an open COM port
on your PC. *Serial cables are not provided with TalkSwitch units.
1.4.4.1 Connecting TalkSwitch to a PC using a USB cable
If you have an available USB port then connect TalkSwitch to the PC using the USB
cable. When you run the TalkSwitch software, you will need to select ‘USB’ as the
connection type then press connect.
1.4.4.2 Connecting TalkSwitch to a PC using a Serial cable
If you have an available Serial port, then connect TalkSwitch to your PC using an
optional Serial cable.
When you run the TalkSwitch software, you will need to select ‘Serial’ as the
connection then select the Serial Port associated to this physical Serial port on your PC.
Make sure you do not have any other communications programs running at the same
time you want to use the TalkSwitch configuration software. These may include Palm
Pilot, Hot Sync, TalkWorks, Digital Camera software. These programs tend to ‘hold’
onto COM ports and not make them available for any other programs.
If you are having problems communicating with TalkSwitch, please check the
Troubleshooting section of the manual.
6 TalkSwitch User Guide

72.0 Configuring TalkSwitch
Configuring
TalkSwitch
2
2.1 Installing the TalkSwitch Configuration Software
Insert the TalkSwitch CD into your CD drive. The Install program will automatically
launch. If the software does not launch automatically, you can use Windows Explorer
to explore your CD-ROM drive. Double-click the Setup.exe file, then follow the
instructions on the screen. If you are installing on a Windows XP machine, do not
enable Windows 98 compatibility mode for the TalkSwitch software. The TalkSwitch
software can also be downloaded from the TalkSwitch website (www.talkswitch.com).
Configuration software system requirements:
PC running Windows XP/2000
120 MB free hard disk space
128 MB RAM
800 x 600 minimum video resolution
If you are having problems retrieving the settings from TalkSwitch, please check the
Troubleshooting section of the manual.

8 TalkSwitch User Guide
2.2 Running the TalkSwitch software
After installation is complete, double-click the TalkSwitch icon. The following screen
provides different connection options.
Connection Type: USB
If TalkSwitch is connected to the PC via a USB cable, then select this option and
press ‘Connect’ to continue.
Connection Type: Serial
If TalkSwitch is connected to the PC via a Serial cable, then select this option and
choose the Serial Port associated to the connection. Press ‘Connect’ to continue.
Connection Type: Ethernet
Ethernet is not a supported connection type for the TalkSwitch 24CA. Only USB
and Serial are supported.
Connection Type: Internet
Internet is not a supported connection type for the TalkSwitch 24CA since it does
not have an Ethernet port. Only USB and Serial are supported.
Connection Type: File
If you wish to work offline on a configuration file, select this option then press
the Browse button to select the file you wish to view/edit.
Restore Firmware:
This activates the TalkSwitch Firmware Update procedure in the event a firmware
update has failed. Follow the instructions accordingly.

92.0 Configuring TalkSwitch
2.3 Configuration
The configuration screen consists of 4 parts:
1. Menu Items
2. Configuration Navigation
Controls what is displayed in the configuration window.
3. Configuration Window
Displays configuration information.
4. View System Information
Click this button to view each TalkSwitch unit’s MAC address, IP
address, hardware version and firmware version.
5. Resize
Grabbing this corner by left-clicking on the mouse allows you to
increase or decrease the window size.
There is context sensitive help information available for each option in the
configuration software. Simply rest your mouse cursor over any control for a second
or two and then information related to that control will appear.
1
2
3
4
5

10 TalkSwitch User Guide
Menu Items - File
Open File...
Opens existing configuration files from the PC. Default configuration files
are included with the software. TalkSwitch also backs up to a file called
“LastSavedConfig.dat” every time you save settings to TalkSwitch.
Save to TalkSwitch
Saves the current configuration to TalkSwitch.
Save to file...
Saves the current configuration to a file.
Exit
Closes the Configuration.
Retrieve settings:
Retrieves settings from TalkSwitch connected to the PC.
Update Firmware:
This action locks the system down and then proceeds with updating the
firmware once all calls have terminated. For more details on upgrading the
TalkSwitch Firmware, see Section 4.8.
Menu Items — View
Toolbar
Toggles the toolbar on/off.
Status Bar
Toggles the status bar on/off.
Menu Items — Tools
Memory Usage:
Displays a dialog box showing internal memory usage for Voicemail or Auto
Attendant messages.
Voicemail Manager:
Displays a dialog box giving you options to check the status of all voicemail,
delete a mailbox password, and reset mailboxes to factory default.

112.0 Configuring TalkSwitch
Terminal Window:
Displays a command line interface to enter commands. Useful for troubleshooting
in conjunction with technical support.
Defaults:
Select this option to reset the current page or the entire configuration back
to defaults.
Menu Items — Help
Support on the Web:
Launches your browser and directs you to our support site.
About TalkSwitch:
Displays the TalkSwitch software version number, TalkSwitch firmware version
number and Copyright information.
Additional PDF help documents can be located in the Start Menu> TalkSwitch folder.
Configuration Navigation
The Configuration Navigation organizes all the configuration topics within folders.
The following is a brief description of each configuration folder:
About TalkSwitch
This tab displays version information about the TalkSwitch software, firmware
and hardware. It also displays memory usage with details about voicemail
messages and Auto Attendants.
System Information
This folder allows you to configure the system setup. This includes activating
lines, extensions, VoIP and music-on-hold.
Voicemail
This folder allows you to configure each individual voice mailbox and also some
global settings for the voicemail system.
Call Handling
This folder allows you to configure how you want incoming calls to be handled.
It allows you to setup your Auto Attendants and individual call handling for each
line and distinctive ring number for both operating modes.

12 TalkSwitch User Guide
2.3.1 System Information
2.3.1.1 Administration
It is recommended that you enter an Administrator password to prevent tampering
with the system configuration.
System Name:
The system name is for informational purposes to confirm the identity of the
system when connected.
Administrator password:
To activate the use of an administrator password, enter a 4 to 8 digit password.
The password can only contain numbers since it is also used to gain access to the
system using a touch tone phone.
If the administrator forgets their password, the only option to gain access to the
configuration settings is to contact TalkSwitch.

132.0 Configuring TalkSwitch
2.3.1.2 Telephone Lines
This section is used to inform TalkSwitch about the lines or VoIP ports plugged into
its back panel. Simply select a line and fill in the information. For each line there is
a status message (“Line detected at initialization”) indicating if TalkSwitch detected
a line plugged into the associated line port. If a line is plugged into a line port and
is not detected, check your telephone line, and then choose File>Retrieve settings to
update the screen.
Connection type:
Select what’s connected to the Line jack on TalkSwitch. Selecting VoIP means that
you have a VoIP device plugged into the jack. This will now enable callers to select
250-299 from a local extension or auto attendant to speed dial a VoIP location.
In the “Phone numbers” section:
Enter the ‘main’ telephone number for the appropriate line connected to
TalkSwitch. Enable the Distinctive Ring Numbers 1 and/or 2 if you have this
service on the current line and wish to have incoming calls handled 'differently'
on the basis of the distinctive ring. If you want Distinctive Ring numbers handled
the same way as your 'Main' number, do not place a check mark in the box.
Next, enter the ‘Distinctive Ring’ telephone number for each of the Distinctive
Ring numbers associated to this line. Distinctive Ring 1 corresponds to any
double ring pattern. Distinctive Ring 2 corresponds to any triple ring pattern.

14 TalkSwitch User Guide
In the “Telephone company services” section:
Select any of the Telephone Company Services that you currently have for each
line. The following is an explanation of each service and the impact of selecting
each option with respect to how TalkSwitch handles calls. For definitions and
details on how to use these features with TalkSwitch, see Appendix B.
3-Way Calling/Conference:
TalkSwitch can work with either service to forward calls to Remote
Extensions or other external phone numbers while using the same
line (Same Line Connect). You can also use this service as an option
for bridging calls to external numbers when calling into TalkSwitch
from the outside. If you find that you are having difficulties with line
levels when forwarding calls to Remote Extensions or using Call
Bridge, you should use 3-way calling to forward calls as a solution.
Transfer and Clear (Centrex/Plexar transfer):
TalkSwitch can clear the line after forwarding a call to a Remote
Extension if your telephone line supports this feature. If you enable
this feature without actually having the service, callers will be
disconnected after the call is forwarded to the Remote Extension.
Call Waiting:
Check this box if you have Call Waiting service on the current line. It
is recommended that you remove this service from your line(s) since
there is no way for TalkSwitch to handle a second call on the same
line while it is handling the first call. You may want to instead
consider adding the Hunt/Rollover service to your lines.
Caller ID:
Check this box if the current line provides Caller ID information.
TalkSwitch will pass along the Caller ID information to selected
extensions. Also, TalkSwitch can use the time information provided by
Caller ID to update TalkSwitch’s internal clock. (see section 2.3.5.4).
Telephone Company Voicemail:
Check this box if you are subscribed to a Telephone Company
Voicemail service.
Hunt/Rollover/Busy Forwarding:
Check this box if the current line is associated with a Line Hunt or
Line Rollover service from the Telephone Company. In general, any
lines that belong to a Hunt/Rollover group should be configured to
handle calls the same way.
In the “Calibration” section:
After you have configured the lines, it is recommended that you calibrate the
lines. Completing this procedure optimizes your telephone line volume levels for
the Call Bridge and Call Forwarding (with Remote Extensions) features.
/