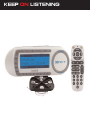
Sirius Satellite Radio XTR8CK User manual
- Category
- Video games
- Type
- User manual

Instruction Manual
To activate your XACT Sirius Satellite Radio Receiver or for latest news and questions regarding
Sirius Satellite Radio service visit www
.sirius.com or call 1-888-539-SIRIUS (7474).
For accessory & product information visit us at www.getxact.com.
Pause Rewind Replay
LIVE SATELLITE RADIO
Model XTR8CK

KEEP ON LISTENING

This equipment has been tested and found to comply with the limits for a Class B digital device, pursuant to
Part 15 of the FCC Rules. These limits are designed to provide reasonable protection against harmful
interference in a residential installation. This equipment generates, uses, and can radiate radio frequency
energy and, if not installed and used in accordance with the instructions, may cause harmful interference to
radio communications. However, there is no guarantee that interference will not occur in a particular
installation. If this equipment does cause harmful interference to radio or television reception, which can be
determined by turning the equipment off and on, the user is encouraged to try to correct the interference by
one or more of the following measures:
• Reorient or relocate the receiving antenna.
• Increase the separation between the equipment and Receiver.
• Connect the equipment into an outlet on a circuit different from that to which the Receiver
is connected.
• Consult the dealer or an experienced radio/TV technician for help.
Changes or modifications not expressly approved by the Manufacturer for compliance could void the user’s
authority to operate the equipment. The manufacturer is not responsible for any Radio or TV interference
caused by unauthorized modifications to this equipment. Such modifications could void the user's authority to
operate the equipment.
Note: Use only the appropriate XACT accessories or input devices with your receiver. Use only the 12v
Vehicle Adapter that is provided with the kit. It is important that you do not modify it in any way as this
may result in damage to your equipment and void the warranty.
COPYRIGHT / TRADEMARKS
No part of this publication may be reproduced, stored in a retrieval system, or transmitted in any form or by
any means, whether electronic, mechanical, photocopying, recording or otherwise without the prior writing of
the publisher.
“Sirius” and Sirius dog logo and related marks are registered trademarks of Sirius Satellite Radio Inc. To
activate your XACT Sirius Satellite Radio Receiver or for latest news and questions regarding Sirius Satellite
Radio service visit www.sirius.com or call 1-888-539-SIRIUS (7474).

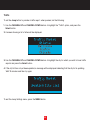
SAFETY PRECAUTIONS
Warning
Follow these notifications to avoid any traffic accidents or personal injury:
1. Installation must be performed according to this user guide.
2. Do not install the device where it may obstruct your view through the windshield or your vehicle’s indicator
displays.
3. Do not install the device where it may hinder the function of safety devices such as an airbag. Doing so
may prevent the airbag from functioning properly in the event of an accident.
4. The installation and usage suggestions contained in this user guide are subject to any restrictions or
limitations that may be imposed by applicable law. The purchaser should check applicable law for any
restrictions or limitations before installing and/or operating this device.
5. Failure to follow these safety instructions and warnings may result in a severe accident.
Danger
Be aware of the following precautions to prevent fire and avoid personal injury:
1. To avoid short circuits, never put or leave any metallic objects (coins, tools, etc.) inside the device.
2. If the device emits smoke or strange smells, turn the power off immediately and contact your dealer.
3. Do not drop the device or subject it to strong impacts or mechanical shocks.
4. If the LCD display becomes damaged or broken, do not touch the liquid crystal fluid. The fluid may be
dangerous to your health or even fatal. If the liquid crystal fluid contacts your body or clothing, immediately
wash it off with soap and water.
Caution
Do not operate this device in a way that might divert your attention from driving safely. As a driver, you are
responsible for safely operating your vehicle in accordance with traffic safety laws at all times.

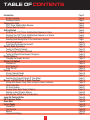
TABLE OF CONTENTS
Introduction Page 3
Product Overview Page 3
Package Contents Page 3
Components Guide Page 4
XACT Sirius Satellite Radio Receiver Page 4
Wireless Remote Control Page 5
Getting Started Page 6
Mounting Your XACT Sirius Satellite Radio Receiver at Home Page 6
Mounting Your XACT Sirius Satellite Radio Receiver in a Vehicle Page 6
Activating Your Sirius Subscription Page 7
Accessing and Making Note of Your Identification Number Page 7
Using The Vehicle Kit Page 9
If you Have Purchased the Home Kit Page 10
Satellite Radio Operations Page 12
Tuning to Different Channels Page 12
Direct Tuning to Different Channels Page 12
Tuning to Different Entertainment Categories Page 12
Display Options Page 13
Changing the Display Text Size Page 13
Display List Options Page 14
Channel List Page 14
Artist Name List Page 14
Song Title List Page 15
Presets Page 16
Storing Channel Presets Page 16
Using Channel Presets Page 17
Searching for Channel Presets (P. Tune Mode) Page 17
Memory and SIRIUS-Seek (S-Seek) Functions Page 19
Storing Artist Names, Song Titles, and Sports Teams to Memory Page 19
Initial Game Alert Page 21
All Score Updates Page 21
Viewing Stored Alerts Stored in Memory Page 23
Deleting an Alert Stored in Memory Page 24
Activating the SIRIUS-Seek (S-Seek) Alert Page 25
Jump Set Feature Button Page 26
FM Frequency Button Page 28
Game Alert Page 28
Instant Replay Page 29
Pause/Play Page 29
Fast Forward Page 30
Rewind Page 30
Using Instant Replay Page 31
11
TABLE OF CONTENTS

2
TABLE OF CONTENTS
Menu Options Page 34
FM Transmitter Page 34
FM Presets Page 35
FM On/Off Page 36
Game Alert Page 36
Settings Page 38
Jump Settings Page 38
Traffic Page 39
JumpSet Page 40
Display Options Page 41
Memory Options Page 42
Clear All Memory Page 43
Auto Select Page 43
Audio Level Page 44
Confirmation Tone Page 45
Parental Control Page 45
Lock/Unlock Page 46
Edit Code Page 47
Time Based Features Page 50
Clock Page 50
Format Page 51
Time Zone Page 51
Daylight Savings Time Page 52
Alarm Page 52
Set Alarm Page 52
Alarm Time Page 53
Program Alert Page 54
Program Time/Day Page 54
Channel Number Page 55
Program Alert On/Off Page 56
Auto Shutdown Page 56
Sleep Mode Page 57
Signal Indicator Page 58
Sirius Satellite Map Page 58
Factory Default Page 59
Problem Solving Page 61
Warranty Page 62
Warranty Page 63
2

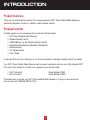
INTRODUCTION
Product Overview
Thank you for purchasing this product! Your new plug and play XACT Sirius Satellite Radio Receiver is
specifically designed to mount in a vehicle or indoor/outdoor location.
Package Contents
Carefully unpack your kit and ensure that you have the following items.
• XACT Sirius Satellite Radio Receiver
• Wireless Remote Control
• CR2025 Battery (for the Wireless Remote Control)
• Vehicle Mounting Bracket (Windshield / Dashboard)
• Vehicle Antenna
• 12v Vehicle Adapter
• User’s Guide
In the event that any item is missing or if you find any mismatch or damage, promptly contact your dealer.
Your XACT Sirius Satellite Radio Receiver must be used in conjunction with any one of the following XACT
Kits, such as the Vehicle kit or Home kit as required by your specific needs.
• XACT Vehicle Kit: Model Number XS081
• XACT Home Kit: Model Number XS082
The easiest way to activate your XACT Sirius Satellite Radio Receiver is to log on to www.sirius.com.
You may also call 1-888-539-SIRIUS (7474).
3
3
INTRODUCTION

4
COMPONENTS GUIDE
4
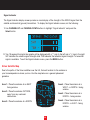
XACT Sirius Satellite Radio Receiver
1. Power Button/IR for Remote Control
2. Rewind
3. Play/Pause
4. Fast Forward
5. Memo/SIRIUS-Seek
6. Display
7. Select
8. Channel Up and Down
9. Category Left and Right (jump to the next
or previous category)
10. Numerical Keys (presets or direct tunning)
11. Band/Preset Tune Mode
12. FM Transmitter Button
13. Jump Button
14. Menu
15. Antenna Jack
16. FM Out Jack
17. Audio Jack
18. DC Power Jack

COMPONENTS GUIDE
5
Wireless Remote Control
The wireless remote control packed with your plug and play XACT Sirius Satellite Radio mirrors the operations
of your plug and play XACT Sirius Satellite Radio Receiver from a remote location.
1. Power Button
2. Category Left and Right (jump to the next
or previous category)
3. Mute
4. Channel Up and Down
5. Play/Pause
6. Fast Forward
7. Volume Up and Down
8. FM Transmitter Button
9. Display
10. Memo/SIRIUS-Seek
11. Numerical Keys (presets or direct tunning)
12. Band/Preset Tune Mode
13. Menu
14. Jump Button
15. Rewind
16. Select
5
COMPONENTS GUIDE

6
GETTING STARTED
Mounting Your XACT Sirius Satellite Radio at Home
Find an appropriate location near your stereo receiver to install your plug and play XACT Sirius Satellite Radio
Receiver.
Mounting Your XACT Sirius Satellite Radio in a Vehicle
Find an accessible location in your vehicle to install your plug and play XACT Sirius Satellite Radio Receiver;
usually, this is on or near the dashboard.
Do not mount your device where it may obstruct your view through the windshield or your view of your
vehicle’s indicator displays.
Do not mount your device where it may impede your access to the vehicle’s controls.
Do not mount your device where it may hinder the function of safety devices, such as an airbag. Doing
so may prevent the airbag from functioning accordingly in the event of an accident.
Mount your XACT Sirius Satellite Radio Receiver where it can be easily reached.
The device must be directly in line-of-sight of the remote controller.
If you're not going to operate your vehicle for an extended period of time (e.g. parking garage while on
vacation) unplug your XACT Sirius Satellite Radio Receiver from the the cigarette lighter adapter.
Note: Do not modify or alter in any way the wires or connections especially to the 12v vehicle adapter.
Doing so will prevent the protection provided in the circuitry from functioning properly and result in
damaging your receiver. This will void your warranty.
6

Activating Your Sirius Subscription
Before beginning to use your new device, you must first subscribe to Sirius Satellite Radio service.
There are two ways to activate the Sirius Satellite Radio Service:
1. Visit www.sirius.com and click activate, then follow the on-screen instructions.
2. Call Sirius at 1-888-539-7474. A representative will help you activate your Sirius Satellite Radio Service.
Note: Make sure to have your identification number accessible when calling Sirius.
Accessing and Making Note of Your Identification Number
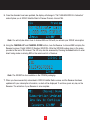
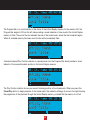
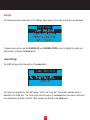
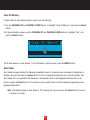
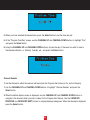
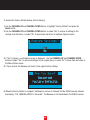
3. Press the POWER button to turn the Receiver On. The Receiver will display the SIRIUS logo.
4. The Receiver will update the SIRIUS channel line up. The display will show, "UPDATING CHANNELS" and
show the status of the update. Wait until the channel updates have completed before pressing any buttons on
the Receiver.
7
7

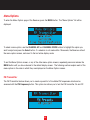
5. Once the channels have been updated, the display will change to "Call 1-888-539-SIRIUS to Subscribe"
and will place you in SIRIUS Satellite Radio's Preview Channel, channel 184.
Note: You will only be able to tune to channel 000 and 184 until you activate your SIRIUS subscription.
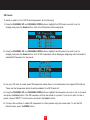
6. Using the CHANNEL UP and CHANNEL DOWN buttons, tune the Receiver to channel 000 to display the
Receiver's unique 12-digit SIRIUS ID Number (SID/ESN). Write the SID/ESN number down in the space
provided at the end of this manual. The SID may also be accessed by Pressing the Select button to enter
direct tuning mode or entering 000 on the remote control or Receiver.
Note: The SID/ESN is also available on the XTR8CK packaging.
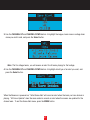
7. When you have successfully subscribed to SIRIUS Satellite Radio service, and the Receiver has been
updated with your subscription information, an alert will be displayed. To continue, press any key on the
Receiver. The activation of your Receiver is now complete.
8

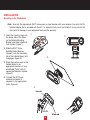
Mounting to the Dashboard or Console
Note: Use only the appropriate XACT accessories or input devices with your receiver. Use only the 12v
Vehicle Adapter that is provided with the kit. It is important that you do not modify it in any way as this
may result in damage to your equipment and void the warranty.
If using the AAMPs mounting holes to fasten the Vehicle Mount to your vehicle, Bolt or screw the Vehicle
Mount in place and proceed to step
2.
1. Remove the protective film
from one side of the supplied
double sided 3M tape. Press
firmly to secure the tape to the
bottom of the Vehicle
Mount. (figure 1).
2. Slide the XACT Sirius Satellite
Radio Receiver (figure 2) onto
the mounting tab of the Vehicle
Mount until it engages.
(figure 3).
3. Connect the DC Power,antenna
and audio (if required) to the
appropriate jacks. (figure 4).
INSTALLATION
4.
3.
2.
1.
9
USING THE VEHICLE KIT

10
Mounting to the Windshield
Note: Use only the appropriate XACT accessories or input devices with your receiver. Use only the 12v
Vehicle Adapter that is provided with the kit. It is important that you do not modify it in any way as this
may result in damage to your equipment and void the warranty.
1. Insert the 4 suction cups into
the larger side of the holes
on the Vehicle Mounting
Bracket and slide outward to
lock in place. (figure 1).
2. Slide the XACT Sirius
Satellite Radio Receiver
(figure 2) onto the mounting
tab of the Vehicle Mount until
it engages. (figure 3).
3. Place the suction cups on the
Vehicle Mount in an
appropriate location on your
windshield. Press firmly to
secure the Receiver in place.
(figure 3).
4. Connect the DC Power,
antenna and audio (if
required) to the appropriate
jacks. (figure 4).
INSTALLATION
4.
3.
2.
1.

11
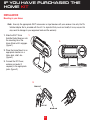
Mounting in your Home
Note: Use only the appropriate XACT accessories or input devices with your receiver. Use only the 12v
Vehicle Adapter that is provided with the kit. It is important that you do not modify it in any way as this
may result in damage to your equipment and void the warranty.
1. Slide the XACT Sirius
Satellite Radio Receiver onto
the mounting tab of the
Home Stand until it engages.
(figure 1).
2. Place the Home Mount in an
appropriate location on a
table, desk, shelf, etc...
(figure 2).
3. Connect the DC Power,
antenna and audio (if
required) to the appropriate
jacks. (figure 3).
IF YOU HAVE PURCHASED THE
HOME KIT
INSTALLATION
1.
2.
3.

After you have successfully activated your SIRIUS Satellite Radio subscription, and the Receiver has received
the subscription information from the SIRIUS signal, the default display screen will be displayed.
Tuning to Different Channels
Pressing the CHANNEL UP or CHANNEL DOWN button will cause the Receiver to immediately tune to the
next or previous channel.
Pressing the CATEGORY PREVIOUS or CATEGORY NEXT button again will cause the Receiver to display a
channel listing for that category. Use the CHANNEL UP or CHANNEL DOWN buttons to highlight a channel
within the category and press the Select button to tune to the highlighted channel. When a new channel is
selected, the display will revert to the default display screen for the new channel. To exit the channel list mode
without changing to a different channel, press and hold the DISP button for 1½ seconds, until the default
screen is displayed.
Direct Tuning to Different Channels
A channel may be directly selected by entering the channel number using the 0 - 9 buttons on the Receiver.
To enter a channel number, momentarily press and release the Select button. At the display prompt enter the
three digit channel number.
Tuning to Different Entertainment Categories
Pressing the CATEGORY PREVIOUS or CATEGORY NEXT button will cause the receiver to display a list of
the channels in the current category, highlighting the channel to which you are currently tuned.
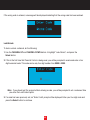
SATELLITE RADIO OPERATIONS
12
3-Digit Channel Number
Song Title
Artist’s Name
Category Name
Channel Name
Clock
Band or Preset Bank Number
Signal Strength Indicator

A momentary press of the DISP button while in the category list mode will cause the Receiver to display the
current list of Artist Names.
The next momentary press of the DISP button will cause the Receiver to display the current list of Song Titles.
Display Options
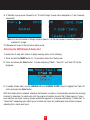
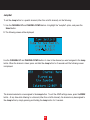
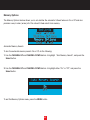
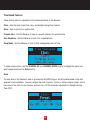
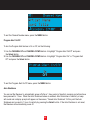
Changing the Display Text Size
Momentarily pressing and releasing the DISP (Display) button while the default screen is displayed changes
the artist name and song title to a scrolling single line, large format display for easier viewing from a distance.
13
Normal Text Size
Large Text Size

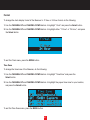
Display List Options
Pressing and holding the DISP button for 1½ seconds will cause the Receiver to enter the channel, artist
name, or song title list mode.
Channel List
The channel list mode makes it easy to quickly search for and locate music by channel name.
Once the Receiver has entered the channel list mode, a listing of the channel numbers and names are
displayed.
Artist Name List
Momentary pressing and releasing the DISP button while in the channel list mode will cause the Receiver to
display the current list of Artist Names.
14

Song Title List
The next momentary press of the DISP button will cause the Receiver to display the current list of Song Titles.
Note: If you are viewing a sports category channel list (NFL
®
, NBA
®
, NHL
®
, or College), pressing the
DISP button will instead toggle between the team names and the current score of any live play-by-
play game. Use the CATEGORY PREVIOUS and CATEGORY NEXT buttons to scroll through the
music and entertainment categories, and the CHANNEL UP and CHANNEL DOWN buttons to scroll
through the available channels in each category to find the channel to which you want to listen.
When you have found the channel you wish to listen to, highlight the channel using the CHANNEL
UP and CHANNEL DOWN buttons and press the Select button to tune to the channel. The new
channel will begin playing and the display will revert to the default display screen for the
new channel.
To exit the channel list mode without changing to a different channel, press and hold the DISP button for 1½
seconds, until the default screen is displayed.
15

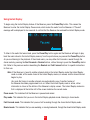
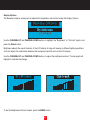
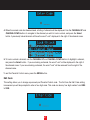
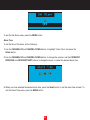
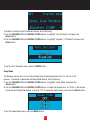
Presets
You can store up to 30 of your favorite channels as presets for quick recall access. The preset channels are
stored in 3 bands, A, B, and C, each containing 10 channel presets, and are numbered 0 to 9. The 10 channel
presets in each band are accessed by pressing the appropriate number (0 to 9) on the Receiver. A momentary
press and release of the BAND button cycles through the 3 preset bands (A, B, and C).
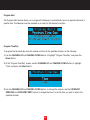
Storing Channel Presets
To store a favorite channel as a preset, do the following:
1. Momentarily press and release the BAND button until the desired preset band, A, B, or C is displayed in the
lower right corner of the default display screen.
2. Tune the Receiver to the channel you wish to store as a preset. (See the section, Basic Operation for
specific instructions for tuning to a channel).
3. Press and hold for 1½ seconds the numbered PRESET button in which you wish to store your favorite
channel, until you hear a beep.
The band and preset number will then be displayed in the lower right corner of the display screen to confirm
that the channel has been stored.
16
Page is loading ...
Page is loading ...
Page is loading ...
Page is loading ...
Page is loading ...
Page is loading ...
Page is loading ...
Page is loading ...
Page is loading ...
Page is loading ...
Page is loading ...
Page is loading ...
Page is loading ...
Page is loading ...
Page is loading ...
Page is loading ...
Page is loading ...
Page is loading ...
Page is loading ...
Page is loading ...
Page is loading ...
Page is loading ...
Page is loading ...
Page is loading ...
Page is loading ...
Page is loading ...
Page is loading ...
Page is loading ...
Page is loading ...
Page is loading ...
Page is loading ...
Page is loading ...
Page is loading ...
Page is loading ...
Page is loading ...
Page is loading ...
Page is loading ...
Page is loading ...
Page is loading ...
Page is loading ...
Page is loading ...
Page is loading ...
Page is loading ...
Page is loading ...
Page is loading ...
Page is loading ...
Page is loading ...
Page is loading ...
-
 1
1
-
 2
2
-
 3
3
-
 4
4
-
 5
5
-
 6
6
-
 7
7
-
 8
8
-
 9
9
-
 10
10
-
 11
11
-
 12
12
-
 13
13
-
 14
14
-
 15
15
-
 16
16
-
 17
17
-
 18
18
-
 19
19
-
 20
20
-
 21
21
-
 22
22
-
 23
23
-
 24
24
-
 25
25
-
 26
26
-
 27
27
-
 28
28
-
 29
29
-
 30
30
-
 31
31
-
 32
32
-
 33
33
-
 34
34
-
 35
35
-
 36
36
-
 37
37
-
 38
38
-
 39
39
-
 40
40
-
 41
41
-
 42
42
-
 43
43
-
 44
44
-
 45
45
-
 46
46
-
 47
47
-
 48
48
-
 49
49
-
 50
50
-
 51
51
-
 52
52
-
 53
53
-
 54
54
-
 55
55
-
 56
56
-
 57
57
-
 58
58
-
 59
59
-
 60
60
-
 61
61
-
 62
62
-
 63
63
-
 64
64
-
 65
65
-
 66
66
-
 67
67
-
 68
68


Sirius Satellite Radio XTR8CK User manual
- Category
- Video games
- Type
- User manual
Ask a question and I''ll find the answer in the document
Finding information in a document is now easier with AI
Related papers
-
Sirius Satellite Radio Stream | Jockey II XTR2CK User manual
-
Sirius Satellite Radio SCFM1, Starbase User manual
-
-
-
-
-
-
-
-
Other documents
-
Kenwood KTC=H2A1 User manual
-
Acroprint MasterSync Easy Set Up Owner's manual
-
Advent SIRIUS CE1000SR User manual
-
Sirius ST3TK1, Starmate 3 Receiver Kit Owner's manual
-
-
JVC KT-SR3000 User manual
-
Directed SIRIUS FM-SC 1 User's Installation Manual
-
 American Wireless SIR-STRPNP1 User manual
-
Clarion SIRIUS Plug and Play User manual
-
Audiovox SIR- CK2 User manual
