JVC LVT1134-001A User manual

Category
Car media receivers
Type
User manual
LVT1134-001A
[J]
CD RECEIVER KD-AR5000/KD-LHX500
RECEPTOR CON CD KD-AR5000/KD-LHX500
RECEPTEUR CD KD-AR5000/KD-LHX500
INSTRUCTIONS
MANUAL DE INSTRUCCIONES
MANUEL D’INSTRUCTIONS
For customer Use:
Enter below the Model No. and Serial
No. which are located on the top or
bottom of the cabinet. Retain this
information for future reference.
Model No.
Serial No.
For installation and connections, refer to the separate manual.
Para la instalación y las conexiones, refiérase al manual separado.
Pour l’installation et les raccordements, se référer au manuel séparé.
This unit is equipped with the display demonstration. To cancel it, see page 7.
Esta unidad está equipada con demostración en la pantalla. Para cancelarla, consulte la página 7.
Cet appareil est équipé d’une fonction de démonstration des affichages. Pour l’annuler, référez-
vous à la page 7.
ENGLISH
Detachable
KD-LHX500
KD-AR5000
ESPAÑOL
FRANÇAIS
Cover_KD-AR_LHX5000[J]f.p65 1/27/04, 9:14 PM3
2
ENGLISH
INFORMATION (For U.S.A.)
This equipment has been tested and found to comply with the limits for a Class B digital device, pursuant to
Part 15 of the FCC Rules. These limits are designed to provide reasonable protection against harmful
interference in a residential installation. This equipment generates, uses, and can radiate radio frequency
energy and, if not installed and used in accordance with the instructions, may cause harmful interference to
radio communications. However, there is no guarantee that interference will not occur in a particular
installation. If this equipment does cause harmful interference to radio or television reception, which can be
determined by turning the equipment off and on, the user is encouraged to try to correct the interference by
one or more of the following measures:
Reorient or relocate the receiving antenna.
Increase the separation between the equipment and receiver.
Connect the equipment into an outlet on a circuit different from that to which the receiver is connected.
Consult the dealer or an experienced radio/TV technician for help.
How to reset your unit
Press the reset button on the control panel
using a ball-point pen or a similar tool.
This will reset the built-in microcomputer.
Your preset adjustments—such as preset
channels or sound adjustments—will also be
erased.
For safety....
Do not raise the volume level too much, as
this will block outside sounds, making
driving dangerous.
Stop the car before performing any
complicated operations.
IMPORTANT FOR LASER PRODUCTS
1. CLASS 1 LASER PRODUCT
2. CAUTION: Do not open the top cover.
There are no user serviceable parts inside
the unit; leave all servicing to qualified
service personnel.
3. CAUTION: Visible and invisible laser
radiation when open and interlock failed or
defeated. Avoid direct exposure to beam.
Cautions:
Do not operate the touch panel using a
ball-point pen or a similar tool with the
sharp tip (it may damage the touch panel).
If the temperature inside the car is below
0°C (32°F), the movement of animation
and text scroll will be halted on the
display to prevent the display from being
blurred.
appears on the display.
When the temperature increases, and the
operating temperature is resumed, these
functions will start working again.
Temperature inside the car....
If you have parked the car for a long time in hot
or cold weather, wait until the temperature in
the car becomes normal before operating the
unit.
Warning:
If you need to operate the receiver while
driving, be sure to look ahead carefully or
you may be involved in a traffic accident.
Thank you for purchasing a JVC product.
Please read all instructions carefully before operation, to ensure your complete understanding and
to obtain the best possible performance from the unit.
01-05_KD-AR_LHX5000[J]f.p65 1/27/04, 9:15 PM2
3
ENGLISH
How to read this manual:
To make the explanations as simple and
easy-to-understand as possible, we have
adapted the following methods:
Some related tips and notes are
explained later in the sections “More
about This Receiver” (see pages 46 to
48) but not in the same section
explaining the operations. If you want to
know more about the functions, or if you
have a doubt about the function, go to the
section and you will find the answers.
Contents
How to reset your unit ..................................... 2
Location of the Buttons ................................. 4
Basic Operations ............................................ 6
Canceling the display demonstration ............... 7
Setting the clock .............................................. 8
Radio Operations ........................................... 9
Listening to the radio ....................................... 9
Storing stations in memory ............................ 10
Tuning in to a preset station .......................... 11
Changing the display pattern ......................... 11
Basic Disc Operations ................................. 12
Advanced Disc Operations.......................... 14
Locating a track or folder on a disc ............... 14
Prohibiting disc ejection ................................ 15
Selecting playback modes ............................. 16
Changing the display pattern ......................... 17
Sound Adjustments ...................................... 18
Setting the basic sound selection menu—SEL .... 18
Selecting preset sound modes
(i-EQ: intelligent equalizer) .................... 19
Storing your own sound modes ..................... 20
Graphic Displays ......................................... 21
Basic procedure ............................................. 21
Downloading the file for “OPENING/
ENDING/MOVIE” .................................. 22
Downloading the files for “PICTURE” ......... 23
Deleting all files ............................................ 25
Activating the downloaded files .................... 25
General Settings—PSM .............................. 27
Basic procedure ............................................. 27
Selecting the dimmer mode ........................... 32
Changing the display color ............................ 33
Other Main Functions ................................. 35
Assigning titles to the sources ....................... 35
Changing the control panel angle .................. 36
Detaching the control panel ........................... 36
Basic CD Changer Operations ................... 37
Advanced CD Changer Operations ........... 39
Locating a disc ............................................... 39
Locating a track or folder on a disc ............... 40
Selecting playback modes ............................. 42
Changing the display pattern ......................... 43
External Component Operations ............... 44
Maintenance ................................................. 45
More about This Receiver ........................... 46
Troubleshooting ........................................... 49
Specifications................................................ 51
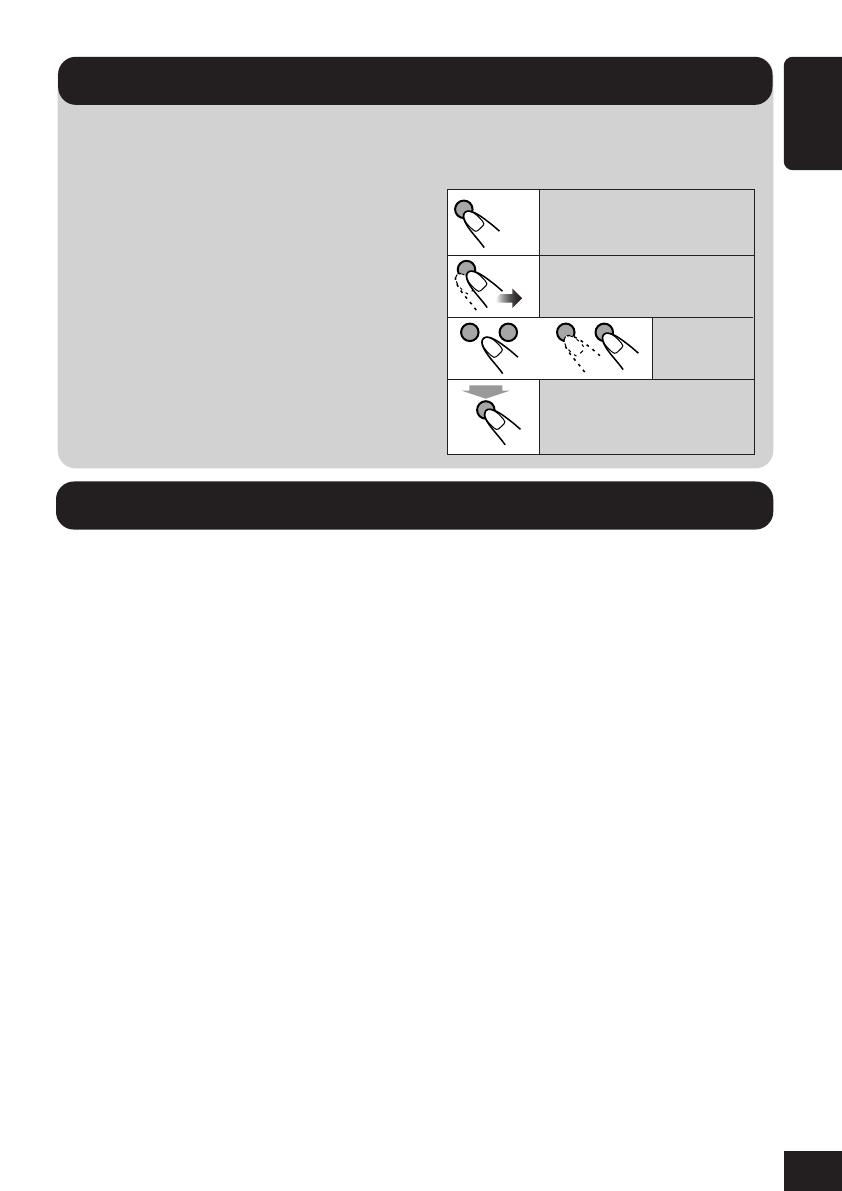
Press briefly.
Press repeatedly.
or
Press and hold until your
desired response begins.
Hold
Press either
one.
Button and touch panel operations are
explained only with the illustrations as
follows:
Important!
01-05_KD-AR_LHX5000[J]f.p65 1/27/04, 9:15 PM3
4
ENGLISH
(Standby/On/Attenuator) button
Turns on and off the power, and also attenuates
the sounds.
MENU button
Show the Main Menu.
VOLUME+/– button
Adjust the volume level.
0 (eject) button
Open the control panel (and eject the
disc if any).
Touch Panel
Used to operate the receiver.
(angle) button
Adjust the control panel angle.
DISP (display) button
Change the information shown on the display.
(control panel release) button
Detach the control panel.
Remote
sensor*
* DO NOT expose the remote sensor on
the control panel to strong light (direct
sunlight or artificial lighting).
Reset button
Reset the built-in microcomputer.
Control panel
WARNINGS on the battery:
Store the battery in a place where
children cannot reach. If a child
accidentally swallows the battery,
consult a doctor immediately.
Do not recharge, short, disassemble, or
heat the battery or dispose of it in a fire.
Doing any of these things may cause the
battery to give off heat, crack, or start a
fire.
Location of the Buttons
Do not leave the battery with other
metallic materials. Doing this may cause
the battery to give off heat, crack, or start
a fire.
When throwing away or saving the battery,
wrap it in tape and insulate; otherwise, the
battery may start to give off heat, crack, or
start a fire.
Do not poke the battery with tweezers or
similar tools. Doing this may cause the
battery to give off heat, crack, or start a
fire.
01-05_KD-AR_LHX5000[J]f.p65 1/27/04, 9:15 PM4
5
ENGLISH
(back side)
Lithium coin battery
(CR2025)
1
2
3
With the + side facing
upwards
Remote controller
ANGLE button
Adjust the control panel angle.
VOL (volume) +/– buttons
BAND button
Select the FM/AM band (FM1,
FM2, FM3, and AM).
SOURCE button
Select the source.
Number buttons
Select the preset station if
pressed, or
Store a station if press and
held.
Select the tracks while
playing CDs.
Select the folders while
playing MP3 discs.
Select the discs while
operating the CD changer.
4/¢ buttons
Searches for stations (Auto
Search) if pressed, or
Skips frequencies after pressed
and held (Manual Search).
Change the tracks on the disc.
5/ buttons
Change the preset stations.
Change the folder on the
MP3/WMA discs.
(Standby/On/Attenuator) button
CAUTION:
DO NOT leave the remote controller in a
place (such as dashboards) exposed to direct
sunlight for a long time. Otherwise, it may
be damaged.
01-05_KD-AR_LHX5000[J]f.p65 1/27/04, 9:15 PM5
6
ENGLISH
Select the source.
3
Adjust the volume
4
Adjust the sound
For details, see pages 18 to 20.
When operating the touch panel
Make sure to touch the area inside the key
icon boundary, but not on the boundary.
1
Turn on the power
The Operation screen for last
selected source is recalled.
2
Select the source
Source Selection screen (KD-AR5000)
Source Selection screen (KD-LHX500)
Main touch panels used in this section
Basic Operations
To return to the previous screen, press “BACK”
(if shown). See also page 46.
You can also
change the
source by....
Then just wait.
Hold Hold
* What appears changes depending on
the Ext Input setting (see page 31).
KD-AR5000: CD-CH/SIRIUS
KD-LHX500: CD-CH/LINE-IN/SIRIUS
Main Menu
Not displayed for LINE-IN or SIRIUS
*
Not displayed for SIRIUS
*
06-11_KD-AR_LHX5000[J]f.p65 1/27/04, 9:16 PM6
7
ENGLISH
To drop the volume in a moment (ATT):
To restore the sound, press
it again.
To turn off the power:
CAUTION on Volume Setting:
Discs produce very little noise compared
with other sources. If the volume level is
adjusted for the tuner, for example, the
speakers may be damaged by the sudden
increase in the output level. Therefore, lower
the volume before playing a disc and adjust
it as required during playback.
Canceling the display demonstration
When shipped from the factory, display
demonstration has been activated, and starts
automatically when no operations are done for
about 20 seconds.
To cancel the display demonstration, follow
the procedure below:
1
2
3
To be continued...
What information is shown on the touch panel
The following information are shown commonly for all sources.
If you press DISP on the control panel, the touch panel will show the different information or
different screens. (Details about this will be explained later separately for each source.)
Clock time
i-EQ setting
(page 19)
Current source
Hold
Select Off.
Current source
information icon
appears.
Ex.: Station name
icon for the tuner
06-11_KD-AR_LHX5000[J]f.p65 1/27/04, 9:16 PM7
8
ENGLISH
5
6
7
8
9
To check the current clock time
when the unit is turned off...
To change the voice support system
You can select either “Beep” or “Voice” for
the voice support system (VSS).
Furthermore, if you select “Voice,” you can
select the language—English, Spanish, or
French.
To change them, see pages 30 and 31.
4
To activate the display demonstration, repeat
the same procedure and select any one other
than “Off” in step
3
.
For more details, see “To show the display
demonstration” on page 29.
Setting the clock
You can also set the clock system to 24 hours or
12 hours.
1
2
3
4
Exit
Select CLOCK.
Now Clock Hr setting
appears.
Adjust the hour.
Select Clock Min.
Adjust the minute.
Select 24H/12H.
Select 24Hours or 12Hours.
The last selected item appears.
06-11_KD-AR_LHX5000[J]f.p65 1/27/04, 9:16 PM8
9
ENGLISH
Listening to the radio
1
Select the Tuner
2
Select the band (FM/AM)
This receiver has three FM bands (FM1, FM2,
FM3). You can use any one of them to listen to
an FM broadcast.
3
Start searching for a station
Auto Search” begins.
When a station is received, searching stops.
To stop searching, press the same icon.
To tune in to a station manually
In step
3
above...
Select “TUNER.
Radio Operations
Main touch panels used in this section
Activate “Manual
Search.
Select station
frequencies.
Hold
Main Menu
Tuner Mode Menu
To return to the previous screen, press
BACK (if shown).
Tuner Operation screen
Preset Station List*
1
Appears only for FM.
*
1
The lists show either the station frequency or assigned name (the first 8 characters, see page 35).
You can also
change the
source by....
Then just wait.
Appears only for FM.
Press to change the FM band (1=2=3=...).
Hold to change the FM band (3=2=1=...).
06-11_KD-AR_LHX5000[J]f.p65 1/28/04, 2:30 PM9
10
ENGLISH
When an FM stereo broadcast is hard to
receive:
1
2
3
On: Reception improves, but stereo
effect will be lost.
Off: Normally select this.
4
Storing stations in memory
You can preset 6 stations for each band.
FM station automatic presetting—SSM
(Strong-station Sequential Memory)
This is only for FM bands.
1
2
3
FM1 FM2
FM3AM
FM1 FM2
FM3AM
Exit.
4
Local FM stations with the strongest
signals are searched and stored
automatically in the selected FM band.
Manual presetting
Ex. Storing an FM station of 92.5 MHz into
the preset number 1 of the FM1 band.
1
2
Holding or on the Tuner
Operation screen can also display the
Preset Station List (see step
5
below).
3
4
5
6
Select 1 in this example.
On Off
(in this example, of 92.5 MHz)
(in this example, FM1)
Hold
Hold
06-11_KD-AR_LHX5000[J]f.p65 1/27/04, 9:16 PM10
11
ENGLISH
Tuning in to a preset station
1
2
To select a preset station using the
Preset Station List
Holding
or on the Tuner
Operation screen can also display the Preset
Station List.
1
2
3
4
5
FM1 FM2
FM3AM
FM1 FM2
FM3AM
Select a preset
number.
Select a preset number.
Changing the display pattern
Station name if assigned
Preset number
if any
Lights while receiving
an FM stereo program
Clock time is enlarged.
Audio Level Meter* (see page 30)
Graphic screen*
(Appears only after you have
download a file, see page 25)
Goes back to the Tuner Operation screen.
Tuner Operation screen
* These screens will be temporarily canceled
when you operate the unit.
06-11_KD-AR_LHX5000[J]f.p65 1/27/04, 9:16 PM11
12
ENGLISH
1
Open the control panel
The unit turns on, then...
2
Insert a disc
The unit draws the disc, the control panel
closes then goes back to the previous
position (see page 36), and playback starts
automatically.
MP3 Operation screen
WMA Operation screen
To fast-forward or reverse the track:
To go to the next or previous tracks:
To stop play and eject the disc:
To return the control
panel to its previous
position, press it again.
Main touch panels used in this section
Basic Disc Operations
Sticker
Sticker
residue
Disc
Stick-on
label
Warped
disc
Do not use the following discs:
CD/CD Text Operation screen
Hold
Hold
Microsoft and Windows Media are either
registered trademarks or trademarks of
Microsoft Corporation in the United States
and/or other countries.
12-17_KD-AR_LHX5000[J]f.p65 1/27/04, 9:17 PM12
13
ENGLISH
About MP3 and WMA discs
MP3 and WMA (Windows Media
®
Audio)
tracks” (words “file” and “track” are used
interchangeably) are recorded in “folders.”
“Root” is similar to the root of a tree. Every
track and folder can be linked to and be
accessed from the root.
When an MP3 or a WMA folder includes an
image <jll> file edited by Image Converter
(Wide)—supplied in the CD-ROM, you can
show the image on the display while the
tracks in the folder are played back. (See
pages 29 and 47 for details.)
: Folder with its play order
: MP3/WMA track with its
play order
Display indications when inserting
an audio CD or a CD Text:
Display indications when inserting
an MP3 or a WMA disc
Disc type
Total folder
number
Total track
number
1
1
2
3
10
11
12
4
5
6
7
8
9
01
01
05
02 03
04
Hierarchy
ROOT
Level 1 Level 2 Level 3 Level 4 Level 5
Current folder*
3
Current track*
3
*
3
If “Tag” is set to “On” (see page 30), ID3 tag
information will appear on the display if the
disc has an ID3 tag.
The album name/performer with (disc)
indicator appears on the display instead of
the folder name; while track title with
(track) indicator appears instead of the track
name.
CAUTIONS:
Do not insert 8 cm (3-3/16”) discs (single
CDs) into the loading slot. (Such discs
cannot be ejected.)
Do not insert any disc of unusual shape—
like a heart or flower; otherwise, it will
cause a malfunction.
Do not expose discs to direct sunlight or
any heat source or place them in a place
subject to high temperature and humidity.
Do not leave them in a car.
Track name*
1
Disc name*
2
*
1
Appear only for CD Texts. (“No Name” appears
if no name is recorded).
*
2
Appear for CD Texts and CDs if it has been
assigned. (“No Name” appears if no name is
recorded or assigned).
12-17_KD-AR_LHX5000[J]f.p65 1/27/04, 9:17 PM13
14
ENGLISH
Advanced Disc Operations
Main touch panels used in this section
Locating a track or folder on a disc
To locate a folder on the screen (only
for MP3/WMA discs)
Holding or on the Disc Operation
screen can also display the Folder List.
1
2
3
4
The current folder is highlighted.
Select a folder number.
If you select the currently selected folder
(highlighted on the screen), the File List
screen (see step
3
below), then you can
select a track to start with.
To locate a track on the screen (only for
MP3/WMA discs)
1
2
3
4
The current track is highlighted.
Select a track number.
Disc Mode Menu screen
Skip 10 screen
To return to the previous screen, press
“BACK” (if shown).
Folder List screen (only for MP3/WMA)*
1
Appears only for MP3/WMA.
File (Track) List screen (only for MP3/WMA)*
1
*
2
*
2
*
1
The lists show the folder/file names actually
recorded (the first 8 characters).
*
2
Press to go to the next list; hold to go back to
the previous list.
12-17_KD-AR_LHX5000[J]f.p65 1/27/04, 9:17 PM14
15
ENGLISH
Hold
4
First time you press “+10” or “–10,” the
track skips to the nearest higher or lower
track with a track number of multiple ten
(ex. 10th, 20th, 30th).
Then, each time you press the button, you
can skip 10 tracks.
After the last track, the first track will be
selected, and vice versa.
5
6
Prohibiting disc ejection
You can lock a disc in the loading slot.
1
2
“No Eject” flashes, and
the disc cannot be
ejected.
To cancel the prohibition, repeat the same
procedure (press “Eject OK” in step
2
). “Eject
OK” flashes.
(3 times)
(Twice)
To locate a track (or folder) directly
using the remote controller
To select a track (or folder for MP3 and
WMA discs) number from 1 – 6:
To select a track (or folder for MP3 and
WMA discs) number from 7 (1) – 12 (6):
To directly select the folders using the number
button(s), it is required that folders be assigned 2
digit numbers at the beginning of their folder
names—01, 02, 03, and so on.
To skip 10 tracks at a time
You can quickly reach a desired track on a disc
including many tracks.
For MP3 and WMA, you can select only a
track within the current folder.
Ex. To select track number 32 while playing
track number 6
1
2
3
Hold
(at the same
time)
Hold
12-17_KD-AR_LHX5000[J]f.p65 1/27/04, 9:17 PM15
16
ENGLISH
Selecting playback modes
You can use only one of the following playback
modes at a time.
To play back only intros (Intro Scan)
You can play back the first 15 seconds of each
track sequentially.
1
2
3
Mode Plays the beginnings of
Track : All tracks of the disc.
While playing,
lights
up.
Folder* : First tracks of all folders.
While playing, lights
up.
Off : Cancels Intro Play.
* “Folder” can be selected for MP3 and
WMA discs only.
4
To play back tracks repeatedly (Repeat
Play)
You can repeat playback.
1
2
3
Mode Plays repeatedly
Track : Current track.
While playing, lights
up.
Folder* : All tracks of the current folder.
While playing, lights
up.
Off : Cancels Repeat Play.
* “Folder” can be selected for MP3 and
WMA discs only.
4
Track Folder
Off
*
Track Folder
Off
*
Exit.
Exit.
12-17_KD-AR_LHX5000[J]f.p65 1/27/04, 9:17 PM16
17
ENGLISH
To play back tracks at random (Random
Play)
You can play back tracks at random.
1
2
3
Mode Plays randomly
Folder* : All tracks of the current folder,
then moves to the next folder
and so on.
While playing,
lights
up.
Disc : All tracks on the disc.
While playing,
lights
up.
Off : Cancels Random Play.
* Folder can be selected for MP3 and
WMA discs only.
4
Changing the display pattern
Clock time is enlarged.
Goes back to the Disc Operation screen.
DiscFolder
Off
*
Exit.
Audio Level Meter (see page 30)
Graphic screen
(Appears only after you have
download a file, see page 25)
Disc Operation screen
12-17_KD-AR_LHX5000[J]f.p65 1/27/04, 9:17 PM17
18
ENGLISH
Sound Adjustments
Setting the basic sound selection
menu—SEL
1
Show the Main Menu
2
Show the basic sound
selection menu
3
Select a setting item
Return
F6 (front only)
to
R6 (rear only)
4
Adjust the item
To adjust fader and balance:
To select the cutoff frequency and adjust
the subwoofer output level:
To adjust the input level of each source:
To adjust fader and balance—FAD/BAL:
Adjust fader—speaker output balance between
the front and rear speakers.
Adjust the balance—speaker output balance
between the left and right speakers.
L6 (left only)
to
R6 (right only)
18-20_KD-AR_LHX5000[J]f.p65 1/27/04, 9:18 PM18
19
ENGLISH
00 (min.)
to
08 (max.)
–05 (min.) to +05 (max.)
To adjust subwoofer output—SUB OUT:
Select an appropriate cutoff frequency level
according to the subwoofer connected.
Low: Frequencies higher than 55 Hz are cut
off to the subwoofer.
Mid: Frequencies higher than 85 Hz are cut
off to the subwoofer.
High: Frequencies higher than 115 Hz are cut
off to the subwoofer.
Adjust the subwoofer output level.
To adjust the input level of each source
—VOLUME ADJUST:
This setting is required for each source except
FM. Before making an adjustment, select an
appropriate source for which you want to make
an adjustment.
Once you have made an adjustment, it is
memorized, and the volume level will
automatically increase or decrease by adjusted
level whenever you change the source.
Adjust to match the input level to the FM sound
level.
Selecting preset sound modes
(i-EQ: intelligent equalizer)
You can select a sound mode suitable to the
music genre.
Available sound modes:
Flat (To cancel the sound mode. No sound
mode is applied)
Hard Rock
R & B
Pop
Jazz
Dance
Country
Reggae
Classic
User 1, User 2, User 3
1
2
3
4
Select a sound mode.
Exit.
18-20_KD-AR_LHX5000[J]f.p65 1/27/04, 9:18 PM19
20
ENGLISH
Storing your own sound modes
You can adjust the sound modes and store your
own adjustments in memory.
1
Repeat steps
1
to
3
on page 19 to select a
sound mode you want to adjust.
2
3
Ex. When you select “Flat”
Select the frequency band—60Hz, 150Hz,
400Hz, 1kHz, 2.4kHz, 6kHz, 12kHz.
Adjust the level of the selected band
within the range of –05 to +05.
4
Repeat steps
2
and
3
to adjust the other
frequency bands.
5
6
For details about the preset settings of each
sound mode, see below.
Sound Preset equalizing values
Mode 60 Hz 150 Hz 400 Hz 1 kHz 2.4 kHz 6 kHz 12 kHz
Flat 00 00 00 00 00 00 00
Hard Rock +03 +03 +01 00 00 +02 +01
R & B +03 +02 +02 00 +01 +01 +03
Pop 00 +02 00 00 +01 +01 +02
Jazz +03 +02 +01 +01 +01 +03 +02
Dance +04 +02 00 –02 –01 +01 +01
Country +02 +01 00 00 00 +01 +02
Reggae +03 00 00 +01 +02 +02 +03
Classic +02 +03 +01 00 00 +02 00
User 1 00 00 00 00 00 00 00
User 2 00 00 00 00 00 00 00
User 3 00 00 00 00 00 00 00
Select one of the user modes to
store your adjustment (ex. when
you selecting “USER1”).
18-20_KD-AR_LHX5000[J]f.p65 1/27/04, 9:18 PM20
  • Page 1 1
  • Page 2 2
  • Page 3 3
  • Page 4 4
  • Page 5 5
  • Page 6 6
  • Page 7 7
  • Page 8 8
  • Page 9 9
  • Page 10 10
  • Page 11 11
  • Page 12 12
  • Page 13 13
  • Page 14 14
  • Page 15 15
  • Page 16 16
  • Page 17 17
  • Page 18 18
  • Page 19 19
  • Page 20 20
  • Page 21 21
  • Page 22 22
  • Page 23 23
  • Page 24 24
  • Page 25 25
  • Page 26 26
  • Page 27 27
  • Page 28 28
  • Page 29 29
  • Page 30 30
  • Page 31 31
  • Page 32 32
  • Page 33 33
  • Page 34 34
  • Page 35 35
  • Page 36 36
  • Page 37 37
  • Page 38 38
  • Page 39 39
  • Page 40 40
  • Page 41 41
  • Page 42 42
  • Page 43 43
  • Page 44 44
  • Page 45 45
  • Page 46 46
  • Page 47 47
  • Page 48 48
  • Page 49 49
  • Page 50 50
  • Page 51 51
  • Page 52 52
  • Page 53 53
  • Page 54 54
  • Page 55 55
  • Page 56 56
  • Page 57 57
  • Page 58 58
  • Page 59 59
  • Page 60 60
  • Page 61 61
  • Page 62 62
  • Page 63 63
  • Page 64 64
  • Page 65 65
  • Page 66 66
  • Page 67 67
  • Page 68 68
  • Page 69 69
  • Page 70 70
  • Page 71 71
  • Page 72 72
  • Page 73 73
  • Page 74 74
  • Page 75 75
  • Page 76 76
  • Page 77 77
  • Page 78 78
  • Page 79 79
  • Page 80 80
  • Page 81 81
  • Page 82 82
  • Page 83 83
  • Page 84 84
  • Page 85 85
  • Page 86 86
  • Page 87 87
  • Page 88 88
  • Page 89 89
  • Page 90 90
  • Page 91 91
  • Page 92 92
  • Page 93 93
  • Page 94 94
  • Page 95 95
  • Page 96 96
  • Page 97 97
  • Page 98 98
  • Page 99 99
  • Page 100 100
  • Page 101 101
  • Page 102 102
  • Page 103 103
  • Page 104 104
  • Page 105 105
  • Page 106 106
  • Page 107 107
  • Page 108 108
  • Page 109 109
  • Page 110 110
  • Page 111 111
  • Page 112 112
  • Page 113 113
  • Page 114 114
  • Page 115 115
  • Page 116 116
  • Page 117 117
  • Page 118 118
  • Page 119 119
  • Page 120 120
  • Page 121 121
  • Page 122 122
  • Page 123 123
  • Page 124 124
  • Page 125 125
  • Page 126 126
  • Page 127 127
  • Page 128 128
  • Page 129 129
  • Page 130 130
  • Page 131 131
  • Page 132 132
  • Page 133 133
  • Page 134 134
  • Page 135 135
  • Page 136 136
  • Page 137 137
  • Page 138 138
  • Page 139 139
  • Page 140 140
  • Page 141 141
  • Page 142 142
  • Page 143 143
  • Page 144 144
  • Page 145 145
  • Page 146 146
  • Page 147 147
  • Page 148 148
  • Page 149 149
  • Page 150 150
  • Page 151 151
  • Page 152 152
  • Page 153 153

JVC LVT1134-001A User manual

Category
Car media receivers
Type
User manual

Ask a question and I''ll find the answer in the document

Finding information in a document is now easier with AI