Bauknecht 1CI-40 User guide

Category
Freezers
Type
User guide
N C
M Y
ENVIRONMENTAL HINTS
Packing
Do not throw the packing into the garbage: first sort out the
different materials (i.e.: steel, cardboard, polystyrene) fol-
lowing local regulations.
Conformity declaration
This appliance incorporates parts intended to come
into contact with foodstuff in compliance with EEC di-
rective 89/09/CEE.
Information
This appliance is free of CFC’s (refrigerant circuit contains
R134a) or free of HFC’s (refrigerant circuit contains R600a
Isobutane). For more details, p lease refer to the rating plate
on the appliance.
For appliances with Isobutane (R600a)
The refrigerant Isobutane is a natural gas of high environ-
mental compatibility but which is inflammable. Therefore, it
is essential to ensure that the ducts of the refrigerant circuit
do not get damaged.
KNOW YOUR APPLIANCE
The appliance you have just bought, marked , allows
the perfect freezing-in of fresh and cooked foods, the pro-
duction of ice cubes and the storage of deep frozen foods.
Please read these instructions carefully; you will find the
description of your appliance and the useful hints to obtain
the best performance to store foods.
DESCRIPTION OF THE APPLIANCE (Fig. )
A) Freezing-in basket
B) Frozen foods storage baskets
C) Thermostat (to be adjusted by means of a coin)
D) Fast freeze switch (yellow pilot lamp)
E) Freezing alarm pilot lamp (red light)
It lights up when:
the appliance is first connected to the mains supply
the temperature inside the freezer is not cold enough
the freezer has been loaded with fresh foods to be frozen
the freezer door is left open for a long time.
It switches off when:
the freezer has reached the correct storage temperature
F) Operation pilot lamp (green light).
English
5
INSTALLATION (Fig. 2-3)
This appliance is for building-in and do not install it as a free-
standing unit. Please check your appliance and ensure that
it is undamaged: any transport damage must be reported to
your dealer within 24 hours of receipt.
The appliance should not be installed close to heat sources
such as cookers, central heating boilers, direct sunlight, etc.
It must however be located in a well ventilated dry space.
Before building-in the appliance, we suggest you check that
the pipes at the rear have not been damaged during trans-
port and that they do not touch the appliance or the wall, to
avoid noise during the operation. Ensure that the housing is
ventilated at the rear, a front opening must be provided as
well; please refer to the separate instructions enclosed.
Clean the interior of the appliance with a sponge dampened
in a solution of lukewarm water and bicarbonate of soda or
vinegar. Position the accessories (if supplied).
Important: Accessibility to the plug has to be guaranteed
even after installation to disconnect it, if required. If not
possible, connect the appliance to an all-pole switching de-
vice with contact separation of at least 3 mm placed in an
accessible position.
ELECTRICAL CONNECTION AND
OPERATION
(for U.K. only)
Important:
The fuse cover must be refitted when changing a fuse.
In the event of a fuse cover being misplaced, the plug
must not be used until a correct replacement is fitted.
Please ensure that t he replacement fuse cover is of the
same colour as the insert or, as the colour embossed in
words on the base of the plug.
If the fitted p lug is not suitable for your socket outlets, it
should be cut off and disposed of, to avoid a p ossible shock
hazard should it be inserted into a 13A socket elsewhere.
A suitable alternative plug should then be fitted to the cable.
ELECTRICAL INFORMATION
“WARNING - THIS APPLIANCE MUST BE EARTHED”
(For Great Britain only)
Fuse replacement.
If the mains lead of this appliance is fitted with a BS 1363A
13 amp fused plug, to change a fuse in this type of plug use
an A.S.T.A. approved fuse to BS 1362 type and proceed as
follows:
1. Remove the fuse cover (A) and fuse (B).
2. Fit replacement 13A fuse into fuse cover.
3. Refit both into plug.
IMPORTANT: The fuse cover must be refitted when chang-
ing a fuse and if the fuse cover is lost the plug must not be
used until a correct replacement is fitted.
Correct replacement are identified by the colour insert or the
colour embossed in words on the b ase of the plug.
Replacement fuse covers are available from your local elec-
trical store.
CONNECTION TO A REWIREABLE PLUG
If the fitted plug is not suitable for your socket outlet, then it
should be cut off and disposed of in order to avoid a poss-
ible shock hazard should it be inserted into a 13A socket el-
sewhere. A suitable altenative plug should then be fitted to
the cable.
The wires in this mains lead are coloured in accordance with
the following code;
BLUE - “NEUTRAL” (“N”)
BROWN - “LIVE” (“L”)
GREEN AND YELLOW - “EARTH” (“E”)
1.
The GREEN AND YELLOW wire must b e connected to the
terminal in the plug which is marked with the letter “E” or by
the Earth symbol
or coloured green or green and yellow.
2. The BLUE wire must be connected to the terminal which
is marked with the letter “N” or coloured black.
3. The BROWN wire must be connected to the terminal
which is marked with the letter “L” or coloured red.
N C
M Y
For the Republic of Ireland only
The information given in respect of Great Britain will fre-
quently apply, but a third type of plug and socket is also
used, the 2-pin, side earth type. In this case, the wire which
is coloured GREEN AND YELLOW must be connected to the
EARTH contact, and the other two wires to the two pins, ir-
respective of colour. The supply to the socket must be fitted
with a 16 amp fuse.
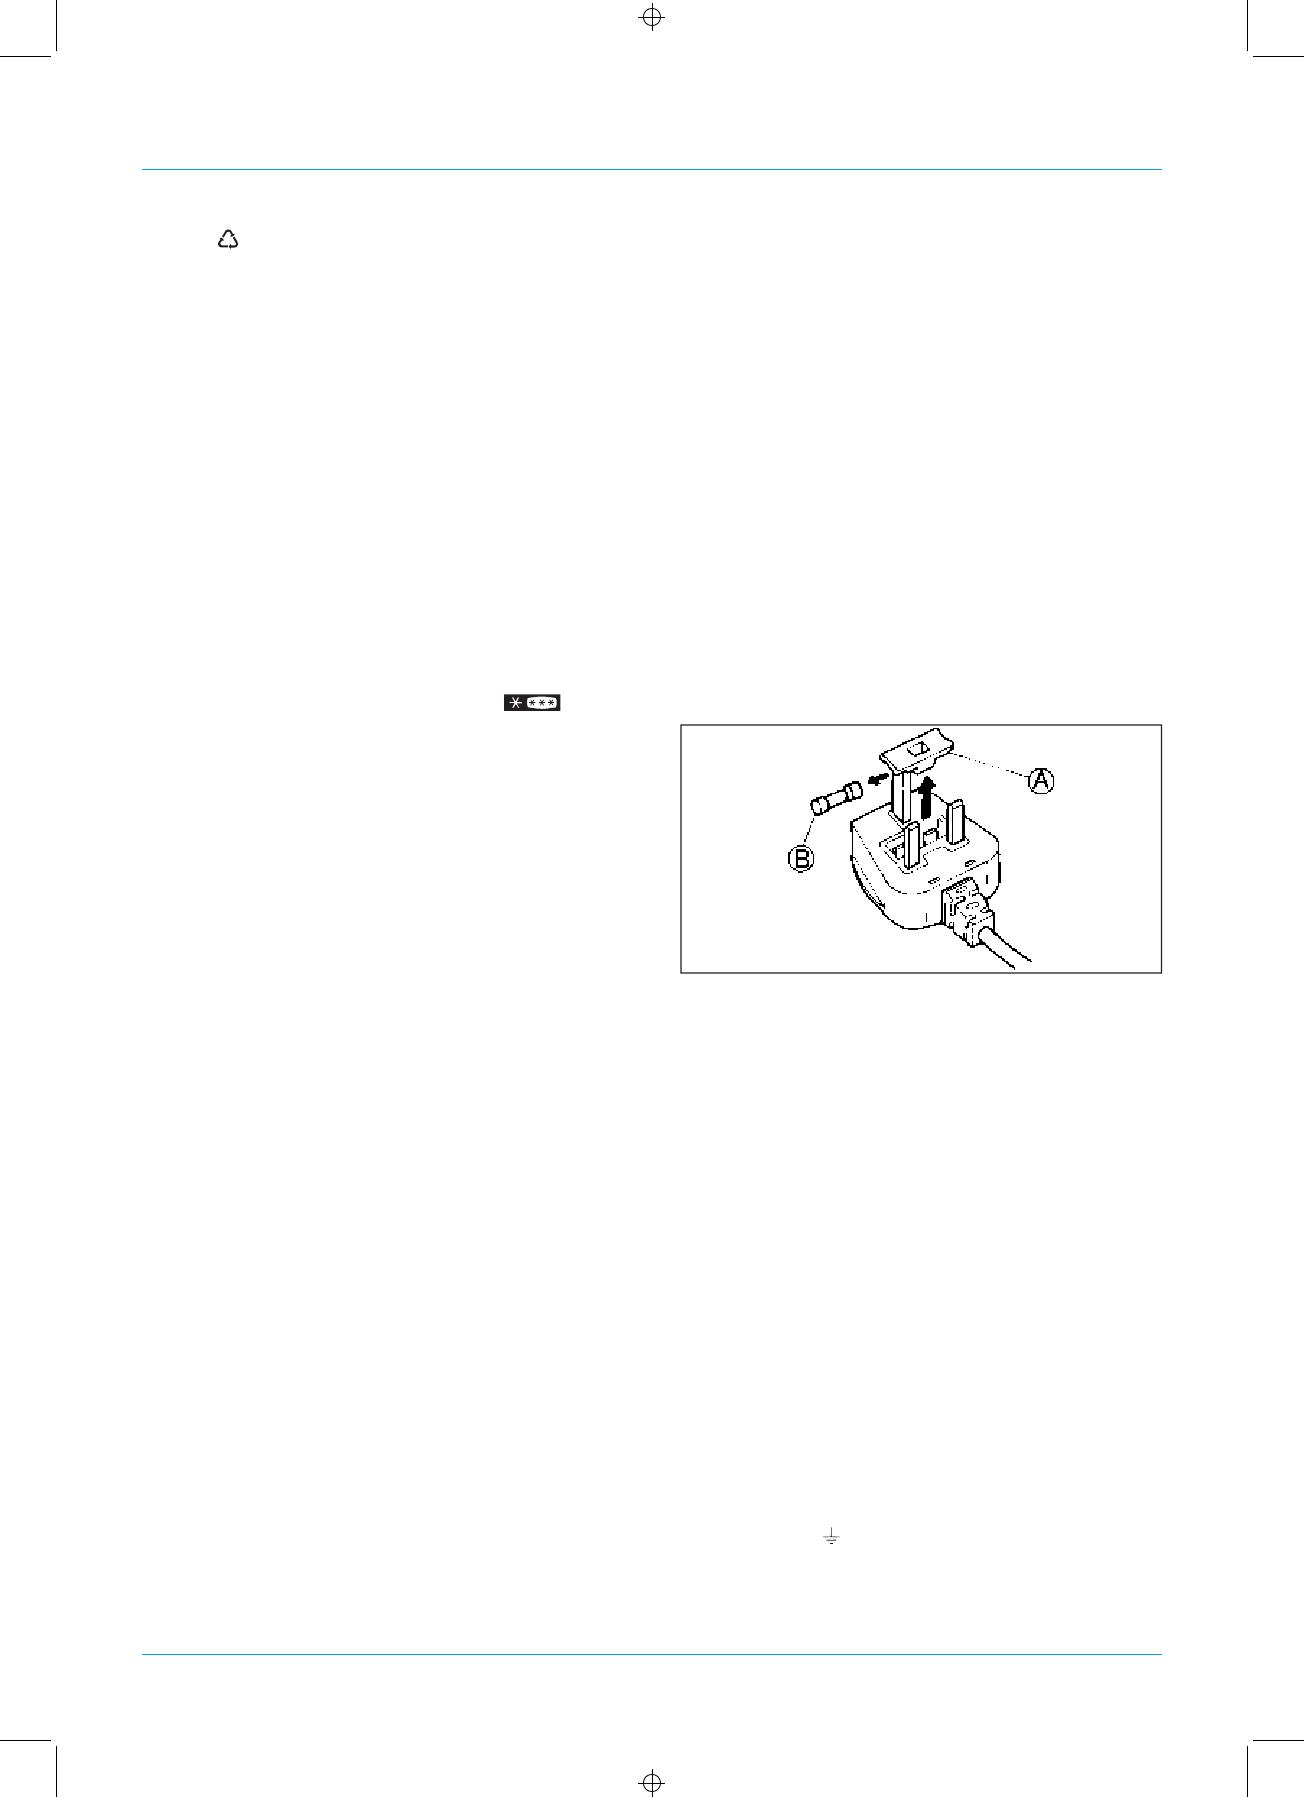
Leave the appliance to stand for one hour before connect-
ing it to the electricity supply. Please check that the voltage
on the rating plate (Fig. 4-5) situated inside the liner, corres-
ponds to the voltage in your home 240 V.
The earthing of this appliance is compulsory by law.
The manufacturer will accept no liability for damage to per-
sons or objects arising from the non-observance of this re-
quirement.
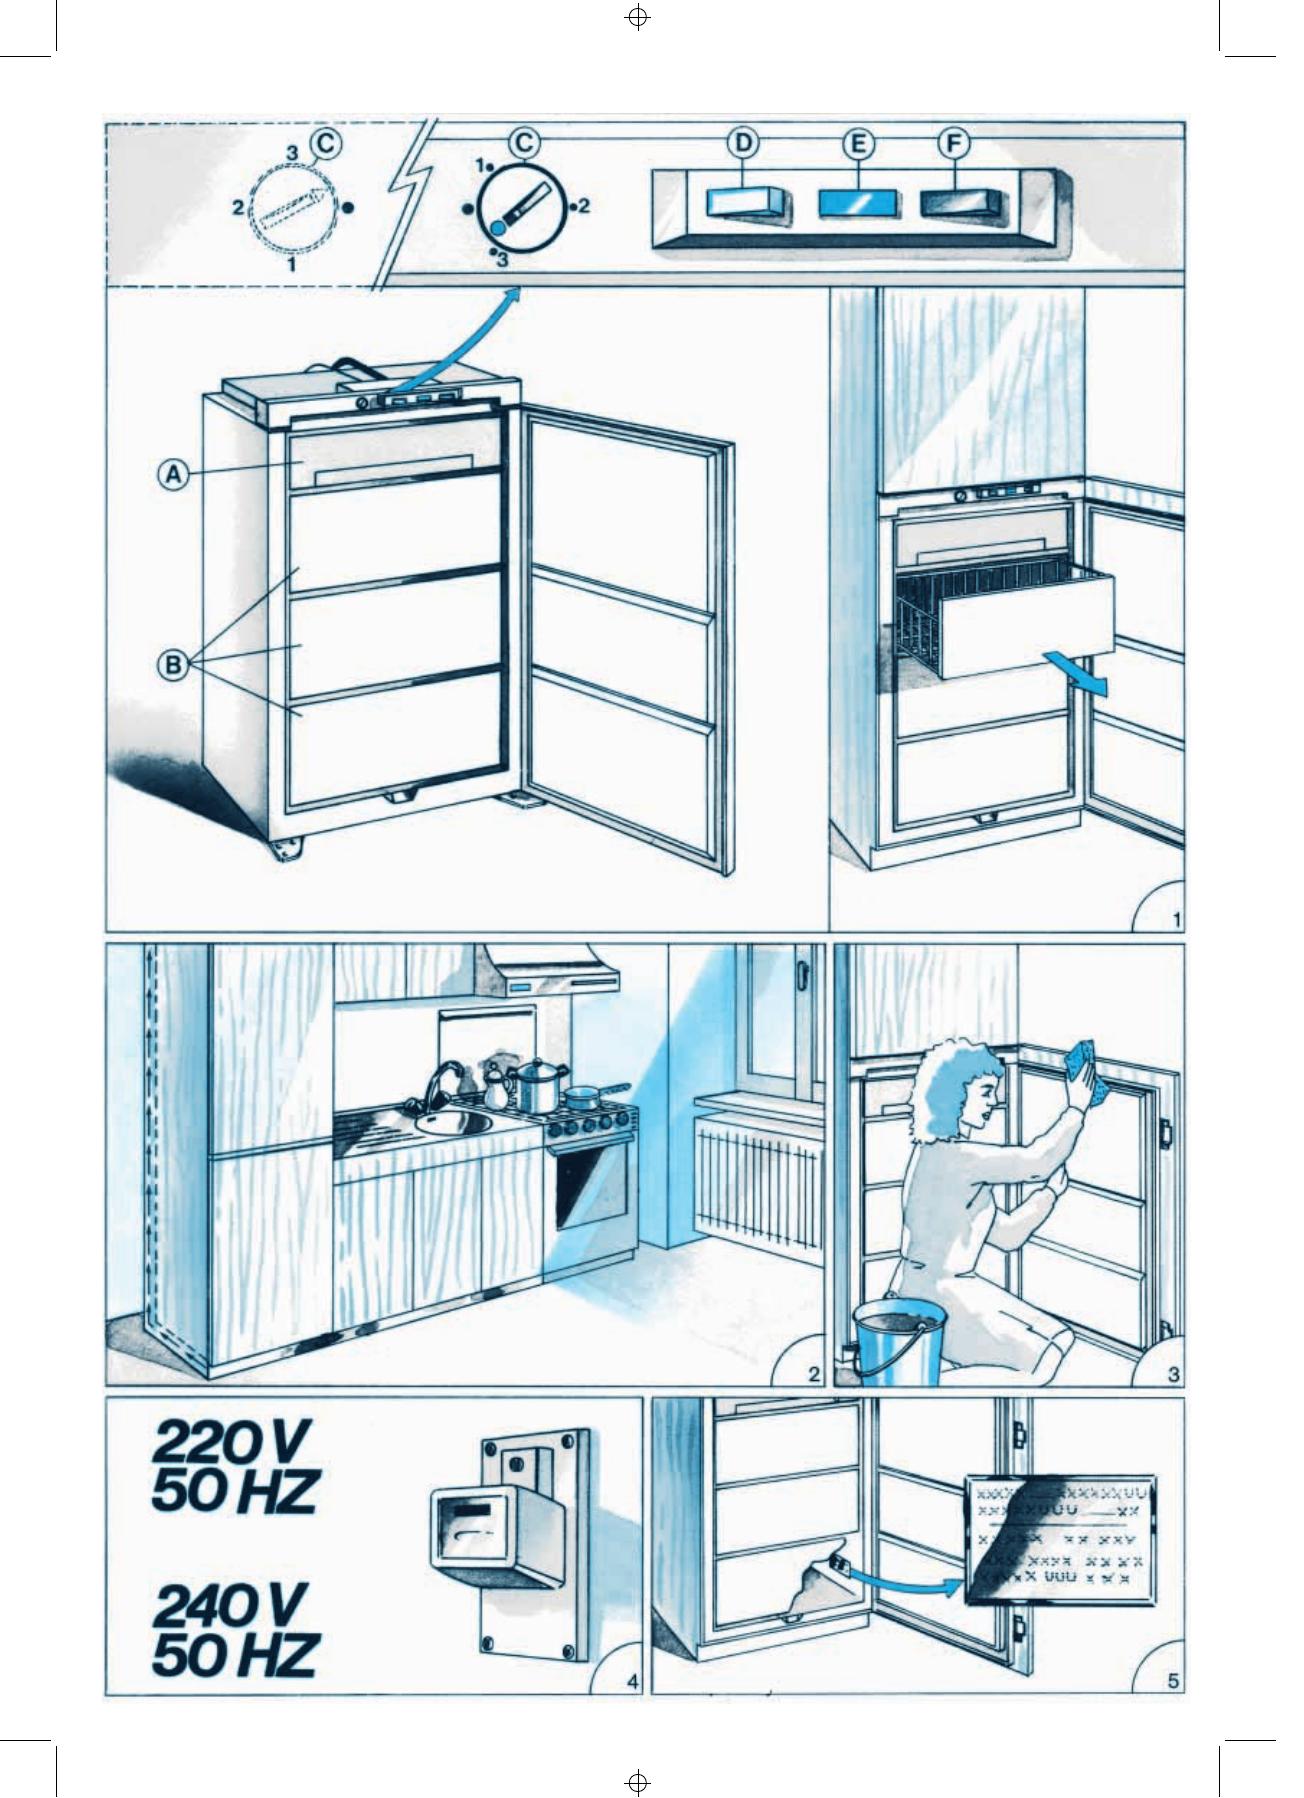
When the appliance is connected to t he electricity supply,
the green and the red light (Fig. F-E) will switch on, if the
thermostat control knob is not set to the
x position.
Adjust the temperature as indicated in the next chapter: the
freezer is ready for use when the red light goes off.
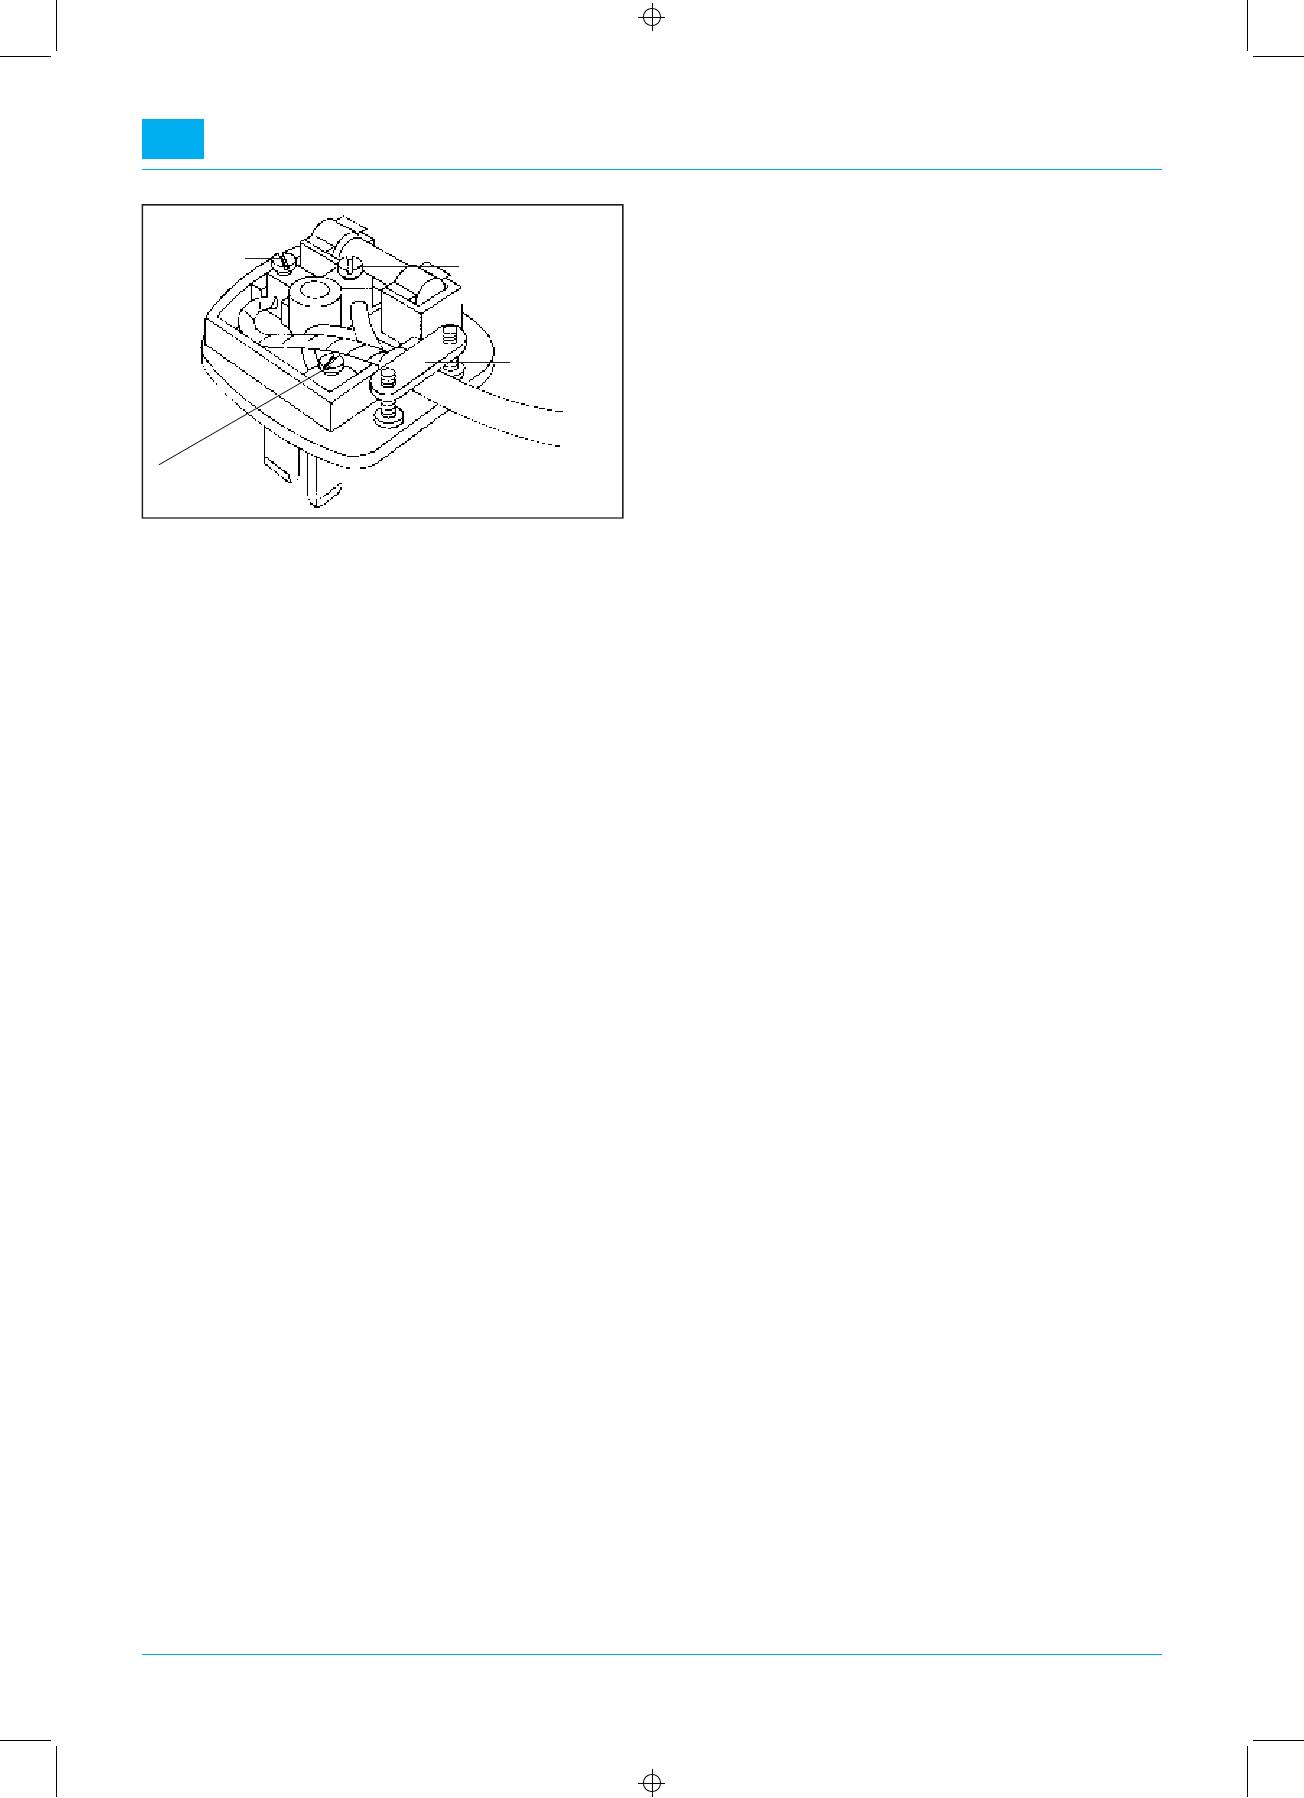
GREEN AND
YELLOW (“E”)
BROWN (“L”)
CABLE CLAMP.
BLUE (“N”)
Connection to a
typical13ampplug
ADJUSTMENT OF THE TEMPERATURE
The thermostat (Fig. C) controls the internal temperature.
If the thermostat control knob is set to the
x position, the
operation of the appliance is interrupted, and the lights go
off. The ideal temperature to store frozen foods is −8
o
C.
At a normal ambient temperature included between +20
o
C
and +25
o
, we suggest you adjust the thermostat control
knob to position 2.
If you need colder or warmer temperatures than −8
o
C, turn
the thermostat control knob to the higher position or towards
position
x respectively.
The internal temperatures of the freezer are a ffected by the
temperature of the surrounding air, the food stored and the
frequency of door opening. The setting of the thermostat
may require adjustment to allow f or these factors.
USE OF THE FREEZER COMPARTMENT
FREEZING-IN
Themaximumquantityoffood,inkg,thatcanbefrozenina
24 hours period at an ambient temperature of 25
o
C, is stated
on the rating plate (Fig. 5). The freezing-in of fresh foods
must be carried out in the two freezing-in compartment, sit-
uated at the top of the freezer.
The freezing-in capacity stated on the rating plate, is obtai-
ned by removing the drawers and placing the foods to be
frozen on the refrigerating grid directly.
To obtain the best results, proceed as follows:
Transfer in the lower baskets all the foods stored in the
two top freezing-in compartments.
Wrap foods in plastic or aluminium foil or store them in
the suitable containers.
Label each pack indicating the type of food and the
freezing-in date.
Place the packets in the top freezing-in compartments
(Fig. 6).
At ambient temperatures up to +25
o
C, press the fast
freeze switch (D) (Fig. D) yellow pilot lamp on, 24 hours
prior to freeze-in foods.
The appliance operates continuously: we recommend, 24
hours a fter introduction of foods, to press switch D to reset
the normal operation. Do not store warm foods in the freezer.
Never re-freeze partially or totally thawed foods.
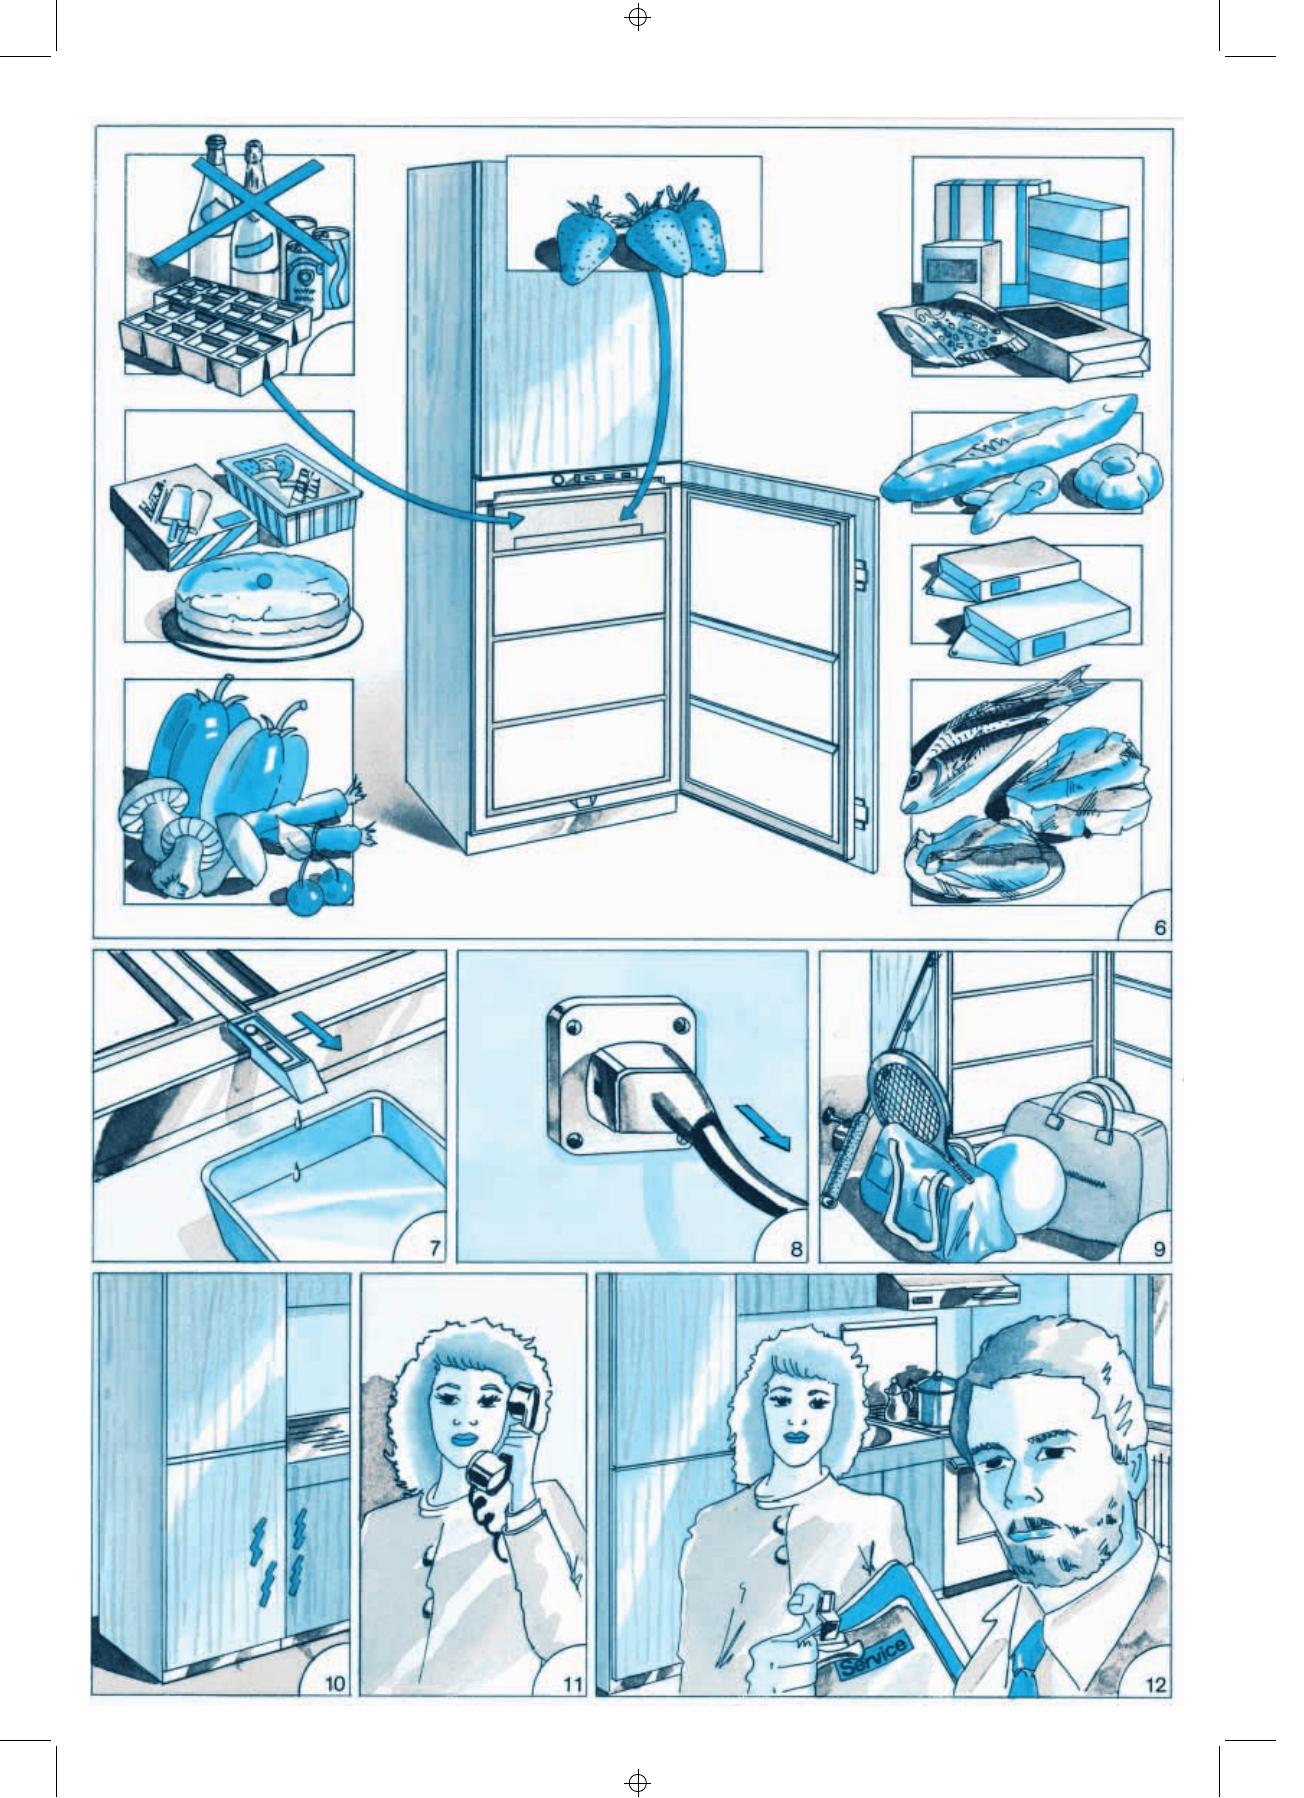
PRODUCTION OF ICE CUBES (Fig. 6)
May we suggest that you 3/4 fill the ice cube trays and store
on the upper basket of the freezer.
Attention: Do not eat ice cubes or ice lollies immediately
after their removal from the freezer as they may give rise to
“cold” burns. Do not place liquids in glass containers.
STORAGE OF DEEP FROZEN FOODS (Fig. 7)
When buying deep frozen foods, make sure that wrapper or
packet is intact. If it bulges or sags or has spots of moisture
on it, it may not have been kept cold enough and the con-
tents may have lost their original quality.
When home, store d eep frozen foods in the freezer with the
least possible delay, as any appreciable rise in temperature
may alterate their freshness.
Store deep frozen foods no longer than the packet instruc-
tions recommend.
Place the packets in the storage compartments, leaving
the freezing-in compartment empty.
The maximum available volume to store foods is obtai-
ned by removing the drawer and the baskets, except the
bottom baskets.
In any case, packets can be placed directly on the refrige-
rated plates, following the limit load marked on the liner
sides. You f reezer maintains the correct storage tempera-
ture, even if case of p ower failure, for  hours approx. in the
freezing-in compartment, and for 6 hours approx. in the
storage baskets; however, we suggest you leave the freezer
door closed, during the power failure.
Note: Due to the effectiveness of the door seal, it is not al-
ways possible to open the door immediately after closing it.
Wait some minutes before attempting to open it again.
GB
6
THAWING
Here are some basic suggestions:
Raw vegetables: Do not thaw - put straight into boiling
water and cook normally.
Meat (large cuts): Thaw in the refrigerator compartment
without unwrapping them. Before cooking, leave at room
temperature for some hours. If you have a microwave the
meat can be defrosted following the manufacturers instruc-
tions.
(small cuts): Thaw at room temperature or cook directly.
Fish: Thaw in the refrigerator compartment without unwrap-
ping or cook directly before being completely thawed.
Previously cooked food: Re-heat in the oven without re-
moving from its aluminium container.
Fruit: Thaw in the refrigerator compartment.
DEFROSTING
The quantity of frost which builds-up inside the freezer de-
pends on the frequency of door opening.
The frost must be removed when it reaches a 3 mm thick-
ness. Generally defrosting is carried out twice a year, and
when the quantity of food stored in the freezer is low.
To defrost, proceed as follows:
24 hours prior defrosting, switch on the fast freeze facility
so that the food stored is at the lowest temperature before
taking it out from the freezer.
Disconnect the appliance from the mains (Fig. 8).
N C
M Y
Remove the ice trays.
Wrap the foods in layers of newspaper and place them in
a cool place.
Remove the baskets.
Pull out the drain (Fig. 7).
Place a shallow bowl (capacity pint) under the drain to
collect the defrost water.
Leave the door open.
Never use pointed objects to remove the ice. Any damage
caused in this way is not covered by the guarantee.
Avoid using hot water, electric heaters or other devices to
accelerate defrosting.
At completion of defrosting, clean the compartment with a
sponge dampened in a solution of lukewarm water and bi-
carbonate of soda and vinegar.
Clean the door gasket with a sponge dampened in water.
Avoid soiling the door gasket with oil or any greasy sub-
stance as it could become porous.
Then rinse and dry carefully.
Replace the drain and the baskets and reconnect the ap-
pliance to the mains.
Defrosting has to be carried out as quickly as possible.
When the red pilot lamp goes off, replace t he food in the
freezer.
MAINTENANCE AND CLEANING
A p eriodic and proper maintenance will ensure a longer life
to your appliance.
When carrying out any cleaning operations, always dis-
connect the appliance from the mains supply.
If the plug is inaccessible, switch off the electricity at the
mains. To clean the interior, follow the instructions given in
the previous chapter.
HINTS FOR HOLIDAYS (Fig. 9)
If you plan to be away for a long time: disconnect t he ap-
pliance from the mains, empty and clean t he inside of the
compartments.
Leave the door open to prevent the appliance from smelling
musty. If you plan to be away f or a short time: let t he ap-
pliance operate normally.
SERVICE (Fig. 0--2)
The incorrect operation of the appliance is not always due to
a fault but it may also result from poor installation or usage.
To prevent unnecessary service calls for which you will be
charged, we suggest you consult this t rouble-shooting
guide.
) Red light on continuously, internal temperature too
high.
Check that:
the door is properly closed
the freezer is not too close to a heat s ource
there is a large build-up of frost on the inner walls
the condenser or the ventilation grill is clean
the ambient temperature is excessively low, in this case,
turn the thermostat control knob to a higher setting. I f the red
light still remains on, the thermostat may be faulty.
Turn on the fast freeze switch to conserve the f ood while you
call a service technician.
2) The compressor functions continuously.
Check that:
the fast freeze switch is turned off
the ambient temperature is too high
the door has been opened too frequently.
3) The freezer does not work.
Check that:
there is not a power failure
the plug is making good contact with the socket
any automatic circuit breakers have tripped or any fuses
blown
the supply cable is broken.
For Great Britain only
Check the plug fuse, if fitted. Try new fuse - check remov-
able plugs for loose connections and tighten if necessary.
Loose connections can cause overheating of the plug: if this
has occurred, replace the plug.
4) The freezer is very noisy.
Check t hat the freezer is touching other furniture, which can
cause vibration.
5) The door seal is warm - it is not a fault, but it prevents
condensation.
Note: When replacing a damaged supply cord, be sure the
new cord is correctly clamped.
If you have followed the above checks and your appliance
still does not work properly, get in touch with the Service Di-
vision.
Addresses and telephone numbers can b e found on the
Service Registration Card or B ooklet.
State clearly what is wrong and the type and serial number
of your appliance.
GB
7
N C
M Y
N C
M Y
  • Page 1 1
  • Page 2 2
  • Page 3 3
  • Page 4 4
  • Page 5 5

Bauknecht 1CI-40 User guide

Category
Freezers
Type
User guide

Ask a question and I''ll find the answer in the document

Finding information in a document is now easier with AI