Page is loading ...

Before assembly
• We recommend that time is taken to read the
instructions before starting assembly, then
follow the easy step by step guide.
The instruction sheet is only a guide to
the assembly. Certain items may not be
shown to scale.
• Check all components prior to assembly
• This product should be assembled by no
less than two people.
• Never attempt to erect the assembly in
high winds.
• Drill components where indicated.
IMPORTANT SAFETY INFORMATION
Adult assembly is required. Checks and main-
tenance needs to be carried out on the main
parts (fixings etc.) at regular intervals. If these
checks are not carried out the product could
become unsafe.
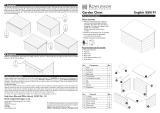
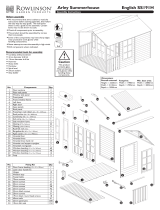
Playaway Swiss Cottage English SS288E
Assembly Instructions
No. Components Qty.
1 Floor panel 2
2 Angled back panel 1
3 Landing support back panel 1
4 Small side panel 2
5 Large side panel 2
6 Large front window panel 1
7 Small front window panel 1
8 door header panel 1
9 Apex panel 2
10 Landing floor 1
11 Landing support block (35x29x100mm) 1
12 Fence top rail 1
13 Ladder 1
14 Ladder attachment piece (500x45x32mm) 1
15 Fence railing 10
16 Purlin (35x29x1815mm) 5
17 Small front roof panel (980x1220mm) 1
18 Small Rear roof panel (980x811mm) 1
19 Large front roof panel (1900x1220mm) 1
20 Large rear roof panel (1900x811mm) 1
21 Felt battens (1015x29x29mm) 4
22 Batten blocks (29x29x140mm) 10
23 Roofing felt roll (10m) 1
24 Short shaped bargeboard 1
25 Long shaped bargeboard 1
26 Short plane bargeboard 1
27 Long plane bargeboard 1
28 Door 1
29 Long side/rear coverstrip (12x40x1700mm) 4
30 Short side coverstrips (12x40x1235mm) 3
31 Front coverstrips (12x40x830mm) 1
32 Window glazing (478x398mm) 3
33 Horizontal beading (10x10x479mm) 6
34 Vertical beading (10x10x382mm) 6
35 Door hinge strip (12x40x1220mm) 1
36 Door hinge 1
37 Finial 2
38 Catch mounting block (29x29x80mm) 1
WARNING
Not suitable for children under 36 months
due to small parts and sharp points.
1
2
3
5
4
6
8
7
12
11
10
9
13
14
15
16
17
18
20
21
22
23
24
25
26
x 2 Drill
27
29
30
31
32
33
34
36
28
40
37
39
38
19
35
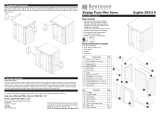
No. Fixing Kit Qty.
39 Roller catch kit 1
40 Metal L-Brackets 2
41 Door handle 1
42 50mm screws 72
43 35mm screws 85
44 25mm screws 26
45 19mm black round head screws 4
46 10mm round head screws 4
47 30mm nails 86
48 20mm nails 36
49 10mm felt nails 139
41
Recommended tools for assembly
• Cross head screw driver
• Hammer
• Sharp knife
• Drill with 3mm diameter drill bit
• Spirit level
• Tape measure
• Silicon sealant
• Step ladder

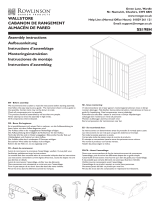
1. Laying the floor section
Prepare a level area for the playhouse to sit. Attach three wooden or similar bearers of size 50 x 50 x 1810mm (not supplied in kit) to each floor section.
To “VALIDATE” the guarantee, this item should be
erected on 50mm x 50mm treated wooden or similar
bearers (These are not supplied with the kit.) Ground
contact must be avoided.
Back panel
Side panel
Panel frames
rest on floor.
Panel cladding
overhangs floor
edge.
50mm
Small side
panel
Angled back
panel
2. Fixing the wall panels together
Position the angled back panel and a small side panel on the floor as show. Note how the panel frames sit on the floor with the panel cladding overhanging the floor edge.
Ensure square and secure using 3 x 50mm screws through the frame of the side panel into the frame of the back panel. Position the other back panel next to the first, ensure
level and secure them together using 3 x 50mm screws through the frame of the first back panel into the frame of the second. Continue adding the rest of the panels as
shown in the diagrams.
Small side
panel
Drill pilot
holes for each
screw in this
section.
Drill
Landing support
back panel
Large side
panel
Large side
panel
Small window
Panel
Large window
panel
Use this diagram to check the
correct orientation of the corners
Important
Ensure the back
panel and apex
panel interlock
correctly.
Apex
panel
Back
panel
50mm
Drill
Drill pilot holes for
each screw in this
section.
Ensure the door header
panel and front window
interlock correctly.
header
panel
window
panel
3. Door header, apex panels and door hinge strip
Position the door header panel on top of the small window panel, make sure the bottom shiplap board of the header panel fits correctly into the top shiplap board of the
window panel. Secure to the large window panel using 2 x 50mm screws, then secure it down to the small window panel using 2 x 50mm screws. Lift one apex assembly
on top of the back panel, make sure the bottom shiplap board of the apex panel fits correctly into the top shiplap board of the back panel. Secure by using 2 x 50mm screws,
screw up through the top frame of the back panel into the bottom frame of the apex panel. Attach the second apex panel to the front of the building in the same way. In the
door opening, fit the door hinge strip to the end of the left panel as shown. Drill pilot holes in the strip before securing with 3 x 35mm screws.
35mm
Drill
Drill pilot holes for
each screw in the
hinge strip to avoid
splitting the timber.
50mm
50mm

50mm
50mm
6. Landing ladder and fence
Secure the ladder attachment piece using 2 x 50mm screws to the bearer of the landing floor, 400mm from the back panel. Position the ladder so that its upright framing is
against the bearer of the landing floor and the top step is against the ladder attachment piece. Secure with 2 x 50mm screws, screw through the top step of the ladder into
the ladder attachment piece. Secure the tops of the ladder framing to the fence top rail using 2 x 50mm screws. To the left of the ladder secure three fence railing evenly
spaced using 4 x 35mm screws to the landing floor and fence top rail. Fix seven fence railing in the same way to the right of the ladder. Secure the ladder to the floor using
two L-brackets and 4 x 25mm screws per bracket as shown below.
400mm
50mm
50mm
50mm
35mm
5. Landing floor
Attach the landing support block over the join of the two side panels at the same height as the landing support framing. Secure using 2 x 50mm screws. Place the landing
floor onto its support framing and push up against the side panels. Secure the landing in place using 7 x 50mm screws, screw upwards through the support framing into the
bearers of the floor. Position the fence top rail to the apex frames, ensure the rail is in line with the edge of the landing floor using 1 x 50m screws at each end of the rail
Important
Landing support block must be
positioned the same height as the
landing support framing
Landing support block
Screw up through the
landing support fram-
ing into the landing
bearers
25mm
4. Securing the walls to the floor
Ensure the walls are sitting square on the floor and secure them down using 16 x 50mm screws, screw through the panel framing into the floor.
50mm
Back panel
Side panel
50mm
Important
Fence top rail must be
in line with the edge of
the landing
7. Roof purlins
Insert the five roof purlins into the rebates in the front and rear walls. Fix in place using 1 x 50mm screw at each end of each purlin. Screw through the purlin and into the
frame of the apex panels.
50mm
Drill pilot holes for
each screw in this
section.
Drill pilot holes for
each screw in this
section.
Drill pilot holes for
each screw in this
section.
Drill
Drill pilot holes for all 50mm
and 35mm screws this section.
50mm
50mm
Drill
Drill
50mm
Drill

9. Door fitting
Open the hinge flat and position it on the left side of the door as show, secure in place using 9 x 25mm screws. Position the door in the door way, adjust the height of the
door so it will be able to open and close freely. When in place secure the hinge to the door frame using 9 x 25mm screws.
25mm
Door Door
Gap No gap
Important
When fitting the hinge ensure there is
no gap between the front of the door
and the hinge bar.
Front apex Rear apex
Roof panels
Side view of roof position
50mm 50mm
Felt
batten
Felt
batten
30mm
8. Roof
Secure two felt battens to the lower edge of the two short roof panels using 12 x 30mm nails. Ensure the felt battens are flush to the edges of the panels. In the same
way attach two felt battens to the lower edge of the two large roof panels. Flush to the front and rear edges of the large roof panel attach three bargeboard blocks using
2 x 30mm nails per block. To the small roof panel attach two blocks front and rear. See diagram below for correct spacing of the blocks. Position two panels on top of the
building, make sure the top edges of the panels are located at the apex and bargeboard blocks at the back are butted up against the outside of the apex panel. Secure the
small panel in place using 18 x 35mm screws. Screw through the roof panel and into the purlins and the top of the side wall. Attach the large panel in the same way using
24 x 35mm screws.
560mm
420mm
Large roof panel
Small roof panel
Bargeboard block spacing
Attach a set of blocks to the
rear of the roof.
Important
35mm
1260mm
Bargeboard blocks at the back of
the building must be butted up
against the outside of the rear
apex panel.
30mm
25mm

12. Bargeboards and finials
Fasten the shaped bargeboards to the front edge of the roof so that the top edge is flush with the roof line and the two boards meet evenly at the apex, secure the short
bargeboard using 3 x 30mm nails and the long board using 4 x 30mm nails. Nail through each board into the bargeboard blocks and end of the felt batten. Position the finial
centrally over the join of the two bargeboards and secure using 2 x 30mm nails. Attach the two plain bargeboards and a finial to the back of the building in the same way.
11. Coverstrips
Fit the large coverstrips in the corners of the large side wall secure in place using 4 x 30mm nails. The remaining two long coverstrips are to cover the join of the two large
side panels and back panels, position them centrally over the joins and secure using 4 x 30mm nails. In the same way attached two short side wall coverstrips in the corners
of the short side wall and the remaining coverstrip over the join of the two panels. secure each one in place using 3 x 30mm nails. Position the front coverstrip over the join
between the large window panel and door header panel. The strip should go up to the roof apex, fix in place using 3 x 30mm nails.
10mm
Felt
nails
30mm
30mm
10mm
Felt
nails
10mm
Felt
nails
10. Roofing felt
Cut the roll of roofing felt into four equal lengths. Place a length along the short side of the roof. At the front and along the lower edge of the roof leave an overhang of felt of
at least 45mm. Fold down the felt along the lower edge and secure to the felt batten using 20 x10mm felt nails evenly spaced. Tension the felt up the roof and secure along
the upper edge using 5 x 10mm felt nails. Repeat this for a second piece of felt on the large side of the roof. Add a third piece of felt higher up the large roof panel, ensure
a good overlap with the second felt piece and secure using 20 x 10mm felt nails along the lower edge of the felt, tension the felt up the roof and secure using 5 x 10mm felt
nails. Once the three pieces of felt are in place position the final piece over the roof ridge making sure it overlaps the felt pieces on either side of the roof, attach using 20 x
10mm felt nails evenly spaced, along each lower edge of the felt. Dress down the ends of all felt pieces and attach to the batten blocks using 14 x 10mm felt nails at the front
and rear. When all the felt is in fixed in position, trim of any excess.
10mm
Felt
nails
10mm
Felt
nails
30mm
30mm
30mm
30mm
30mm
30mm
30mm
30mm 30mm

Window glazing
Wooden beading
Window frame
13. Window glazing
We recommended that a waterproof sealant is applied around the edge of the glazing before fitting. Place window pane on the inside of the window frame, Using 3 x 20mm
nails per beading strip. Nail the top and bottom strip first and then the sides. Repeat for all three windows.
10mm
View of door frame from inside playhouse
50mm
19mm
14. Door catch and handle
On the inside of the playhouse, fit the catch mounting block using 2 x 50mm screws to the frame of the apex panel at the top left corner of the door frame. The roller catch
is fitted to the mounting block and the catch plate is fitted to the door. Position them so that when the door is shut the two parts clip together. Once in position fix the two
parts of the catch in place with 4 x 10mm screws. To the front of the door position the door handle half way up the right-hand side. Secure in place using 4 x 19mm black
round head screws.
10mm
Important safety and maintenance information - Retain for future reference
• This product is not suitable for all children under 36 months, due to it having small parts and sharp points.
• For Family domestic use only.
• For outdoor use.
• Ensure any loose knots are removed from any panels, to reduce risk of choking. Fill holes with a suitable wood filler obtained from most DIY stores.
• It is recommended that the playhouse is positioned on a level surface at least 2m from any structure or obstruction such as a fence, garage, house, overhanging
branches, laundry lines, electrical wires.
• It is recommended that the playhouse is not installed on concrete, asphalt or any other hard surface.
• The company takes every care to ensure all goods are clean and free from splinters and rough edges prior to leaving the factory.
• Visually inspect the playhouse and to reduce the risk of splinter sand down any sharp edges or rough surfaces.
• Checks and maintenance of the main parts (fixings, etc) should be made at the beginning of each season and at regular intervals throughout. If checks are not carried
out the product could become unsafe.
• Ensure all fastenings are securely located.
• Oil all metallic moving parts.
• Ensure that the pointed ends of all nails, screws and other fastenings are not accessible on any surface of the constructed playhouse, and that all heads and surfaces
of these fastenings are either flush with the surface or countersunk.
• Always ensure a safe, suitable treatment is used to ensure the safety of children and animals.
• Assembly and installation instructions must be kept for further reference.
Shiplap buildings come ready stained but this is only a preparatory treatment. To VALIDATE the guarantee, the building must be properly treated with a recognised
external wood preserver WITHIN 3 MONTHS of assembly and RE-TREATED ANNUALLY thereafter. Adequate provision must be made to ensure ground contact is
avoided and air is able to circulate underneath the building.
Placing the building on a concrete pad or slab base is acceptable provided that the building is not allowed to sit in pooled water during wet conditions.
If the building is to sit on soil or grass it MUST be erected on pressure treated wooden 50mm x 50mm or similar bearers (These are not supplied in the kit).
Rowlinson Garden Products recommend using pressure treated bearers with all buildings on any type of base.
Timber Information.
As timber is a natural material, there are certain weather conditions that may affect the materials properties. In times of excessive dry spells the material may lose some of its
internal moisture causing a certain degree of shrinkage on a panel and in periods of excessive rain there will be a certain amount of swelling throughout the wooden panels.
This process can not be avoided. If you have problems with certain boards shrinking in dry spells try to decrease the amount of direct sunlight on the building or the amount
of air passing over the building. During hot spells spray water directly onto the panels with the aid of a garden hose
This product meets the requirements of BS EN 71 Parts 1 & 2:2011 and 3:1995
If in doubt of any aspect regarding the assembly, use or safety of your playhouse please contact us :
Help Line: (Normal Office Hours) 01829 261 121
Email: [email protected]
ROWLINSON GARDEN PRODUCTS LIMITED
Green Lane
Wardle Nr. Nantwich
Cheshire
CW5 6BN
www.rowgar.co.uk 2022 © Rowlinson Garden Products Ltd
We constantly improve the quality of our products,
occasionally the components may differ from the
components shown and are only correct at time
of printing. We reserve the right to change the
specification of our products without prior notice.
/