Page is loading ...


2
Table of contents
1. Precautions ...................................................................................................................................... 3
2. Product Certification ......................................................................................................................... 3
3. Preface............................................................................................................................................. 4
4. Product Overview ............................................................................................................................. 5
5. Function and Features...................................................................................................................... 6
6. Product Structure ............................................................................................................................. 8
7. Installation ........................................................................................................................................ 9
8. Operating Instructions .................................................................................................................... 10
9. Parameter & Settings ..................................................................................................................... 14
10. Operation ..................................................................................................................................... 20
11. File Storage and Playback ............................................................................................................ 30
12. Additional Backup Battery Installation ........................................................................................... 31
13. Specifications & Parameters ......................................................................................................... 33
14. Appendix ...................................................................................................................................... 34
15. Copyrights .................................................................................................................................... 35
16. Warranty ...................................................................................................................................... 36

3
1. Precautions
1. This camcorder is a precision product. Please do not drop it or hit it physically.
2. Keep the camcorder away from any object with a strong magnetic field, like magnet or electromotor,
or any object emitting strong radio waves, like antenna, as a strong magnetic field may cause failure to
the device or cause damage to image and audio data.
3. Do not expose the camcorder to high temperature or sunlight directly.
4. Keep the Micro SD card away from the strong magnetic field of TV, speaker, or magnet. Do not put
it in any place with potential static, or the data stored on it may be lost.
5. If the camcorder overheats, smokes or smells while charging, please disconnect the USB cable or
the USB power adapter immediately to avoid the risk of fire.
6. Put the device out of reach of any child while charging, as the power cord may cause an accidental
suffocation or electric shock to the child.
7. Please keep this product in a cool, dry, and dust-free place.
2. Product Certification
Certified by FCC and CE, this product complies with the recommended standards and guarantees the
user's safety.

4
3. Preface
Thanks for purchasing FANTEC’s BeastVision HD hands-free mini high-definition digital camcorder.
Due to its small size and design, the hands-free camcorder is easy to operate. Supported by high-
definition and dynamic image capturing technology, it can record real scenes and various activities
anytime and anywhere and you can share wonderful recording experiences with your family and
friends. This manual specifies how to use and install the device and provides detailed information,
including the instructions on use, operation and installation as well as the technical specifications.
Please read this manual carefully.
1. Repair
If the device has a problem, you should take it to an appointed repair center and let the specialists do
the repair, never repair the player yourself, you might damage the device or endanger yourself or your
data.
2. Disposing of the Camcorder
When you dispose the camcorder, be sure to dispose it appropriately. Some countries may regulate
disposal of electrical device, please consult with your local authority.
3. Others
Do not disassemble the camcorder, repair or change the design of it, any damage done will not be
included in the repair policy.
Do not press the buttons of the device too hard.
Avoid hitting the player with hard object, and stay away from magnetic fields.
During electrostatic discharge and the strong electromagnetic field, the product will malfunction, then
remove the battery and the product will return to normal performance next time it is powered on.

5
4. Product Overview
As a multifunctional high-definition digital sports video camcorder, this product provides many functions
such as high-definition recording, digital photographing, voice storage, real-time display, photo
shooting, time display, remote control, digital zoom, TFT color screen, multi-functional keys, laser
indication, high-speed USB data transmission, HDMI high-definition output function, low power
indication, memory card space display and USB charging.
Do not litter! Please recycle!
Note:
All the information contained in this manual was correct at the time of publication. However, as our
engineers are always updating and improving the product, your device’s software may have a slightly
different appearance or modified functionality than presented in this manual.

6
5. Function and Features
1. 170° extra-large wide-angle lens; Aperture f/2.8
2. Specialized HD Camcorder, supporting 1080I/1080P/960P/720P high-definition video
recording
3. Photo shooting function, supporting 8.0 Megapixels (3200x2400)
4. 10x digital zoom function
5. Various shooting modes available: Single shooting, three photos continuous shooting, auto
continuous shooting
6. Self-timer function
7. Voice recording function
8. Wireless remote control function
9. Image rotation of 180º (over head recording)
10. Laser indicating function
11. Video loop coverage function
12. With LCD segment screen and split TFT main screen, to display various working modes in
real time
13. With waterproof case, the waterproof grade is IP68, the waterproof depth is up to 60 meters,
and it has two back cover designs
14. TFT display screen, to play and playback videos, and photos
15. With built-in dismountable high-capacity lithium battery, it can be re-charged
16. Better image effect, three video output modes available
17. Battery power detection and Micro SD card free space detection
18. High-speed dynamic video recording, supports instant response for bright and dark
environments
19. Three photo metering modes for various shooting circumstances

7
20. Delicate and stylish exterior design
21. HDMI high-definition interface and AV output interface, to connect a high-definition display
device or TV to view files
22. Supporting a Micro SD card up to 64GB (Class 10 recommended)
23. High-quality color fidelity, clearer and more realistic image
24. Remote control for video recording, stopping and shooting by using wireless remote control
(unique code pairing function, avoiding interference with other remote control)
25. Recording MOV videos, can directly played by PC or uploaded onto video websites
26. Auto standby power-saving function
27. Supports fast forward and fast rewind (1/4x/1/2x/2x/4x/8x/16x)
28. Supports time setting (RTC function) and time superposition function
29. Supports USB2.0
30. Built-in stereo microphone, high-quality voice recording effect
31. Various sports accessories, truly enables sport video recording
32. Steady shot: maintain the normal function after being dropped or stricken
33. Good seismic resistance
34. Settings auto saving mode

8
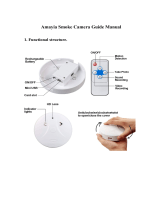
6. Product Structure
1. TFT Display screen
10. Buzzer
19. LCD segment screen
2. MENU key
11. SD card slot
20. Shutter
3. Up key
12. Right key
21. Stop key
4. Left key
13. AV out interface
22. Camera lens
5. Down key
14. Record key
23. Recording/ shooting LED (blue)
6. Playback key
15. Video/Voice record LED (green)
24. Laser transmitter
7. OK key
16. Power switch
25. HDMI out interface
8. Remove TFT button
17. Microphone
26. USB device interface
9. Lanyard hole
18. Working/ Charging LED (red)
27. Thread interface

9
7. Installation
1. The device can be used in handheld or hands-free mode and combined with various non-hand-held
accessories. The camcorder can be installed wherever you like, even operation in the water by the
waterproof casing is possible.
The installation is shown as follows:
a) Installation and removal of the TFT
display screen and the main body
b) Installation of the main body without TFT display
screen into the waterproof case
2. Installation of remote control.
Please install the remote control onto the correct position based on the accessories below:
1. Velcro
2. Clip
3. Binding tape (optional)

10
8. Operating Instructions
1. Start up
Turn the power switch to “ON” to start up the device.
2. LCD segment screen icons:
a) Record mode: The current record mode can be viewed on the top left corner of the LCD segment
screen, this symbol “ ” indicates the video recording mode and this symbol “ ” indicates the voice
recording mode.
b) Photo shooting indicator: The shooting icon “ ” can be viewed on the LCD segment screen. The
icon will twinkle one time when shooting one photo.
c) Power icon: The power icon “ ” can be viewed on the top right corner of the LCD segment screen.
The icon is visible constantly after the device is running and the disappearance of the icon means the
device is shut down or has entered the standby mode.
d) Video recording duration: The duration of the current video recording is displayed on the middle line
of the LCD segment screen, and is indicated by this display “ ”. The video recording duration
will start displaying when pressing “Record” key, and it will stop when pressing “Record” key once
again.
Note:
The video recording duration on LCD segment screen and TFT display screen is displayed
synchronously.

11
e) Indication of battery power: The battery power icon “ ” can be viewed on the bottom left corner of
LCD segment screen and it will indicate the battery power status after starting up. The more black
grids the higher the remaining power.
f) USB connection: The USB mode icon “ ” can be viewed on the LCD segment screen and it
indicates whether the device is connected with the computer. The green indicator light on the left
twinkles slowly. The icon appears after connecting with a computer in operating mode and it will not be
displayed when not connecting with computer.
g) Micro SD card capacity indication: The Micro SD card capacity icon “ ” can be viewed on the
bottom right corner of LCD segment screen to indicate the capacity of the Micro SD card. The more
black grids the higher the spare capacity. The green indicator light on the left remains shinning when
the card is out of memory.
3. TFT display screen icons
a) Work mode: The video recording icon “ ” on the top left corner of the TFT display screen
indicates that it is in video recording standby mode.
b) Battery power: The battery power icon “ ” on the bottom left corner of the TFT display screen
indicates the remaining power of the battery.
c) Resolution of video recording: 1080P/1080i/960P/720P/WVGA on the bottom left corner of the TFT
display screen indicates that the system is in 1080P/1080i/960P/720P/WVGA mode.
d) Spare storage capacity: Information of whether an external card is installed " or ". The spare
storage capacity " " can be viewed then on the bottom right corner of the TFT display screen.

12
e) It cannot respond operations of "<" and ">" under the preview mode.
f) The device can be charged with the attached USB cable (optional power adapter available, too): The
“Red Indicator of Working/ Charging” on the top of the unit will twinkle slowly during charging and it will
stay constantly red after fully charged. The charging duration is about 3h.
Note:
Before use, please check if there is enough battery power. In case of a low battery, please charge the
device via the attached USB cable. The “Red Indicator of Working/ Charging” will twinkle slowly during
charging and if the battery is fully loaded, it remains shinning constant.
4. Format the Micro SD card
Please select particularly a high-speed Micro SD card only and format it via the device before
recording videos, voice or taking photos. If the Micro SD card has ever been used on other devices,
please format it on device first.
Note:
Please confirm whether files on the internal memory of the device and on the Micro SD card are
needed before operating. Locked files on the device can be removed by formatting the internal
memory.

13
5. Set the date/ time
In preview mode, press “M” key to enter the menu interface, press “>” key to shift to the setup interface
“ ”, press “ + ” or “ - ” key to select the menu “Date/Time”, and then press “OK” key to enter the
setup interface of “Date/Time”. Then press “OK” key again to finish. Characters/ numbers showing date
or time turn blue when the cursor appears. Press “+” or “-” to reset the date or time. Press “OK” to
confirm the revision. Press “M” to exit the setting interface.
In preview mode, press “M” key to enter the menu interface, press “<” or “>”
key to move the cursor left and right and press “+” or “-” key to move the
cursor up and down. After selecting the menu, press “OK” key to set the
selected menu and press “M” key again to exit.
(The parameters set will resume even in case the product needs to be
powered off or restarted. In order to have a different mode, please read the
product manual.)

14
9. Parameter & Settings
1. Setting of Camcorder parameter:
a) Video resolution: Select 1080P, 1080i, 960P, 720P, WVGA
b) Visual Angle: The camcorder supports three visual angles (default setting is “Wide Angle”).
Wide Angle “ “ Middle Angle “ ” Narrow Angle “ ”
Same image with different visual angles
Comparison of same scene in different angles
Wide Angle
Middle Angle
Narrow Angle
c) Bit rate: The camcorder supplies two options, fine “ “and normal ” “ (default setting is “fine”).
A clearer image results a higher bit rate and a larger file size.

15
d) Laser Synchronous Shooting: Turn on ” ” or turn off “ “ the laser transmitter (default setting
is “OFF”).
e) Shooting Mode: Select video recording “ ” or voice recording “ ”.
f) Pre-Recording Mode: In preview mode, press “M” to enter the mode selection interface and select
“Pre-Recording”. Press “REC” key to enter pre-recording mode. The video will be buffered for 5
seconds until you press “REC” key again to start regular video recording. The buffered video taken in
the last 5 seconds of pre-recording mode are now at the beginning of the regular video.
g) Self-Recording Mode: In the preview mode, press “M” to enter the mode selection interface. Select
“Self-Recording” mode and choose an option from “OFF”, “3 Seconds”, “5 Seconds” or “10 Seconds” to
set the countdown time before video starts recording.
h) Photo Rotation Mode: In the preview mode, press “M” key to enter the mode selection interface and
select “Photo Rotation” to have upward photos when the camcorder is in a reverse position.
i) Time display: In the preview mode, press “M” key to enter video setting interface. If the “Time
Display” is activated, the shooting date and time will automatically appear at the right bottom of the
screen during video recording. Shooting date and time will not appear on the screen in case “Time
Display” is not activated.

16
Note:
a) In “Voice recording mode”, press “Record” key and the system starts recording. Voice recording
duration is displayed on the bottom of the TFT display screen and the green indicator twinkles slowly; if
press “Record” key again, the system will stop and save the current audio file.
The green indicator turns off and the red indicator remains bright and the unit returns to the preview
mode (the corresponding operation is displayed on the LCD segment screen).
b) During “Sound recording”, the product is responsive only when pressing “Stop”, “Off” or “M” key. If
you may switch to video recording, the sound recording will be automatically stopped and saved.
c) The laser icon will be displayed on the top left corner of the preview interface when turning on the
function of “Laser synchronous shooting”, which indicates the system is in this shooting mode. At this
time, the laser will be turned on when starting recording and it will be turned off when stopping
recording.
d) When “Pre-recording” and “Self-recording” mode are both activated, press “REC” key during pre-
recording to start self- recording countdown. Press “REC” key again to start self recording and the clips
taken in last few seconds in pre- recording status can be saved as the beginning of the video.
2. Setting the camcorder parameter:
a) Image resolution: Select 3M, 5M or 8M.
b) Single shot: Press “Shutter” once can take one photo.
c) Triple Shot: Press “Shutter” once can take three photos continuously.
d) Continuous shoot: Takes one photo every 0.5s/1s/2s/5s/10s/20s/30s/60s until you press a key to
stop, the card is full or the power is run out.

17
e) Self-Timer Mode: Select time to count down (“3s”, “5s” or “10s”) and press “M” to return to preview
status. Press “Camera” and the countdown starts. The self-timer indicator light flashes after the
countdown takes a snapshot. The self-timer mode remains activated as default. In order to switch to
single snapshot mode, please manually turn off self-timer mode.
f) Time display: In the preview status, press “M” to enter the camcorder setting interface. If “Time
Display” is activated, the shooting date and time will automatically appear at the right bottom of the
screen during shooting. Shooting date and time will not appear on the screen in case “Time Display” is
not activated.
Note:
a) The self-timer mode remains activated as default. In order to switch to single snapshot mode,
please manually turn off self-timer mode.
b) The self-timer mode and continuous shooting mode cannot be activated at the same time.
3. Setting of system parameter:
a) Beep: Turn on or turn off the key tone.
b) Self lamp: Please turn it on or off before self timing, the default setting is “ON”.
c) Loop coverage: The video/ audio file will be auto saved in segment once every 15 minutes when
setting “Loop Coverage”. If it is not set, the video/ audio file will be auto saved in segment once every
30 minutes.
Note:
The current actual segment file is determined by the file size set, but not determined by the true time,
that is to say, the file will be segmented more than 15/30 minutes at a dark environment.

18
d) Auto standby: Set the auto standby time to 0, 2 minutes, 5 minutes or 10 minutes. If there’s mission
or operation, the system will start the standby countdown and the device will turn off. If there is an
operation during the countdown, the system will restart it. If video recording or the shutter is operated
in the standby mode, the device will be waked up. The default standby time is 5 minutes.
e) TV output format: NTSC or PAL video format output to TV. If the selected format is changed, please
unplug the AV cable and then reinsert it to update the parameters.
f) Contrast Ratio: The product is preset with standard contrast ratio. If necessary, the contrast ratio can
be increased for a better night shot.
g) ISO Sensitivity: The preset ISO sensitivity is activated as default. If necessary, ISO800 can be set
for a better night shot.
h) Exposure: Even if exposure is activated as default to achieve good exposure of the photos, in case
the scene looks dark in comparison with light surroundings, you can choose center exposure mode. In
case the scene looks light in comparison with dark surroundings, choose dot exposure mode.
i) Format: After confirming that all files recorded are not needed to be saved, all files can be removed
by formatting.
Note:
If there is no card inserted, the memory of the unit will be formatted. After inserting a card, the system
will format the card, but not the internal memory unit.

19
j) Factory default: This operation is setting all parameter to factory default. The system will set the
display mode to English. Press “M” key to enter the menu selection, press “<” or “>” key to enter the
menu “Setup”, press “-“ key to select the option “Language”.
k) Language: “English” or “German” can be selected via left or right key.
l) Date/Time: The time can be adjusted. It will be displayed on the bottom right corner of the video file
or photo file when recording or shooting.
Note:
Press “M” key under the submenu to exit the settings of the submenu.

20
10. Operation
1. Memory card
Insert the Micro SD card.
2. Preview mode
Turn the power switch to “ON” to turn on the device and the red indicator will be lightened and the unit
will enter the preview mode.
Note:
a) In case of low battery power, you will find the battery icon “ ” and the message “Low Power” on the
TFT screen.
b) If no Micro SD card is inserted, this Micro SD card icon “ ” is shown on the TFT screen.
3. Video recording:
Press the “Record” key in preview mode to start recording. The video recording duration will be
displayed on the top right of TFT display screen. During video recording process you can zoom in (“+”
key) and zoom out (“-” key). If press “stop” key, the system will stop and save the current video and the
front side blue indicator will turn off.
Note:
a) If you turn the power switch to “OFF” during video recording, the system will save the current file
and then shut down.
b) If the battery power is getting to low during video recording, the system will save the current file and
/