Tripp Lite Owner's Manual B005-HUA2-K Owner's manual

Category
KVM switches
Type
Owner's manual
1
Owner’s Manual
2-Port HDMI KVM Switch
with 4K Video, Audio and
Peripheral Sharing
Model: B005-HUA2-K
1111 W. 35th Street, Chicago, IL 60609 USA • tripplite.com/support
Copyright © 2020 Tripp Lite. All rights reserved.
WARRANTY REGISTRATION
Register your product today and be
automatically entered to win an ISOBAR
®
surge protector in our monthly drawing!
tripplite.com/warranty
Español 9 • Français 17 • Русский 25
2
• B005-HUA2-K 2-Port HDMI KVM Switch
• IR Extender
• IR Remote Control
• (2) USB 3.0 A/B Device Cables (M/M)
• External Power Supply (Input: 100–240V, 50/60 Hz, 0.5A; Output: 5V 3A)
• Mounting Hardware
• Owner’s Manual
• P785-HKIT06 or P785-HKIT10 KVM Cables
• U322-Series USB 3.0 A/B Device Cables
• P312-Series Mini Stereo Audio Cables
• P568-Series High-Speed HDMI Cables
Console:
• HDMI monitor capable of supporting the highest resolution of any
computer in the installation
• USB keyboard and mouse
• Microphone and speakers with 3.5 mm stereo connectors (optional)
Computer:
• HDMI input
• USB Type-A port
• 3.5 mm stereo microphone and speaker jacks (optional)
• Windows 2000/XP/Vista/Win7/Win8/Win10, Linux or Apple Mac OS
operating system
Package Contents
Optional Accessories
System Requirements
3
• Controls 2 HDMI computers from a single HDMI video console
• Supports True 4K @ 60 Hz video resolutions, including 4:4:4 HDR
and HDCP 2.2
• Supports all HDMI 2.0 specifications
• Supports RGB 4:4:4/ YCbCr 4:4:4/ YCbCr 4:2:2/ YCbCr 4:2:0
• Supports 12 bits per channel (36-bit all channels) Deep Color and
6 Gbps per channel (18 Gbps all channels) bandwidth
• Built-in 2-port USB 2.0 hub allows USB devices to be shared between
computers connected to the KVM switch
• 3.5mm stereo jacks allow a microphone to provide audio input
to each connected computer and let you listen to audio output on a
set of speakers
• Additional console audio jacks are conveniently located on the front
panel, making them ideal for use with speakers and microphones
• Switch between connected computers via front-panel pushbuttons,
IR remote, mouse movement or keyboard hotkeys
• Supports hot-plugging – computers and devices can be unplugged
and re-plugged without having to shut down the KVM switch
• Quick installation without the need for software
• Stores the monitor’s EDID (Extended Display Identification Data) to
optimize display resolution
Product Features
4
Panel Descriptions
Front Panel
1
Power – Press to turn the unit on and off.
2
Power Indicator – Illuminates red to signal the DC power supply is
connected to an outlet and the KVM switch is turned on.
3
Input Selector – Illuminates blue to indicate whether PC1 or PC2 has been
selected. Select LEDs flash in a loop during automatic switching mode.
Online LEDs illuminate when the corresponding USB-B port is connected.
4
IR EXT – Connect the included IR Extender for IR signal reception from
the included IR Remote Control.
5
IR – Signal reception point for the IR Remote Control.
6
3.5 mm Microphone – Connect a microphone.
7
3.5 mm Stereo – Connect a stereo audio device.
8
USB-A 3.0
Connect USB peripherals (printers, scanners, U-disks, etc.).
Rear Panel
1 2 4 5 6 73 8
9
Outputs
a. Connect a mouse and keyboard to the USB 2.0 ports.
b. Connect an amplifier to the 3.5 mm stereo port.
c. Connect a microphone to the 3.5 mm microphone port.
d. Connect a local HDMI monitor to the HDMI Out port.
10
PC1 Input – Connect to a computer’s HDMI, USB, stereo audio
and microphone ports.
11
PC2 Input – Connect to a second computer’s HDMI, USB,
stereo audio and microphone ports.
12
DC 5V Input – Connect the included 5V/3A DC power supply.
9 10 11 12
5
Refer to the following steps and diagram to set up your KVM switch
installation.
Note: Before making any connections, make sure power to all devices connected
to the KVM switch is turned off. Unplug the power cords of any computers that have
the Keyboard Power On function.
1. Connect computers to the USB-B input ports using USB cables. Connect
the computers’ microphone and stereo audio ports using 3.5 mm audio
cables. Connect computers to the “HDMI In” ports using HDMI cables.
2. Connect a keyboard and mouse to the USB-A ports on the rear panel.
Connect a microphone and amplifier to the microphone and stereo audio
ports using 3.5 mm audio cables. Connect a monitor to “HDMI Out”
using a HDMI cable.
3. Connect the included DC power supply, and press the Power button.
The Power LED will illuminate. When computers are connected to the
PC1 and PC2 ports, the Online LEDs will illuminate.
Installation and Operation
IR Extender
Amplifier
Keyboard
Mouse
HDMI Display
Mic
PC1 PC2
Power Supply
USB Devices
(Printer, Scanner, U-disk, etc)
Amplifier
Mic
6
Installation and Operation
4. Press the buttons on the front panel to select the desired computer.
The Select LED will illuminate to indicate which computer is currently
selected. The monitor will show the corresponding image, and the
selected computer can by controlled via keyboard and mouse.
5. The included IR Remote Control works the same as the pushbuttons:
a. For input: “1” specifies PC1 and “2” specifies PC2.
b. For loop switching: Order is PC1>PC2>PC1>…
6. USB peripherals, such as printers, scanners and thumb drives, can be
connected to the front-panel USB-A ports.
Special Function Operation
1. Mouse Traversal Function – Place the mouse on the far right of the
monitor, and continue to slide it to the right for 2 seconds. The KVM
switch will automatically switch to the next port. Switching order is
PC1>PC2>PC1>…
2. USB-B Detection Switching Function:
a. When the unit detects that a computer is connected to the USB-B
port, the unit immediately switches to that computer, and the
corresponding Online and Select LEDs illuminate. For instance,
if PC1 is already connected, then PC2 becomes connected via
USB-B, and the KVM will automatically switch to PC2.
b. When the currently selected computer is powered off or the USB
cable is dialed out, the KVM automatically switches to the next
computer with the power on and the USB port connected.
7
Special Function Operation
3. Hotkey Function:
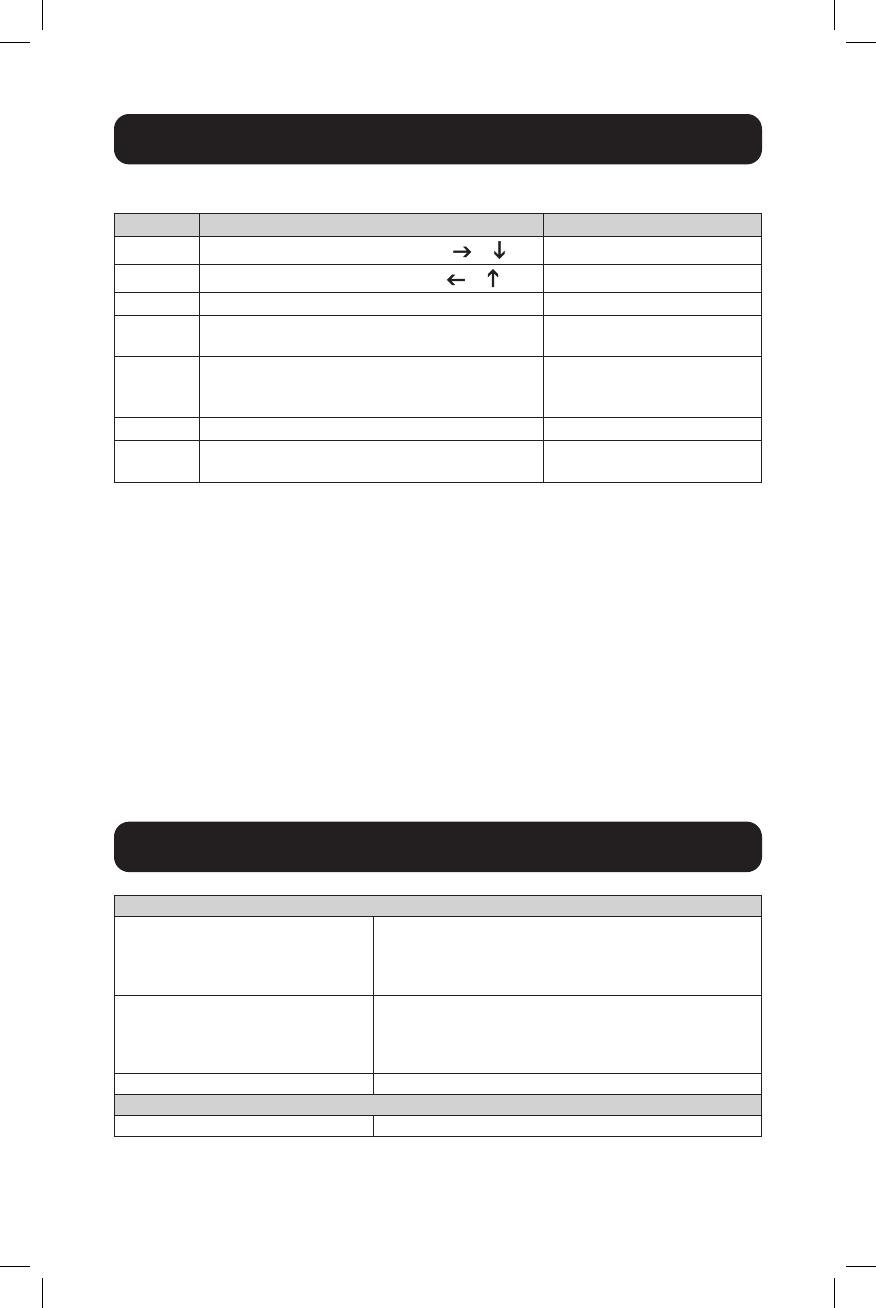
Number Hotkey Combination Function Description
1
[Scroll Lock]++¹ [Scroll Lock] + or
Switch to the next port
2
[Scroll Lock]++ [Scroll Lock] + or
Switch to the previous port
3
[Scroll Lock]++ [Scroll Lock] + [X]²
Switch to PC "X"
4
[Scroll Lock]++ [Scroll Lock] + [S]³
Enable Automatic Switching
(Default: 15 seconds)
5
[Scroll Lock]++ [Scroll Lock] + [I] +
[N]
4
+ [Enter]
Set the Automatic
Switching Interval
(Between 5 ~ 999 Seconds)
6
[Scroll Lock]++ [Scroll Lock] + [B] + [1/0]
5
Buzzer On/Off (Default: On)
7
[Scroll Lock]++ [Scroll Lock] + [F] + [L] +
[A] + [S] + [H] + [Enter]
All resume hotkey
default mode
6
Notes:
1. Hotkeys are not case-sensitive.
2. A noise sounds when switching between PC1 and PC2.
1
“++” means to press [Scroll Lock] twice in rapid succession. For example: [Scroll Lock] ++ [Scroll Lock] + [1]” means to
press the Scroll Lock button twice in rapid succession and then press the number 1 button. The detection period between each
hotkey code is 5 seconds. If the Scroll Lock button is pressed the first time and 5 seconds pass before the Scroll Lock button is
pressed again, the hotkey code will be invalid.
2
“X” indicates the PC input. For example, to switch to PC2, the hotkey combination is [Scroll Lock] ++ [Scroll Lock] + [2].
3
Turning on this function will cause HDMI, microphone and speaker ports to enter automatic switching mode without USB. Press
any key (except Spacebar) to exit to the port used prior to the automatic switching sequence. Press Spacebar to stay at the port
currently in use. When automatic switching mode is enabled, the corresponding “Select” LED of the port currently in use will flash.
4
“N” indicates the number of switching interval, which can be 5 seconds to 999 seconds.
5
“1” means On, “0” means Off.
6
This mode only relates to hotkey function #4 and #6.
Connectors
KVM Connectors (Female) USB 3.0-B x2 (Rear)
HDMI x2 (Rear)
3.5 mm Stereo Jack x2 (Green, Rear)
3.5 mm Stereo Jack x2 (Pink, Rear)
Console Connectors (Female) USB 2.0-A x2 (Rear)
HDMI x1 (Rear)
3.5 mm Stereo Jack x2 (Green, 1 Front, 1 Rear)
3.5 mm Stereo Jack x2 (Pink, 1 Front, 1 Rear)
USB Hub Connectors (Female) USB 3.0-A x2 (Front)
Video Resolution
Maximum Resolution 4K x 2K @ 60 Hz (4K UHD)
Specifications
8
Operating Bandwidth
HDMI Bandwidth 18 Gb
Environmental
Operating Temperature Range 32° ~ 113°F (0° ~ 45°C)
Operating Humidity Range 10% ~ 85% RH (No Condensation)
Storage Temperature Range 14° ~ 176°F (-10° ~ 80°C)
Storage Humidity Range 5% ~ 90% RH (No Condensation)
Power Requirement
External Power Supply DC 5V/3A
Power Consumption (Max) 12W
ESD Protection
Human Body Model +/- 8kV (Air Gap Discharge)
+/- 4kV (Contact Discharge)
Specifications
1111 W. 35th Street, Chicago, IL 60609 USA • tripplite.com/support
20-04-033 93-3C92_RevA
3-YEAR LIMITED WARRANTY
Seller warrants this product, if used in accordance with all applicable instructions, to be free from original
defects in material and workmanship for a period of 3 years from the date of initial purchase. If the product
should prove defective in material or workmanship within that period, Seller will repair or replace the
product, at its sole discretion.
THIS WARRANTY DOES NOT APPLY TO NORMAL WEAR OR TO DAMAGE RESULTING FROM ACCIDENT,
MISUSE, ABUSE OR NEGLECT. SELLER MAKES NO EXPRESS WARRANTIES OTHER THAN THE WARRANTY
EXPRESSLY SET FORTH HEREIN. EXCEPT TO THE EXTENT PROHIBITED BY APPLICABLE LAW, ALL IMPLIED
WARRANTIES, INCLUDING ALL WARRANTIES OF MERCHANTABILITY OR FITNESS, ARE LIMITED IN DURATION
TO THE WARRANTY PERIOD SET FORTH ABOVE; AND THIS WARRANTY EXPRESSLY EXCLUDES ALL
INCIDENTAL AND CONSEQUENTIAL DAMAGES. (Some states do not allow limitations on how long an implied
warranty lasts, and some states do not allow the exclusion or limitation of incidental or consequential
damages, so the above limitations or exclusions may not apply to you. This warranty gives you specific legal
rights, and you may have other rights which vary from jurisdiction to jurisdiction.)
WARNING: The individual user should take care to determine prior to use whether this device is suitable,
adequate or safe for the use intended. Since individual applications are subject to great variation, the
manufacturer makes no representation or warranty as to the suitability or fitness of these devices for any
specific application.
PRODUCT REGISTRATION
Visit tripplite.com/warranty today to register your new Tripp Lite product. You’ll be automatically entered into
a drawing for a chance to win a FREE Tripp Lite product!*
* No purchase necessary. Void where prohibited. Some restrictions apply. See website for details.
Tripp Lite has a policy of continuous improvement. Specifications are subject to change without notice.
Photos and illustrations may differ slightly from actual products.
Warranty and Product Registration
9
Manual del Propietario
KVM HDMI de 2 Puertos
con Video 4K, Audio y
Compartido de Periféricos
Modelo: B005-HUA2-K
1111 W. 35th Street, Chicago, IL 60609, EE UU • tripplite.com/support
Copyright © 2020 Tripp Lite. Todos los derechos reservados.
English 1 • Français 17 • Русский 25
  • Page 1 1
  • Page 2 2
  • Page 3 3
  • Page 4 4
  • Page 5 5
  • Page 6 6
  • Page 7 7
  • Page 8 8
  • Page 9 9
  • Page 10 10
  • Page 11 11
  • Page 12 12
  • Page 13 13
  • Page 14 14
  • Page 15 15
  • Page 16 16
  • Page 17 17
  • Page 18 18
  • Page 19 19
  • Page 20 20
  • Page 21 21
  • Page 22 22
  • Page 23 23
  • Page 24 24
  • Page 25 25
  • Page 26 26
  • Page 27 27
  • Page 28 28
  • Page 29 29
  • Page 30 30
  • Page 31 31
  • Page 32 32

Tripp Lite Owner's Manual B005-HUA2-K Owner's manual

Category
KVM switches
Type
Owner's manual

Ask a question and I''ll find the answer in the document

Finding information in a document is now easier with AI