BM04101 Molift Quick Raiser English - Rev H 08/05/2013 Page 2 of 20
IMPORTANT!
The patient lifter is only meant to be used by
qualied personnel.
The manual shall not be handed over, or
made available to, any unauthorised third
party, without a prior written consent from
Etac Supply Gjøvik. Existing laws, conventions
and agreements protects all documents. No
extract of this documentation can be re-
produced, used or transferred without pri-
or written consent from Etac Supply Gjø-
vik. Violation of these regulations may lead
to judicial repercussions and economic
responsibility. Industrial rights are reserved.
Etac AS, Etac Supply Gjøvik
Hadelandsveien 2
2816 Gjøvik, Norway
Teleph: (+47) 40001004 www.molift.com
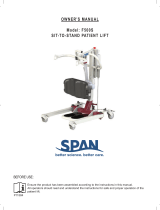
About Molift Quick Raiser 1, 2 and 2+
Molift Quick Raiser is designed to cover the need
for lift and transfer of patients who are to some ex-
tent capable to actively participate in the process.
The lifter has an exceptional design and the shape
of the lifter and geometry of the lifting movement
imitates the natural pattern of movement of a per-
son. The lifter is only intended for lift and transfer
to and from a sitting position.
• Molift Quick Raiser 1 has xed legs, while Molift
Quick Raiser 2 / 2+ has spreadable legs.
• Molift Quick Raiser 1 and 2 has a lifting capac-
ity of 160 kg Safe Working Load (SWL).
• Molift Quick Raiser 2+ has a lifting capacity of
200 kg Safe Working Load (SWL).
All three variants of Molift Quick Raiser is de-
scribed in this manual, and when Molift Quick
Raiser is written it applies for all three, if not it is
specied by number 1, 2 or 2+.
Molift Quick Raiser 1, 2 and 2+ are CE labelled ac-
cording to Council Directive (93/42/EEC) concern-
ing medical devices as medical equipment class 1,
and has been tested and approved by third party,
according to standards IEC 60601-1, IEC 60601-1-2
and NS-EN ISO 10535:2006
Before using the patient lifter
Before using a patient lifter, the operator must be
trained accordingly. Practice lifting a colleague,
and be lifted by others. It is important not only to
know how to move another person using the lifter,
but also how it is to be lifted. Try out and practice
using all the relevant slings for the dierent types
of lifter and movement you may encounter. Before
lifting a person, you should explain the procedure.
When using the lifter, it’s also important to use the
correct sling and accessories according to:
• type of disability
• size
• weight
• type of movement
The lifter must be taken out of service imme-
diately, or not returned to service, if faults
and/or irregularities that may have influence
on the safety are discovered.
Table of content
About Molift Quick Raiser 1, 2 and 2+ 2
Molift Quick Raiser - use ................... 3
Check list before use ......................... 3
General Safety precautions .............. 4
Adjusting and transferring ............... 5
Assembly and disassembly ............... 7
Battery and charging ........................ 9
Safety devices .................................. 10
Technical data Molift Quick Raiser 1 11
Technical data Molift Quick Raiser 2 12
Technical data Molift Quick Raiser 2+ 13
Labels and symbols ......................... 14
Accessories ....................................... 15
Troubleshooting .............................. 16
Maintenance .................................... 17
Checklist for periodic inspection ... 18