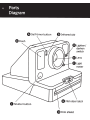
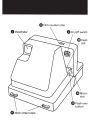
Polaroid Originals OneStep2 is an analog instant camera for the modern era. It takes a moment and turns it into something you can hold, something you can share, something real. Inspired by the original OneStep camera from 1977, the OneStep 2 has a self-timer function allowing you to place yourself in your photos or create perfectly-timed photographs. The camera has 3 battery states, indicated by the camera's flash charge LED light. It works with all Polaroid Originals i-Type and 600 type film packs. We recommend using i-Type film as it is optimized for use with the OneStep 2.
Polaroid Originals OneStep2 is an analog instant camera for the modern era. It takes a moment and turns it into something you can hold, something you can share, something real. Inspired by the original OneStep camera from 1977, the OneStep 2 has a self-timer function allowing you to place yourself in your photos or create perfectly-timed photographs. The camera has 3 battery states, indicated by the camera's flash charge LED light. It works with all Polaroid Originals i-Type and 600 type film packs. We recommend using i-Type film as it is optimized for use with the OneStep 2.


-
 1
1
-
 2
2
-
 3
3
-
 4
4
-
 5
5
-
 6
6
-
 7
7
-
 8
8
-
 9
9
-
 10
10
-
 11
11
-
 12
12
-
 13
13
-
 14
14
-
 15
15
-
 16
16
-
 17
17
-
 18
18
-
 19
19
-
 20
20
-
 21
21
-
 22
22
-
 23
23
-
 24
24
-
 25
25
-
 26
26
-
 27
27


Polaroid Originals OneStep2 is an analog instant camera for the modern era. It takes a moment and turns it into something you can hold, something you can share, something real. Inspired by the original OneStep camera from 1977, the OneStep 2 has a self-timer function allowing you to place yourself in your photos or create perfectly-timed photographs. The camera has 3 battery states, indicated by the camera's flash charge LED light. It works with all Polaroid Originals i-Type and 600 type film packs. We recommend using i-Type film as it is optimized for use with the OneStep 2.
Ask a question and I''ll find the answer in the document
Finding information in a document is now easier with AI
Related papers


Other documents
-
Polaroid NOW User manual
-
Polaroid 11652293 User manual
-
Polaroid OneStep+ User manual
-
Polaroid Now Plus User manual
-
-
-
-
-
Polaroid Go 2nd Gen User manual
-
Polaroid 9035 User manual