Texas Instruments TI-Navigator User manual
- Category
- Software
- Type
- User manual
This manual is also suitable for

TI-Navigator™
Reference Guide

ii
Important Information
Texas Instruments makes no warranty, either express or implied,
including but not limited to any implied warranties of merchantability
and fitness for a particular purpose, regarding any programs or book
materials and makes such materials available solely on an "as-is" basis. In
no event shall Texas Instruments be liable to anyone for special,
collateral, incidental, or consequential damages in connection with or
arising out of the purchase or use of these materials, and the sole and
exclusive liability of Texas Instruments, regardless of the form of action,
shall not exceed the purchase price of this product. Moreover, Texas
Instruments shall not be liable for any claim of any kind whatsoever
against the use of these materials by any other party.
Copyright © 2006, 2008 Texas Instruments Incorporated.
Microsoft®, Windows®, and CompuServe® are trademarks of their
owners.

Contents
iii
Important Information................................................................... ii
Getting started with TI-Navigator .........................................1
Starting TI-Navigator™ on your computer................................... 1
The TI-Navigator computer home screen ..................................... 2
TI-Navigator computer tools.......................................................... 7
Creating and managing your teacher account............................. 8
Using calculator screen options................................................... 11
Logging in to TI-Navigator on your calculator........................... 12
Logging in to TI-Navigator (student instruction) ....................... 13
The TI-Navigator calculator home screen ................................... 15
TI-Navigator calculator tools ....................................................... 15
Managing classes..................................................................17
Creating classes............................................................................. 17
Selecting a class ............................................................................ 19
Beginning and ending class sessions........................................... 20
Changing the class view............................................................... 20
Removing items from the Class Record....................................... 23
Removing classes .......................................................................... 24
Managing student accounts.................................................25
Adding students to classes........................................................... 25
Checking student login status ..................................................... 27
Arranging the seating chart ........................................................ 27
Sorting student information........................................................ 28
Using the Student Portfolio view................................................ 29
Resetting student passwords ....................................................... 32
Changing the classes of a student............................................... 34
Changing student names and identifiers.................................... 36
Moving a student to another class.............................................. 37
Copying a student to another class............................................. 38
Removing a student from a class................................................. 38
Exchanging files with students ...........................................41
Sending files ................................................................................. 41
Sending files (student instruction) .............................................. 46
Collecting files .............................................................................. 48
Receiving files (student instruction)............................................ 50
Deleting files from calculators..................................................... 51
Checking the status of file transfers ........................................... 53
Canceling file transfers ................................................................ 54

iv
Finding transferred files ...............................................................55
Changing the unprompted file location .....................................55
Viewing file properties................................................................. 56
Running interactive activities ............................................. 59
Introduction to the Activity Center tool .....................................59
Configuring activities ...................................................................68
Changing the graph window settings.........................................79
Saving and loading activity settings ........................................... 90
Starting and managing activities.................................................91
Creating and adding activity data............................................... 94
Contributing activity data (student instruction).......................102
Plotting activity data ..................................................................112
Editing activity data.................................................................... 120
Saving and loading activity data ...............................................121
Deleting activity data .................................................................123
Viewing activity data.................................................................. 125
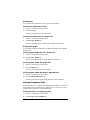
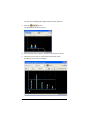
Viewing Frequency Plots ............................................................127
Showing and hiding activity data.............................................. 130
Highlighting activity data ..........................................................134
Sorting activity data ...................................................................135
Polling students.................................................................. 139
The Quick Poll tool window and tabs .......................................139
Opening the Quick Poll tool ......................................................141
Polling your students..................................................................142
Stopping polls .............................................................................143
Pausing polls ...............................................................................143
Resuming paused polls...............................................................144
Responding to polls (student instruction).................................144
Sending poll results to students.................................................146
Saving polls .................................................................................146
Viewing poll results .................................................................... 146
Sorting poll data .........................................................................148
Showing and hiding display names........................................... 148
Viewing previous polls ...............................................................148
Closing the Quick Poll tool.........................................................149
Capturing calculator screens ............................................. 151
Capturing calculator screens ...................................................... 151
Viewing Captured Screens .........................................................152
Saving captured screens .............................................................153
Refreshing captured screens ......................................................154
Showing and hiding display names........................................... 154

v
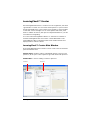
LearningCheck™ Creator....................................................157
LearningCheck™ Creator Main Window .................................. 157
Creating a new document ......................................................... 158
Specifying document properties ............................................... 159
Adding a new section ................................................................ 160
Adding questions ....................................................................... 161
Adding specific question types.................................................. 163
Editing Presentation Sequence.................................................. 172
Adding questions from the Item Bank...................................... 174
Saving a document..................................................................... 177
Adding special characters to text 178
Working with documents .......................................................... 180
Opening existing documents..................................................... 181
Printing a Report........................................................................ 188
Working with Images 190
Previewing a document ............................................................. 197
Sending documents to calculators ............................................ 198
Sending a document to a classroom network .......................... 200
Notes and tips for TI-73 Explorer™ users.................................. 201
Troubleshooting LearningCheck™ Creator .............................. 202
The Class Analysis Tool .......................................................207
Getting started ........................................................................... 207
Creating a new class analysis ..................................................... 207
Viewing a slide show of the analysis......................................... 221
Printing analysis reports............................................................. 222
Glossary of terms used in Class Analysis.................................... 241
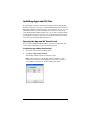
Installing Apps and OS files ...............................................243
Opening the App and OS Transfer tool .................................... 243
Adding files to the transfer list ................................................. 244
Selecting and unselecting files to send..................................... 245
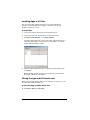
Removing files from the transfer list ........................................ 245
Installing Apps or OS files .......................................................... 246
Closing the App and OS Transfer tool....................................... 246
Troubleshooting..................................................................247
Frequently-asked questions ....................................................... 247
System requirements.................................................................. 255
Error messages............................................................................ 256
Glossary...............................................................................261
Terms ........................................................................................... 261
File types ..................................................................................... 264


Getting started with TI-Navigator 1
Getting started with TI-Navigator
The TI-Navigator™ classroom learning system provides the hardware and
software tools you need to set up a wireless classroom network. The
TI-Navigator™ system lets you:
• Create and manage classes on the classroom network.
• Transfer files between your computer or calculator and your
students’ calculators.
• Monitor your students with screen captures and polling.
• Perform various interactive activities with your students to enhance
your lessons.
• Use different tools to create, distribute, and analyze educational
content.
• Install TI Graphing Calculator Applications (Apps) on your students’
calculators.
The TI-Navigator™ system has two main components that make it work:
• TI-Navigator computer software. The TI-Navigator computer
software contains the tools and options you need to run your
wireless classroom network.
• TI-Navigator calculator software. The TI-Navigator calculator
software contains the tools you and your students need to exchange
information with each other through the TI-Navigator network.
This section provides basic information about TI-Navigator, including
information on both the computer software and the calculator software.
Starting TI-Navigator™ on your computer
You can start the TI-Navigator™classroom learning system from your
computer’s start menu.
To start TI-Navigator on your computer
f Click
Start > Programs > TI Tools > TI-Navigator > TI-Navigator™.
The TI-Navigator™ computer home screen opens.
Note: If you have not used the TI-Navigator system before, a prompt
opens asking if you want to set up your classroom. You can choose to
set up your classroom or continue on to the TI-Navigator computer
home screen.

2 Getting started with TI-Navigator
Note: Make sure that the network indicator at the bottom of the screen
indicates that the TI-Navigator™ network is available. If it is not
available, this indicates an error.
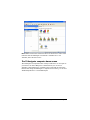
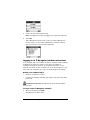
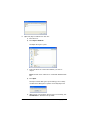
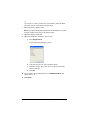
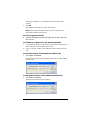
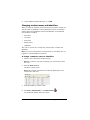
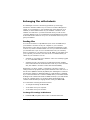
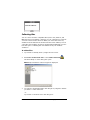
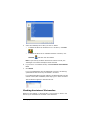
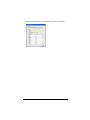
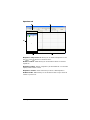
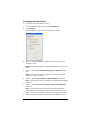
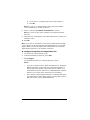
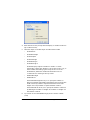
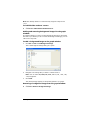
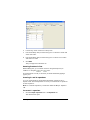
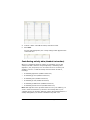
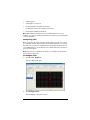
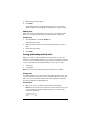
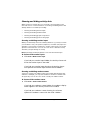
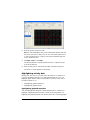
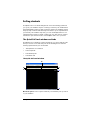
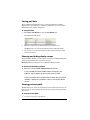
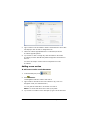
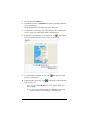
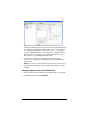
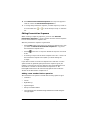
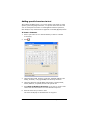
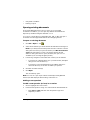
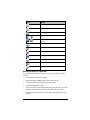
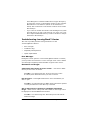
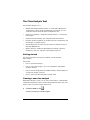
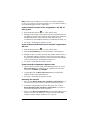
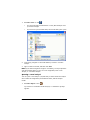
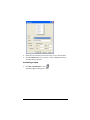
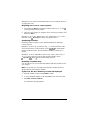
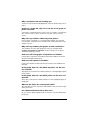
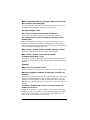
The TI-Navigator computer home screen
The TI-Navigator™computer home screen provides the tools and options
you need to run the TI-Navigator software. Below you can see an
example of the TI-Navigator computer home screen with its main parts
labeled. Following the TI-Navigator computer home screen, you can find
detailed explanations of each labeled part.

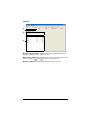
Getting started with TI-Navigator 3
Ê Classroom tab
Ë
Tools tab
Ì Current Class
Í Class Record
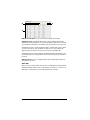
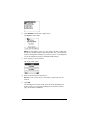
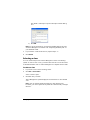
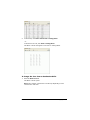
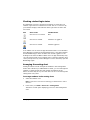
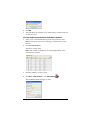
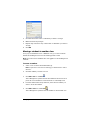
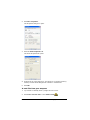
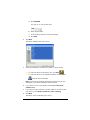
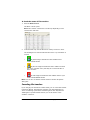
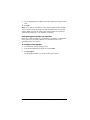
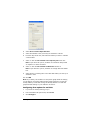
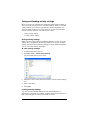
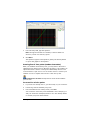
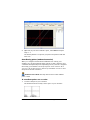
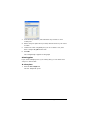
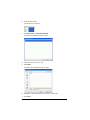
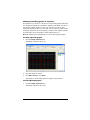
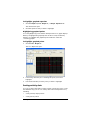
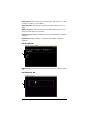
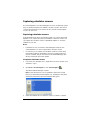
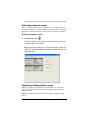
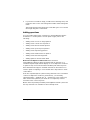
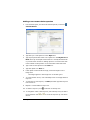
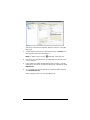
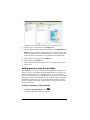
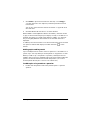
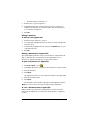
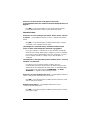
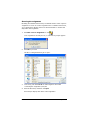
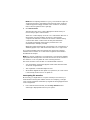
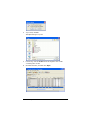
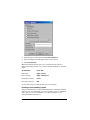
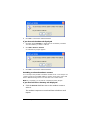
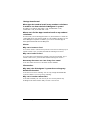
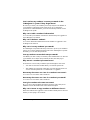
Classroom tab
In the Classroom tab, you can view the students in the selected class and
add, remove, or edit students. The Classroom tab has three views, the
Seating Chart, Student List and Student Portfolio views. In the Seating
Chart view, you can view your students by their display name and an
icon. In the Student List view, you can view your students listed in a table
with some of their account information. The Student Portfolio view
displays student names and the scores for every assignment. Below you
can see an example of the Classroom tab with its main parts labeled.
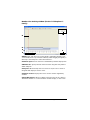
Note: The example below shows the Classroom tab in Student List view.
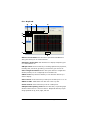
ÊË
Ì
Í

4 Getting started with TI-Navigator
Ê Classroom toolbar. Lets you add, edit, and remove students.
Ë
Student roster. 1) Seating Chart view - Shows students listed with
display names and student icons. The Seating Chart view lets you arrange
your students in the Classroom tab like they are seated in your classroom.
2) Student List view - Shows students listed in a table with some of their
account information. The Student List view lets you sort students by
display name, first name, last name, user name, and student ID.
3) Student Portfolio View - Displays students listed in a table with scores
associated with each assignment that you have included in the Student
Portfolio.
Ì
View selector. Lets you toggle between the Seating Chart view and
the Student List view.
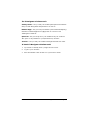
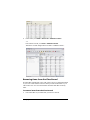
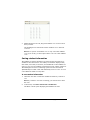
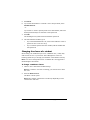
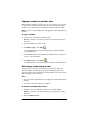
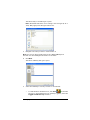
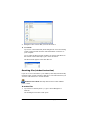
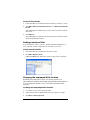
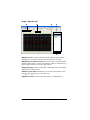
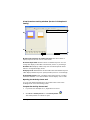
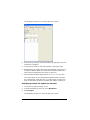
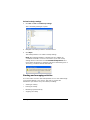
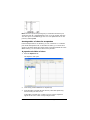
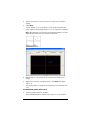
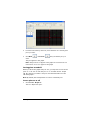
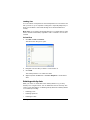
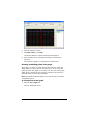
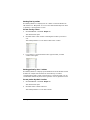
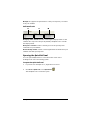
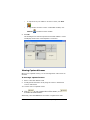
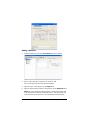
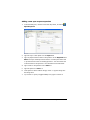
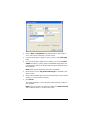
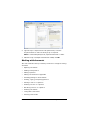
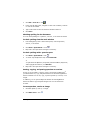
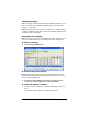
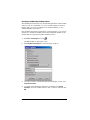
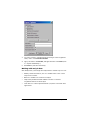
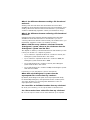
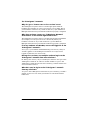
Tools tab
The Tools tab contains three main sections, including The Activity Center
and Networked Software, Tasks, and Utilities. Each section contains icons
that link to a particular tool in the TI-Navigator™ software.
Ê
Ë
Ì

Getting started with TI-Navigator 5
Ê Networked software icons. Icons that let you launch the TI Computer
Applications (Apps) that you can use with the TI-Navigator™ software,
including Class Analysis and LearningCheck™ Creator. You must have
these Apps installed on your computer in order to launch them from the
TI-Navigator™ system.
Ë Activity Center icon. Icon that launches the Activity Center tool, a
TI-Navigator™ tool you can use to create and run interactive activities
with your class.
Ì
Tasks icons. Icons that launch task tools in the TI-Navigator™ software,
including Send to class, Collect from class, Delete from class, the Screen
Capture tool, and the Quick Poll tool.
Í
Utilities icons. Icons that launch utilities in the TI-Navigator™
software, including the App and OS Transfer tool and Network Manager.
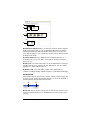
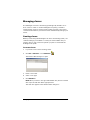
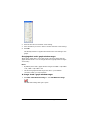
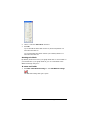
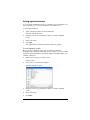
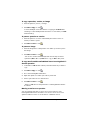
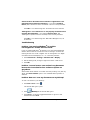
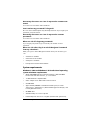
Current Class
Current Class lets you select classes you have created, as well as begin and
end class sessions for the selected class. Below you can see an example of
the Current Class with its main parts labeled.
Ê
Class list. A drop-down list where you can select a class from the ones
you have created. The Class list is disabled when you have a class session
running.
Ê
Ì
Í
Ë
Ê
Ë

6 Getting started with TI-Navigator
Ë Begin/End Class button. Button that lets you begin or end a class
session.
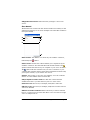
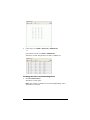
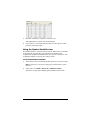
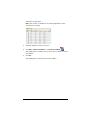
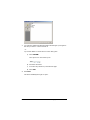
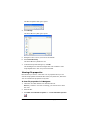
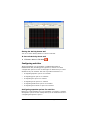
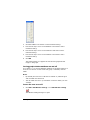
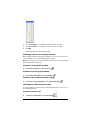
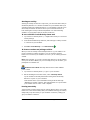
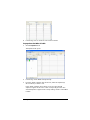
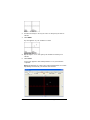
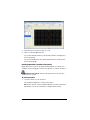
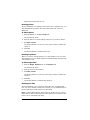
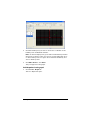
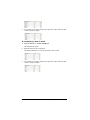
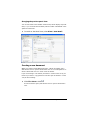
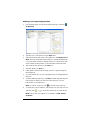
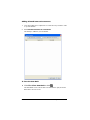
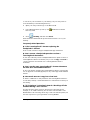
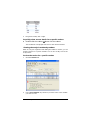
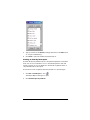
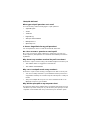
Class Record
The Class Record contains both the current and historical activity for the
selected class. Below you can see an example of the Class Record with its
main parts labeled.
Ê File deletion. The deletion of a file from your students’ calculators,
indicated by the symbol.
Ë
File transfer. The transfer of files between your computer and your
students’ calculators. Arrows beside files indicate file transfers. The
symbol indicates transfers from your computer to your class’s calculators.
The symbol indicates transfers from your class’s calculators to your
computer. File transfers remain current until all students receive the file,
you stop the transfer, or you end the class session.
Ì
Status. The progress of an action. For example, “23 of 25” indicates
that 23 out of 25 students have received a file.
Í
Unprompted from Class folder. A folder that contains the files
students have sent to you that were not part of a collect action.
Î
Current action. An action (for example, send) that is still active.
Ï
Historic action. An action (for example, send) that is inactive. Historic
actions are disabled.
Ð
Remove From Record button. Button that lets you remove selected
historic or active actions from the Class Record. You can remove a single
action or multiple actions.
Í
Î
Ï
Ì
Ë
Ê
Ð

Getting started with TI-Navigator 7
TI-Navigator computer tools
The TI-Navigator™ classroom learning system contains tools that you can
use to interact with your students from your computer. Some of the tools
are part of the TI-Navigator™ system, while other tools are optional. This
section describes different tools you can use in the TI-Navigator™ system,
as well as how to launch them.
The TI-Navigator computer tools
Activity Center – Contains various activities you can use to interact with
your students during your lessons. With the Activity Center tool, you can
run interactive activities with your class involving lists, graphs, points,
and equations.
App and OS Transfer – Lets you install TI Graphing Calculator
Applications (Apps) on your students’ calculators.
Class Analysis – Lets you collect and analyze answers to assignments, as
well as use a slide show to review the results with your students. Class
Analysis is an optional tool. If you do not install it, then you cannot
launch it in the TI-Navigator™ system.
LearningCheck Creator – Lets you create assignments to run on TI
calculators and send the assignments to your students.
Network Manager – Lets you activate access points and hubs and
resolve network problems.
Quick Poll – Lets you send polls to your students and receive their poll
responses.
Screen Capture – Lets you capture your students’ calculator screens and
display them on your computer.
To launch TI-Navigator computer tools
1. Click View > Tools or click the To ols tab.
The Tools tab opens.

8 Getting started with TI-Navigator
2. If the tool you want to launch is inactive, begin the class session.
3. Click the icon of the tool you want to launch.
Note: You can also launch many of these tools from the Tools menu.
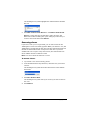
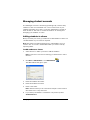
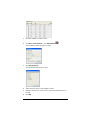
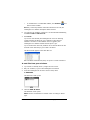
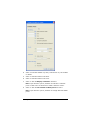
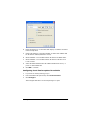
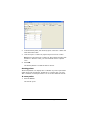
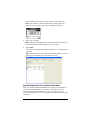
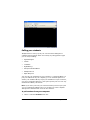
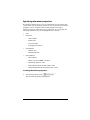
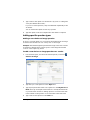
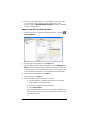
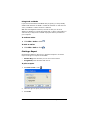
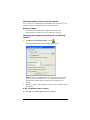
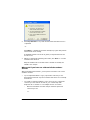
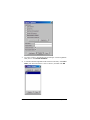
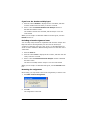
Creating and managing your teacher account
You can create your teacher account in the Teacher Preferences section of
the TI-Navigator™ classroom learning system. Your teacher account lets
you log in to the TI-Navigator™r network from your calculator. After you
create your teacher account, you can later change your password or your
user name.
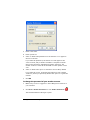
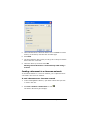
To create your teacher account
1. If you have a class session running, end it.
2. Click
Tools > Teacher Preferences or click Teacher Preferences .
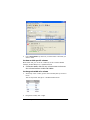
The Teacher Preferences dialog box opens.

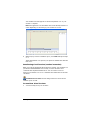
Getting started with TI-Navigator 9
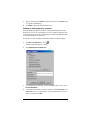
3. Enter a user name.
4. Enter a password.
5. Select or deselect the preference for the teacher icon to appear in
the classroom view.
If you select this preference, the teacher icon will appear in the
classroom view, and you will be included as a recipient in Send to
Class, Collect from Class and Delete from Class operations. The
teacher calculator screen will be included in screen captures of the
class.
6. Select or deselect the option for transfers to be forced by default.
If you select this option, all file transfers will be forced to student
calculators, unless you specifically deselect the option for a given file
transfer.
7. Click
OK.
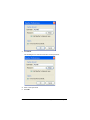
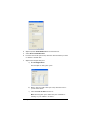
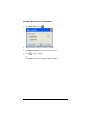
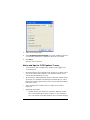
To change the password of your teacher account
1. Make sure you are not logged in to the TI-Navigator™ network on
your calculator.
2. Click
Tools > Teacher Preferences or click Teacher Preferences .
The Teacher Preferences dialog box opens.

10 Getting started with TI-Navigator
3. Click Reset.
The TI-Navigator™ software clears the current password.
4. Enter a new password.
5. Click
OK.

Getting started with TI-Navigator 11
To change the user name of your teacher account
1. Make sure you are not logged in to the TI-Navigator™ network on
your calculator.
2. Click
Tools > Teacher Preferences or click Teacher Preferences .
The Teacher Preferences dialog box opens.
3. Enter a new user name.
4. Click
OK.
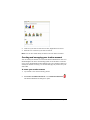
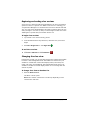
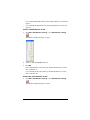
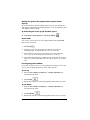
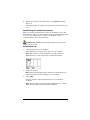
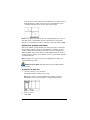
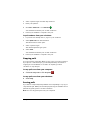
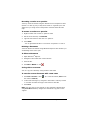
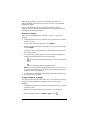
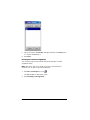
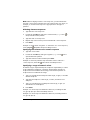
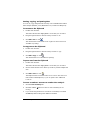
Using calculator screen options
The TI-Navigator™ classroom learning system has a number of options
you and your students can use from your calculator screens. To select an
option defined at the bottom of the calculator screen (such as
Mark
associated with the o key), press the graph key directly below the
option.
Press a key to select one of these
options. For example, press
o
to select Mark.

12 Getting started with TI-Navigator
Logging in to TI-Navigator on your calculator
The TI-Navigator™ classroom learning system uses both your computer
and your students’ calculators. Your computer and your students’
calculators communicate through the TI-Navigator™ network. You do
not have to log in to the TI-Navigator™ network on your computer to
communicate with your students. However, if you plan to participate
from your calculator during the TI-Navigator class session, then you must
also log in to the TI-Navigator™ network from your calculator.
Before you log in
Create your teacher account in Teacher Preferences.
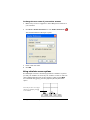
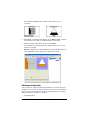
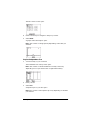
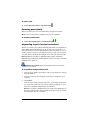
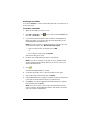
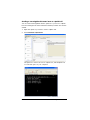
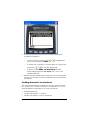
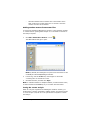
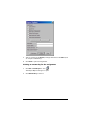
To log in to the TI-Navigator network
1. If you have not already done so, begin the class session on your
computer.
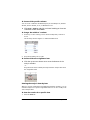
2. On your calculator, press Apps.
The Applications menu opens.
3. Select
NavNet from the list of applications.
The NavNet screen opens.
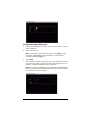
4. Press any key on your calculator.
The Login screen opens.

Getting started with TI-Navigator 13
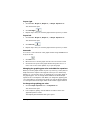
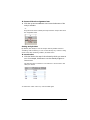
5. Enter your user name and password.
Note: TI-73 Explorer™ users, press -t to type text characters.
6. Select OK.
The TI-Navigator™ Home screen opens. From the TI-Navigator™
Home screen, you can use the TI-Navigator™ activities, network
apps, quick poll tool, and transfer capabilities.
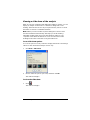
Logging in to TI-Navigator (student instruction)
Your computer and your students’ calculators communicate through the
TI-Navigator™ network. In order for you and your students to
communicate using this network, your students must log in to the
network from their calculators. Below you can find instructions you can
use to tell your students how to log in to the TI-Navigator™ network.
Before your students log in
• Create your students’ accounts.
• Provide your students with their user names and, if necessary, their
passwords.
Student Point of View: The steps below are from the student’s
point of view.
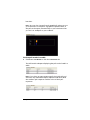
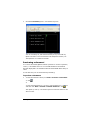
To log in to the TI-Navigator network
1. On your calculator, press Apps.
The Applications menu opens.

14 Getting started with TI-Navigator
2. Select NavNet from the list of applications.
The NavNet screen opens.
Note: If you attempt to log in to a class using a calculator other than
the type of calculator that is being used for the class, you will receive
an error message. (For example, you cannot log in to a class designed
for the TI-73 Explorer™ using a TI-84 Plus Silver Edition.)
3. Press any key on your calculator.
The Login screen opens.
4. Enter your user name and password.
Note: If you do not know your user name or password, ask your
teacher.
5. Select
OK.
The TI-Navigator™ Home screen opens. From the TI-Navigator™
Home screen, you can use the TI-Navigator™ activities, network
apps, and transfer capabilities.
Page is loading ...
Page is loading ...
Page is loading ...
Page is loading ...
Page is loading ...
Page is loading ...
Page is loading ...
Page is loading ...
Page is loading ...
Page is loading ...
Page is loading ...
Page is loading ...
Page is loading ...
Page is loading ...
Page is loading ...
Page is loading ...
Page is loading ...
Page is loading ...
Page is loading ...
Page is loading ...
Page is loading ...
Page is loading ...
Page is loading ...
Page is loading ...
Page is loading ...
Page is loading ...
Page is loading ...
Page is loading ...
Page is loading ...
Page is loading ...
Page is loading ...
Page is loading ...
Page is loading ...
Page is loading ...
Page is loading ...
Page is loading ...
Page is loading ...
Page is loading ...
Page is loading ...
Page is loading ...
Page is loading ...
Page is loading ...
Page is loading ...
Page is loading ...
Page is loading ...
Page is loading ...
Page is loading ...
Page is loading ...
Page is loading ...
Page is loading ...
Page is loading ...
Page is loading ...
Page is loading ...
Page is loading ...
Page is loading ...
Page is loading ...
Page is loading ...
Page is loading ...
Page is loading ...
Page is loading ...
Page is loading ...
Page is loading ...
Page is loading ...
Page is loading ...
Page is loading ...
Page is loading ...
Page is loading ...
Page is loading ...
Page is loading ...
Page is loading ...
Page is loading ...
Page is loading ...
Page is loading ...
Page is loading ...
Page is loading ...
Page is loading ...
Page is loading ...
Page is loading ...
Page is loading ...
Page is loading ...
Page is loading ...
Page is loading ...
Page is loading ...
Page is loading ...
Page is loading ...
Page is loading ...
Page is loading ...
Page is loading ...
Page is loading ...
Page is loading ...
Page is loading ...
Page is loading ...
Page is loading ...
Page is loading ...
Page is loading ...
Page is loading ...
Page is loading ...
Page is loading ...
Page is loading ...
Page is loading ...
Page is loading ...
Page is loading ...
Page is loading ...
Page is loading ...
Page is loading ...
Page is loading ...
Page is loading ...
Page is loading ...
Page is loading ...
Page is loading ...
Page is loading ...
Page is loading ...
Page is loading ...
Page is loading ...
Page is loading ...
Page is loading ...
Page is loading ...
Page is loading ...
Page is loading ...
Page is loading ...
Page is loading ...
Page is loading ...
Page is loading ...
Page is loading ...
Page is loading ...
Page is loading ...
Page is loading ...
Page is loading ...
Page is loading ...
Page is loading ...
Page is loading ...
Page is loading ...
Page is loading ...
Page is loading ...
Page is loading ...
Page is loading ...
Page is loading ...
Page is loading ...
Page is loading ...
Page is loading ...
Page is loading ...
Page is loading ...
Page is loading ...
Page is loading ...
Page is loading ...
Page is loading ...
Page is loading ...
Page is loading ...
Page is loading ...
Page is loading ...
Page is loading ...
Page is loading ...
Page is loading ...
Page is loading ...
Page is loading ...
Page is loading ...
Page is loading ...
Page is loading ...
Page is loading ...
Page is loading ...
Page is loading ...
Page is loading ...
Page is loading ...
Page is loading ...
Page is loading ...
Page is loading ...
Page is loading ...
Page is loading ...
Page is loading ...
Page is loading ...
Page is loading ...
Page is loading ...
Page is loading ...
Page is loading ...
Page is loading ...
Page is loading ...
Page is loading ...
Page is loading ...
Page is loading ...
Page is loading ...
Page is loading ...
Page is loading ...
Page is loading ...
Page is loading ...
Page is loading ...
Page is loading ...
Page is loading ...
Page is loading ...
Page is loading ...
Page is loading ...
Page is loading ...
Page is loading ...
Page is loading ...
Page is loading ...
Page is loading ...
Page is loading ...
Page is loading ...
Page is loading ...
Page is loading ...
Page is loading ...
Page is loading ...
Page is loading ...
Page is loading ...
Page is loading ...
Page is loading ...
Page is loading ...
Page is loading ...
Page is loading ...
Page is loading ...
Page is loading ...
Page is loading ...
Page is loading ...
Page is loading ...
Page is loading ...
Page is loading ...
Page is loading ...
Page is loading ...
Page is loading ...
Page is loading ...
Page is loading ...
Page is loading ...
Page is loading ...
Page is loading ...
Page is loading ...
Page is loading ...
Page is loading ...
Page is loading ...
Page is loading ...
Page is loading ...
Page is loading ...
Page is loading ...
Page is loading ...
Page is loading ...
Page is loading ...
Page is loading ...
Page is loading ...
Page is loading ...
Page is loading ...
Page is loading ...
Page is loading ...
Page is loading ...
Page is loading ...
Page is loading ...
Page is loading ...
Page is loading ...
Page is loading ...
Page is loading ...
Page is loading ...
Page is loading ...
Page is loading ...
Page is loading ...
Page is loading ...
Page is loading ...
Page is loading ...
Page is loading ...
Page is loading ...
Page is loading ...
Page is loading ...
Page is loading ...
Page is loading ...
Page is loading ...
Page is loading ...
Page is loading ...
Page is loading ...
Page is loading ...
Page is loading ...
-
 1
1
-
 2
2
-
 3
3
-
 4
4
-
 5
5
-
 6
6
-
 7
7
-
 8
8
-
 9
9
-
 10
10
-
 11
11
-
 12
12
-
 13
13
-
 14
14
-
 15
15
-
 16
16
-
 17
17
-
 18
18
-
 19
19
-
 20
20
-
 21
21
-
 22
22
-
 23
23
-
 24
24
-
 25
25
-
 26
26
-
 27
27
-
 28
28
-
 29
29
-
 30
30
-
 31
31
-
 32
32
-
 33
33
-
 34
34
-
 35
35
-
 36
36
-
 37
37
-
 38
38
-
 39
39
-
 40
40
-
 41
41
-
 42
42
-
 43
43
-
 44
44
-
 45
45
-
 46
46
-
 47
47
-
 48
48
-
 49
49
-
 50
50
-
 51
51
-
 52
52
-
 53
53
-
 54
54
-
 55
55
-
 56
56
-
 57
57
-
 58
58
-
 59
59
-
 60
60
-
 61
61
-
 62
62
-
 63
63
-
 64
64
-
 65
65
-
 66
66
-
 67
67
-
 68
68
-
 69
69
-
 70
70
-
 71
71
-
 72
72
-
 73
73
-
 74
74
-
 75
75
-
 76
76
-
 77
77
-
 78
78
-
 79
79
-
 80
80
-
 81
81
-
 82
82
-
 83
83
-
 84
84
-
 85
85
-
 86
86
-
 87
87
-
 88
88
-
 89
89
-
 90
90
-
 91
91
-
 92
92
-
 93
93
-
 94
94
-
 95
95
-
 96
96
-
 97
97
-
 98
98
-
 99
99
-
 100
100
-
 101
101
-
 102
102
-
 103
103
-
 104
104
-
 105
105
-
 106
106
-
 107
107
-
 108
108
-
 109
109
-
 110
110
-
 111
111
-
 112
112
-
 113
113
-
 114
114
-
 115
115
-
 116
116
-
 117
117
-
 118
118
-
 119
119
-
 120
120
-
 121
121
-
 122
122
-
 123
123
-
 124
124
-
 125
125
-
 126
126
-
 127
127
-
 128
128
-
 129
129
-
 130
130
-
 131
131
-
 132
132
-
 133
133
-
 134
134
-
 135
135
-
 136
136
-
 137
137
-
 138
138
-
 139
139
-
 140
140
-
 141
141
-
 142
142
-
 143
143
-
 144
144
-
 145
145
-
 146
146
-
 147
147
-
 148
148
-
 149
149
-
 150
150
-
 151
151
-
 152
152
-
 153
153
-
 154
154
-
 155
155
-
 156
156
-
 157
157
-
 158
158
-
 159
159
-
 160
160
-
 161
161
-
 162
162
-
 163
163
-
 164
164
-
 165
165
-
 166
166
-
 167
167
-
 168
168
-
 169
169
-
 170
170
-
 171
171
-
 172
172
-
 173
173
-
 174
174
-
 175
175
-
 176
176
-
 177
177
-
 178
178
-
 179
179
-
 180
180
-
 181
181
-
 182
182
-
 183
183
-
 184
184
-
 185
185
-
 186
186
-
 187
187
-
 188
188
-
 189
189
-
 190
190
-
 191
191
-
 192
192
-
 193
193
-
 194
194
-
 195
195
-
 196
196
-
 197
197
-
 198
198
-
 199
199
-
 200
200
-
 201
201
-
 202
202
-
 203
203
-
 204
204
-
 205
205
-
 206
206
-
 207
207
-
 208
208
-
 209
209
-
 210
210
-
 211
211
-
 212
212
-
 213
213
-
 214
214
-
 215
215
-
 216
216
-
 217
217
-
 218
218
-
 219
219
-
 220
220
-
 221
221
-
 222
222
-
 223
223
-
 224
224
-
 225
225
-
 226
226
-
 227
227
-
 228
228
-
 229
229
-
 230
230
-
 231
231
-
 232
232
-
 233
233
-
 234
234
-
 235
235
-
 236
236
-
 237
237
-
 238
238
-
 239
239
-
 240
240
-
 241
241
-
 242
242
-
 243
243
-
 244
244
-
 245
245
-
 246
246
-
 247
247
-
 248
248
-
 249
249
-
 250
250
-
 251
251
-
 252
252
-
 253
253
-
 254
254
-
 255
255
-
 256
256
-
 257
257
-
 258
258
-
 259
259
-
 260
260
-
 261
261
-
 262
262
-
 263
263
-
 264
264
-
 265
265
-
 266
266
-
 267
267
-
 268
268
-
 269
269
-
 270
270
-
 271
271
-
 272
272
-
 273
273
-
 274
274
-
 275
275
-
 276
276
-
 277
277
-
 278
278
-
 279
279
-
 280
280
-
 281
281
-
 282
282
-
 283
283
-
 284
284
-
 285
285
-
 286
286


Texas Instruments TI-Navigator User manual
- Category
- Software
- Type
- User manual
- This manual is also suitable for
Ask a question and I''ll find the answer in the document
Finding information in a document is now easier with AI
Related papers
-
Texas Instruments Titanium TI-89 User manual
-
-
Texas Instruments TINSPIRECXFFP User manual
-
-
-
Texas Instruments TI-Nspire CX User manual
-
-
-
Texas Instruments TI-92 User manual
-
Texas Instruments TI-84 PLUS User manual
Other documents
-
Sharp EL330TB User manual
-
Barco NCN-210 Installation guide
-
 Avid Sibelius Sibelius 8.0 User guide
-
SMART Technologies Sync 2009 User manual
-
Miller MK285021D Owner's manual
-
-
-
-
-
 Avid Sibelius Sibelius 7.1 User guide

