Page is loading ...

Elevator Call Device CCU-310EV
Product User Guide
Thank you for purchasing COMMAX products.
Please carefully read this User’s Guide (in particular, precautions for safety) before using a product and follow
instructions to use a product exactly.
The company is not responsible for any safety accidents caused by abnormal operation of the product.

1
Contents
1. Product Introduction ········································· 2
2. Safety and Precaution ········································ 3
3. Name and Features of each part ··························· 4
4.
Product Installation and Setting method···················5
5. How to set the product for each mode ·················· 6
6.
How it works ·················································· 20
7.
How to set household using PC ························· 22
8.
CCU-310EV Factory Reset ································ 29
9.
Wiring Diagram ············································ 29
10.
Specification ··············································· 32

2
Your unit is designed so it can be flush mounted on the or used. When flush mounted on the wall, the stand permils you to the
unit for an gular of unit view. The model number is located on the bottom and record the serial number in the space provided
below(available). Refer to these numbers whenever you call upon your COMMAX dealer regarding this product.
Model No. Serial No.
To prevent fire or shock hazard, do not expose the unit to rain or moisture.
This symbol is intended to alert the use to the presence of uninsulated dangerous Voltage within the product s enclose that
may be of sufficient magnitude to constitute a risk of electric shock to persons.
This symbol is intended to alert the use to the presence of important operating and maintemance(servicing) instructions in the
literature accompanying the appliance
1.
Product Introduction
CAUTION : To reduce the risk of electric shock, do not remove cover(or back) no user-serviceable
part inside refer servicing to qualified service personnel
caution
Risk of electric shock
do not open

3
Damage Requiring Service : This equipment from the power source and source and refer servicing to qualified service per-
sonnel under the following conditions
when the power is damaged.
if liquid has been spoiled or objects have hallen into the unit
if the equipment has been exposed to rain or water.
if the equipment has been dropped or otherwise damaged.
when the equipment exhibits a distinct change in performance- this indicates a need for service.
Water and Moisture : Do not use this product near water, for example, near a bath tub, wash bowl, kitchen sink, or laundry
tub, in a wet basement, or near a swimming pool, and the like.
Accessories : The product may fall, causing serious injury to a child or adult, and serious damage to the appliance. Any
mounting of the manufacture s instructions, and should use a mounting accessory recommended by the manu-
facturer.
Object and Liquid Entry : Never push objects of any kind into this product through openings as they may touch dangerous
voltage points or short-out parts that could result in a fire or electric shock. Never spill liquid of any
kind on the product.
Lightning : For added protection for this product before a lightning storm, or when it is left unattached and un used for long
periods of time, unplug it from the wall outlet and disconnect the other system. This will prevent damage to the
product due to lightning and power-line surges. If you live in an ared heavily prone to lightning storms, it is recom-
mended that you invest in power-line, telephone-line, RF cable and actuator / polarization surge protectors to pro-
tect your appliance system from possible damage
2.
Safety and Precaution

4
3.
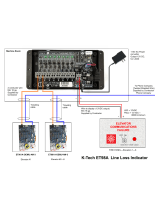
Name and Features of each part
ΗDIP Switch : DIP switch for Mode & ID setting.
ΘRS-485 connection terminal : RS-485 DATA connection terminal.
ΙRS-232 Data Port : RS-232 DATA communication line port.(PC DATA connection terminal)
ΚData Port : 481 System DATA communication line port.
ΛStatus LED : LED for operation status check.
Μ481 or 485 setting DIP switch : 481 communication (1, 2, 3 ON) / 485 communication (4, 5, 6 ON))
ΝCall setting button : Guard station calling button during CCU-310EV ID setting.
ΞPower port : DC power terminal (DC adaptor 12V / 1A)
⑨ EL connection port : Connection port for EL calling button (PORT_1~PORT_10)

5
4..
Product Setting and setting method
4-1. Product installation and setting method
z This product must be used different modes like household input / household floor / lobby.
Ȅ Caution: When changing to each mode, be sure to change the mode after factory reset.
(For the initialization method, refer to "8. CCU-310EV Factory Reaet".)
z To select mode, check DIP Switch’s S/W1 and S/W2.
household input mode : S/W1 ΓOFF
,
S/W2 Î “OFF”
household floor mode : S/W1 ΓOFF” S/W2 Î “ON”
lobby mode : S/W1 ΓON”, S/W2 Î “OFF”
z DIP switch(SETTING S/W)
z This product is an elevator call device that can be linked with the lobby phone and the video
phone according to the mode.
zDIP switch(481 or 485 SETTING S/W)
481 Mode : S/W1,2,3 ΓON” , S/W4,5,6 Î “OFF”
(481 Mode : Home Auto System connection)
*481 Mode : Please use after connecting 2P DATA
communication line.
485 Mode : S/W1,2,3 ΓOFF” , S/W4,5,6 Î “ON”
(485 Mode : Home Network System connection)
*485 Mode : Please use after connecting 3P RS-485 line.
*Please refer to the User’s manual of Home Network System.

6
5. How to set the product for each mode
5-1. Setting method when household input mode
(When you call an elevator from a household)
(Note)Only household input mode is supported when RS-485 interface with Home Network
products.
z It supports only the elevator call function in the household,
z The elevator call function is not supported when the door is opened by the lobby phone.
z Applicable for only specific video phone which provides EL call function.
z Household information must be registered in CCU-310EV to use EL calling.
z Only registered household can use EL calling.
z 1 unit of CCU-310EV can register up to 10 households.
z ID of CCU-310EV can be fixed from “1” to “63”.
z 10 households are set for one CCU-310EV (Up to 630 households)

7
Η Set DIP switch to be household input mode.
*( S/W1 Î OFF , S/W2 Î OFF)
Θ Set ID of CCU-310EV using DIP switch (S/W3 ~ S/W8).
(Refer to 5-1-1. “ID setting method by DIP switch”)
Ι Press “ID SET” button to call guard station.
Κ ID of CCU-310EV shown on guade station. (shown like "9501-XXXX")
ex) If S/W8 is ON , shown like “9501-0001”.
(Remark)
Ȅ Meaning of “9501 – 0001”
“9501” : Serial number of CCU-310EV device (household input mode / household floor mode)
“0001” : ID of CCU-310EV just set (by DIP switch)

8
Λ Setting target household’s building No., room No. and SUB No. from guard station.
Ȅ SUB number is the port number of CCU-310EV for elevator call.
Press the expansion button and enter the SUB number.
Ex) Building 101 Room 101 Port 1
1> Calling guard station by CCU-310EV ID_SET button.
2> From guard station (During calling)
“Remote” button Î “101”(building No.) Î “
ミ
” Î “101”(Room No.) Î Extension button
Î “0”(SUB No.) Î “#” Î Call end
Ȅ SUB Number : - SUB number is a port number that such household will use for EL calling.
- SUB number can be set from “0” to “9”.
*
SUB number “0” ~ “9” means CCU-310EV’s “PORT_1” ~ “ PORT_10” numbers.
※ Household input mode must be registered individually for each household.
(“Sub 0” Î “Port_1” ..... Î “
Sub 9
Î “Port_10”)

9
5-1-1. ID setting method by DIP switch (Household input mode)
(S/W3 ~ S/W 8 : BOARD ID setting)
* Please refer to the below instruction
.
Number How to set up Number How to set up Number How to set up
1 2 3
Number How to set up Number How to set up Number How to set up
61 62 63

10
5-2. Setting method when household floor mode.
z It supports only the elevator call function in the household,
The elevator call function is not supported when the door is opened by the lobby phone.
z Applicable for only specific video phone which provides EL call function.
z Household’s floor information must be registered in CCU-310EV to use EL calling.
z All households of the floor set by CCU-310EV can use EL calling.
1 unit of CCU-310EV can register up to 10 floors. (up to 80 floors)
z It is used to set one floor per port of board.
Η Set DIP switch to be household floor mode.
(When you call an elevator from a household)
* ( S/W1 Î OFF , S/W2 Î ON)
z ID of CCU-310EV can be set from “1” to “8”.
z In floor mode, up to 8pcs of CCU-310EV can be installed.

11
Θ ID setting of CCU-310EV by DIP switch (S/W5 ~ S/W8).
(Refer to 5-2-1. “ID setting method by DIP switch”)
Ι Call guard station by pressing " ID SET" button.
Κ ID of CCU-310EV shown on guade station. (shown like "9501-XXXX")
Ex) If SW8 is ON , shown like “9501-0001”.
(Remark)
Ȅ Meaning of “9501 – 0001”
“9501” : Serial number of CCU-310EV device (household input mode / household floor mode)
“0001” : ID of CCU-310EV (Set by DIP switch)
Λ Setting household’s building number, and CCU-310EV’s ID from guard station.
Ex.1) In case building 101’s CCU-310EV ID is “1”
1> Call guard station by CCU-310EV ID_SET button.
2> From guard station (During calling status)
“Remote” button Î “101”(Building No.) Î “
ミ
” Î “0001”(ID No.) Î “#” Î Call End
Ȅ Registration complete : Building 101’s ID is number 1.
Î EL calling button can be connected from 1
st
floor to 10
th
floor.
Î “PORT_1” : 1
st
floor ~ “PORT_10” : 10
th
floor.

12
Ex. 2) In case building 101’s CCU-310EV ID is “2”
1> Call guard station by CCU-310EV ID_SET button.
Æ Shown “ 9501-0002” on guard station.
2> From guard station (During calling status)
“Remote” button Î “101”(Building No.) Î “
ミ
” Î “0002”(ID No.) Î “#” Î Call End
Ȅ Registration complete : Building 101’s ID is number 1.
Î EL calling button can be connected from 11
th
to 20
th
floor.
Î “PORT_1” : 11
th
floor ~ “PORT_10” : 20
th
floor.
Ȅ The floor is automatically assigned as above when entering the ID.
two digits of the four digits of the household number.
Ex1> 0101 - 0101: 1st floor (Designated ID_1 / PORT_1)
Ex 2> 0101 - 0707: 7th floor (Designated as ID1_ / PORT_7)
Ex 3> 0101 - 1109: 11th floor (Designated as ID_2 / PORT_1)
Ex 4> 0101 - 2010: 20th floor (Designated as ID_2 / PORT_10)
In "household floor mode", the household floor is divided into the first.

13
5-2-1. ID setting method by DIP switch (Household Floor mode)
(S/W5 ~ S/W 8 : BOARD ID setting)
* Please refer to the below instruction
.
Number How to set up Number How to set up Number How to set up
21 3
456
78

14
[Reference]
Ȅ How to set up the CCU-310EV if the guard room is not installed.
(Household / Floor mode)
ȄIf there is a guard stationCDS-4GS installed,WXUQRIIWKHguad station and set the
household input mode on the lobby phone. (Household / Floor mode)
z Proceed after setting the household input mode on the lobby phone.
Household input mode on the lobby phone.
"Program" button Î Management password Î "Bell button" Î "Program" button Î
"15" Î "Bell button" : Lobby phone enters household input mode.
£ Press "ID SET" button on the CCU-310EV to call.
¤ ID of CCU-310 is displayed on the lobby phone.
¥ Input the ID No. set by DIP S/W.
¦ Input serial number as "0".
§ When the input is complete, exit the household input mode on the lobby phone.

15
5-3. Setting method when using in “Lobby mode”
z Only the lobby phone is linked (the elevator is called when the door is opened by the lobby
phone) and does not support the elevator call function in the household.
z Before setting, go to “Program No.18 (Connect SECUMAX) and select "Use : 1".
z Please use after connecting DATA communication.
(DATA line connects to the Guard station DATA line.)
Η Put “ON” of DIP switch 1. (set CCU-310EV to be lobby mode.)
*( S/W1 Î ON , S/W2 Î ON) : In case Secumax is not installed
(When calling the elevator from the lobby phone)
*( S/W1 Î ON , S/W2 Î ON) : In case Secumax is installed

16
Θ Set ID of CCU-310EV by DIP switch.
z Set ID of CCU-310EV by DIP switch’s “S/W5~S/W8”
Ι Press call button to call guard station.
Κ Shown ID of CCU-310EV on guard station. (Shown like “9500-XXXX”)
(ex) DIP switch “8” is ON, “9500-0001” is shown.
Λ Set the same building number as you set building number on the guard station.
Room number is set to be same with CCU-310EV’s ID number ( ID set by DIP switch)
Μ The ID of CCU-310EV changes.
z CCU-310EV 1 unit (one ID) can cover 10 units of lobby phones (10 buttons of EL call).
Ex. 1) Connect CCU-310EV "ID 1" to the product serial number "XXXX-9901 ~ XXXX-9910".
¾ If you connect a lobby phone to CCU-310EV "ID 1" product in 101,
you can connect up to ten Lobby phones sequentially from 0101-9901 to 0101-9910.
Ex. 2) Connect CCU-310EV "ID 2"
to the product serial number "XXXX-9911 ~ XXXX-9920".
¾ If you connect a lobby phone to CCU-310EV "ID 2" in building 102,
you can connect up to ten Lobby phones sequentially from 0102-9911 to 0102-9920.

17
Ν Connect EL calling button to PORT_1 ~ PORT_10 which is the same ID of installed
lobby phone.
Ex. 1) 1
st
floor’s Lobby ID is “101-9901”,
Connect EL calling button to “PORT_1”.
Ex. 2) Basement 1
st
floor’s Lobby ID is “101-9902”,
Connect EL calling button to “PORT_2”.

18
Ȅ Notes when use Lobby mode.
z S/W1 : Set LOBBY mode Î SW1 “ON”.
z S/W2 : Set response of lobby SECUMAX DATA Î SW2 “ON”.
¾
This is for the system without SECUMAX.
¾
In caes of using CCU-310EV without SECUMAX, lobby’s SECUMAX DATA must be set “ON”.
Æ CCU-310EV collects data which LOBBY informs to SECUMAX.
Also, it works when opening the door during calling between LOBBY and household.
¾
If no intalled SECUMAX., calling might be calling problem due to lots of data stored
into the lobby.
Î If no SECUMAX., S/W2 must be “ON” to respond the data instead of SECUMAX.
z S/W3, S/W4 : NONE USED
z S/W5~S/W8 : CCU-310EV ID setting
- S/W5 (BIT3), S/W6 (BIT2), S/W7 (BIT1), S/W8 (BIT0)
- LOBBY MODE: ID1 ~ ID9 can be set.
Ex.) 10 LOBBY is set per one CCU-310EV. (Total of 90 units)
- DIP switch ID setting method : refer to “5-3-1. DIP switch setting method”.

19
5-3-1. CCU-310EV ID setting method by DIP switch (Lobby Mode)
(S/W5 ~ S/W 8 : BOARD ID setting)
* Please refer to the below instruction
.
Number How to set up Number How to set up Number How to set up
21 3
456
789
/