Page is loading ...

SKU# 29055XT Van Double
SKU# 29056XT Van Triple
Installation Manual
Van
WARNINGS / LIMITATIONS • AVERTISSEMENTS / LIMITATIONS • ADVERTENCIAS / LIMITACIONES
• Do not exceed vehicle manufacturer’s load limits.
• If used in conjuction with another type of load
carrying system the lower weight capacity of
the two systems should be followed.
• Tie down front and rear of all long loads to the
vehicles bumpers for safe transport.
• Install parts as shown on illustrations.
• Carrying high loads over rough roads with
excess speed may damage the system.
Good judgment must be exercised at all times.
• Ne pas dépasser la limite de charge fixée
par le fabricant du véhicule.
• S’il est utilisé en conjonction avec un autre type
de système de transport de charge, la capacité de
charge la plus faible des deux systèmes doit être
prise en compte.
• Arrimer l’avant et l’arrière de toutes les charges
longues aux pare-chocs pour assurer la sécurité
lors du transport.
• Installez les pièces, comme illustré.
• Transporter de lourdes charges sur des
routes cahoteuses à une vitesse élevée peut
endommager le système. Il faut faire preuve d’un
bon jugement en tout temps.
• No supere los límites de carga indicados
por el fabricante.
• Si se usa junto con otro tipo de sistema
portacargas se debe seguir la capacidad
de carga más baja de los dos sistemas.
• Para un transporte más seguro, ate la parte
delantera y trasera de todos los cargamentos
largos a los parachoques de los vehículos.
• Instale las piezas tal como se muestra en
las ilustraciones.
• Transportar cargas pesadas por caminos
desparejos a excesiva velocidad puede dañar
el sistema. Utilice siempre buen criterio.
5067310

Van installation is straightforward, and should take you under 20 minutes to complete.
You’ll attach the Crossbars to the
Corner Brackets, then attach this assembly to the Gutter Rails of your van.
Tools Required
1) Tape Measure
2) Socket Wrench
3) 9/16” Socket
Recommended
1) Torque Wrench
Special Installation notes:
• All 1998+ Chevy Express / GMC Savanna (G-Series Vans) require the supplied Gutter
Span, which are designed to span the putty filled rain gutter of the Van for maximum
strength. If you use the supplied Gutter Spans, refer to “Roof Installation B” instruc-
tions on page 5 for proper installation.
• All 2000+ Ford Econoline Vans: DO NOT install the rubber strips to the Corner Brackets.
•
(SKU# 29056
to a Chevy Express / GMC Savanna
to a Chevy Express / GMC Savanna (SKU# 29056
When installing a Van Triple (SKU# 29056XT) to a Chevy Express / GMC Savana and
Ford Vans with
curved roofs, you’ll need to add the supplied Shims, to compensate for
the gutter’s curve.
Gutte
r Span
Gutter Span
Shim
5067310

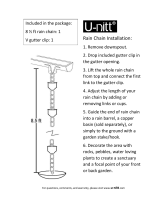
3.
Insert the J-Hooks with Neoprene Strips through the
Assembly Slots at the base of the Corner Bracket. Then
insert 2 Brass Nuts into the opening of the J-Hook clips.
Thread each screw approx. 1/4 in. into the J-hook’s brass
nut. (Do not completely tighten screws) Repeat for each
Corner Bracket, (2 hooks for each Bracket).
(See Fig. 1)
4.
Now you’re ready to attach the Crossbars (see Shim
Installation, page 6, if shims are required on front and
rear racks). Insert the heads of four 1 1/2” T-Bolts into the
Crossbar Slot on the bottom of each Crossbar (the bottom
is the side with the Flat Recess)
(see Fig. 2
). Slide 2 T-
Bolts to the left side and 2 T-Bolts to the right.
1.
Fit the Rubber Strip on the lower edge of each Corner
Bracket.
Do not install strip:
• On 2000+ Ford 150 Econoline vans.
• If using the Gutter Spans
2.
Insert 2 (5/16” x 1 3/4 ” long) Socket Head Cap Screws
through the Lock Washers and then into the holes in each
Corner Bracket Tab.
(See Fig. 1)
5.
Attach a Corner Bracket assembly to the Crossbar by
inserting the T-Bolts through the two holes in the Corner
Bracket. Partially tighten and secure with the Self Lock-
ing Nuts – enough to hold the Corner Bracket in place.
Repeat for each of the remaining three Brackets.
6.
Slide
the Crossbar Tiedowns onto the Crossbar by insert-
ing the M8x26mm T-Bolts into the top Crossbar Slot.
Figure 1
Figure 2
7.
Place a complete
assembly at the
desired location on the
van’s roof, making sure
that the Crossbars are
parallel with the front
of the van. Check that
the Corner Brackets
are the same distance
from the driver and
passenger doors.
Socket head cap screw
Tiedown
Lock washer
Assembly slot
Rubber strip
Brass square nut
Neoprene strip
J-Hook
Corner bracket
Crossbar slot
Crossbar slot
Corner bracket tab
Brass nut fits into J-hook
T-Bolt
End view of crossbar
Self locking nut
Flat recess
5067310

Roof Installation A:
Normal Installation
8.
The lower edge of each Corner Bracket fits snugly into
the top corner of the van’s rain gutter. Place the J-Hooks
with Neoprene Strips around the outside edge of rain
gutter
(see Fig 3A)
.
CAUTION:
Re-torque all fasteners after first 100 miles to
adjust for settling. Recheck all torques every 3000 miles. Pro-
longed driving, vibrations may cause the fasteners to loosen.
• Roof Installation A: Normal Installation
• Roof Installation B: Gutter Span Installation
9
.
Center the Crossbars by measuring from the end of each
Corner Bracket, to the Crossbar ends, left and right.
1
0
.
Tighten the T-Bolts on the underside of the Crossbar to
240 in/lbs. (20 ft/lbs.) to secure the Corner Brackets to
the Crossbar.
1
1
.
Now tighten all Socket Head Cap Screws to 120 in/lbs.
(10 ft/lbs.) with the supplied Allen Wrench.
1
2
.
Reposition the Crossbar Tiedowns where desired. Now
you’re ready to go!
Capacity – The TracVan System is rated for a capacity of
500 lbs., evenly distributed over all racks, assuming normal
driving conditions and loading.
Do not exceed the racks’ rated capacity, as you could dam-
age the van’s rain gutter.
Secure loads carefully and exercise caution at all times.
• We recommend using transverse ratchet straps to securely
tie down cargo.
• Run additional ratchet straps around the front & rear of
loads, attaching them to the Crossbars to prevent any load
shifting during acceleration and stopping.
Figure 3A
VAN ROOF – REAR VIEW
Corner bracket tab
Corner bracket
Rubber strip
Socket head cap screw
Lock washer
Neoprene strip
Crossbar
J-Hook clip
5067310

Roof Installation B:
Gutter Span Installation
8.
Slide 2 Gutter Spans under each Corner Bracket so
that they line up under the slots as shown, with the “V”
Groove facing up. The “Hook” of the Gutter span must en-
gage the upper edge of the gutter, with the opposite end
positioned in the middle of the gutter groove
(see Fig 3B).
Figure 3B
9.
The lower edge of each Corner Bracket fits snugly into
the top of the Gutter Span. Place the J-Hooks around the
outside edge of rain gutter
(see Fig 3B)
.
10.
Center the Crossbars by measuring from the end of each
Corner Bracket, to the Crossbar ends, left and right.
11.
Tighten the T-Bolts on the underside of the Crossbar to
240 in/lbs. (20 ft/lbs.) to secure the Corner Brackets to
the Crossbar.
12.
Now tighten all Socket Head Cap Screws to 120 in/lbs.
(10 ft/lbs.) with the supplied Allen Wrench.
13.
Reposition the Crossbar Tiedowns where desired.
Now you’re ready to go!
CAUTION:
Re-torque all fasteners after first 100 miles to
adjust for settling. Recheck all torques every 3000 miles.
Prolonged driving, vibrations may cause the fasteners to
loosen.
Capacity – The TracVan System is rated for a capacity of
500 lbs., evenly distributed over all racks, assuming normal
driving conditions and loading.
Do not exceed the racks’ rated capacity, as you could
damage the van’s rain gutter.
Secure loads carefully and exercise caution at all times.
• We recommend using transverse ratchet straps to securely
tie down cargo.
• Run additional ratchet straps around the front & rear of
loads, attaching them to the Crossbars to prevent any load
shifting during acceleration and stopping.
Corner bracket tab
Corner bracket
Gutter span
Socket head cap screw
Socket head cap screw
Socket head cap screw
Lock washer
Neoprene strip
Crossbar
Gutter putty
J-Hook clip
VAN ROOF – REAR VIEW
Hook
5067310

Caution:
Recheck the bolt torques every 3000 miles.
With prolonged driving, vibrations may cause the
fasteners to loosen.
Capacity: The van rack is rated for a capacity of 500 lbs.,
evenly distributed, assuming normal driving conditions and
loading. Please secure loads carefully, and exercise caution
at all times!
The gutters on some Vans are curved, which makes install-
ing three level crossbars a special challenge. To compen-
sate for this curvature, you’ll install our shims in the front
and rear crossbar assemblies, raising them to the height of
the middle rack.
1. Verify that you have received four Van Rack Shims.
2. Install the middle (third) crossbar assembly roughly in
center of van roof per Van Rack Installation Instructions.
3. Loosely assemble the front and rear crossbar assemblies,
placing the shims between the corner brackets and the
crossbar
(Fig. 4).
4. Install the front crossbar assembly in desired location
near front of van roof, and tighten all fasteners in accor-
dance with Van Rack Installation Instructions.
5. Position the rear crossbar assembly on rear of van roof,
engaging lower edge of comer brackets in rain gutters.
6. Place a straight-edge (a ladder or straight piece of
lumber will do) atop crossbars
(Fig. 5)
to check that the
(Fig. 5) to check that the (Fig. 5)
racks are all in line. As necessary, slide the rear crossbar
assembly to the front or rear until the straight-edge rests
flatly and evenly on all three crossbars. Complete instal-
lation to rear crossbar assembly in accordance with Van
Rack Installation Instructions.
7. Check all fasteners for proper torque.
SHIM INSTALLATION
Supplied as
part of SKU 29056XT, Van
Triple
Figure
5
Figure
4
Shim
Slide rear crossbar until
it contacts straight edge
Rest straight edge on front
and center crossbars
VAN ROOF – SIDE VIEW
Shim
Shim
5067310

C7
Thule Inc. • 42 Silvermine Road • Seymour, CT 06483
Thule Canada Inc. • 710 Bernard • Granby QC J2J 0H6
North American Consumer Service: Toll Free 800-238-2388 / Fax 450-777-3615 • www.thule.com
EN = North American English ES = Latin American Spanish
When using Thule Load carriers and accessories, the user must
understand the precautions. The points listed below will assist you
in using the rack system and will encourage safety.
• For quality fits and safety, use only the recommended rack or accessory
as stated in Thule’s current Fit Guide. Do not assume a rack will fit,
always check the current Fit Guide when obtaining a new vehicle.
• The maximum load specified in the assembly instructions is not to be
exceeded. However, this limit is always subordinate to the maximum load
recommended by the manufacturer of the car itself. It is always the lower
maximum recommended load that applies. Max roof load = load carrier
weight + any fitted carrier accessories + the weight of the load itself.
• Always make sure all doors are open when mounting a roof rack system.
Make sure all knobs, bolts, screws, straps, and locks are firmly attached,
tightened and locked before every trip. Knobs, bolts, screws, straps and
locks must be periodically inspected for signs of wear, corrosion, and
fatigue. Check your load at stops during the trip to ensure continued
fastening security.
• Check local and state laws governing projection of objects beyond the
perimeter of a vehicle. Be aware of the width and height of your cargo
since low clearance branches, bridges, and parking garages can aect
the load. All cargo will aect the vehicle’s driving behavior. Never drive
with any lock, knob or rack in an open or unlocked position. All long
loads such as, but not limited to, sailboards, surfboards, kayaks, canoes,
and lumber must be tied down front and rear to the bumpers or tow
hooks of the vehicle.
• Remove your Thule rack and accessories when they are not in use and
before entering automatic car washes.
• All locks must be turned and moved periodically to ensure smooth
operation. Use graphite or dry lubricant to help this. Thule locks are
designed to deter vandalism and theft but should not be considered
theft proof. Remove valuable gear if your vehicle is unattended for an
extended period. Place at least one key in the glove compartment.
• For safety to your vehicle and rack system, obey all posted speed limits
and trac cautions. Adapt your speed to the conditions of the road and
the load being carried.
• Do not use Thule load carriers and accessories for purposes other
than those for which they were designed. Do not exceed their carrying
capacity. Failure to follow these guidelines or the product’s instructions
will void the warranty.
• All loads must be secured using the provided straps.
• Consult with your Thule dealer if you have any questions regarding the
operations and limits of Thule products. Review all instructions and
warranty information carefully.
• Not for use on trailers or towed vehicles.
• Not for oroad use.
• Keep bicycle tires away from hot exhaust.
Cuando use portacargas y accesorios Thule, debe asegurarse
de entender todas las precauciones. Los puntos indicados
a continuación le ayudarán a usar el sistema de bastidor y
fomentarán su seguridad.
• Por seguridad y para obtener un ajuste correcto, use solamente el
bastidor o accesorio Thule recomendado según en la Guía de ajuste
Thule más actual. No suponga el ajuste del bastidor, siempre verifique la
Guía de ajuste más actual cuando compre un nuevo vehículo.
• No debe excederse la carga máxima especificada en las instrucciones
del conjunto. Sin embargo, este límite siempre depende de la carga
máxima que recomienda el fabricante del automóvil. Siempre debe
usarse la menor carga máxima recomendada. Carga del techo máxima
= peso del abrazadera de carga + cualquier accesorio del abrazadera
+ el peso de la carga.
• Siempre asegúrese que las puertas del automóvil estén abiertas cuando
monte un sistema de bastidor para techo. Cerciórese de que las perillas,
los pernos, los tornillos, las correas y las cerraduras estén firmemente
sujetos, apretados y asegurados con llave antes de cada viaje. Debe
revisar periódicamente que las perillas, los pernos, los tornillos, las
correas y los seguros no tengan señales de desgaste, corrosión o
fatiga. Revise su carga en las paradas durante su viaje para garantizar la
seguridad continua de la sujeción.
• Verifique las leyes estatales y locales que rigen la proyección de objetos
más allá del ancho del vehículo. Esté al tanto de la anchura y altura de
su carga, ya que las ramas, los puentes, los estacionamientos de baja
altura pueden dañar su carga.Toda carga afectará el comportamiento
de manejo del vehículo. Nunca conduzca con alguno de los seguros, las
perillas o los bastidores abiertos o sin seguro. Todas las cargas largas,
como tablas a vela, tablas de surf, kayacs, canoas y madera, deban
atarse al frente y atrás los parachoques o ganchos de remolque del
vehículo.
• Quite su bastidor y accesorios Thule cuando no se usen y antes de
entrar a establecimientos para lavado automático de vehículos.
• Todas los seguros deben girarse y moverse periódicamente para
garantizar que no se atasquen. Use grafito u otro lubricante en seco
similar para este fin. Los seguros Thule están diseñados para disuadir
el vandalismo y los robos. Saque todo equipo valioso si su vehiculo no
tendrá vigilancia por largo tiempo.Ponga porlo menos una llave en la
guantera.
• Como seguridad para su vehículo y sistema de bastidor, obedezca todos
las límites de velocidad y avisos de tráfico. Adapte su velocidad a las
condiciones del camino y de la carga transportada.
• No use portacargas y accesorios Thule con otra función para la que fue
destinada. No exceda su capacidad de carga. Se anulará la garantia si no
sigue estos lineamientos o las instrucciones del producto.
• Todas las cargas deben atarse con la correas incluídas.
• Consulte a su distribuidor Thule si tiene alguna pregunta sobre
el funcionamiento y los límites de los productos Thule. Repase
cuiadosamente todas las instrucciones y la de garantia.
• No use en tráilers o vehículos de remolque.
• No conduzca fuera del camino.
• Mantenga las ruedas de las bicicletas lejos del tubo de escape caliente.
THULE RACK GUIDELINES DIRECTRICES PARA LOS PORTAEQUIPAJES THULE
Register online at
www.thule.com/warranty

Thule Inc. • 42 Silvermine Road • Seymour, CT 06483
Thule Canada Inc. • 710 Bernard • Granby QC J2J 0H6
North American Consumer Service: Toll Free 800-238-2388 / Fax 450-777-3615 • www.thule.com
C7
EN = North American English ES = Latin American Spanish
THULE will warranty all THULE brand car rack systems and its accessories
manufactured by THULE during the time that an original retail purchaser owns
the product. This warranty terminates if a purchaser transfers the product to any
other person.
Subject to the limitations and exclusions described in this warranty, THULE will
remedy defects in materials or workmanship by repairing or replacing, at its
option, a defective product without charge for parts or labor. In addition, THULE
may elect, at its option, not to repair or replace a defective product but rather
issue to a purchaser a refund equal to the purchase price paid for the product or
a credit to be used toward the purchase of a new THULE load carrier system.
No warranty is given for defects caused by normal wear and tear, cosmetic rust,
scratches, accidents, unlawful vehicle operation, or modification of, or any types
of repair of, a load carrier system other than those authorized by THULE.
No warranty is given for defects resulting from conditions beyond THULE’s
control including, but not limited to, misuse, overloading, or failure to assemble,
mount or use the product in accordance with THULE’s written instructions or
guidelines included with the product or made available to the purchaser.
In the event that a product is defective, the purchaser should contact the
THULE dealer from whom the product was purchased or an Authorized Thule
Service Center. If the dealer or Authorized Thule Service Center is not able to
correct the defect, the purchaser should contact THULE in writing or by phone
using the contact information listed at the bottom of this page.
In the event that a product needs to be returned to THULE, a THULE technician
at the address or telephone number listed below will provide the purchaser with
the appropriate mailing address and any additional instructions. Please note that
the purchaser will be responsible for the cost of mailing the product to THULE
and that proof of purchase in the form of an original purchase invoice or receipt
and a detailed description of the defect must be included in the mailing.
DISCLAIMER OF LIABILITY
REPAIR OR REPLACEMENT OF A DEFECTIVE PRODUCT OR THE ISSUANCE
OF A REFUND OR CREDIT (AS DETERMINED BY THULE) IS A PURCHASER’S
EXCLUSIVE REMEDY UNDER THIS WARRANTY. DAMAGE TO A PURCHASER’S
VEHICLE, CARGO AND/OR TO ANY OTHER PERSON OR PROPERTY IS
EXCLUDED.
THIS WARRANTY IS EXPRESSLY MADE IN LIEU OF ANY AND ALL OTHER
WARRANTIES, EXPRESS OR IMPLIED, INCLUDING THE WARRANTIES OF
MERCHANTABILITY AND FITNESS FOR A PARTICULAR PURPOSE.
THULE’S SOLE LIABILITY TO ANY PURCHASER IS LIMITED TO THE REMEDY
SET FORTH ABOVE. IN NO EVENT WILL THULE BE LIABLE FOR ANY LOST
PROFITS, LOST SALES, OR FOR ANY CONSEQUENTIAL, DIRECT, INDIRECT,
INCIDENTAL, SPECIAL, EXEMPLARY, OR PUNITIVE DAMAGES OR FOR ANY
OTHER DAMAGES OF ANY KIND OR NATURE.
SOME STATES DO NOT ALLOW THE EXCLUSION OR LIMITATION OF
INCIDENTAL OR CONSEQUENTIAL DAMAGES, SO THE ABOVE LIMITATIONS
MAY NOT BE APPLICABLE.
THIS WARRANTY GIVES YOU SPECIFIC LEGAL RIGHTS, AND YOU MAY ALSO
HAVE OTHER RIGHTS WHICH VARY FROM STATE TO STATE.
THULE garantizará todos los sistemas portacargas de la marca THULE y sus
accesorios fabricados por THULE mientras el comprador original esté en
posesión del producto. Esta garantía finaliza si un comprador transfiere el
producto a cualquier otra persona.
Según las limitaciones y exclusiones que se describen en esta garantía, THULE
remediará cualquier defecto en los materiales o la mano de obra reparando o
reemplazando, a discreción propia, cualquier producto defectuoso sin cobrarle
al propiedtario por las piedzas o la mano de obra. Además, THULE puede
optar, a discreción propia, a no reparar o reemplazar un producto defectuoso
y en su lugar devolver al comprador el dinero del precio que pagó por el
producto o dotarle un crédito que puede usarse para comprar un nuevo sistema
portacargas THULE.
No se otorga garantía alguna por los defectos causados por el uso y desgaste
normales, la corrosión cosmética, las ralladuras, los accidentes o la conducción
ilegal del vehículo, o cualquier modificación o reparación del sistema
portacargas sin incluir aquellas modificaciones o reparaciones autorizadas por
THULE.
No se otorga garantía alguna por los defectos que resulten de condiciones más
allá del control de THULE que incluyen, pero no se limitan a, el uso indebido, la
sobrecarga, la instalación, montaje o usos incorrectos del producto según las
instrucciones o las directrices escritas de THULE adjuntas con el producto o que
estén a disposición del comprador.
En caso que el producto presente defectos, el comprador deberá comunicarse
con el vendedor THULE que se lo vendió, o con un Centro Autorizado de
Servicio Thule. En caso que el vendedor o Centro Autorizado de Servicio Thule
no puedan solucionar el defecto, el comprador deberá comunicarse por correo
o teléfono con el servicio de información de THULE cuyos datos aparecen a pié
de página.
En el caso de que el producto deba devolverse a THULE, un técnico de THULE
en la dirección o número de teléfono indicados abajo le proporcionará una
dirección postal donde enviarlo así como instrucciones adicionales. Por favor
observe que el comprador será responsable de abonar el costo de enviar el
producto THULE y que debe adjuntar una prueba de compra como una factura
o un recibo original así como una descripción detallada del defecto.
DESCARGO DE RESPONSABILIDAD
BAJO ESTA GARANTÍA, LA ÚNICA SOLUCIÓN PARA EL COMPRADOR ES EL
REEMPLAZO DEL PRODUCTO DEFECTUOSO, LA DEVOLUCIÓN DEL DINERO
O DOTACIÓN DE CRÉDITO (SEGÚN LO DETERMINE THULE). SE EXCLUYEN
LOS DAÑOS AL VEHÍCULO DEL COMPRADOR, A LA CARGA O A CUALQUIER
OTRA PERSONA O PROPiedDAD.
ESTA GARANTÍA SE HACE DE FORMA EXPRESA EN VEZ DE CUALQUIER
OTRA GARANTÍA, IMPLÍCITA O EXPLÍCITA, INCLUSO LAS GARANTÍAS DE
COMERCIABILIDAD Y ADECUACIÓN PARA PROPÓSITOS CONCRETOS.
LA ÚNICA RESPONSABILIDAD DE THULE HACIA EL COMPRADOR SE LIMITA
A LA SOLUCIÓN ESTABLECIDA ANTERIORMENTE. EN NINGÚN CASO SERÁ
THULE RESPONSABLE DE NINGÚN BENEFICIO PERDIDO, VENTAS PERDIDAS
O DE CUALQUIER DAÑO CONSECUENTE, DIRECTO, INDIRECTO, INCIDENTAL,
ESPECIAL, EJEMPLAR O PUNITIVO DE CUALQUIER TIPO O ÍNDOLE.
ALGUNOS ESTADOS NO PERMITEN LA EXCLUSIÓN O LA LIMITACIÓN DE
DAÑOS INCIDENTALES O CONSECUENTES, POR CONSIGUIENTE EN ESOS
ESTADOS LAS LIMITACIONES ANTERIORES NO SON APLICABLES.
ESTA GARANTÍA LE OTORGA DERECHOS LEGALES ESPECÍFICOS Y USTED
TAMBIÉN PUEDE TENER OTROS DERECHOS QUE VARÍAN DE UN ESTADO A
OTRO.
THULE CAR RACK SYSTEMS LIMITED LIFETIME WARRANTY
[EFFECTIVE JANUARY 1, 2006]
Register online at www.thule.com/warranty
GARANTÍA DE POR VIDA LIMITADA PARA LOS SISTEMAS
PORTAEQUIPAJES PARA AUTOS THULE
[VIGENTE A PARTIR DEL 1.º DE ENERO DE 2006]
Regístrese en línea en www.thule.com/warranty
Register online at
www.thule.com/warranty
/