Page is loading ...

Part Number 10400135-102 07/2007 ©2007 Overland Storage, Inc. W Page 1 of 4
This document describes how to do the following options:
• Replace existing drives in a drive bay with an LTO-4
SCSI or FC tape drive in an ARCvault loader or library.
• Add a new LTO-4 SCSI or FC tape drive in an empty
drive bay of an ARCvault 48 Library.
WARNING: To reduce the risk of electric shock or
damage to equipment, remove the power cord.
CAUTION: Adding a new tape drive results in a
reconfiguration of the library. In the ARCvault 48, it also
automatically disables any existing partitions.
IMPORTANT: When installing an LTO-4 drive into an
empty ARCvault 48 drive bay, an ARCvault Drive Bay
Upgrade Kit (available separately) is required. If two half-height
drives exist in a drive bay, both must be removed.
Unpacking
Carefully unpack and verify that you have all these parts:
• LTO-4 full height tape drive (SCSI or FC)
• Four M3x5 screws
• LVD SCSI cable, 2m (6.5 ft.) (SCSI add-on drive only)
• SCSI terminator (SCSI add-on drive only)
• These remove & replace instructions
Electrostatic Discharge Information
A discharge of static electricity can damage micro-circuitry
or static-sensitive devices. To help prevent Electrostatic
Discharge (ESD) damage, observe these and other
standard ESD precautions:
• Transport and store items in static-safe containers.
• Make sure you are always properly grounded.
• Avoid touching pins, leads, or circuitry.
Use this procedure to install a new LTO-4 full-height drive in a drive bay currently containing one or two drives. The new
drive replaces the existing drives. To install a drive in an empty drive bay, use the “New Drive Installation” on page 3.
Remove the Drive Assembly
1. To power down the unit from the Operator Control
Panel (OCP), press Power > Power Off Library >
OK (at the power down message).
2. After the unit has shut down, remove the power cord.
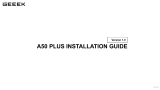
3. At the rear, remove either the SCSI cables and
terminator or FC cables from the appropriate drive
cover (Figure 1).
Figure 1. Drive Cover Assembly Locations and Cabling (2U and 4U)
ARCvault
™
Series
LTO-4 SCSI/FC Tape Drive
Add-On or Replace Instructions
Overview & Notes
A
R
C
-
0
1
0
4
Existing Drive Replacement
A
R
C
-
0
0
8
7
A
R
C
-
0
0
7
5
SCSI CableTerminator
Power Cord
Thumbscrews
Power Cord
Thumbscrews
FC Cable

Part Number 10400135-102 07/2007 ©2007 Overland Storage, Inc. W Page 2 of 4
4. Loosen the two thumbscrews on the drive cover.
5. Remove the drive cover as follows:
a. Gently pull the drive cover out and hold it about
2 inches (5cm) below the drive bay (Figure 2).
b. Unplug the fan wiring from the fan connector.
c. For a SCSI drive assembly, using the guide handles,
pull the assembly out about 1 inch (2.5cm) and
unplug the SCSI cables from the drives.
d. Set the old drive cover aside.
Figure 2. SCSI Drive Assembly Cabling (2U SCSI)
6. Unplug the power and serial cables from the drive
assembly and position them off to the right.
7. Grasp the drive assembly guide grips and carefully
slide the assembly out of the unit.
Install the New Drive
1. Check the jumper pins on the new drive to confirm
they are at the default settings (ON-off-off-off-ON-ON).
2. Remove the drive assembly guides (Figure 3) located
on the sides of the assembly.
Figure 3. Remove Drive Assembly Guides (Single HH Drive)
3. Attach the drive guides to the sides of the new drive
(Figure 4) with four new M3x5mm screws.
Be sure the thicker guide is on the left side (when
looking at the front of the drive).
Figure 4. LTO-4 SCSI Drive Assembly (Rear View)
Reinstall the Drive Assembly
1. With the wiring positioned off to the right, slide the
drive assembly back into the drive bay.
For a SCSI drive assembly, leave the assembly sticking
out about 1 inch (2.5cm).
2. Attach black cable of the serial Y-cable to the drive
(Figure 5).
CAUTION: You MUST connect the BLACK serial
cable to the new LTO-4 drive for the unit to operate
correctly.
Figure 5. Attaching the Serial Y-Cable
3. Attach a power cable to the drive.
Continue with “Final Assembly and Test” on page 4.
A
R
C
-
0
0
4
4
Serial Cables
Power Cables
Drive Cover
Fan
Connector
SCSI Cable
Assembly
A
R
C
-
0
1
0
6
Air Baffle
Drive Front
Screw Holes
Left Guide
Right Guide
Screw Holes
A
R
C
-
0
0
1
7
Drive Guides
LTO-4 Drive
Screws
S
e
r
i
a
l
P
o
w
e
r
S
C
S
I
Jumper Pins
A
R
C
0
1
4
3
Black to LTO-4
White (not used)
Power Cable

Part Number 10400135-102 07/2007 ©2007 Overland Storage, Inc. W Page 3 of 4
Use this procedure to install a new LTO-4 drive into an
empty drive bay on an ARCvault 48.
IMPORTANT: An ARCvault Drive Bay Upgrade Kit
(available separately) is required for this procedure. The
kit contains:
• 4-port drive cover assembly
• Left and right drive guides with four screws
• Serial Y-cable
• Air baffle with two screws (not used for this installation)
Remove the Drive Bay Baffle
1. From the Operator Control Panel (OCP), press Power
> Power Off Library > OK (at the power down
message) to power down the unit.
2. After the unit has shut down, remove the power cord.
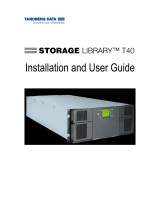
3. Using a Phillips screwdriver, remove the two screws
holding the drive bay baffle (Figure 6).
Figure 6. ARCvault 48 Rear with Drive Bay Baffle
4. Remove the baffle and set it aside.
Install the New Drive
1. Check the jumper pins on the new drive to confirm
they are at the default settings (ON-off-off-off-ON-ON).
2. Attach the drive guides to the sides of the new drive
(Figure 7) with four new M3x5mm screws.
Be sure the thicker guide is on the left side (when
looking at the front of the drive).
Figure 7. LTO-4 SCSI Drive Assembly (Rear View)
Install the New Drive Assembly
1. With the wiring positioned off to the right, slide the
drive assembly back into the drive bay.
For a SCSI drive assembly, leave the assembly sticking
out about 1 inch (2.5cm).
2. Attach the main plug of the new serial Y-cable to the
serial cable going into the unit.
3. Attach the black cable of the Y-cable to the drive
(Figure 8).
CAUTION: You MUST connect the BLACK serial
cable to the new LTO-4 drive for the unit to operate
correctly.
Figure 8. Attaching the Serial Y-Cable
4. Attach the power cable to the drive.
Continue with “Final Assembly and Test” on page 4.
New Drive Installation
A
R
C
-
0
0
7
7
Screws
SCSI Cables
Terminators
Baffle
Power Cord
A
R
C
-
0
0
1
7
Drive Guides
LTO-4 Drive
Screws
S
e
r
i
a
l
P
o
w
e
r
S
C
S
I
Jumper Pins
A
R
C
-
0
1
4
4
Serial Y-Cable
Black to LTO-4
White (not used)
Unit Main
Serial Cable
Power Cable

Part Number 10400135-102 07/2007 ©2007 Overland Storage, Inc. W Page 4 of 4
IMPORTANT: For optimum performance of the library, it is
recommended that each drive be connected to the host
by a separate bus.
1. Install the drive cover as follows:
a. Holding the drive cover below the drive bay opening,
plug in the fan connector.
b. On a SCSI system, reattach the SCSI drive cables,
and slide the drive assembly the rest of the way
into the drive bay.
c. Carefully seat the drive cover and tighten the two
thumbscrews.
CAUTION: Be sure that all drive wiring is secure in
the space between the drive assembly and the
drive cover.
2. Reconnect the SCSI cables and terminator or FC
cables to the rear of the unit.
3. Plug in the power cord and power on the unit.
4. During POST, as soon as the reconfiguration message
appears, press OK.
5. After the library reboots, check the OCP Status to
verify that the unit recognizes the new drive.
All information contained in or disclosed by this document is considered proprietary by Overland Storage. By accepting this material, the recipient agrees that this material and the information contained therein are held in confidence and in trust and will not be
used, reproduced in whole or in part, nor its contents revealed to others, except to meet the purpose for which it was delivered. It is understood that no right is conveyed to reproduce or have reproduced any item herein disclosed without express permission from
Overland Storage. Overland Storage provides this document as is, without warranty of any kind, either expressed or implied, including, but not limited to, the implied warranties of merchantability and fitness for a particular purpose. Overland Storage may make
improvements or changes in the product(s) or program(s) described in this document at any time. These changes will be incorporated in new editions of this publication.
Overland Storage assumes no responsibility for the accuracy, completeness, sufficiency, or usefulness of this document, nor for any problem that might arise from the use of the information in this document.
Final Assembly and Test
Additional Help
You can get additional technical support on the Internet at http://support.overlandstorage.com, or call
1-877-654-3429 (toll-free U.S. & Canada), +44 (0) 118-9898050 (Europe), or +1 (858) 571-5555 Option 5 (International).
/