Page is loading ...

Installation
P.O. Box 309
Menomonee Falls, WI 53052 USA
800 BRADLEY (800 272 3539)
+1 262 251 6000
bradleycorp.com
WF2500 Series Terreon Classic
WF2600 Series Terrazzo
WF2700 Series Stainless Steel
WF2800 Series Bradstone
WF3200
Series
Terreon Deep Bowl
TDB3100 Series Terreon Deep Bowl
WF3203
215-1833-10 Rev. A; ECN 17-00-006B
© 2017 Bradley
Page 1 of 2 11/21/2017
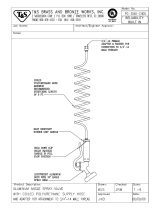
WF2605
WARNING
Make sure that all water supply lines have been flushed and then completely turned off before beginning
isntallation. Debris in the supply lines can cause valves to malfunction.
Turn OFF electrical supply to the unit before installation.
NOTICE
Main water supply to the unit should be "ON" at all times.
IMPORTANT
Read this installation manual completely to ensure proper installation, then file it with the owner or
maintenance department. Compliance and conformity to drain requirements and other local codes and
ordinances is the responsibility of the installer.
Separate parts from packaging and make sure all parts are accounted for before discarding any packaging
material. If any parts are missing, do not begin installation until you obtain the missing parts.
Product warranties and parts information may also be found under ”Products” on our web site at bradleycorp.com.

Cleaning and Maintenance
WF2500, WF2600, WF2700, WF2800, WF3200, TDB3100 Series
P.O. Box 309 • Menomonee Falls, WI 53052-0309 • 1 800 BRADLEY • 262 251 6000 • bradleycorp.com
2 of 3 12/19/2017 Bradley • 215-1832-10 Rev. A: ECN 17-00-006B
Cleaning and Maintenance for Terreon
®
Material Description: Terreon is a densified solid surface material composed of bio based resin and is resistant to
chemicals, stains, burns and impact. Surface can be easily repaired with everyday cleansers or fine grit abrasives. Because
Terreon is a unique cast material, its aggregate flow and distribution, and shades of color can vary from product to product
creating natural characteristics.
Routine Cleaning: For regular cleaning, use mild neutral base cleaners.
Stubborn Stains: Remove tough stains with Soft-Scrub
®
and a green Scotch-Brite
®
pad or lightly sand in a circular motion
with 240 grit wet/dry sandpaper. The finish can then be renewed with a maroon Scotch-Brite pad.
Scratches: Remove scratches with a green Scotch-Brite pad. The finish can then be renewed with a maroon Scotch-Brite
pad.
Hard Water Deposits: Remove hard water deposits with a mild solution of vinegar and water. Always rinse the unit
thoroughly after cleaning.
Restoring the surface: Use Hope’s
®
Perfect Countertop to refresh and protect the Terreon Solid Surface material. Dark
Terreon colors may require additional care and maintenance. For complete instructions on this additional maintenance, visit
bradleycorp.com.
Repair Kits: Terreon repair kits are available. Contact your Bradley representative or distributor for part numbers and pricing.
Repair kits are made to order and have a shelf life of 30 days.
NOTICE! Do not use strong acid or alkaline chemicals and cleaners to clean Terreon. If these chemicals come in
contact with the surface, wipe them off immediately and rinse with soapy water. Avoid contact with harsh
chemicals such as paint remover, bleach, acetone, etc. Avoid contact with hot pans and objects.
Cleaning and Maintenance for Stainless Steel
Material Description: Stainless steel is extremely durable, and maintenance is simple and inexpensive. Proper care,
particularly under corrosive conditions, is essential. Always start with the simplest solution and work your way toward the more
complicated.
Routine cleaning: Daily or as often as needed use a solution of warm water and soap, detergent, or ammonia. Apply the
cleaning solution per the manufacturer's instructions and always use a soft cloth or sponge to avoid damaging the finish.
Stubborn Stains: To remove stains from stainless steel use a stainless steel cleaner and polish such as Ball
®
stainless steel
cleaner or a soft abrasive. Always follow the manufacturer's instructions and apply in the same direction as the polish lines.
NOTICE! Never use ordinary steel wool or steel brushes on stainless steel. Always use stainless steel wool or
stainless steel brushes.
Fingerprints and Smears: To remove fingerprints or smears use a high quality stainless steel cleaner and polish in
accordance with the manufacturer's instructions. Many of these products leave a protective coating that helps prevent future
smears and fingerprints.
Grease and Oil: To remove grease and oil use a quality commercial detergent or caustic cleaner. Apply in accordance to the
manufacturer's instructions and in the direction of the polish lines.
Precautions: Avoid prolonged contact with chlorides (bleaches, salts), bromides (sanitizing agents), thiocyanates (pesticides,
photography chemicals, and some foods), and iodides on stainless steel equipment, especially if acid conditions exist.
NOTICE! Do not permit salty solutions to evaporate and dry on stainless steel.
The appearance of rust streaks on stainless steel leads to the belief that the stainless steel is rusting. Look for the actual
source of the rust in some iron or steel particles which may be touching, but not actually a part of the stainless steel structure.
NOTICE! Strongly acidic or caustic cleaners may attack the steel causing a reddish film to appear. The use of these
cleaners should be avoided.
Brand Names
Use of brand names is intended only to indicate a type of cleaner. This does not constitute an endorsement, nor does the
omission of any brand name cleaner imply inadequacy. Many products named are regional in distribution, and can be found
in local supermarkets, department and hardware stores, or through your cleaning service. It is emphasized that all products
should be used in strict accordance with package instructions.

Cleaning and Maintenance
WF2500, WF2600, WF2700, WF2800, WF3200, TDB3100 Series
P.O. Box 309 • Menomonee Falls, WI 53052-0309 • 1 800 BRADLEY • 262 251 6000 • bradleycorp.com
3 of 3 12/19/2017 Bradley • 215-1832-10 Rev. A: ECN 17-00-006B
Cleaning and Maintenance for Terrazzo
Material Description: Terrazzo is a mosaic-looking natural stone and concrete material polished to a high gloss and sealed
with clear polyurethane resin for long lasting beauty. Terrazzo is precast and composed of 85% stone and 15% binder with
steel reinforcing rods cast into the bowl.
Routine Cleaning: Clean daily or as often as conditions require with any standard detergent, warm water and a soft cloth.
Stubborn Stains: If stains have permeated the surface of the terrazzo, follow instructions for restoring the surface listed
below.
Restoring the surface: Use paint stripper to remove the existing polyurethane (it is important to remove all of the old
polyurethane to ensure a high quality finish). Then use light grit sand paper to remove any stubborn staines that have
permeated the surface. Clean and thoroughly dry the bowl. Then apply 2 to 3 coats of polyurethane to the terrazzo
in accordance with the manufacturer's instructions. Allow the polyurethane to dry completely per the manufacturer's
recommendations before turning on the water.
NOTICE! If the bowl is not completely dry before applying the polyurethane, the polyurethane will not adhere to the
surface.
NOTICE! Make sure the surface is complete covered with polyurethane to prevent water from penetrating the
surface and damaging the terrazzo.
Repair Kits: Terrazzo repair kits are available. Contact your Bradley representative or distributor for part numbers and pricing.
NOTICE! Do not place acid or alkaline solutions (floor stripper or drain cleaners) into the terrazzo bowl or use them
to clean the bowl. If these solutions come into contact with the terrazzo, rinse the bowl immediately with
water and inspect for damage. If damage has occurred, follow the directions for restoring the surface. If
bowl begins to haze, it is usually a sign that the terrazzo has come into contact with an acid or alkaline
chemical or has been exposed to UV radiation. To repair this condition, follow the instructions for
restoring the surface.
Cleaning and Maintenance for Bradstone
Material Description: Bradstone is an extremely durable plastic material made of reinforced thermosetting polyester resins,
finely ground inorganic fillers and fade resistant pigments. Bradstone is impervious to most chemicals and stains.
Routine Cleaning: Soap and dirt accumulations should be washed off with detergent cleaners. Abrasive and caustic
cleaners are not recommended. An occasional waxing with automotive wax will make future cleaning even easier.

1 of 8 1/15/2018 Bradley • 215-1833-6 Rev. A: ECN 17-00-006B
Bowl and Pedestal Assembly
TDB3103, WF3203
P.O. Box 309 • Menomonee Falls, WI 53052-0309 • 1 800 BRADLEY • 262 251 6000 • bradleycorp.com
This document describes installation of washfountain bowl and pedestal only. Some optional equipment and
accessories are shown for clarity. For activation, optional equipment and accessory installation, see installation
documents included with those parts.
Supplies Required by Installer
• (4) 1/2" lag bolts, screws or other fasteners to anchor washfountain pedestal
• 1/2" nominal copper tubing for hot and cold water supply lines
• 1" hot and cold water or tempered supply lines and fittings (see activation instructions)
• Reducing fittings and 1/2" nominal copper tubing supply lines for types with supplies from above (see
activation instructions)
• Standard P-trap
• 1-1/2" drain lines and fittings
• Teflon tape or pipe dope
Before installation of bowl and pedestal assemblies, review all included instructions. Some options may require
additional steps during the bowl and pedestal installation process.

2 of 8 1/15/2018 Bradley • 215-1833-6 Rev. A: ECN 17-00-006B
Bowl and Pedestal Assembly
TDB3103, WF3203
P.O. Box 309 • Menomonee Falls, WI 53052-0309 • 1 800 BRADLEY • 262 251 6000 • bradleycorp.com
Semi-Circular Washfountain Dimensions (Optional Equipment Shown)
Model TDB3103
36" Semi-circular - side view
22-3/4"
(577)
14-1/16"
(357)
4-3/4"
(121)
13-1/2"
(343)
*41-1/4"
(1048)
*24-1/2"
(622)
6"
(152)
*34"
(864)
*30-3/8"
(772)
*38"
(965)
*44-7/8"
(1140)
Optional equipment may not comply with
all ADA dimensional guidelines
*53-1/4"
(1353)
5-1/2"
(140)
Top View
36"
(914)
Back View
14"
(356)
8"
(203)
12"
(305)
*10"
(254)
14"
(356)
*9"
(229)
7"
(178)
Bottom View
10"
(254)
5-1/2"
(140)
*Adjustments to Vertical Dimensions
for Various Rim Heights
Rim Height Application Adjustment
34" Adult Height ADA, TAS Adult Height None, as shown
32" TAS Ages 11 thru 14 or 15, Grades 6 thru 8 or 9 Subtract 2"
30" TAS Ages 4 thru 10 or 11, Grades 6 thru 8 or 9
& Proposed Juvenile Height ADA
Subtract 4"

3 of 8 1/15/2018 Bradley • 215-1833-6 Rev. A: ECN 17-00-006B
Bowl and Pedestal Assembly
TDB3103, WF3203
P.O. Box 309 • Menomonee Falls, WI 53052-0309 • 1 800 BRADLEY • 262 251 6000 • bradleycorp.com
Semi-Circular Washfountain Dimensions
Model WF3203
36" Semi-circular - side view
Back View
Bottom View
10"
(254)
5-1/2"
(140)
Top View
36"
(914)
22-3/4"
(577)
4-5/8"
(118)
13-3/8"
(340)
6"
(151)
52-11/16"
(1339)
44-1/2"
(1131)
41-1/8"
(1046)
39"
(991)
35"
(889)
24-1/2"
(662)
14"
(356)
8"
(203)
12"
(305)
14"
(356)
9"
(229)
10"
(254)
7"
(178)
5-1/2"
(140)

4 of 8 1/15/2018 Bradley • 215-1833-6 Rev. A: ECN 17-00-006B
Bowl and Pedestal Assembly
TDB3103, WF3203
P.O. Box 309 • Menomonee Falls, WI 53052-0309 • 1 800 BRADLEY • 262 251 6000 • bradleycorp.com
(mm)
1-1/2" NPT
Drain from
the Wall
34" (864)
Rim Height**
See Table
Below
Pedestal
Opening at Wall
Finished Floor
9"
(229)
2" (51)
1" (25)
Semi-Circular Washfountain Rough-Ins
12" (305)*
See Table
Below
4"
(102)
2"
(51)
1/2" Nominal Copper
Tubing for Supply Lines,
Stub Out 1" from Wall
7"
(178)
Hot Cold
Location of Electrical Outlet (Check
Local Codes - Outlet may be Required
to be in a Remote Location)*
**Adjustments to Vertical Dimensions
for Various Rim Heights
Rim Height Application Adjustment
34"
35" (WF3203)
Adult Height ADA, TAS Adult Height None, as shown
32" TAS Ages 11 thru 14 or 15, Grades 6 thru 8 or 9 Subtract 2"
30" TAS Ages 4 thru 10 or 11, Grades Pre-K thru 5
or 6 & Proposed Juvenile Height ADA
Subtract 4"
*Electrical outlet only necessary
for certain activation options. read
all instructions included with the
washfountain prior to rough in and
installation of bowl and pedestal.

5 of 8 1/15/2018 Bradley • 215-1833-6 Rev. A: ECN 17-00-006B
Bowl and Pedestal Assembly
TDB3103, WF3203
P.O. Box 309 • Menomonee Falls, WI 53052-0309 • 1 800 BRADLEY • 262 251 6000 • bradleycorp.com
Rough-In Specifications
(mm)
Type A Drain
- Supplies through wall
- Vented through wall
off-drain
Trap for Wall Outlet Only
Type O Drain
- Supplies from above
- Vented through wall
off drain
13" R Top Access
Trap
36" (914) Bowl
1-1/2" NPT Drain
1"
(25)
7/8"
(22)
Hot
Cold
7/8"
(22)
4"
(102)
1-1/2" NPT Drain
Through Wall
(Stub Out to Suit
Trap Dimensions)
7-3/8" R. Bottom Access
1/2" Nominal Copper
Tubing for Cold Supply,
Through Wall
36" Bowl
(914)
1-1/2" NPT Drain
5" R. Bottom Access
1/2" Nominal Copper
Tubing for Hot Supply,
Through Wall
1" (25)
2"
(51)
2"
(51)
Drain P-Trap and supplies by others.
4"
(102)
Clearance Hole
4-3/4"
(121)
*12"
(305)
*17-21"
(432 - 533)
Drain through Wall
Supplies through Wall
Trap for Wall Outlet Only
Wall
4"
(102)
Clearance Hole
4-3/4"
(121)
*17-21"
(432 - 533)
Drain through Wall
*Adjustments to Vertical Dimensions
for Various Rim Heights
Rim Height Application Adjustment
34"
35" (WF3203)
Adult Height ADA, TAS Adult Height None, as shown
32" TAS Ages 11 thru 14 or 15, Grades
6 thru 8 or 9
Subtract 2"
30" TAS Ages 4 thru 10 or 11, Grades
Pre-K thru 5 or 6 & Proposed
Juvenile Height ADA
Subtract 4"
4-3/4"
(121)
1/2" Nominal Copper Tubing
Supplies from Above

6 of 8 1/15/2018 Bradley • 215-1833-6 Rev. A: ECN 17-00-006B
Bowl and Pedestal Assembly
TDB3103, WF3203
P.O. Box 309 • Menomonee Falls, WI 53052-0309 • 1 800 BRADLEY • 262 251 6000 • bradleycorp.com
1
Rough-in Drain and Supplies
A
Rough in supply and drain piping
as required for your installation.
CAUTION Bowl surface is very smooth. Approximate
weight of bowl is 75 pounds. Handle with Care!
2
Bowl/Pedestal Mounting and Assembly
A
Attach the stainless steel pedestal base
to the pedestal using supplied screws
and finishing washers.
C
Secure pedestal to wall with suitable
fasteners, 1/2" anchors and 1/2" bolts
(supplied by installer).
D
Using two people, carefully lift bowl
onto pedestal.
E
Position the bowl so that the threaded
rods in the bowl mate with the slotted
holes in the pedestal.
F
Using 1/4" wing nuts and washers,
secure the bowl to the pedestal, three
places.
Top View
Drain
A location to plug in the 24 VAC Tramsformer is
required. Refer to drawing for Outlet Rough-In.
Position the pedestal at the desired
location and mark the position of the (4)
pedestal wall mounting locations.
B
Front View
Place Hands
Here When
Lifting Bowl
Threaded Rod
(Secured by 1/4"
wing nut and
washer)
Pedestal
(219-039)
Base Assembly, Standard Height
(S17-281)
Base Assembly, TAS (S17-284)
Base Assembly, Juvenile Height
(S17-285)
Shell, Wall Mounted - Trim Piece
(186-1306)
Wall Mounting
Locations
(Typical)
Place Hands
Here When
Lifting Bowl
Drain
#10 - 24 Screw (3)
(160-248)
Finish Washers (3)
(142-002CA)
Before attaching 1/4" wing nuts and washer to
threaded rod, remove red protective caps from
threaded rods. Discard sleeve caps after removal.

7 of 8 1/15/2018 Bradley • 215-1833-6 Rev. A: ECN 17-00-006B
Bowl and Pedestal Assembly
TDB3103, WF3203
P.O. Box 309 • Menomonee Falls, WI 53052-0309 • 1 800 BRADLEY • 262 251 6000 • bradleycorp.com
3
Installing Drain Spud in Bowl
A
Secure drain spud with lock nut and
washers.
Seal between drain spud and drain hole with
plumber’s putty (supplied by installer).
Strainer and Spud
Bowl
Apply Plumber's Putty Here
Locknut
Drain Pre-Pack
(S45-273)
Fiber Washer

8 of 8 1/15/2018 Bradley • 215-1833-6 Rev. A: ECN 17-00-006B
Bowl and Pedestal Assembly
TDB3103, WF3203
P.O. Box 309 • Menomonee Falls, WI 53052-0309 • 1 800 BRADLEY • 262 251 6000 • bradleycorp.com
Cleaning and Maintenance for Terreon
®
Material Description: Terreon is a densified solid surface material composed of bio based resin and is resistant to
chemicals, stains, burns and impact. Surface can be easily repaired with everyday cleansers or fine grit abrasives.
Because Terreon is a unique cast material, its aggregate flow and distribution, and shades of color can vary from
product to product creating natural characteristics.
Routine Cleaning: For regular cleaning, use mild neutral base cleaners.
Stubborn Stains: Remove tough stains with Soft-Scrub
®
and a green Scotch-Brite
®
pad or lightly sand in a circular
motion with 240 grit wet/dry sandpaper. The finish can then be renewed with a maroon Scotch-Brite pad.
Scratches: Remove scratches with a green Scotch-Brite pad. The finish can then be renewed with a maroon
Scotch-Brite pad.
Hard Water Deposits: Remove hard water deposits with a mild solution of vinegar and water. Always rinse the unit
thoroughly after cleaning.
Restoring the surface:
Use Hope’s
®
Perfect Countertop to refresh and protect the Terreon Solid Surface material.
Dark Terreon colors may require additional care and maintenance. For complete instructions on this additional
maintenance, visit bradleycorp.com.
Repair Kits: Terreon repair kits are available. Contact your Bradley representative or distributor for part numbers and
pricing. Repair kits are made to order and have a shelf life of 30 days.
NOTICE! Do not use strong acid or alkaline chemicals and cleaners to clean Terreon. If these chemicals
come in contact with the surface, wipe them off immediately and rinse with soapy water. Avoid
contact with harsh chemicals such as paint remover, bleach, acetone, etc. Avoid contact with hot
pans and objects.
Cleaning/Maintenance Instructions for Gel-coated Fiberglass
Material Description: The Terreon Washfountains referenced in this installation manual use a gel-coated fiberglass
pedestal.
Routine Cleaning: The gel-coated pedestal should be cleaned daily or as often as needed with a mild solution of
detergent and water. Always use a soft cloth to avoid damage to the finish.
Repair Kits: There are no repair kits available for fiberglass materials. However, replacement parts are available,
contact your Bradley representative for pricing and part numbers.
NOTICE! Do not expose gel-coated fiberglass to solvents as they will damage the material and may create
harmful fumes.
Brand Names: Use of brand names is intended only to indicate a type of cleaner. This does not constitute an
endorsement, nor does the omission of any brand name cleaner imply its inadequacy. Many products named are
regional in distribution, and can be found in local supermarkets, department and hardware stores, or through your
cleaning service. It is emphasized that all products should be used in strict accordance with package instructions.

1 of 3 12/19/2017 Bradley • 215-1834-21 Rev. A: ECN 17-00-006B
Sprayheads
WF2500, WF2600, WF2700, WF2800, WF3200, TDB3100 Series
P.O. Box 309 • Menomonee Falls, WI 53052-0309 • 1 800 BRADLEY • 262 251 6000 • bradleycorp.com
Sectional Sprayhead
1
32
54
Sectional Sprayhead
(Circular Shown - S34-038,
Semi-Circular Similar - S34-037)
Connector
1/4" NPT x 1/4" Tube
(169-974)
1/4" Supply Tubing
(4 Required for Circular,
2 Required for Semi-Circular)
Parts List
Item Part No. Description
Circular
Semi-
Circular
Qty
1 115-080 Sectional Sprayhead - Plated (Circular) 1
1 115-079 Sectional Sprayhead - Plated (Semi-Circular) 1
2 159-115 Bottom Plate 1 1
3 124-032 Gasket 1 1
4 160-138 Screw, 10-24 x 1/2" Button Head 4 4
5 142-002BT Washer, #10, Split Lock 4 4

2 of 3 12/19/2017 Bradley • 215-1834-21 Rev. A: ECN 17-00-006B
Sprayheads
WF2500, WF2600, WF2700, WF2800, WF3200, TDB3100 Series
P.O. Box 309 • Menomonee Falls, WI 53052-0309 • 1 800 BRADLEY • 262 251 6000 • bradleycorp.com
Non-Sectional Sprayhead
Repair kit does not include sprayhead grommet. Order as a separate item.
1
2
3
4
5
9
6
8
7
10
Parts List
Item Part No. Description
Sprayhead
Assembly
Repair Kit
S45-051
Qty
1 125-001DE Neoprene Washer - Top 1 1
2 139-031 Sprayhead Manifold 1 -
3 124-001AL Washer 3 4
4 160-211 Carriage Bolt 3 4
5 115-061 Sprayhead Top 1 -
6 116-008 Sprayhead Bottom 1 -
7 124-001AT Washer 3 4
8 161-025 Nut 3 4
9 124-020C Sprayhead Grommet - Circle 1 -
9 120-020D Sprayhead Grommet - Semi-Circle 1 -
9 120-020E Sprayhead Grommet - Corner 1 -
10 125-001DF Neoprene Washer - Bottom 1 1

3 of 3 12/19/2017 Bradley • 215-1834-21 Rev. A: ECN 17-00-006B
Sprayheads
WF2500, WF2600, WF2700, WF2800, WF3200, TDB3100 Series
P.O. Box 309 • Menomonee Falls, WI 53052-0309 • 1 800 BRADLEY • 262 251 6000 • bradleycorp.com
Sprayhead Troubleshooting
Problem Cause Solution
Water splashes over
the rim of the bowl.
Foreign matter has reduced the size of
the sprayhead slots, causing greater
pressure at the open slots.
Clean the sprayhead:
1. Disassemble the sprayhead and dislodge any dirt,
lime build-up and foreign debris with a wire brush.
2. Sprayheads with rubber grommet spray rings may
be cleaned by rubbing a coin over the grommet.
Throttle down the volume control (water spray should strike
the bowl without splashing outside of the bowl).
Water flow diminishes
from the sprayhead.
Strainer portion of the stop-strainer-check
valve is plugged.
Remove and clean the strainer screen from the stop-
strainer-check valve.
The non-sectional sprayhead includes a
perforated neoprene spray ring grommet that is
self-cleaning. The water pressure flexes the spray
holes which slows accumulation of foreign matter
and tends to "break loose" any such deposits that
may have accumulated.
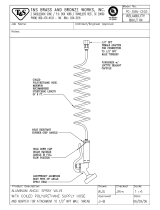
Sprayhead Tubing Connections
WARNING Flush supply lines before making connections.
A
Using a sharp razor, cut tubing squarely
and remove any burrs. DO NOT pinch or
crush end of tubing.
B
Loosen nut on fitting. Moisten end of
tube and push into fitting until it is firmly
seated. Tighten nut to secure tube
to fitting (make sure nut is securely
tightened).
C
If connector leaks, reseat tubing
according to above procedure. If leaking
persists, replace male connector, or call
a Bradley representative for assistance.
Tubing
Sprayhead
Tubing
Nut
Male Tube
Connector
(269-626)

1 of 11 12/19/2017 Bradley • 215-1834-4 Rev. A: ECN 17-00-006B
TouchTime
®
Activation Modules - Non-Sectional Semi-Circular Washfountains
TDB3103, WF3203, TDB3104, WF3204
P.O. Box 309 • Menomonee Falls, WI 53052-0309 • 1 800 BRADLEY • 262 251 6000 • bradleycorp.com
Supplies Required by Installer
• (4) 1/2" lag bolts, screws or other fasteners to anchor washfountain pedestal
• 1/2" nominal copper tubing for hot and cold water supply lines
• Standard P-trap (vented trap supplied by Bradley when required)
• 2" drain lines and fittings
• 1-1/2" vent or tie pipe on fixtures vented through washfountain column
• Teflon tape or pipe dope
• 110VAC GFI power source for 120VAC/12VDC plug in adapter
• OPTIONAL: Bradley recommends installing an electrical cutoff switch to the unit. This feature allows no
accidental water delivery during regular maintenance and service.
Pre-Installation Information
TouchTime
TouchTime pushbutton/piezo switch activates a flow of water. Sprayhead is controlled by a solenoid valve, allowing
user to activate a flow of tempered water from sprayhead with a pushbutton or piezo switch for 15 seconds.
Activation time can be adjusted in the field. Valve uses less than half the maximum amount of hot water allowed by
the ANSI/ASHRAE/ES 90A-1980 standard.
Solenoid Valve
An electronically controlled solenoid valve serves as the metering mechanism. Few moving parts provide reliable
metering performance and the solenoid is unaffected by chemicals and minerals often present in municipal water
supplies.
Not all equipment shown in this document is available on all washfountains shown within these
pages. See Tech Data for optional equipment available for your washfountain.

2 of 11 12/19/2017 Bradley • 215-1834-4 Rev. A: ECN 17-00-006B
TouchTime
®
Activation Modules - Non-Sectional Semi-Circular Washfountains
TDB3103, WF3203, TDB3104, WF3204
P.O. Box 309 • Menomonee Falls, WI 53052-0309 • 1 800 BRADLEY • 262 251 6000 • bradleycorp.com
A
Install hemmed end (not sharp end) of
support tube with gasket onto bowl.
B
Place sprayhead with 3/8" tubing onto
support tube. Run the tubing down
through the support tube and connect to
valve tube connector. Make sure the spray
holes point away from the wall.
C
Place the upper tie bar (notched at both
corners of each end) on top of sprayhead
parallel to wall. Connect the longer tie rod
to the 4-1/4" tie rod using the coupling nut
with hex head set screws. Run the tie rod
assembly down through upper tie bar and
secure from underneath the bowl using
lower tie bar (no notches) and hex nut
with socket head set screw.
Tie Rod Pre-Pack
Cover
TouchTime
Module
Assembly
Coupling
Nut
Sprayhead
Tie Bar
Tie Rod
Supply Tubes
Section View of
A/O Unit Assembly
Some optional equipment shown.
1a
Assemble TouchTime
®
– A and O Units without Tie Pipe Option (A Shown)
Pedestal Assembly
54" Standard Pedestal (S17-259)
54" TAS Pedestal (S17-345)
36" Standard Pedestal (S17-288)
36" TAS Pedestal (S17-289)
36" Juvenile Height (S17-290)
36" Wall Pedestal (S17-291)
Tie Rod Pre-Pack
(S45-1336)
Top Cover
A (107-099)
O (107-179)
Module Cover
(S04-083)
Sprayhead (S05-054B)
See 215-1834-21 for Supply Connections.
Drain
54" Semi (S45-273)
36" Semi (269-1597)
54" Terreon
®
Deep Bowl Shown
(Part No. Varies with color, size
and shape of bowl. Contact
your local Bradley Rep for
assistance)
Tie Bar Pre-Pack
(S45-055)
1/2" Flexible
Supply Tube
Support
Tube Gasket
(125-011)
Support Tube
STD (S57-005)
TAS/JUV (S57-006)
Standard Tie Rod (176-008A)
Juvenile Tie Rod (176-008)
Tie Bar
Restraining Bracket
(140-126)
A/O
(A shown)
Access Panel
54" Semi (186-1456)
36" Semi (186-1260)
TouchTime Module Assembly
PushButton (S83-341-DC)
Piezo Switch (S83-384-DC)
Valve Assembly
TMA (S45-2927) or TL (S45-2928)

3 of 11 12/19/2017 Bradley • 215-1834-4 Rev. A: ECN 17-00-006B
TouchTime
®
Activation Modules - Non-Sectional Semi-Circular Washfountains
TDB3103, WF3203, TDB3104, WF3204
P.O. Box 309 • Menomonee Falls, WI 53052-0309 • 1 800 BRADLEY • 262 251 6000 • bradleycorp.com
Unit with "O" Drain and
TouchTime Module Shown, Also
Available with "A" Drain
Top Cover
Soap
Dispenser
8-5/8" Tie Rod
Spacer
Coupling
Nut
Module
Cover
4-1/4" Tie Rod
TouchTime Module
Assembly
Pushbutton (S83-341-DC)
Piezo Switch (S83-384-DC)
Coupling
Nut
Tie Bar
Sprayhead
(S05-054B) See 215-1384-21
for supply connections.
Support Tube
STD (S57-005)
TAS/JUV (S57-006)
Standard Tie Rod
21-5/8"
Juvenile Tie Rod
18-1/8"
Some optional equipment shown.
1a
Assemble TouchTime
®
– A and O Units without Tie Pipe Option (A Shown)
D
Place the TouchTime module assembly on top
of sprayhead. Rotate until TouchTime module
locks in with tie bar. Drop 1/8" diameter tube
down to valve assembly and connect to the
module assembly. Make sure pushbuttons or
piezo switches are facing away from the wall.
Skip to step F for units without soap.
E
For units with soap option, install the spacer,
soap dispenser and cover using the third tie
rod (8-5/8" long) and second coupling nut as
shown. Secure with acorn nut and set screw.
F
Secure module cover and top cover with
sprayhead restraining bracket, acorn nut
and set screw.
G
Connect supply stops onto stub-outs.
Connect flexible hoses to supply stops.

4 of 11 12/19/2017 Bradley • 215-1834-4 Rev. A: ECN 17-00-006B
TouchTime
®
Activation Modules - Non-Sectional Semi-Circular Washfountains
TDB3103, WF3203, TDB3104, WF3204
P.O. Box 309 • Menomonee Falls, WI 53052-0309 • 1 800 BRADLEY • 262 251 6000 • bradleycorp.com
Cover
TouchTime
Module
Assembly
Sprayhead
Tie Bar
Supply Tube
Section View of
B/H Unit Assembly
Some optional equipment shown.
1b
Assemble TouchTime
®
– B and H Units with Tie Pipe Option (B Shown)
Pedestal Assembly
54" Standard and Juvenile Pedestal Assembly (S17-242) (shown)
36" Standard and Juvenile Pedestal (S17-337)
36" TAS Pedestal Assembly (S17-338)
54" TAS Pedestal Assembly (S17-342)
A
Install hemmed end (not sharp end) of
support tube with gasket onto bowl.
B
Place sprayhead with 3/8" tubing onto
support tube. Run the tubing down
through the support tube and connect
to valve tube connector. Make sure the
spray holes point away from the wall.
C
Insert the 1-1/2" vent pipe (supplied by
installer) down through the support tube
and thread into vented trap.
Top Cover
(107-185 (B))
(107-048 (H))
Module
Cover
Support
Tube Gasket
(125-011)
Support Tube
STD (S57-005)
TAS/JUV (S57-006)
1-1/2" Vent Pipe
Vented Trap
(111-024)
Tie Bar Pre-Pack
(S45-056)
B/H
(B shown)
Sprayhead (S05-054B)
See 215-1834-21 for Supply Connections.
Drain
54" Semi (S45-273)
36" Semi (269-1597)
54" Terreon
®
Deep Bowl Shown
(Part No. Varies with color, size
and shape of bowl. Contact your
local Bradley Rep for assistance)
Access Panel
54" Semi (186-1456)
36" Semi (186-1260)
TouchTime Module Assembly
Pushbutton (S83-341)
Piezo Switch (S83-384)
Valve Assembly
TMA (S45-2927) or TL (S45-2928)

5 of 11 12/19/2017 Bradley • 215-1834-4 Rev. A: ECN 17-00-006B
TouchTime
®
Activation Modules - Non-Sectional Semi-Circular Washfountains
TDB3103, WF3203, TDB3104, WF3204
P.O. Box 309 • Menomonee Falls, WI 53052-0309 • 1 800 BRADLEY • 262 251 6000 • bradleycorp.com
Top
Cover
Soap
Dispenser
Spacer
Module
Cover
TouchTime Module
Assembly
Pushbutton (S83-341-DC)
Piezo Switch (S83-384-DC)
Tie Bar
Sprayhead (S05-054B)
See 215-1834-21 for
supply connections.
Support Tube
STD (S57-005)
TAS/JUV (S57-006)
Unit with "H" Drain and
TouchTime Module Shown, Also
Available with "B" Drain
Some optional equipment shown.
1b
Assemble TouchTime
®
– B and H Units with Tie Pipe Option (B Shown)
Skip to step F for units without soap.
E
For units with soap option, slide the spacer
and soap dispenser over the 1-1/2" pipe.
F
Position the upper tie bar slightly below
the module or soap dispenser and fasten
securely to vent pipe with set screws
provided. Secure top cover to tie bar with two
cap screws provided.
D
Place the TouchTime module assembly on top
of sprayhead. Rotate until TouchTime module
locks in with tie bar. Drop 1/8" diameter tube
down to valve assembly and connect to the
module assembly. Make sure pushbuttons or
piezo switches are facing away from the wall.
G
Connect supply stops onto stub-outs.
Connect flexible hoses to supply stops.

6 of 11 12/19/2017 Bradley • 215-1834-4 Rev. A: ECN 17-00-006B
TouchTime
®
Activation Modules - Non-Sectional Semi-Circular Washfountains
TDB3103, WF3203, TDB3104, WF3204
P.O. Box 309 • Menomonee Falls, WI 53052-0309 • 1 800 BRADLEY • 262 251 6000 • bradleycorp.com
A
Connect 1/2" dia. tubing from
the sprayhead to the solenoid
assembly. The male connector for
the valve assembly will remain tight
and leakproof when tubing is cut
and installed properly. Follow the
procedures below when installing
tubing to ensure that you achieve a
leakproof seal.
• Using a sharp razor, cut tubing
squarely and remove any burrs. DO
NOT pinch or crush end of tubing.
• Loosen nut on fitting. Moisten end
of tube and push into fitting until it is
firmly seated. Tighten nut to secure
tube to fitting (make sure nut is
securely tightened).
• If connector leaks, reseat tubing
according to above procedure.
If leaking persists, replace male
connector, or call your Bradley
representative for assistance.
Flush supply lines before making connections.
2
Connect Valve and Tubing for Non-Sectional TouchTime Control
Components for Supply
Connection Prepack
TMV (S45-2730) Shown,
TL (S45-2731) Similar
Other components not shown for clarity.
TMV Non-Sectional Valving Shown,
TL Valving Similar
1/2" OD Supply Tubing to
Non-Sectional Sprayhead
- See 215-1834-21 for
connection detail.
/