
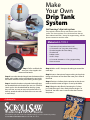
Gail Jennings’ drip tank system.
The purple line divides the top and bottom views of the
system. The close up photos show, clockwise from the top,
the medicine bottle and C-clamp, the copper tubing, and the
plastic container to catch the water.
Make
Your Own
Drip Tank
System
Step 1: Drill a small hole the
same size as the nipple in the
bottom of the bottle.
Step 2: Insert the threaded nipple into the bottom of the
bottle, add a rubber washer and tighten the nut inside
the bottle. Attach the clear plastic tubing to the nipple.
Step 3: Attach the bottle to a threaded rod and t into
the threaded hole at the back of the saw arm. (The R.B.I.
Hawk saw has this threaded hole for the drip system
they sell. Your saw may or may not have the hole. If it
doesn’t, attach the rod to the back of the saw arm with
a small clamp.)
Step 4: Add a small C-clamp on the tubing to control the
water drip.
Step 5: Insert a short piece of copper tubing in the plastic
tubing at the lower end to direct the water just in front of
the blade.
Step 6: Position a shallow plastic container under the saw
table to catch the water and glass silt cut by the blade.
Step 7: Begin the drip ow by loosening the C-clamp
just a little bit to get a slow, steady drip on the glass at
the blade. You don’t want so much water that it loosens
the pattern.
Materials & TOOLS
• Flatbottomplasticbottleatleast3”tall
• 1⁄4”-diameterx30”-longclearplastictubing
• Threadednippletotinthetubing
• Threadedrod
• Rubberwasher
• SmallC-clamp
• 1⁄4”-outsidediameterx2-3”-longcoppertubing
• Plasticcontainer
As featured in
Subscribe or join the Scroll Saw Woodworking & Crafts community today.
Visit www.scrollsawer.comorcall800-457-9112.
-
 1
1

Ask a question and I''ll find the answer in the document
Finding information in a document is now easier with AI
Other documents
-
Pelican Omni 4-Stage RO Owner's manual
-
 QEP 60024 User manual
-
 Jackson / Dalton Dishwasher 24LT User manual
-
 Buehler ISOMET 2000 User manual
-
Sears 153.33207 User manual
-
 Cuno SQC Pro User manual
-
Dometic Hydraulic Steering for Inboard and Sterndrive Powered Vessels Operating instructions
-
 Cuno SQC Series User manual
-
Pentek PENTEK-GS-10ALS-JG14 User manual
-
Vertex GP6 User manual


