Page is loading ...

¡AVISO!
Lea y siga todas las instrucciones
de funcionamiento y seguridad
antes de usar esta sierra.
STK# 60024
OWNER’S MANUAL
MANUEL D’UTILISATION
MANUAL DE OPERACIÓN
24" PROFESSIONAL TILE SAW
SCIE Á CARREAUX
PROFESSIONNELLE DE 61cm
SIERRA DE LOSETAS
PROFESIONAL DE 61cm
CAUTION!
Read and follow all safety
and operating instructions
before using this saw.
ATTENTION!
Lire et suivre toutes les directives
de sécurité et d’opération
avant d’utiliser cette scie.
60024 MANUAL-tri.qxd:60024 MANUAL-tri.qxd 4/23/09 4:45 PM Page 1

-2-
TABLE DES MATIÈRES
Instructions de Sécurité pour
les Scies à Carreaux......................12
Exigences Électriques ..................13
Avertissement ..............................14
Fonctions de Pointe ....................14
Spécifications – Électrique
et Moteur ....................................15
Déballage, Assemblage
et Installation ...............................15
Installation D’Assemblage
du Moteur ..................................15
Installation de la Lame et du
Protecteur Lame ..........................15
Retrait et Installation
du Plateau D’Eau..........................16
Installation de la Pompe à Eau ....16
Directives de Sécurité de la
Pompe D’Eau ..............................16
Table de Coupe et Rallonge
de Table de Coupe Optionnelle ..17
Profondeur de Coupe ..................17
Remplacement de Courroie ........17
Remplacement de Roulements........18
Support de la Scie........................18
Fonctionnement de la Scie ..........18
Entretien de la Scie – Alignement
de la Lame/Table..........................19
Lames Diamantées ......................19
Choses à Faire et à Ne Pas Faire
pour les Lames Diamantées..........19
Liste de Pièces..............................20
Pièces Éclatées..............................21
TABLA DE CONTENIDO
Instrucciones de Seguridad de
Sierra para Losetas ......................22
Requerimientos Eléctricos ............23
Advertencia..................................24
Caracteristicas de Avanzada ........25
Especificaciones Eléctricas
del Motor ....................................25
Retiro del Embalaje, Montaje
Puesta a Punto.............................25
Instalación del Conjunto
del Motor ....................................25
Instalación del Disco y su
Protección de Seguridad ..............26
Retiro y Instalación de la
Bandeja para Agua ......................26
Instalación de la Bomba de Agua 26
Pautas de Seguridad para
la Bomba de Agua ......................27
La Mesa de Corte y Extensión
Opcional para la Mesa de Corte....27
Profundidad de Corte ..................27
Cambio de la Correa....................28
Cambio de Cojinetes ......................28
Soporte de la Sierra......................28
Funcionamiento de la Sierra ........28
Mantenimiento de la Sierra - Alineación
entre la mesa y el disco ................29
Discos de Diamante ....................29
Qué Hacer y Qué no Hacer con
los Discos de Diamante ..................29
Lista de Partes..............................30
Dezpiezado..................................31
24" Professional Tile Saw
Scie á Carreaux Professionnelle de 61 cm
Sierra de Losetas Profesional de 61 cm
STK# 60024
TABLE OF CONTENTS
Safety Instructions for Tile Saw ......3
Electrical Requirements ..................4
Warning ........................................4
State-of-the-Art Features ................5
Electrical/Motor Specifications........5
Unpacking, Assembly & Set-Up ....5
Motor Assembly Installation ..........6
Blade & Blade Guard Installation....6
Water Tray Removal & Installation..6
Water Pump Installation ................7
Water Pump Safety Guidelines ......7
Cutting Table &
Optional Cutting Table Extension ..7
Cutting Depth ..............................8
Belt Replacement ..........................8
Bearing Replacement ....................8
Saw Stand......................................8
Saw Operation ..............................9
Saw Maintenance -
Table/Blade Alignment ..................9
Diamond Blades ............................9
Do’s & Dont’s for Diamond Blades....9
Parts List ......................................10
Specifications ..............................10
Exploded Parts ............................11
GARANTIE LIMITÉE
Faire référence à la carte de guarantie.
LIMITED WARRANTY
Refer to warranty card.
GARANTIA LIMITADA
Referirse a la tarjeta de guarantia.
60024 MANUAL-tri.qxd:60024 MANUAL-tri.qxd 4/23/09 4:45 PM Page 2

-3-
SAFETY INSTRUCTIONS FOR TILE SAW
READ THIS OWNER’S MANUAL COMPLETELY AND MAKE SURE YOU UNDERSTAND ALL OF IT’S SAFETY
GUIDELINES.
1. KEEP GUARDS IN PLACE and in working order.
2. REMOVE ADJUSTING KEYS AND WRENCHES. Before turning on the tile saw, make sure the keys and adjusting
wrenches have been removed.
3. KEEP WORK AREA CLEAN. Cluttered areas and benches invite accidents.
4. ALWAYS REMAIN ALERT WHEN THE SAW IS IN USE. Inattention on the part of the operator may lead to
serious injury.
5. DON’T USE IN A DANGEROUS ENVIRONMENT. Don’t use power tools in damp or wet locations or expose
them to rain. Keep work area well lighted.
6. KEEP CHILDREN AWAY. All visitors should remain at a safe distance from work area.
7. MAKE WORKSHOP CHILD-PROOF with padlocks, master switches or by removing starter keys.
8. USE RIGHT TOOL. Don’t force tool or attachment to do a job for which it was not designed.
9. USE PROPER EXTENSION CORD. Make sure your extension cord is in good condition. When using an
extension cord, be sure to use one heavy enough to carry the current your product will draw. An undersized
cord will cause a drop in line voltage resulting in loss of power and overheating. Table 1 shows the correct size
to use depending on cord length and nameplate ampere rating. If in doubt, use the next heavier gauge. The
smaller the gauge number, the heavier the cord.
10. DON’T FORCE TOOL. It has been designed to operate at maximum safety and performance levels.
11. DO NOT FORCE THE MATERIAL BEING CUT. Always let the blade cut at its own speed.
12. WEAR PROPER APPAREL. Do not wear loose clothing, neckties, rings, bracelets or other jewelry which may get
caught in moving parts. Non-slip foot wear is recommended. Wear protective hair covering if you have long
hair.
13. ALWAYS USE SAFETY GLASSES. Also use face or dust mask
for commercial cutting operations. Everyday
eyeglasses only have impact-resistant lenses, they are NOT
safety glasses.
14. SECURE WORK. Use clamps or a vise instead of your hand to
hold work when practical. This safety precaution allows for
proper tool operation using both hands.
15. DON’T OVERREACH. Keep proper footing and balance at all
times.
16. MAINTAIN TOOLS WITH CARE. Keep tools clean and in good
working condition for maximum safety performance. Follow
instructions for lubricating and changing accessories.
17. DISCONNECT TOOLS BEFORE SERVICING – when changing
accessories, such as blades, bits, cutters, etc.
18. REDUCE THE RISK OF UNINTENTIONAL STARTING. Make
sure switch is in OFF position before plugging in.
19. USE RECOMMENDED ACCESSORIES. Consult the owner’s
manual for recommended accessories. The use of improper
accessories may increase risk of injury.
20. DO NOT DRY CUT WITH BLADES DESIGNED FOR WET CUTS.
21. MAKE SURE YOU USE THE CORRECT BLADE for the job you are doing.
22. NEVER STAND ON TOOL. Serious injury could occur if the tile saw is tipped or if the cutting tool is
unintentionally contacted.
23. CHECK DAMAGED PARTS. Before further use of the tool, damaged part(s), (i.e. guard) should be carefully
checked to determine that it will operate properly and perform its intended function. Check for alignment of
moving parts, binding of moving parts, breakage of parts, mounting and any other conditions that may affect
the saw’s operation. A guard or other part that is damaged should be properly repaired or replaced.
24. ENSURE THAT THERE IS A CONTINUOUS FLOW OF WATER to both sides of blade during operation.
25. CHECK DIAMOND BLADES CAREFULLY FOR CRACKS, NICKS, MISSING DIAMOND MATRIX OR OUT-OF-
ALIGNMENT CONDITION. Replace damaged blades immediately. DO NOT USE DAMAGED BLADES. They may
cause bodily injury.
26. DIRECTION OF FEED. Feed work into the blade against the direction of rotation of the blade only.
27. DO NOT ALTER THE PLUG OR USE A 2-PRONG RECEPTACLE. This saw is equipped with a 3-prong electrical
plug.
28. NEVER LEAVE TOOL RUNNING UNATTENDED. Turn power off. Don’t leave tool until it comes to a
complete stop.
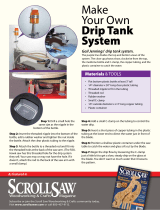
ILLUSTRATION 1
DRIP LOOP
60024 MANUAL-tri.qxd:60024 MANUAL-tri.qxd 4/23/09 4:45 PM Page 3

-4-
29. POSITIONING OF TILE SAW (See Illustration 1)
A. To avoid the possibility of the appliance plug or receptacle getting wet position the tile saw to one side of a
wall-mounted receptacle to prevent water from dripping onto the receptacle or plug. The user should
arrange a “drip loop” in the cord connecting the saw to a receptacle. The “drip loop” is that part of the cord
below the level of the receptacle, or connector if an extension cord is used, to prevent water traveling along
the cord and coming in contact with the receptacle.
B. If the plug or receptacle does get wet, DO NOT unplug the cord. Disconnect the fuse or circuit breaker that
supplies power to the tool. Then, unplug and examine for presence of water in the receptacle.
30. CHECK DIAMOND BLADES CAREFULLY for cracks, nicks, missing diamond matrix, or out-of-alignment.
Replace blades immmediately. DO NOT use damaged blades. They may cause bodily injury.
ELECTRICAL REQUIREMENTS
•CONNECTING TOOLTO POWER SOURCE OUTLET. This tile saw must be connected to a grounded power source
while in use to protect the operator from electrical shock.
• In the event of a malfunction or breakdown, grounding provides a path of least resistance for electrical current
to reduce the risk of electrical shock. The tile saw is equipped with an electrical cord with a grounding conductor
and a grounding plug. Insert the 3-prong electrical plug into a 3-pole receptacle that is properly installed and
grounded in accordance with all local codes and ordinances.
• Do not modify the plug provided if it will not fit the outlet. Have the proper outlet installed by a qualified
electrician.
• Improper connection of the equipment-grounding conductor can result in a risk of electric shock. The conductor
with insulation that is green on the outside (with or without yellow stripes) is the equipment-grounding
conductor. If repair or replacement of the electrical cord or plug is necessary, do not connect the equipment-
grounding conductor to a live terminal.
• Check with a qualified electrician or service personnel if the grounding instructions are not completely
understood, or if in doubt as to whether the tool is properly grounded.
• Use only 3-wire extension cords that have 3-prong grounding plugs and 3-pole receptacles that accept the tile
saw’s plug.
• Repair or replace damaged or worn cord immediately.
• If the plug or receptacle does get wet, do not unplug the cord. Disconnect the fuse or circuit breaker that supplies
power to the tool. Then, unplug and examine for presence of water in the receptacle.
• Only UL-listed extension cords should be used with this product.
• Improper use of extension cords may cause inefficient operation of your tool, which can result in overheating.
Be sure your extension cord is rated to allow sufficient current flow to the motor. For the proper gauge for this
tile saw, please refer to Table 1.
• Do not let your fingers touch the terminals of plug when installing or removing the plug to or from the outlet.
• This tile saw must be properly grounded. The risk of electric shock and bodily injury are greatly increased if it is
not, particularly when used in damp locations or in proximity to plumbing.
This tool is intended for use on a circuit that has an outlet
that looks like the one shown in Illustration 2. The tool has
a grounding plug that looks like the plug illustrated in Figure
(A). A temporary adapter, which looks like the adapter
illustrated in Figures (B) and (C), may be used to connect
this plug to a 2-pole receptacle as shown in Figure (B) if a
properly grounded outlet can be installed by a qualified
electrician. The green-colored rigid prongs extending from
the adapter must be connected to a permanent ground such
as a properly grounded outlet box.
(C) GROUNDING ADAPTER
(A) GROUNDING PIN
(B) GROUNDED OUTLET BOX
METAL SCREW
(Not Permitted In Canada)
ILLUSTRATION 2
WARNING
PERSONAL INJURY CAN OCCUR IF OPERATED IMPROPERLY.
• Keep fingers and loose clothing away from rotating blade.
• Use extreme caution when cutting tile. Make sure hands and fingers are clear from the blade groove in the
sliding table. Severe abrasion, cuts, or pinching of hands or fingers can occur as the table is advanced,
particulary at the end of its travel.
• Electrical shock can occur if operating instructions are not followed.
60024 MANUAL-tri.qxd:60024 MANUAL-tri.qxd 4/23/09 4:45 PM Page 4

120

-6-
BLADE & BLADE GUARD INSTALLATION
1. The blade guard (2) must be installed before the diamond cutting
blade (3) can be attached. (See Diagram)
2. Use the blade guard adjustment knob (1) to fasten the blade guard
firmly against the motor assembly.
3. Carefully raise the cutting head to its highest position and tighten the
adjustment knob on the rear support post so the cutting head is held
firmly in place.
4. Raise the blade guard to the highest level and tighten the blade guard
adjustment knob. Then, remove the blade shaft nut and outer flange.
5. Place the blade onto the shaft, pushing it up against the inner flange.
It is important to be sure the directional arrow is pointing in the
direction of rotation.
6. Replace the outer flange and blade shaft nut. With one hand, hold the
blade and tighten the blade shaft nut with your free hand. Make
certain the nut is firmly tightened with wrench provided. DO NOT
OVER-TIGHTEN!
7. Release the blade shaft lock after the blade shaft nut is fully tightened.
8. Lower the blade guard into position and tighten the adjustment knob. Then, slightly loosen the rear support
adjustment knob and lower the cutting head so that the blade is 1⁄4" below the top surface of the cutting table.
Tighten the adjustment knob firmly to hold the cutting head in place.
WARNING: SETTING THE BLADE TOO LOW MAY CAUSE DAMAGE TO THE CUTTING TABLE. IF THE BLADE IS SET
TOO HIGH, IT MAY CATCH OR GRAB THE MATERIAL BEING CUT, CAUSING DAMAGE AND POSSIBLE INJURY.
BLADE INSTALLATION
MOTOR ASSEMBLY INSTALLATION
CAUTION: FOLLOW ALL OF THE ASSEMBLY & INSTALLATION INSTRUCTIONS COMPLETELY BEFORE CONNECTINGTHE
SAW TO A POWER SOURCE OR TURNING THE MOTOR ON.
1. Remove motor assembly (5) and saw-frame assembly (6) from the
box. (See Diagram)
2. Motor-support shaft (1) and support-shaft bolt (3) are located inside
the motor assembly.
3. Use the handles to lift motor assembly. Slide motor assembly with
the motor-support shaft into place in the rear support post (4).
4. Once motor assembly is in place, attach the mounting plate
adjustment knob (2) to keep motor assembly stable.
5. From the lifting side, insert motor-support bolt shaft into rear
support post and tighten bolt.
MOTOR ASSEMBLY
WATER TRAY REMOVAL & INSTALLATION
EASY REMOVAL AND INSTALLATION
1. Pull out the drain plug in the bottom of the water tray and drain all
water.
2. Lift up the cutting table with one hand.
3. With the other hand, pull out the water tray from the right-hand side.
4. Lift out the water tray for cleaning. (Hose down and clean as
necessary.)
5. To install, follow steps 2 & 3 in reverse.
6. Next, make sure the drain plug for the water tray is firmly in the drain
hole before filling the tray with water.
7. Lastly, lower the cutting table back to its original flat position.
NOTE: THERE IS NO ADJUSTMENT NECESSARY TO THE WATER TRAY
WHEN IT IS CORRECTLY INSTALLED.
WATER TRAY REMOVAL
& INSTALLATION
DIAGRAM
5
6
60024 MANUAL-tri.qxd:60024 MANUAL-tri.qxd 4/23/09 4:45 PM Page 6

-7-
WATER PUMP INSTALLATION
1. Remove the water pump from its box and ensure that it is not cracked or
damaged in any way (See Diagram)
2. Attach the end of the plastic tubing, hanging down from the blade guard,
to the water pump nipple.
3. Place the water pump in the rear of the water tray on its side, with the
water pump nipple also on its side.
4. Next, fill the water tray with water so that its level is higher than the water
intake nozzle.
5. Keep the power cord out of the water and plug it into the 3-prong
receptacle on the back of the cutting head assembly. The pump is
activated by the ON/OFF switch on the electric motor.
NOTE: WATER PUMP SAFETY GUIDELINES & MAINTENANCE
INSTRUCTIONS ARE IN THE FOLLOWING SECTION. PLEASE READ CAREFULLY AND COMPLETELY.
WATER PUMP
INSTALLATION
WATER PUMP SAFETY GUIDELINES
1. The pump is equipped with grounding-type attachment plug. Be sure to connect the plug to a properly
grounded grounding type receptacle, to reduce the risk of electric shock.
2. When assembling & installing the water pump system, be sure to fully support the pump and piping to reduce
the chance of pump failure or damage.
3. Never handle the pump by the cord, with wet hands, or when standing on a wet surface.
4. Do not use the pump to pump anything other than water, or other compatible liquids. Never use to pump
gasoline, kerosene, or other combustible or corrosive liquids.
5. Should pump fail, always disconnect from power source before handling pump or attempting to unclog or
service the pump in any way.
6. Never let the pump operate dry. It is self-cooled by pumping liquid. Dry use will cause pump damage and may
cause the motor to fail.
CUTTING TABLE & OPTIONAL CUTTING TABLE EXTENSION
CUTTING TABLE MARKED IN INCHES AND CENTIMETERS FOR ACCURATE CUT DIMENSIONS.
STEPS FOR POSITIONING 45°/90° RIP GUIDE:
1. Set the rip guide by positioning it on the desired dimension and tighten the threaded knob on the rip guide.
Make sure rip guide is firmly tightened to avoid slippage.
2. The rip guide can be used for 90° rip cuts and 45° rip cuts from both the
left and right side. (Note the straight and 45° angled slits on the bottom
of the rip guide in the diagram.)
3. After the rip guide is positioned for the desired cut, place material flush
against the rip guide and the measurement rail. For 45° rip cuts, place the
corner of material in the open slot of the measurement rail.
4. Simply line up the material to be cut with the appropriate pre-marked
lines on the cutting table’s rubber mat.
5. Now you are ready to make your cut.
6. For miter cuts, use the miter block attachment included with the saw.
Simply place the lip of the miter block on the measurement rail with the
threaded knobs facing you. Next, tighten both threaded knobs to secure
miter block in place. Place material onto miter block and you are ready to
cut.
7. For greater stability when cutting larger tiles, use the optional cutting-
table extension. This extension snaps easily onto the leading edge of the
cutting table.
CUTTING TABLE
45°/90° RIP GUIDE
& MITER BLOCK
60024 MANUAL-tri.qxd:60024 MANUAL-tri.qxd 4/23/09 4:45 PM Page 7

-8-
CUTTING DEPTH
1. The recommended cutting depth for all materials is 1⁄4" below the top
surface of the cutting table. (See Diagram)
2. To adjust cutting depth, loosen the large motor mounting plate
adjustment knob, and move up or down.
BELT REPLACEMENT
CAUTION: ALWAYS TURN OFF SAW AND UNPLUG FROM POWER SOURCE
BEFORE REMOVING BELT GUARD OR ADJUSTING/CHANGING BELT.
1. Loosen and remove the belt guard screws and take off the belt guard.
2. Loosen the 4 nuts (front & back) on the mounting plate.
3. Gently loosen the motor adjustment clip on the very rear of the motor
mounting plate.
4. Carefully nudge the motor slightly forward so there is a little slack
in the belt.
5. Remove the old belt and replace with the new belt.
6. To reassemble, reverse Steps 1-5.
BELT REPLACEMENT
BEARING REPLACEMENT
1. Follow BLADE INSTALLATION instructions on page 6.
2. Hold down the blade shaft lock until it locks in place. Turn the inner flange
off (counter-clockwise).
3. Follow BELT REPLACEMENT instructions on above. Then, unscrew the
hex screw and take out the pulley.
4. Hold the bearing housing and unscrew the 3 hex screws on the mounting
plate.
5. Now the bearing housing is ready to be removed.
6. To replace all parts, reverse steps in instructions.
BEARING HOUSING REPLACEMENT
SAW STAND
The saw stand includes (2) wheels with foot activated brakes.
The stand folds for compact storage and transportation.
To assemble the stand:
1. Attach the wheels to frame W with the four 1/4" x 13⁄4" bolts, washers and
nuts provided.
2. Place frame W inside the second frame X, and secure the two frames with
the 5/16" x 2" bolts as shown.
3. Put the wheel brakes in the DOWN position, and make sure the wheels are
firmly locked.
4. Set the stand on a firm, flat and level surface. Do not set the stand on soft
soil, on uneven ground, or on debris in the work area. If ground is soft, use
a piece of plywood under the stand to provide a solid, level and even base
for the saw stand.
5. Secure the frame of the saw to the optional stand with the vertical post of
the frame toward the rear of the stand, above the wheels. Insert the 1/4" x
3/4" round head bolt into the square hole of the saw frame and into the
stand. Thread the plastic knob securely onto the bolt, as shown in the drawing.
6. Make sure all bolts and nuts are securely tightened.
1/4" x 3/4" round head bolt
5/16" x 2" bolts
frame W
frame X
(no wheels)
1/4" x 13⁄4" bolts
rest
SAW STAND
CUTTING DEPTH
60024 MANUAL-tri.qxd:60024 MANUAL-tri.qxd 4/23/09 4:45 PM Page 8

-9-
SAW OPERATION
1. Make sure you have read this manual completely before operating your saw.
2. Make sure that there is sufficient water in the water pan to cover the inlet on the water pump, and that water
is being supplied to the saw blade before attempting to cut any material.
3. Make sure your material is positioned properly on the saw table before beginning your cut. Feed your material
slowly into the blade. DO NOT force material. The blade will cut smoother and faster if these steps are followed.
4. ALWAYS practice SAFETY FIRST. Wear eye safety goggles, a dust mask and gloves when operating this saw.
Discard cracked, bent, chipped, or damaged blades.
SAW MAINTENANCE - TABLE/BLADE ALIGNMENT
WARNING: DO NOT SERVICE, CLEAN OR MAINTAIN THE SAW WITHOUT FIRST TURNING OFF THE MOTOR AND
UNPLUGGING THE SAW FROM ITS POWER SOURCE. FAILURE TO DO SO MAY RESULT IN SERIOUS INJURY TO
THE OPERATOR.
1. “Truing” the Cutting Table may be required occasionally. The saw blade must be 90° to the “Tile Stop” on the
cutting table to prevent blade “binding” while cutting tile.
a. Use a carpenter’s square, held against the blade and against the “tile stop”, at the back of the cutting table.
b. If the two are not square (90°), loosen the hex head bolt on the left guide rail, and move the guide rail until
the blade and cutting table are exactly square.
c. Tighten the hex head bolt on the guide rail securely.
2. For longest life and best performance, clean the saw after every use.
3. Wipe off all exterior surfaces and keep the cutting table clean and free of tile chips and debris.
4. Wipe off both the guide bars and the rollers on the cutting table.
5. Place light machine oil on the guide bar to facilitate smooth travel of the linear guide assembly.
DO’s & DON’Ts FOR DIAMOND BLADES
DO’s
1. Inspect blades daily for cracks or uneven wear. Discard cracked, chipped or bent blades!
2. Always use manufacturer’s recommendation for matching the right blade with the right material being cut.
3. Inspect the arbor shaft for uneven wear before mounting the blade.
4. Always use blades with the correct arbor size on a compatible arbor shaft.
5. Ensure the blade is mounted with the rotation arrow in the proper direction and is securely tightened with a
wrench.
6. Always wear proper safety equipment at all times when operating the saw. Wear goggles and dust mask at all
times when operating saw.
7. Periodically check the blade for cracks or bond fatigue.
8. Always ensure a continuous flow of water on both sides of the blade before cutting any material.
DON’Ts
1. Do not operate the saw without all safety guards in position.
2. Do not operate the saw with blades larger or smaller than 10" (250mm).
3. Do not cut dry with blades marked “Use Wet.”
4. Do not exceed maximum RPMs recommended by the blade manufacturer.
5. Do not force the material into the blade. Let the blade cut at its own speed.
6. Do not cut material not recommended by the blade manufacturer.
7. Do not use “open” blades, such as segmented, turbo, or wood saw blades in this saw. Severe bodily injury
and damage to your saw can occur.
DIAMOND BLADES
1. Use 10" diameter continuous rim wet diamond blades in this saw.
2. Arbor holes of 5⁄8" diameter will fit this saw.
3. DO NOT use segmented blades, “turbo” blades, wood sawing blades, blades with openings, or any other
cutting devices in this tile saw. Severe bodily injury, and damage to the saw can occur.
60024 MANUAL-tri.qxd:60024 MANUAL-tri.qxd 4/23/09 4:45 PM Page 9

- 10 -
DESCRIPTION No.
Folding Saw Stand w/Wheels 60024-01
Wheel / Brake Assembly (w/4 bolts, washers, nuts) 60024-03
Stand Knobs (2) 60024-04
Frame Assembly 60024-05
Roller Guide Bar (w/2 bolts, washers, nuts) 60024-06
Water Tray Assembly 60024-07
Drain Plug 60024-08
Angle Bar on Water Tray (w/2 bolts, washers, nuts) 60024-09
Water Tray Brackets for Lock (set of 2 w/screws) 60024-10
Water Valve 60095-11
Water Pump Tubing 60095-12
Water Flow “T” & “L” w/ Tubing 60024-13
“U”-shaped Roller Set 60024-15
Cutting Table 60024-16
Rubber Mat for Cutting Table 60024-17
Ruler Guide (w/4 bolts) 60024-18
Ruler Guide Sticker 60024-19
L-shaped Supporter (w/2 bolts, washers) 60024-20
Angle Bar Rollers Set 60024-21
Rear Support Post (w/bolt, washers, nuts, 1 hex) 60024-22
Mounting Plate Adjustment (w/nut & lock washer) 60024-23
Motor Support Shaft (w/bolt & washer) 60024-24
Mounting Plate 60024-25
Motor Adjustment Clip (w/bolt & washer) 60024-26
Bearing Housing 60024-27
Blade Shaft Lock Pin 60024-28
Inner Flange 60024-29
Outer Flange 60024-30
Blade Lock Nut 60024-31
Blade Guard 60024-32
Blade Guard Bolt 60024-33
Blade Guard Adjustment Knob 60024-34
Belt Guard Bracket 60024-35
Belt Guard 60024-36
Blade Shaft Lock 60024-37
Power Switch 60024-38
Circuit Breaker 60024-39
Waterproof Cover for Circuit Breaker 60024-40
Power Switch Housing 60024-41
Power Cord 60024-42
Motor 60024-43
Pulley 60024-44
Belt 60024-45
Single Socket 60024-46
Splash Guard Flap 60024-47
Rubber Mat for Front Extension Table 60024-48
Front Extension Table 60024-49
Rubber Mat for Side Extension Table 60024-50
Side Extension Table 60024-51
Miter Block 60024-52
45°, 90° Rip Guide 60024-53
Universal Wrench 60024-55
Water Pump 60095
10" Continuous Rim Wet Diamond Blade 6-1003CR
Specifications
Motor: 115V-60Hz
2HP
RPM: 3600 (single speed)
AMPS: 15
Blade Capacity: 10" (250mm) Continuous
Rim Wet
Arbor: 5/8" (16mm)
Weight: 100 lbs.
Square Cut: 24" (61cm)
Diagonal Cut: 17" (43cm)
Depth of Cut: 31⁄2" (8,9cm)
PARTS LIST
60024 MANUAL-tri.qxd:60024 MANUAL-tri.qxd 4/23/09 4:45 PM Page 10

- 11 -
EXPLODED PARTS
TABLE EXTENSION
FRONT
Easily slips onto the
leading edge of the
cutting table for
maximum support
when cutting
larger tile.
MITER BLOCK
TABLE EXTENSION SIDE
Easily slips onto the leading
edge of the cutting table for
maximum support when
cutting larger tile.
60024 MANUAL-tri.qxd:60024 MANUAL-tri.qxd 4/23/09 4:45 PM Page 11
/