Page is loading ...

[REVISION R] Form No. 343319 | ©2023 Dometic
SEASTAR INBOARD AND
STERNDRIVE CYLINDERS
Hydraulic Steering for Inboard and Sterndrive
Powered Vessels
Installation and User Manual — Book 2.1
EN

To the Installer and End
User (Owner)
Thank you for choosing SeaStar Steering Systems by Dometic. This
Installation and Owner’s Manual contains all the information that
you and others will require for the safe installation and use of your
steering system and MUST remain on board the boat. Throughout
this manual, information for the safe installation and operation of the
steering system will be distinguished in one of the following ways;
Failure to adhere to a warning may lead to loss of steering control.
Loss of steering control may result in unpredictable boat behavior,
leading to ejection from boat causing property damage, personal
injury and/or death.
Hazards or unsafe practices which could result in minor injury or
product or property damage.
Important information in regards to installation, use and maintenance
of the steering components.
NOTICE
CAUTION
WARNING Hazards or unsafe practices which could result in severe personal
injury or death.
These safety alerts alone cannot eliminate all of the hazards that
may be present while on the water. Dometic recommends that all
users of the steering system take an accredited ‘boating safety
course’, follow safe boating practices and are made aware of the
environment that they will be in.
Marine Canada Acquisition Inc. DBA SeaStar Solutions is referred to
as Dometic throughout this publication.
NOTICE

i
Safety Information
The safe operation of the steering system is dependant upon proper
installation and maintenance, common sense, safe judgment and
the knowledge/expertise of the operator. Every installer/user of the
steering system should know the following requirements 'before'
installing/using the steering system.
If you have any questions regarding any of these warnings, contact
Dometic.
To reduce risk of severe injury or death. Always wear a Coast Guard
Approved personal flotation device (PFD) and use an engine shut-off
cord (lanyard).
1. Read and understand the Installation and Owner’s Manuals
provided with your steering components.
2. Ensure that all components required to complete the installation
are on hand (including hoses, fittings, oil and the proper tools
required for the installation).
3. Substituting non SeaStar parts are not recommended as they
may compromise performance/reliability.
1. Install components as directed in all Installation Manuals
(including helm pumps, hoses and fitting kits).
2. DO NOT modify any component in any way without written
consent from Dometic.
3. Comply with all system ratings/regulations (boat/engine, U.S.C.G.).
- Cylinder MUST be compatible with engine(s) installed.
- Cylinder MUST be rated for use on the engine(s) installed.
- Cylinder MUST be able to withstand rudder loads.
4.
Confirm that there is no interference between the steering cylinder(s)
and any other object by performing the following steps:
Stern drive applications:
a) With cylinder installed, turn steering wheel from hard over to
hard over and confirm that no interference occurs.
- If using external mount cylinders, confirm no interference
with drive in UP/DOWN positions.
Inboard applications:
a) Confirm that cylinder(s) fully extend/retract prior to hitting any
installed rudder stops.
5. Confirm that the steering cylinder can be fully stroked in both
directions without stretching, chafing, rubbing and/or kinking of
the hydraulic hoses.
6. Where required, confirm that extruded nylon tubing has NOT been
substituted for SeaStar Steering Hose.
7. DO NOT use a wire coil type trim switch with a hydraulic steering
system as the wire can wind up tight around the steering wheel
shaft and prevent further steering.
8. Conduct System Proof Check as outlined on page 31 of this
manual.
Before installation
Installation
WARNING

ii
During use
After use
Maintenance
Prior to every use 1. Check Fluid level in highest helm pump (see page 31 for proper
fluid level setting).
2.
Verify immediate steering response when turning steering wheel(s).
(Ensure drive(s)/rudder(s) turns when steering wheel is turned.)
3. Visually inspect all steering hoses and fittings for wear, kinking
and/or leaks.
4. Check for binding, loose, worn or leaking steering components.
5. Ensure operator(s) have taken an 'accredited boating course'.
DO NOT OPERATE BOAT IF ANY COMPONENT IS NOT IN PROPER
WORKING CONDITION.
1. WEAR A COAST GUARD-APPROVED PERSONAL FLOTATION
DEVICE (PFD).
2. ATTACH ENGINE SHUT-OFF CORD (LANYARD) TO YOUR PDF.
3. Never allow anyone not familiar with the operation of the
steering system operate the boat at any time.
4. Know and adhere to the operator restrictions for your area
including;
- Federal Laws/Regulations,
- State Laws/Regulations and
- Municipal Laws/Regulations.
DO NOT OPERATE BOAT IF ANY COMPONENT IS NOT IN PROPER
WORKING CONDITION.
1.
Rinse off steering system thoroughly using 'fresh, clean water only'.
- Cleaning fluids containing ammonia, acids or any other corrosive
ingredients MUST NOT be used for cleaning any part of the
hydraulic steering system.
1.
Maintain steering system at a minimum of twice per year.
- See Routine Maintenance, page 32 of this manual.
Keep our waters clean for all current and future users. Dispose of
ALL fluids in accordance with your local regulations.
Safety Information Continued
WARNING

1
INTRODUCTION
Index
Safety Information ...................................................................... i
Introduction .............................................................................. 1
System Overview Diagram .......................................................... 2
Tools ........................................................................................ 3
Things You Need to Know .......................................................... 4
System Installation Overview ...................................................... 5
Cylinder Mounting: Inboard Ball Mount Models ............................ 6
Cylinder Mounting: Ball Joint Bracket Mount Cylinders ................ 12
Cylinder Mounting: Sterndrive Engine Mount Cylinders ............... 14
Hose and Tubing Installations .................................................. 21
Additional Stations, Autopilots & SeaStar Power Assist Units ..... 25
Manual Filling and Purging ....................................................... 26
Oil Level and System Proof Check ............................................ 31
Routine Maintenance .............................................................. 32
Troubleshooting Guide ............................................................. 33
Technical Information .............................................................. 36
Parts List ................................................................................ 37
Warranty ................................................................................. 45
Before proceeding with the installation, read THESE instructions and
ALL other instructions included with the rest of your system (helm
pumps, Power Assist etc). Dometic cannot accept responsibility for
installations where instructions have not been followed, where
substitute parts have been used, or modifications have been made
to our products. Warranty may be void if products other than
Dometic products are used within the system.
Due to a small amount of internal slip, a “Master Spoke” or
“centered” steering wheel cannot be maintained with a hydraulic
steering system. For best results, us an equal distance spoke
steering wheel.
DO NOT use a wire coil type trim switch with a hydraulic steering
system. Wire coil can wind up tight around the steering wheel
preventing further steering.
NOTICE
WARNING
The following steering cylinders are covered within this manual.
HC1503-3, HC5303-3, HC5312-3, HC5313-3, HC5314-3, HC5319-3,
HC5322-3, HC5323-3, HC5326-3, HC5328-3, HC5329-3, HC5330-3,
HC5331-3, HC5332, HC5339-3, HC5373-3, HC5386-3, HC6324-3,
HC5373-3.

2
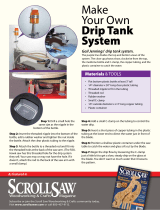
Typical Inboard
Steering System
FILL AND VENT
SYSTEM HERE
COMPENSATING LINE
SEASTAR
HOSE/TUBE
AND/OR
3/8" COPPER
TUBING
ROD END BALL JOINT
FITTING
IF COPPER TUBE IS USED FOR
GENERAL INSTALLATION, USE
CYLINDER HOSE KIT HERE.
TILLER ARM
PORT LINE (LEFT)
MOUNTING FOOT
CYLINDER
ADDITIONAL STEERING
STATION
STARBOARD LINE (RIGHT)
Figure 1. Overview.
THIS HELM MUST BE FITTED
WITH A NON-VENT PLUG.
FAILING TO DO SO WILL
RESULT IN AN OIL LEAK.
CAUTION
DO NOT attempt to install NPT
pipe fittings directly into -3
helms or -3 steering cylinder
hose fitting ports. Doing so will
lead to irreparable damage to
the helm/cylinder. ONLY use
ORB hose fittings provided by
Dometic.
CAUTION

3
TOOLS
You will need the following tools to complete your installation.
• 3" (77 mm) diameter Hole Saw or Key Hole Saw, for use with Front
Mount, Sport/Sport Plus Tilt helms.
• 5⁄16" (8 mm) dia. Drill.
• 7⁄16", 9⁄16", 5⁄8" and 3⁄4" Open End type Wrench/Spanner.
• 15⁄16" Socket.
Standard Helm Mounts
• Square Bezel Backmount, HA5418, 4-1 ⁄2" (115 mm) Hole Saw
• Round Bezel Backmount, HA5478, 4-3⁄8" (112 mm) Hole Saw
• Rear mount Helms, 1-1/6" (27 mm) drill
• Classic Tilt Helms, 4-1 ⁄2" (115 mm) Hole Saw
• 20° Wedge Kit HA5419
Optional Helm Mounts
20° Mount Wedge
• 4" (102 mm) Key Hole or Sabre Saw
• 5⁄16" (8 mm) dia. Drill
• 1⁄2" Wrench/Spanner, Box or Open End type
• 7⁄16" Socket and Drive
Cylinder, ATM and TM Models
• 3⁄4" Wrench/Spanner, Box or Open End type, 2 required.
Cylinder, Ball Joint Bracket Mount Models
• 3/4" Wrench/Spanner, Box or Open End type, 2 required.
Cylinder, Model HC5328-3 (125-8EM)
• 1-5⁄16" Wrench/Spanner, Open or Adjustable type.
Cylinder, Other Models
• No special tools required.
Additional Tools Needed
Do not remove protective caps from fittings and fitting ports until
hose or tube connections are made. Contaminants in the steering
system may cause premature wear and steering malfunctions.
CAUTION
Disposing of excess, left over, or used fluid. If the original oil bottle
is unavailable, dispose of the steering fluid in an environmentally
conscientious manner, adhering to local and federal environmental
regulations.
Always wear safety glasses and protective clothing when working
around hydraulic fluid and components.
NOTICE

4
THINGS YOU NEED TO KNOW
DO NOT use SeaStar PRO helms with ANY unbalanced steering
cylinder. Use of a PRO helm with an unbalanced cylinder will lead
to a lock up of the steering wheel preventing further steering
control, resulting in collision with an obstacle causing property
damage, personal injury and/or death.
SeaStar/SeaStar PRO Steering Hoses CANNOT be cut. Cutting
these hoses will render them useless and a new hose will be
required.
BEFORE beginning with this installation, confirm that ALL
components have been acquired to complete the installation,
including; helm pump(s), hose and tube, oil, pipe sealant and any
other component required. DO NOT USE Teflon tape. ONLY use a
“liquid”, Teflon based pipe sealant (such as Loctite® 542).
Take EXTREME care not to allow any foreign material or contamination
to enter the hydraulic steering system. Contamination is the main
cause of a hydraulic system to wear and or fail. Protect ALL
hose/tube ends until ready to make final connection to fitting.
Follow the maintenance procedures outlined on page 32 of this
manual as well as ALL other manuals included with the other
components of your steering system. Following these procedures,
in the time frame noted will keep you and your passengers safe
from the dangers that are present on the water. Failure to adhere
to ALL maintenance procedures included in ALL Installation and
Owner’s Manual may result in loss of steering control. Loss of
steering control may lead to unpredictable boat behavior, leading
to a collision with an obstacle and/or ejection from the boat,
resulting in property damage personal injury and/or death.
WARNING
WARNING
CAUTION
CAUTION
CAUTION
Study this manual and ALL other manuals provided with your SeaStar
Steering System carefully and thoroughly to familiarize yourself with
all of the components and their intended or required mounting
locations. Ensure there is adequate space available for installation
of ALL components, hydraulic lines and easy access for service. It
is good practice to mount all components first, before running hoses;
this ensures the least chance of an error in hose/tube to fitting
connections. If you must run hoses first a system of marking the
various lines must be used. ALL hose/tube ends MUST be closed
off with tape or similar material to prevent contamination. Read ALL
BOLD print text, notes, cautions and warnings; reading these now
will help prevent unexpected surprises during the installation.
These instructions have been made as complete as possible, but
as brief as practical. If you have any questions please phone
Dometic technical support @ 1.800.730.4082
Before Starting

5
SYSTEM INSTALLATION
OVERVIEW
STEP 1 System Installation
• Install your SeaStar helm pump(s) onto the dash using the
installation instructions provided with your helm pump(s).
DO NOT use a SeaStar PRO helm with an
unbalanced cylinder.
• Install steering cylinder as per the instructions on the following
pages.
Ensure that you follow the installation instructions
for YOUR Steering Cylinder.
• Install hose/tube as per the plumbing diagrams shown on
page 23.
HOSE
HELM
WARNING
NOTICE
STEP 2 Filling and Purging Procedures
• Manual purging: Refer to page 26 of this manual for bleeding
details.
• Power Purging: Refer to Power Purge Installation Manual.
STEP 3 System Proof Check
• The System Proof Check shown on page 31 of
this manual MUST be completed after installation. Doing so
will ensure the safe operation of your steering system. Any
fault (leaks or malfunction) will present itself during this
check. Failure to perform this check may result in loss of
steering control. Loss of steering control may lead to
unpredictable boat behavior, leading to a collision with an
obstacle and/or ejection from the boat, resulting in property
damage personal injury and/or death.
WARNING
CYLINDER

6
CYLINDER MOUNTING
Inboard Ball Mount Models
Proper cylinder mounting is CRITICAL to the successful operation of
your hydraulic steering system. An incorrectly installed cylinder WILL
lead to rapid seal and bearing wear as well as non-repairable damage.
Select the diagram and dimensional data that corresponds with your
cylinder model. Note, not all possible cylinder mounting configurations
are shown, however, all necessary dimensions are shown regardless
of mounting configurations.
If installing rudder stops, ensure that the cylinder(s) reach hard-
over BEFORE rudder stops are engaged.
General
Where applicable, cylinders should be secured with thru bolts,
NOT with lag screws. Failure to adhere to this warning may result
separation of steering components leading to loss of steering
control, which may result in unpredictable boat behavior, leading
to a collision with an obstacle and/or ejection from the boat,
resulting in property damage personal injury and/or death.
Cylinder hose/bleeder fittings must always be installed in the
uppermost position. If this is not possible the cylinder must be
disconnected from mount to allow the bleeder fittings to be in the
up-right position, then, once all air is removed the cylinder can be
re-installed. Leaving air in the system will drastically affect
performance of your steering system.
Protect cylinder shafts from nicks and scratches. A damaged
cylinder shaft can not be repaired and a new cylinder will need to
be purchased.
WARNING
CAUTION
CAUTION
All parts used are corrosion resistant, however with extended
operation under extremely corrosive conditions, corrosion may
occur and affected parts should be replaced.
In order to avoid excess steering loads and to optimize steering
performance, outdrive trim tabs must be adjusted in accordance
with the engine manufacturer’s instructions for specific boat/motor
combinations. Failure to do so will drastically change the
performance and handling characteristics of your boat.
CAUTION
Inboard Aluminum Ball
Mount Cylinder Models
HC5312-3
HC5313-3
HC5314-3
HC5319-3
HC5373-3
To minimize side loading of the cylinder rod and maximize cylinder
performance, it is important that the cylinder is installed as instructed.
The cylinder should be parallel to the transom, tiebar, or keel line
(depending on mounting configuration) when the cylinder rod is fully
extended or retracted.
1. Determine the mounting location for the cylinder. The method
depends on whether the tiller arm length is already set:
a) Tiller arm length is not set: Determine the tiller arm length
(dimension ‘A’) and foot bracket location (dimensions ‘B’ and
‘C’) from table 1. Figure 3 and figure 4 illustrate how to use
these dimensions to locate the cylinder.

Model Bore Stroke
Total Steering Angle
50° 60°70° 80°
ABABABAB
HC5312-3
C:18.88" 1.25" 7" 8.28" 6.38" 7.0 0" 4.94" 6.10" 3.87" 5.45" 3.05"
Torque 7806 in-lb Torque 6304 in-lb Torque 5198 in-lb Torque 4337 in-lb
HC5313-3
C:18.88" 1.35" 7" 8.28" 6.38" 7.0 0" 4.94" 6.10" 3.87" 5.45" 3.05"
Torque 8819 in-lb Torque 7123 in-lb Torque 5873 in-lb Torque 4901 in-lb
HC5314-3
C:18.88" 1.50" 7" 8.28" 6.38" 7.0 0 " 4.94" 6.10" 3.87" 5.45" 3.05"
Torque 10943 in-lb Torque 8838 in-lb Torque 7287 in-lb Torque 6081 in-lb
HC5319-3
C:20.10" 1.75" 7" 8.28" 5.51" 7.0 0" 4.06" 6.10" 3.00" 5.45" 2.17"
Torque 15206 in-lb Torque 12281 in-lb Torque 10126 in-lb Torque 8450 in-lb
HC5373-3
C:23.10" 1.75" 9" 10.65" 7.65" 9.00" 5.79" 7.85" 4.43" 7.0 0 " 3.36"
Torque 19551 in-lb Torque 1579 in-lb Torque 13020 in-lb Torque 10865 in-lb
Table 1.
Table 2.
7
B = A
2
1 – .5S
A– (D/2)
b) Tiller arm length is already set: draw an imaginary line through
the tiller arm hole at both hard over positions and align the
cylinder with this line, as shown in figure 2. Angles X and Y
should be the same at both hard over positions. Alternatively,
you can calculate dimension B from the equation below:
Where:
A is the tiller arm length
S is the stroke of the cylinder
D is the bracket hole spacing (see figure 3 and figure 4)
NOTE 1 HC5314-3 has the same bore and
stroke as the obsolete cylinder, but a
different mounting pattern. HC5319-3
has the same stroke and mounting
pattern as the obsolete cylinder, but the
larger bore will result in more system
turns lock to lock.
* The HC5314-3 uses a 1/2” rod end, if
replacing a ram with a 5/8” rod end use
HP6093 in addition.
NOTE 2 HC5373-3 has same stroke and
mounting pattern as the obsolete
cylinder, but the larger
bore will result in
more system turns lock to lock.
NOTE 3 The two new cylinders (HC5319-3,
HC5373-3) are both designed for use in
catamaran applications. Special “CAT”
cylinders are no longer required.
NOTE 4 All new cylinders use re-positionable
ORB bleed tee fittings.
Obsolete Cylinders Cylinder Replacement Notes
HC5318 BA150-7TM HC5319-3 or HC5314-3 1, 4
HC5319 BA175-7TM HC5319-3 4
HC5319-A BA175-7TM HC5319-3 4
HC5349 BA150-7TM c/w Tees HC5319-3 or HC5314-3 1, 4
HC5350 BA175-7TM c/w Tees HC5319-3 4
HC5355 BA150-7TM Clevis/Tee HC5319-3 or HC5314-3 1, 4
HC5356 BA175-7TM Clevis/Tee HC5319-3 4
HC5369 BA150-9TM HC5373-3 2, 4
HC5373 BA175-9TM c/w Tees HC5373-3 4
HC5318CAT BA150-7TM Catamaran HC5319-3 or HC5314-3 1, 3, 4
HC5319CAT BA175-7TM Catamaran HC5319-3 1, 3, 4

8
Figure 2.
TILLER ARM SHOWN IN HARD
OVER AND MIDSHIP POSITIONS
Y X
CENTER LINE FOR CYLINDER
MOUNT
Figure 3.
D = 2-1⁄4" (57 mm)
2-1⁄4"
(57 mm)
B
B-X
C
C
X
A
A
TILLER
ARM
Attachment to Tiller Arm,
recommended per ABYC.
1.56" (40 mm)
B
B-X
D = 4" (102 mm)
X
C
C
A
HC5319-3, HC5373-3
HC5312-3, HC5313-3, HC5314-3
A
Figure 4.

9
These cylinders are generally used in jet drive applications. ALL
warnings, cautions and notices shown on page 6 and this page are
to be followed to ensure safe operation of the steering system.
Dometic does not make a recommendation as to the installation to
a jet drive. The measurements shown below are used to assist with
the installation.
Jet Drive Cylinders:
HC1503-3 (BA150-3ATM),
HC5303-3 (BA125-3ATM)
HC6324-3 (BA150-3.5ATM)
RETRACTED = 12-1/4" (311 mm)
EXTENDED = 15-1/4" (387 mm)
MID-STROKE = 13-3/4" (349 mm)
HC1503-3 (BA150-3ATM) &
HC5303-3 (BA125-3ATM)
Figure 5.
2-1/4"
(57 mm) 1/2"
(13 mm)
HOLE
2-1/4"
(57 mm)
2. Fasten the rod end to the tiller arm using the supplied hardware.
Torque the nut according to the chart on page 36. If you use an
anti-seize lubricant, be sure to reduce the torque as instructed.
There must be at least two threads protruding past the nylon
locking insert on the nut.
3. Place mounting foot in the location determined in step 1. Shim
under the foot as necessary to make the cylinder as level as
possible. Vertical misalignment will accelerate cylinder wear.
There is NO adjustment for centering cylinder after installation.
Correct mounting is critical at this time.
4. Through-bolt the mounting foot to a substantial mounting structure
using stainless steel (type 304 or 316) capscrews, washers, and
self-locking nuts. Orient the fasteners such that if the nut were
to vibrate loose the fastener would not fall out. Cylinders with
1.5” and smaller bores require 5/16” (8 mm) fasteners, cylinders
with 1.75” bore require 3/8” (10 mm) fasteners. Torque the
fasteners according to the chart on page 36.
5. Before making hose connections, remove the caps from the fittings
and swing the rudder(s) back and forth to confirm there is free
movement of the cylinder. Check that there is no binding anywhere
through the stroke of the cylinder.
Any binding and or interference MUST be corrected prior to use.
Failure to do so may lead to separation of components and/or
prevention of steering control, leading to unpredictable boat
behaviour and/or a collision with an obstacle and/or ejection from
vessel resulting in property damage, personal injury and/or death.
CAUTION
WARNING

10
2-1/4"
(57 mm) 1/2"
(13 mm)
HOLE
RETRACTED = 12.485" (317 mm)
EXTENDED = 15.978" (406 mm)
MID-STROKE = 14.235" (362 mm)
2-1/4"
(57 mm)
HC6324-3 (BA150-3.5ATM)
Figure 6.
Inboard Brass Ball Mount
Cylinder Models:
HC5319-3 (BA175-7TM)
HC5373-3 (BA175-9TM)
1. To achieve MAXIMUM cylinder performance it is suggested that
an imaginary line is drawn though the tiller arm hole at both hard
over positions (see figure 7), this will create the “cylinder center
line”. With the tiller arm at hard over positions, angle X and Y
should be the same.
Figure 7.
TILLER ARM SHOWN IN HARD
OVER AND MIDSHIP POSITIONS
Y X
CENTER LINE FOR CYLINDER
MOUNT
2. Set rudder(s) in the fore and aft position and then attach rod
end ball joint to the tiller arm or tiebar.
3. Remove caps from cylinder hose fittings.
4. Extend cylinder rod to arrive at 21" (533 mm) or 23-1/4" (591 mm)
from center of rod end ball joint hole to the center of the mounting
foot. See figure 8.
CAUTION
NOTICE
NOTICE
In order to obtain a correct push and pull angle between the tiller arm
and cylinder, or tiebar and cylinder, the cylinder should be parallel
to the transom, tiebar or the keel line (depending on your mounting
configuration) when cylinder rod is fully extended (out) or fully retracted (in).
There is NO adjustment for centering cylinder after installation.
Correct mounting is critical at this time. Total cylinder travel is
7" or 9" (depending on your cylinder model)
For twin rudders, the cylinder may be mounted directly to the tiebar
or to one of the tiller arms. ENSURE all measurements remain the
same as if mounting to a rudder arm.

11
3-1⁄2" (89 mm) 1-9⁄16" (40 mm)
4-3⁄4"
(121 mm)
8"
4-1⁄4"
(108 mm)
4" (102 mm)
3" (76 mm)
21" (533 mm)
21" (533 mm)
6"
(152 mm)
(203 mm)
HC5318 (BA150-7TM)
6"
(152 mm)
HC5319 (BA175-7TM)
HC5369 (BA150-9TM)
HC5373 (BA175-9TM)
Figure 8.
WARNING
CAUTION
5. Secure mounting foot to transom or mounting bracket using
four 3/8” (10 mm) Grade 5 bolts (corrosion resistant) and self-
locking nuts.
6. BEFORE final hose/tube connection, swing rudder(s) back and
forth to ensure free movement of cylinder and that there is no
binding of the rod end ball joint.
Any binding and or interference MUST be corrected prior to use.
Failure to do so may lead to separation of components and/or
prevention of steering control. Separation of components or loss
of steering control may lead to a collision with an obstacle and/
or ejection from vessel resulting in property damage, personal
injury and/or death.
The cylinder ball mount allows up to 15° of movement MAX. Any
movement beyond 15° will result in premature seal and/or bearing wear.
29" (736 mm)
7-3⁄4"
(197 mm)
4-1/2"
(114 mm)
9"
(228 mm)23-3⁄4" (603 mm)

12
Ball Joint Bracket Mount Cylinders
These cylinders replace the Hynautic K-18 (HC5322-3) and K-19
(HC5323-3) steering cylinders.
These cylinders are not intended for use on any racing and/or
aggressive type applications.
Important Notes 1. At ALL times protect cylinder shafts from nicks and scratches. A
damaged cylinder shaft cannot be repaired and MUST be replaced.
2. To achieve MAXIMUM performance, cylinder is to be mounted at
a right angle (90°) to the rudder arm when in the center position
(refer to Figure 9 below).
3. Ball joint connections allow for no-load pivoting and minor
misalignment. Ball joint connections are NOT designed to handle
steering loads when significantly misaligned.
4. Mounting area MUST be able to withstand significant forces in
excess of 2000 lb. There must be NO binding or interference of
the ball joints at any point in the steering arc.
Figure 9. Correct Cylinder to Rudder Arm Mounting Orientation.
B
90°
PLANE 'A' TO BE PARALLEL TO PLANE 'B'.
(CYLINDER AND RUDDER ARM TO SWING
TOGETHER IN PARALLEL PANES.)
90°
A
RUDDER ARM IN
CENTERED POSITION
RUDDER
ARM
3/8" HOLES
1
MOUNTING BRACKET
(INCLUDED WITH
CYLINDER)
X
HC5322-3
MIDSTROKE 28" (711mm)
EXTENDED 31-1/2" (800 mm)
RETRACTED 24-1/2" (622 mm)
HC5323-3
MIDSTROKE 33.0" (838 mm)
EXTENDED 37-1/2" (953 mm)
RETRACTED 28-1/2" (724 mm)
CAUTION
NOTICE

13
INBOARD RUDDER ARM HOLE LOCATION
Total Rudder Arc Dimension – Center of Rudder arm to Center of bolt
HC5323-3 (9"stroke) HC5322-3 (7" stroke)
60 degrees 9" 7"
70 degrees 8" 6"
Table 3.
Cylinder Mounting – Rod
End to Tiller Connection
1. Determine rudder arm hole location using Table 3 below.
2. Lightly grease the bolts being installed into the rudder arm and
mounting bracket.
3. Assemble 1/2" x 2–1/4" bolt (item 2) and washers (items 3) into
rod end assembly and rudder arm, as shown in Figure 10.
4. Torque nuts (item 4, Figure 10) to 43 ft-lb (58.3Nm).
5. Place rudder in midstroke position and extend cylinder to mid
stroke (see Figure 9).
6. Temporarily install the other rod end into the mounting bracket
(item 1, Figure 9). Using the bracket as a template, mark off the
positions of the two 3/8" holes on the mounting surface.
7. Once the mounting location is chosen and marked, confirm that
there are no obstructions on the opposite side of the backing
surface and drill the required mounting holes.
8. Mount the bracket (item 1, Figure 9) with through bolts,
washers and nuts (not supplied by Dometic). DO NOT USE LAG
BOLTS.
9. Attach rod end to mounting bracket as described in Steps 3 & 4.
10. BEFORE final hose/tube connection, swing rudder back and
forth to ensure free movement of the cylinder and that the ball
joint connections are not binding.
RUDDER ARM
ROD END ASSEMBLY
2
3
3
4
Figure 10. Attaching Rod End Assembly to Rudder Arm.
Any binding and/or interference
MUST be corrected prior to use.
Failure to do so may lead to
separation of components and/or
prevention of steering control.
Separation of components and/or
prevention of steering control may
lead to unpredictable boat behavior
resulting in property damage,
personal injury and/or death.
WARNING

14
1. A support tube and/or cable support tube provided by the engine
manufacturer MUST be used for these three steering cylinders.
These cylinders are mounted to the sterndrives support/tube
guide support in the same manner as a steering cable.
2. Thoroughly lubricate support tube/cable guide tube, and cylinder
rod with a high quality, anti-corrosive type marine grease (such
as OMC Triple Guard or equivalent) BEFORE mounting cylinder to
support tube.
3. Slide well greased cylinder rod into and through well greased
support/cable guide tube and thread cylinder fully onto support
tube as shown below.
General
Figure 11. HC5328-3 (125-8EM) and HC5329-3 (125-8VEM), NOT for use with SeaStar PRO helm(s).
HC5328-3 = 17-1⁄4" (438 mm) MAX.
HC5329-3 = 21-5 ⁄8" (549 mm) MAX. 9" (228 mm)
INSTALLATION NOTICE
THIS CYLINDER REQUIRES 31” OF SPACE TO INITIALLY INSTALL.
IF 31” ISN’T AVAILABLE YOU CAN REMOVE THE MANUFACTURER’S
POWER STEERING RAM TO PRE-INSTALL THE DOMETIC CYLINDER.
SUPPORT TUBE & DRAG LINK PROVIDED
BY ENGINE MANUFACTURER
HC5328-3
(125-8EM)
HC5329-3
(125-8VEM)
Sterndrive Engine
Mounted Power Assisted
Steering Models
HC5328-3 (125-8EM)
HC5329-3 (125-8VEM)
Sterndrive Engine Mount Cylinders
DO NOT use SeaStar PRO helm(s) with an unbalanced cylinder.
Using a PRO helm with an unbalanced cylinder WILL lead to steering
wheel “lock-up”. Lock-up may lead to collision with an obstacle
resulting in property damage, personal injury and/or death.
WARNING
Sterndrive cylinders are designed for use, in conjunction with, the engine
manufacturer’s power steering system. DO NOT Install into an application
that does not use the engine manufacturers power steering.
NOTICE

15
Figure 12. HC5328-3 (125-8EM) Volvo, NOT for use with SeaStar PRO helm(s).
Figure 13. HC5328-3 (125-8EM) Yanmar, NOT for use with SeaStar PRO helm(s).
Figure 14. HC5328-3 (125-8EM), NOT for use with SeaStar PRO helm(s).
TYPICAL VOLVO ACTUATOR
HC5328-3 = 17-1⁄4" (438 mm)
INSTALLATION NOTICE
THIS CYLINDER REQUIRES 31” OF SPACE TO INITIALLY INSTALL.
IF 31” ISN’T AVAILABLE YOU CAN REMOVE THE MANUFACTURER’S
POWER STEERING RAM TO PRE-INSTALL THE DOMETIC CYLINDER.
TYPICAL ACTUATOR
HC5328-3 = 17-1⁄4" (438 mm)
INSTALLATION NOTICE
THIS CYLINDER REQUIRES 31” OF SPACE TO INITIALLY INSTALL.
IF 31” ISN’T AVAILABLE YOU CAN REMOVE THE MANUFACTURER’S
POWER STEERING RAM TO PRE-INSTALL THE DOMETIC CYLINDER.
TYPICAL YANMAR POWER ASSIST ACTUATOR
HC5328-3 = 17-1⁄4" (438 mm)
INSTALLATION NOTICE
THIS CYLINDER REQUIRES 31” OF SPACE TO INITIALLY INSTALL.
IF 31” ISN’T AVAILABLE YOU CAN REMOVE THE MANUFACTURER’S
POWER STEERING RAM TO PRE-INSTALL THE DOMETIC CYLINDER.
HC5328-3
(125-8EM)
HC5328-3
(125-8EM)
HC5328-3
(125-8EM)

16
HC5331-3 (92VPS) Referring to Figure 15 please observe the following:
• Rotate Cable Tube item 1 into threads of Item 2 until tight.
• Torque setscrew (item 7) to 90 in-lbs and tube insert (item 8)
until tight.
• Item 3 must pass through items 4 and 5 before being secured
by Item 6.
• Always mount cylinder in lower mount position of item 2 and
without spacer item 9, unless mechanical interference prevents
you from doing so.
• If using upper mount position, install spacer, item 9 below item 4.
CAUTION
Figure 15. HC5331-3 (92-VPS), NOT for use with SeaStar PRO helm(s).
The SeaStar HC5331-3 steering cylinder is NOT compatible with some
early model power steering rams. Although the cylinder will still mount
to these rams, loss of articulation and possible damage to the steering
ram may result. Please identify your power steering cylinder by
comparing your clevis bracket to the 4 drawings shown below. The
HC5331-3 IS compatible with units identified by figures 10 to 12,
it is
NOT compatible with the clevis bracket shown in figure 19.
NOTICE
Cut Clevis Pin, (item 3 Figure 15) to a length of 2" when mounting
cylinder in lower position.
4
6
1
5
3
2
8
7
9
NOTE:
If using upper
mount position,
install spacer,
item 9 below
item 4.
/