Page is loading ...

A
B
M16MI345 A04-06/18
EN MAINTENANCE MANUAL
FR NOTICE D’UTILISATION
NL HANDLEIDING
DE BEDIENUNGSANLEITUNG
TEMPCO RF CONTROL
(Deco_Delta)

SYNOPSIS
PRECAUTIONS .................................................................................................................................................................................................................................4
INTRODUCTION ..............................................................................................................................................................................................................................5
INSTALLATION .................................................................................................................................................................................................................................5
Location .............................................................................................................................................................................................................................................5
Electrical connection ....................................................................................................................................................................................................................5
Particular recommendations ..................................................................................................................................................................................................... 5
STARTING THE SYSTEM................................................................................................................................................................................................................6
Receiver .............................................................................................................................................................................................................................................6
Receiver indicator light status ................................................................................................................................................................................................... 6
Transmitter ......................................................................................................................................................................................................................................7
DESCRIPTI ON OF TRANSMITTER MODES (REMOTE CONTROL) ...................................................................................................................................
Confort ..............................................................................................................................................................................................................................................7
Auto .................................................................................................................................................................................................................................................... 7
Eco .......................................................................................................................................................................................................................................................8
Anti Frost ..........................................................................................................................................................................................................................................9
Vacation ............................................................................................................................................................................................................................................9
Boost ..................................................................................................................................................................................................................................................9
Timer Program operating mode ...............................................................................................................................................................................................10
Locking the keypad ........................................................................................................................................................................................................................11
Open window detection .............................................................................................................................................................................................................11
Factory settings .............................................................................................................................................................................................................................. 11
ADVANCED SETTINGS .................................................................................................................................................................................................................11
Fan installed ....................................................................................................................................................................................................................................11
Pairing menu ................................................................................................................................................................................................................................... 12
Ambient temperature, .................................................................................................................................................................................................................12
Adaptative Smart time ................................................................................................................................................................................................................12
Open window detection: ............................................................................................................................................................................................................12
Setpoint temperature. .................................................................................................................................................................................................................12
Radiator sensor / Remote control sensor ..............................................................................................................................................................................12
Setpoint temperature regulation ............................................................................................................................................................................................. 12
Limit the surface temperature .................................................................................................................................................................................................. 12
Room sensor calibration ..............................................................................................................................................................................................................12
Time ....................................................................................................................................................................................................................................................12
Reset your remote control, .........................................................................................................................................................................................................12
Software version, ...........................................................................................................................................................................................................................12
MAINTENANCE, REPAIR AND REMOVAL ............................................................................................................................................................................... 13
Important .........................................................................................................................................................................................................................................13
Cleaning ............................................................................................................................................................................................................................................ 13
Replacing remote control batteries ......................................................................................................................................................................................... 13
WARRANTY ......................................................................................................................................................................................................................................13
TECHNICAL DATA ...........................................................................................................................................................................................................................13
2
EN

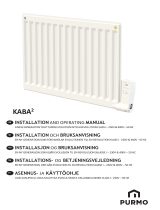
a- Comfort symbol
b- Auto symbol
c- Eco symbol
d- Anti-frost symbol
e- Vacation symbol
f- Boost symbol
g- Timer program symbol
h- Day of the week
i- Heating indicator
j- Fan indicator
k- Open window detection indicator
l- Battery low indicator
m- Indicator for WiFi transmission/paired with
radiator/paired with E3 program controller
(sold separately)
n- Timer program indicator (d1 to d9, U1 to U4)
o- Exemption indicator
p- Installer menu indicator
q- Screen locked indicator
r- 24-hr timer program indicator
s- Setpoint or ambient temperature indicator
t- Ambient temperature indicator
A
B
C
D E F
H I
J
K
L
M
G
N
O P
Q
R
S
T
Power adapter
(sold separately)
3
EN

CAUTION - CERTAIN PARTS OF THIS PRO-
DUCT CAN BECOME VERY HOT AND CAUSE
BURNS. YOU MUST PAY PARTICULAR ATTEN-
TION WHEN IN THE PRESENCE OF CHILDREN
AND VULNERABLE PEOPLE.
CHILDREN AGED BETWEEN 3 AND 8 YEARS
MUST ONLY SWITCH THE APPLIANCE ON OR
OFF ON CONDITION THAT IT IS PLACED OR
INSTALLED IN A NORMAL LOCATION AND
THE CHILDREN ARE PROPERLY SUPERVISED
OR HAVE BEEN INSTRUCTED IN PROPER SAFE
USE OF THE APPLIANCE AND FULLY UNDERS-
TAND THE POTENTIAL DANGERS IT REPRE-
SENTS. CHILDREN UNDER 3 YEARS SHOULD
BE KEPT AWAY FROM THE APPLIANCE UN-
LESS UNDER CONSTANT SUPERVISION. KEEP
THE APPLIANCE AND ITS CABLE OUT OF THE
REACH OF CHILDREN UNDER 8 YEARS.
CHILDREN AGED BETWEEN 3 AND 8 YEARS
MUST NOT CONNECT, ADJUST OR CLEAN
THE APPLIANCE, NOR PERFORM USER MAIN-
TENANCE. THIS APPLIANCE CAN BE USED BY
CHILDREN OF 8 YEARS AND ABOVE AND BY
PEOPLE WITH REDUCED PHYSICAL, SENSO-
RY OR MENTAL CAPABILITIES OR WITH NO
EXPERIENCE OR KNOWLEDGE, IF THEY ARE
PROPERLY SUPERVIZED OR IF THEY HAVE
BEEN GIVEN INSTRUCTIONS RELATING TO
SAFE USE OF THE APPLIANCE AND IF THE PO-
TENTIAL RISKS HAVE BEEN UNDERSTOOD.
CHILDREN MUST NOT PLAY WITH THE AP-
PLIANCE.
CLEANING AND MAINTENANCE BY THE
USER MUST NOT BE PERFORMED BY CHILD-
REN WITHOUT SUPERVISION. IF THE POWER
CABLE IS DAMAGED, IT MUST BE REPLACED
BY THE MANUFACTURER, ITS AFTER-SALES
SERVICE OR SIMILARLY QUALIFIED PERSONS
IN ORDER TO AVOID DANGER. A HEATING
APPLIANCE MUST NOT BE LOCATED DIREC-
TLY UNDER A POWER SOCKET. ALL MAIN-
TENANCE ON THE APPLIANCE MUST BE
CARRIED OUT WHEN SWITCHED OFF BY A
QUALIFIED PROFESSIONAL.
PRECAUTIONS
CONNECTION MUST BE MADE USING AN
OMNIPOLAR CIRCUIT BREAKER DEVICE.
CONTACTS MUST BE SEPARATED BY A DIS-
TANCE OF AT LEAST 3 MM.
TO AVOID OVERHEATING, DO NOT COVER
THE HEATING APPLIANCE! «DO NOT COVER»
MEANS FOR EXAMPLE THAT THE RADIATOR
MUST NOT BE USED TO DRY CLOTHES PLACED
DIRECTLY ONTO THE RADIATOR.
GESTION dES déchETS dES équIpEmENTS élEcTrIOuES ET
ÊLECTRONIOUES CONFORMÉMENT À LA DIRECTIVE
DEEE (2012/19/EU)
The symbol marked on the product’s label means
that the equipment must not be disposed of with
other waste, and that it is subject to selective collec-
tion aimed at its recovery, reuse or recycling. At the
end of its life, this equipment must be returned to
an appropriate collection point for the treatment of
electrical and electronic waste. By complying with
these principles and not throwing the product out
with other household waste, you are contributing to
conserving natural resources and protecting human
health. For any information concerning collection,
treatment, recovery and recycling points, please
contact your local authority or local waste collection
department, or even the retailer where you pur-
chased the equipment. This applies to the countries
in which this directive is in force.
4
EN

See the assembly instructions for attaching the radiator to the
wall. It is important that the thermostat is never placed directly
on the ground as there is a risk of breakage.
The remote control must preferably be installed on an interior
wall, at approximately 1.5 m from the ground, protected from wa-
ter spray, direct sunlight or any other direct thermal interference
such as a lamp, television set, heati ng pipe, draft , etc.
Electrical installati on must comply with local or
nati onal regulati ons. The radiator must be connected using the
original power cable att ached to the appliance. If the radiator
isinstalled in a bathroom or shower room, it must be protected
using a circuit breaker (RCD) with a nominal residual current
notexceeding 30 mA. The radiator must be connected by a
competent and quali ed electrician. Please refer to the cabling
diagram below.
LOCATION
INTRODUCTION
This appliance is a sealed electrical or mixed radiator designed
to be installed on a wall. It complies with NF-EN 60335-1 and EN
60335-2-30 standards as well as European EMC Directi ve 2014/30/
EU and Low Voltage Directi ve 2014/35/EU (CE labeling on all ap-
pliances). It is class II with IP44 protecti on index, and also complies
with European ECO Design Directive. This appliance is supplied
with a 3-wire power cable.
This radiator is tted with a 868.3 MHz radio-frequency receiver
(thermostat) which is designed to provide comfort and save ener-
gy. It is designed to be remote controlled by a transmitter (remote
control) with programmable digital display. This operati ng mode
using radio-frequency allows you to control several radiators, adjust
the ambient temperature directly or through the use of another
operati ng mode. It is possible to adjust the ambient temperature
via the sensor located in the transmitter or receiver.
By default, the temperature is adjusted by the sensor located in the
receiver.
INSTALLATION
PARTICULAR RECOMMENDATIONS
ELECTRICAL CONNECTION
Electric radiators (BAYO ONLY):
During operation, you may notice that some higher and lower ele-
ments are warmer than the rest of the radiator.
o Higher elements are not completely lled to allow expansion of
the heat-carrying liquid during the heating phase.
o Lower elements receive liquid returning aft er transmitting its
heat load.
5
EN

Receiver indicator light status
Operating mode
Indicator status
Radiator paused
Indicator status
Radiator Heating up
Standby Off
Confort Steady green Steady red
Eco Flashing green Flashing red-green
Anti-frost Slow ashing green Slow ashing red-
green
Confort -1°C (*) Double ashing green Double ashing
redgreen
Confort -2°C (*) Double slow ashing
green
Double slow ashing
red-green
Pairing mode Flashing Orange Flashing orange
Sensor fault or
Measured temp. > 35°C
Flashing red --
The RF receiver is tted with an independent regulation system which saves status informati on (start/standby) and tem-
perature setpoints to its memory. Storage of the last received setpoint ensures the temperature is still regulated even if
the transmitter is turned off or its batteries exhausted. Also note that during a power outage to the radiators, pairing does
not need to be reiniti alized.
Important: If your receiver is turned off , your radiator will not receive any commands from the remote control.
Status of 2c signal
Off Surface temperature limitation is not activated
Steady green Surface temperature limitation is not activated
Triple fast ashing red
IWiFi communications with transmitter indicator
Status of 2b and 2c signal
«2b» et «2c» ashing green alernately The receiver was sucessfully reset
«2b» et «2c» ashing orange alternately WiFi communications error
STARTING THE SYSTEM
RECEIVER
Connect your appliance to the electricity supply. Press butt on «B» located on the receiver at the bottom of the appliance
to start the radiator. Indicator light «A» is illuminated and you will hear 2 short «beep» sounds. Pressing button «B» again
will turn off your radiator and produce a long «beep» sound. Indicator light «A» goes out, and no communication with the
remote control is possible.
6
EN

Remove the protective ap from the remote control batt
eries. During rst startup, the appliance starts in comfort
mode. When changing at batteries and a long period has
elapsed (more than 2 minutes), the appliance starts in the
previous operating mode.
The rst step is to adjust the time on your remote control.
This adjustment can be made from any mode and at any
time.
Press and hold the OK butt on for 5 seconds unti l the time
appears. Release it then press the OK button again.
The hour gure ashes. Use the «+ or -» buttons to adjust
then press OK to accept.
The minute gure ashes. Use the «+ or -» buttons to ad-
just then press OK to accept.
The day of the week ashes. Use the «+ or -» buttons to
adjust then press OK to accept.
The date ashes. Use the «+ or -» buttons to adjust then
press OK to accept.
The month ashes. Use the «+ or -» buttons to adjust then
press OK to accept.
The year ashes. Use the «+ or -» buttons to adjust then
press OK to accept.
You will now be returned to the previous mode after accep-
ting the nal setting. The time, date and year are now set on
your remote control. They will be used in Auto and Vacation
modes.
Note: Setting the time is not necessary if your remote
control is paired with the E3 program controller (sold separa-
tely), as the time is automatically synchronized.
To view the adjusted time, press and hold the OK butt on for
5 seconds unti l the time appears. It will remain displayed for
10 seconds before returning to the previous mode.
Important: You can always cancel the last setti ng by pres-
sing the Back button. Also note that if the screen’s back-
ground light is not turned on, simply press any button to
activate it.
To establish communications between the transmitter (Re-
mote Control) and the receiver (Thermostat) follow the ins-
tructions below. This operation is also known as pairing. The
radiator must be turned on.
On the thermostat:
Press and hold butt on «B» on the thermostat for 5 seconds.
Indicator light «A» ashes orange slowly. This is the signal
to release button «B» as the radiator is now in pairing mode.
On the remote control:
1. Press and hold the OK butt on on the remote control for
10 seconds unti l the installer menu appears «bL no», the
symbol appears.
2. Press the « + » butt on once, «rF INI» appears on the
screen. You are now at the pairing menu.
TRANSMITTER
3. Press the «OK» butt on once, «INI» and the symbol
start ashing on the screen. Your radiator is currentl
4. You can pair another radiator by repeating the pre-
vious steps (On the thermostat and on the remote
control).
Note: You can access the installer menu from any
mode.
Important: If you have an E3 program controller (sold
separately) installed in your system, always pair the
remote control rst then the radiator in accordance
with the operati ng modes described above and in the
E3 instruction manual. Timer programming and vaca-
tion functions are handled by the E3 program control-
ler and these symbols disappear from the remote
control screen
COMFORT TEMPERATURE OPERATING
MODE
DESCRIPTION OF
TRANSMITTER
MODES (REMOTE CONTROL)
7
EN

AUTO TEMPERATURE OPERATING MODE
ECO TEMPERATURE OPERATING MODE
Designed to be used when people are occupying the room or
may soon be.
Select this mode using the "+ or -" buttons then press OK. The
temperature setpoint appears on the screen. To modifythis,
press the OK button again and the temperature ashes. Use
the "+ or -" butt on to adjust it then press OK to accept.
The ambient temperature appears for 10 seconds followed
again by the temperature setpoint. The temperature range can
be between 5.5°C and 30°C. A three-color visual behavior indi-
cator displays during adjustment to inform you which tempe-
rature ranges involve low, medium or high energy consumpti
on and allow you to save energy.
Green: Low consumption, temperature between 5.5°C and
19°C
Orange: Medium consumpti on, temperature between
19.5°C and 24°C
Red: High consumpti on, temperature between 24.5°C and
30°C
This visual indicator allows the user to be aware of the risk
of excessive energy consumpti on when setting the comfort
temperature.
The temperature you have set it to is the desired room tempe-
rature for this operating mode. You need to wait several hours
for the room temperature to become stable again.
Pressing the back button displays the ambient temperature in
the room for 10 seconds, the symbol also displays.
Designed to be used when people require automatic and
independent radiator operation as follows:
Priority 1: If the radiator is connected, control is via the
cable: Commands sent by EDF as part of an off -peak
contract such as Tempo or other "6 level" energy manager,
the temperature is adjusted based on the comfort mode
temperature setpoint.
Priority 2: The program currently set on the E3 program
controller (sold separately) if the remote control is paired
with it.
Priority 3: A program previously selected in program
mode on the remote control (d1 to d9, U1 to U9).
You can at any time change the temperature setpoint in
your program by pressing the OK butt on. The temperature
then ashes on the screen. Change it using the "+" and "-"
butt ons then press OK again to accept. In this case, you are
now in timer exemption and the symbol appears on the
screen. Pressing the butt on exits the exemption and re-
turns to the temperature setpoint for your program. If not,
the exemption exits automatically after 2 hours.
Pressing the back button displays the ambient temperature
in the room for 10 seconds, the symbol also displays.
Designed to be used when people are not occupying the
room or are unlikely to be.
Select this mode using the "+ or -" butt ons then press OK.
The temperature setpoint appears on the screen. To mo-
dify. this, press the OK butt on again and the temperature
ashes. Use the "+ or -" button to adjust it then press OK
to accept.
The ambient temperature appears for 10 seconds followed
again by the temperature setpoint. The temperature range
can be between 5.5°C and 19°C but always 0.5°C lower
than the comfort temperature.
The temperature you have set it to is the desired room
temperature for this operati ng mode. You need to wait
several hours for the room temperature to become stable
again.
Pressing the back butt on displays the ambient tempera-
ture in the room for 10 seconds, the symbol also displays.
8
EN

ANTI -FROST TEMPERATURE OPERATING
MODE
VACATION OPERATING MODE
BOOST OPERATING MODE
This mode prevents the system from freezing. It allows a mi-
nimum temperature to be maintained during a prolonged
absence.
Select this mode using the "+ or -" butt ons then press OK.
The temperature setpoint appears on the screen. To modify
this, press the OK butt on again and the temperature a-
shes. Use the "+ or -" button to adjust it then press OK to
accept.
The ambient temperature appears for 10 seconds followed
again by the temperature setpoint. The temperature range
can be between 5°C and 10°C.
Pressing the back butt on displays the ambient temperature
in the room for 10 seconds, the symbol also displays.
This function allows you to set your heating system to
your desired temperature while you are away and is set
using the following 4 steps:
1. Select this mode using the "+ or -" butt ons then press
OK. The temperature setpoint ashes on the screen.
Use the "+ or -" buttons to adjust the desired tempera-
ture to maintain during your absence and then press
OK to accept.
2. Now set the end date for your vacati on starting with
the month. Use "+ or - to adjust then press OK to ac-
cept. (Note: the year changes when you go below the
rst month or above the twelft h.).
3. Set the day your vacati on ends. Use «+ or -» to adjust
then press OK to accept.
4. Set the time your vacati on ends. Use «+ or -» to ad-
just then press OK to accept. (Note: set to hours only);
Your vacation end date appears on the screen and the
vacation symbol ashes
You can exit vacation mode at any time by pressing the
back button for 2 seconds. You will be returned to the
previous mode.
This function allows you to manage rapid tem-
perature increases in your radiator at any time
and for a dened period without modifying your
programs.
Select this mode using the "+ or -" buttons then
press OK. A period of 30 minutes ashes on the
screen. Use the "+ or «-" buttons to adjust the
desired period in steps of 10 minutes. The set pe-
riod range can be between 10 and 120 minutes.
Press OK to accept.
9
EN

TIMER PROGRAM OPERATING MODE
The boost period countdown appears on the screen
and the symbol
ashes. You can exit boost mode
at any time by pressing the back button. You will be
returned to the previous mode.
You can also access boost mode directly by pressing
the button
on the remote control from any mode
except
and . Then set the desired period and
accept as previously instructed.
This function allows you to set regulated tempera-
ture ranges according to the temperatures dened in
Comfort and Eco modes.
You will have a choice of 9 preset programs "d1" to
"d9" and 4 custom programs "U1" to "U4" to suit your
needs.
If you choose a preset program:
1. Select this mode using the "+ or -" buttons then
press OK,
2. "d1" appears on the screen
3. Press OK, "d1" ashes on the screen.
4. You can then choose another preset program using
the "+ or -" butt ons or keep this program. You have the
choice of 9 preset programs "d1" to "d9".
5. Press OK again to accept your choice. You will then
automati cally move into Auto mode (the temperature
setpoint and program number are displayed on the
screen).
List of preset programs and comfort mode operating
ranges.
o d1: Comfort mode all week.
o d2: Comfort mode 6:30 - 8:30 a.m. Monday to Friday
/ 8:30 - 10:30 a.m. at weekends.
o d3: Comfort mode 6:30 - 8:30 a.m. Monday to Friday
/ 8:30 - 10:30 a.m. and 7:00 - 9:00 p.m. at weekends.
o d4: Comfort mode 8:00 - 10:00 a.m. and 9:00 - 11:00
p.m. Monday to Friday / 9:00 - 11:00 a.m. and 9:00 -
11:00 p.m. at weekends.
o d5: Comfort mode 4:30 - 7:30 a.m. and 4:30 - 10:30
p.m. Monday to Friday / 7:00 - 11:00 p.m. at weekends.
o d6: Comfort mode 6:30 - 9:30 a.m. and 5:00 - 11:00
p.m. Monday to Friday / 8:00 a.m. - 11:00 p.m. at
weekends.
o d7: Comfort mode 6:30 - 8:30 a.m. and 12:00 - 2:00
p.m. and 5:00 - 11:00 p.m. Monday to Friday / 7:00 a.m.
- 11:00 p.m. at weekends.
o d8: Comfort mode 7:30 AM - 9:30 a.m. and 12:00 -
2:00 p.m. and 5:00 - 11:00 p.m. Monday to Friday / 8:00
a.m. - 11:00 p.m. at weekends.
o d9: Comfort mode 7:00 a.m. - 11:00 p.m. all week.
Notes: Preset ranges where your heating is in comfort
mode and the rest of the time in eco mode. Programs
d1 to d4 cover mainly radiators in a bathroom and pro-
grams d5 to d9 cover radiators in other rooms of the
house.
If you choose a custom program:
1. Select this mode using the "+ or -" buttons then press
OK,
2. "d1" appears on the screen
3. Press OK, "d1" ashes on the screen.
4. You can then choose a custom program using the "+
or -" buttons. You have a choice of 4 custom programs
"U1" to "U4".
5. Press and hold OK for 2 seconds to access the pro-
gramming mode directly. The time 00:00 and the Eco
symbol
ash on the screen. You can now customize
the program. You are at day 1 of the week (1=Monday).
6. Advance the time of day using the «+» button in steps
of 30 minutes to create your rs
t Eco mode period. Press
10
EN

LOCKING THE KEYPAD
FACTORY SETTINGS
OPEN WINDOW DETECTION
ADVANCED SETTINGS
OK. You just created your rst Eco period of the day.
Comfort ashes on the screen.
7. Advance the time of day using the «+» button in steps
of 30 minutes to create your rst Comfort mode period.
Press OK. You just created your rst Comfort period of the
day. Eco ashes on the screen.
8. Repeat the previous steps as many times are you wish
to create as many Eco and Comfort periods as you wish to
have in the same day.
9. When the timer programming reaches the end of the
day, 23:30 ashes. Press OK.
10. Day 2 (2=Tuesday) and CP YES appear on the screen.
You can choose to copy the day 1 program to day 2 or not.
11. If you choose to copy the program, press OK. Day 3
(3=Wednesday) and CP YES appear on the screen. Repeat
this step unti l you reach the last day of the week.
12. If you choose not to copy the program, press «+» or
«-», CP no now ashes on the screen. Press OK to accept
your choice. You will now have to repeat the programming
steps described above.
13. When you have nished programming the last day of
the week, you must save your program. SAVE appears on
the screen. Press OK to save it. You will then automatically
move into Auto mode. (The temperature setpointand pro
-
gram number are displayed on the screen).
Important: If you choose a program that has already pre
-
viously been customized but which you do not want to
modify, press OK to accept. You will automatically move
into Auto mode (The temperature setpoint and program-
number are displayed on the screen)
.
Notes: program ranges are displayed in a graphic at the
bott om of the screen and the time segment ashes. This
enables you to view an enti re day’s program.
Use this function to avoid making any changes to the
transmitt er setti ngs. To lock the keypad, press «+» and
«-» simultaneouslythen press OK The symbol is displayed
and the keypad is now locked. Repeat the same procedure
tounlock the keypad. The symbol disappears.
The symbol is visible on the screen and disappears
when you have deactivated this functi on in the ad-
vanced settings. When the thermostat detects an open
window, the radiator will switch temporarily to Anti
-frost mode and return toits previous operati ng mode
after the window has been closed.
To reset the thermostat press and hold button "B" for
20 seconds. The indicator light ashes orange and
then turns stable orange before nally going outcom-
pletely. Restart your thermostat by pressing button "B".
The indicator light will ash orange rapidly. Your ther-
mostat is now reset.
Your remote control has an installer menu which al-
lows you to modify various settings to suit your needs.
Press and hold the OK butt on on the remote control
for 10 seconds unti l the installer menu appears "bL
no", the symbol appears. Then press the "+ or -" but-
tons to move through the various setti ngs. You can
exit the installer menu at any time by pressing the
back button, or going down to the "End" setti ng to
exit and return to the previous mode.
Descriptions of the various settings:
o "bL no":
Fan is installed (certain radiator models), set to " no"
by default. To choose a diff erent setti ng, press OK,
" no" ashes, use the "+ or -" butt ons to change it to
"YES", press OK again to accept.
o "rF INI":
Pairing menu, press "OK" once, "INI" and the symbol
ash on the screen. Your radiator is currently pairing.
When the screen returns to the previous mode, your
rst radiator has been successfully paired.
o "tP no":
Display the ambient temperature, set to " no" by de-
fault. To choose a diff erent setting, press OK, " no"
ashes, use the "+ or -" to change it to "YES", press OK
again to accept. In this case, the ambient temperature
will always be displayed on the remote control screen
with the symbol and you will have to press to display
the setpoint temperature for 10 seconds.
o "At YES":
Adaptive start time. This function allows you to anti
cipate the starting of your system. You will reach the
setpoint temperature in the room at the desired time.
It is acti vated when your system changes from eco to
comfort in AUTO mode. It is set to "YES" by default. For
a diff erent setti ng, press OK, "YES" ashes. Use the
"+ or -" buttons to change it to "no". Press OK again to
accept. You have now deactivated the adaptive start
time function.
11
EN

o "oP YES":
Open window detection: when the thermostat detects
an open window, the radiator will switch temporarily
to Anti -frost mode and return to its previous operati
ng mode aft er the window has been closed. It is set
to "YES" by default. For a diff erent setti ng, press OK,
"YES" ashes. Use the "+ or -" buttons to change it to
"no". Press OK again to accept. When you deacti vate
the open window detecti on functi on, the symbol is no
longer displayed on the remote control.
o "t 30.0 °c":
For safety reasons, you can limit the setpoint tempera-
ture. The default setting is 30°C, but you can lower this
temperature down to 20°C. Press OK, " 30.0 °c" ashes.
Use the "+ or -" buttons to change it. Press OK again to
accept.
o "Sd EHt":
Sensor regulated temperature, set to " EHt" by default.
This means the radiator sensor is used to regulate the
temperature.
You can change this setting. Press OK, " EHt" ashes.
Use the "+ or -" butt ons to change it to "Int".
Press OK again to accept. You are now using the remote
control's sensor to regulate the temperature.
" EHt" = Radiator sensor "Int"= Remote control sensor
o "t 0.0 °c":
Setpoint temperature regulation: use this if you noti
ce a discrepancy between the setpoint temperature
and the ambient temperature indicated on the remote
control. This is set to 0.0°c by default. Press OK, " 0.0 °c"
ashes. Use the "+ or -" butt ons to change it. Press OK
again to accept. Setti ngs range between -3.0°C and
+3.0°C. Regulati on is only possible if you are using the
radiator's internal sensor to regulate the temperature:
" EHt" = Radiator sensor.
o "tS 100":
You can limit the surface temperature of your radiator
to 3 diff erent levels
100% 70% or 55% .
This function allows you to reduce the amount of heat
produced and must be taken into considerati on when
assessing a room's heati ng requirements. This is set
to 100% by default. To change this setti ng, press OK,
" 100 " ashes. Use the "+ or -" to change it. Press OK
again to accept. Following a change to this setti ng, the
symbol will appear diff erently on the screen of your
remote control.
o "AC no":
Room sensor calibrati on (sensor located on
your radiator). Calibrati on must be carried out
aft er one day's operati on at the same set-
point. Place a thermometer in the middle of
the room about 1.5 m above ground level and
note the temperature measured aft er 1 hour.
When going into the calibration setting for the
rst time, the display will show "no" to indi-
cate that calibrati on has not been done. Press
OK, and the temperature will ash. Enter the
temperature reading from your thermometer
using the "+ or -" butt ons, then accept your
setti ng by pressing OK. "AC YES" appears on
the screen. You have successfully completed
calibrati on. You can cancel the calibration and
return to "no" by pressing both "+" and "-" si-
multaneously.
Important note: A difference in temperature
that is too great can also mean that your re-
mote control is in the wrong place.
o "Ch YES":
Automati c switch to Daylight Saving Time and
back again, this is set to " YES" by default. You
can change it by pressing OK, " YES" ashes.
Use the "+ or -" butt ons to change it to "no".
Press OK again to accept. In this case, you will
have to change the ti me manually each sum-
mer and winter.
o "CL ":
Reset your remote control, return to default
factory setti ngs. Press and hold OK for 8 se-
conds. When all the icons are displayed on the
screen and the remote control ashes orange
once, your remote control has been successfully
reset. You will be returned to comfort mode at
19°C, and all custom ti mer programs U1 to U4
are cleared.
o "UE 0.1":
Soft ware version, for your information.
o " End":
Display shows "End". Press OK to exit the instal-
ler menu and return to the previous mode.
Note: When navigati ng inside the installer
menu, you can exit at any ti me and return to
the previous modeby pressing the back button
12
EN

MAINTENANCE, REPAIR
AND REMOVAL
CLEANING
REPLACING REMOTE CONTROL BATTERIES
WARRANTY
TECHNICAL DATA
Important: Before carrying out any maintenance work,
make sure the appliance is turned off .
To ensure the lifespan of your appliance, we recom-
mend carrying out these simple maintenance tasks.
o To clean the radiator, do not use abrasive or corrosive
products. Simply use warm, soapy water
o To clean the remote control, use a dry cloth without
any solvent.
When the battery low icon is displayed on the screen,
you must change the batt eries. Press down on the clip
located on the back of the remote control and push
forwards. Replace both batt eries with LR03 AAA alkaline
batt eries. Your remote control will save all your setti ngs,
except for the time.
This product is covered by a 10-year warranty except for
the electrical and electronic components which are cove-
red by a 2-year warranty.
Temperature measurement accuracy: 0.1°C
Temperature regulation accuracy: +/- 0.15°C
Temperature range:
o Comfort: 5.5°C to 30°C, temperature below the
safety temperature.
o Eco: 5.5°C to 19.0.0°C, temperature below the
comfort temperature setpoint.
o Anti -frost: 5.0°C to 10.0°C
Electrical protection:
o Thermostat: Class II - IP44
o Remote Control: Class III - IP31
Remote control batteries: 2 x LR03 AAA 1.5V alka-
line batteries
Operating temperature (Thermostat): -10°C to
+50°C
Storage temperature (Thermostat): -20°C to
+50°C
Humidity: Maximum 90% at 25°C
Radio signal transmission frequency: 868.3 MHz
Transmission range: 30 m / 150 m range out-
doors
13
EN

SOMMAIRE
MISE EN GARDE ..............................................................................................................................................................................................................................16
PRESENTATION ................................................................................................................................................................................................................................17
INSTALLATION .................................................................................................................................................................................................................................17
Emplacement .................................................................................................................................................................................................................................. 17
Raccordement électrique ............................................................................................................................................................................................................ 17
Recommandations particulières ..............................................................................................................................................................................................17
MISE EN ROUTE DE L INSTALLATION ......................................................................................................................................................................................18
Récepteur ..........................................................................................................................................................................................................................................18
Etat du voyant récepteur ............................................................................................................................................................................................................. 19
Emetteur ...........................................................................................................................................................................................................................................19
DESCRIPTION DES MODES DE L EMETTEUR (Télécommande) .....................................................................................................................................
Confort ..............................................................................................................................................................................................................................................19
Auto .................................................................................................................................................................................................................................................... 20
Réduit .................................................................................................................................................................................................................................................20
Hors Gel.............................................................................................................................................................................................................................................20
Vacances ...........................................................................................................................................................................................................................................21
Boost ..................................................................................................................................................................................................................................................21
Programmes ....................................................................................................................................................................................................................................21
Vérouillage du clavier ...................................................................................................................................................................................................................23
Détection de fenêtre ouverte ....................................................................................................................................................................................................23
Paramètres usine ...........................................................................................................................................................................................................................23
REGLAGES EXPERT .........................................................................................................................................................................................................................23
Présence d’un soufflant ...............................................................................................................................................................................................................23
Appairage .........................................................................................................................................................................................................................................23
Température ambiante ................................................................................................................................................................................................................ 23
Adaptative Smart time ................................................................................................................................................................................................................23
Détection fenêtre ouverte .......................................................................................................................................................................................................... 23
Limite température de réglage .................................................................................................................................................................................................23
Sonde radiateur / télécommande ............................................................................................................................................................................................24
Calibrage de la température ......................................................................................................................................................................................................24
Limite de la température de surface ....................................................................................................................................................................................... 24
Etalonnage de la sonde d’ambiance .......................................................................................................................................................................................24
Changement de l’heure ............................................................................................................................................................................................................... 24
Retour aux paramètres usine ....................................................................................................................................................................................................24
Version du logiciel .........................................................................................................................................................................................................................24
ENTRETIEN, REPARATION ET ELIMINATION ...........................................................................................................................................................................25
Important .........................................................................................................................................................................................................................................25
Nettoyage .........................................................................................................................................................................................................................................25
Remplacement des piles .............................................................................................................................................................................................................25
GARANTIE .........................................................................................................................................................................................................................................25
CARACTERISTIQUES TECHNIQUES ...........................................................................................................................................................................................25
14
FR

a- Symbole confort
b- Symbole auto
c- Symbole réduit
d- Symbole hors gel
e- Symbole vacances
f- Symbole boost
g- Symbole programmation
h- Jour de la semaine
i- Indicateur de chauffe
j- Indicateur soufflant
k- Indicateur détection fenêtre
ouverte
l- Indicateur piles usées
m- Indicateur transmission radio/ appairé à un
radiateur
/appairé à une centrale de
programmation E3(En option)
n- Indicateur programme(d1 à d9, U1 à U4)
o- Indicateur dérogation
p- Indicateur menu installateur
q- Indicateur écran verrouillé
r- Indicateur programme sur 24 H
s- Indicateur valeur de température réglée ou am
biante
t- Indicateur température ambiante
A
B
C
D E F
H I
J
K
L
M
G
N
O P
Q
R
S
T
Adaptateur secteur
(En option)
15
FR
FR

ATTENTION - CERTAINES PARTIES DE
CE PRODUIT PEUVENT DEVENIR TRÈS
CHAUDES ET PROVOQUER DES BRÛLURES.
IL FAUT PRÊTER UNE ATTENTION PARTICU-
LIÈRE EN PRÉSENCE D’ENFANTS ET DE PER-
SONNES VULNÉRABLES.
L
ES ENFANTS ÂGÉS ENTRE 3 ET 8 ANS DOIVENT UNIQUE-
MENT METTRE EAPPAREIL EN MARCHE OU À ARRÊT, À
CONDITION OUE CE DERNIER AT ÉTÉ PLACÉ OU INSTAL-
LÉ DANS UNE POSITION NORMALE PRÉVUE ET OUE CES
ENFANTS DISPOSENT D’UNE SURVEILLANCE OU AIENT
REÇU DES INSTRUCTIONS QUANT À L’UTILISATION DE
APPAREIL EN TOUTE SÉCURITÉ ET EN COMPRENNENT
BIEN LES DANGERS POTENTIELS.
IL CONVIENT DE MAIN-
TENIR À DISTANCE LES ENFANTS DE MOINS DE 3 ANS,
À MOINS OU’ILS NE SOIENT SOUS UNE SURVEILLANCE
CONTINUE. GARDEZ L’APPAREIL ET SON CÂBLE HORS DE
PORTÉE DES ENFANTS ÂGÉS DE MOINS DE 8 ANS.
LES ENFANTS ÂGÉS ENTRE 3 ANS ET 8 ANS NE DOIVENT
NI BRANCHER, NI RÉGLER, NI NETTOYER APPAREIL, ET NI
RÉALISER L’ENTRETIEN DE L’UTIUSATEUR. CET APPAREIL
PEUT- ÊTRE UTILISÉ PAR DES ENFANTS D’AU MOINS 8
ANS AINSI OUE DES PERSONNES AYANT DES CAPACITÉS
PHYSIQUES, SENSORIELLE SOU MENTALES RÉDUITES OU
DÉNUÉES D’EXPÉRIENCE OU DE CONNAISSANCE, S’ILS
(SI ELLES) SONT CORRECTEMENT SURVEILLÉ(E)S OU SI
DES INSTRUCTIONS RELATIVES À L'UTILISATION DE AP-
PAREIL EN TOUTE SÉCURITÉ LEUR ONT ÉTÉ DONNÉES ET
SI LES RISQUES ENCOURUS ONT ÉTÉ APPRÉHENDÉS.
LES
ENFANTS NE DOIVENT PAS JOUER AVEC APPAREIL
LE NETTOYAGE ET L’ ENTRETIEN PAR L’USAGER NE
DOIVENT PAS ÊTRE EFFECTUÉS PAR DES ENFANTS SANS
SURVEILJANCE.
SI LE CÂBLE D’ALIMENTATION EST EN-
DOMMAGÉ, IL DOIT- ÊTRE REMPACÉ PAR LE FABRICANT,
SON SERVICE APRÈS-VENTE OU DES PERSONNES DE
QUALIFICATION SIMI AIRE AFIN D'ÉVITER UN DANGER.
APPAREIL DE CHAUFFAGE NE DOIT PAS ÊTRE JUSTE EN
DESSOUS D’UNE PRISE DE COURANT, TOUTES LES INTER-
VENTIONS SUR APPAREIL DOIVENT-ÊTRE EFFECTUÉES
HORS TENSION ET PAR UN PROFESSIONNEL QUALIFIÉ.
LE RACCORDEMENT DEVRA ÊTRE EFFECTUÉ EN UTILI-
SANT UN DISPOSITIF DE COUPURE OMNIPOLAIRE. A
DISTANCE DE SÉPARATION DES CONTACTS DOIT-ÊTRE
D’AU MOI NS 3 MM.
AVERTISSEMENT
AFIN D’ÉVITER UNE SURCHAUFFE, NE PAS COUVRIR
L’APPAREIL DE CHAUFFAGE ! «NE PAS COUVRIR» SIGNI-
FIE PAR EXEMPLE QUE LE RADIATEUR NE DOIT PAS ÊTRE
UTILISÉ POUR SÉCHER DES VÊTEMENTS PLACÉS DIREC-
TEMENT EN CONTACT SUR LE RADIATEUR.
MISE EN GARDE
GESTION dES déchETS dES équIpEmENTS élEcTrIOuES ET
ÊLECTRONIOUES CONFORMÉMENT À LA DIRECTIVE
DEEE (2012/19/EU)
Le pictogramme sur l’étiquette du produit signie que l’équipement
ne peut être jeté avec les autres déchets, qu’il fait l’objet d’une col-
lecte sélective en vue de sa valorisation, réutilisation ou recyclage.
En n de vie, cet équipement devra être remis â un point de collecte
approprié pour le traitement des déchets électriques et électro-
niques. En respectant ces principes et en ne jetant pas le produit
dans les ordures ménagères, vous contribuerez à la préservation
des ressources naturelles et à la protection de la santé humaine.
Pour tous renseignements concernant les points de collecte, de
traitement, dévalorisation et de recyclage, veuillez prendre contact
avec les autorités de votre commune ou le service de collectes des
déchets, ou encore le magasin où vous avez acheté l'équipement.
Ceci s’applique aux pays dans lesquels ladite directive est entrée en
vigueur.
16
FR

Voir instruction de montage pour la xation du radiateur sur le
mur. Il est important que le thermostat ne repose jamais directe-
ment sur le sol: risque de casse.
La télécommande doit être installée de préférence sur un mur inté-
rieur, à environ 1.5m du sol, à l’abri des projections d’eau, du rayon-
nement solaire direct et de toute perturbation thermique directe
telle que lampe d’éclairage, téléviseur, tuyau de chauffage, courant
d’air…
L’installation électrique doit être conforme aux réglementation
locales ou nationales. Le radiateur doit être raccordé à l’aide du
câble d’alimentation d’origine xé à l’appareil. Si le radiateur est
installé dans une salle de bain ou une salle de douche, il doit être
protégé par un disjoncteur(RDC) avec un courant résiduel nominal
ne dépassant pas 30 mA. Le radiateur devra être raccordé par un
électricien compétent et qualié. Référez-vous schéma de câblage
ci-dessous.
EMPLACEMENT
PRESENTATION
Cet appareil est un radiateur électrique ou mixte étanche conçu
pour une installation au mur. Il est conforme aux normes NF- EN
60335-1 et EN 60335-2-30 ainsi qu’à la directive européen CEM
2014/30/UE et basse tension 2014/35/UE (marquage sur tous les
appareils CE), il est de classe II avec indice de protection IP44, il est
également conforme à la directive européen ECO Design. Cet appa-
reil est fourni avec un câble d’alimentation 3 ls.
Ce radiateur est équipé d’un récepteur (thermostat) fréquence
radio (868,3MhZ) qui est conçu pour vous fournir confort et éco-
nomies d’énergie. Il est destiné à être commandé par un émetteur
à distance(télécommande) à affichage digital programmable. Ce
mode de fonctionnement par fréquence radio permet de contrôler
plusieurs radiateurs, de régler la température ambiante directe-
ment ou par l’utilisation d’un autre mode de fonctionnement. Il est
possible de réguler la température ambiante via la sonde placée
dans l’émetteur ou le récepteur. Par défaut, la température est ré-
gulée par la sonde placée sur le récepteur.
INSTALLATION
RECOMMENDATIONS PARTICULIERES
RACCORDEMENT ELECTRIQUE
Radiateurs électriques gamme BAYO:
Au cours de l’utilisation, vous pourrez remarquer que les éléments
hauts et bas sont plus tièdes que le reste du radiateur.
Les éléments supérieurs ne sont pas complètement remplis pour
permettre le dilatation du uide caloporteur lors de la mise en
chauffe.
Les éléments bas reçoivent le retour du uide qui a transmis sa
chaleur.
17
FR

Etat du voyant du récepteur
Mode de
fonctionnement
Etat du voyant
Radiateur en pause
Etat du voyant
Radiateur en chauffe
Veille Eteint --
Confort Vert xe Rouge xe
Réduit Vert clignotant Rouge-vert clignotant
Hors gel Vert clignotant lent Rouge-vert clignotant
lent
Confort -1°C (*) Vert clignotant double Rouge-vert clignotant
double
Confort -2°C (*) Vert clignotant double
et lent
Rouge-vert clignotant
double et lent
Mode appairage Orange clignotant Orange clignotant
Défaut sonde ou
T°C mesurée > 35°C
Rouge clignotant --
(*): Ordres envoyés par EDF dans le cadre d’un abonnement Tempo ou par gestionnaire d’énergie types «6 ordres».
Status of 2c signal
Eteint La limitation de température de surface n’est pas activée
Vert xe La limitation de température de surface n’est pas activée
Clignotement 3 fois rouge rapide
Indicateur de communication radio avec l’emetteur
Status of 2b and 2c signal
Vert clignotant «2b» et «2c» alternativement Le récepteur a été réinitialisé
Orange clignotant «2b» et «2c» alternativement Erreur de communication radio
Le récepteur RF dispose d’un système de régulation autonome qui conserve en mémoire les informations d’état
(marche/veille) et de consigne de température. Le stockage de la dernière consigne reçue permet d’assurer la régula-
tion même si l’émetteur est éteint ou en cas de piles usées. Notez également qu’en cas de coupure de courant sur les
radiateurs, il n’est pas nécessaire de recommencer l’appairage.
Important: Si votre récepteur est éteint, votre radiateur ne recevra pas les ordres de la télécommande.
MISE EN ROUTE DE L INSTALLATION
RECEPTEUR
Raccordez votre appareil à l’installation électrique. Appuyez sur le bouton « B » situé sur le récepteur en bas de l’appa-
reil pour démarrer le radiateur. Le voyant « A » s’allume et vous entendez 2 « beep » sonores courts. Lorsque vous ap-
puyez à nouveau sur le bouton « B » vous éteignez votre radiateur et vous entendez un « beep » sonore long. Le voyant
« A » est éteint, pas de communication possible avec la télécommande.
18
FR

Retirez la languette de protection des piles de la télécom-
mande. Lors de la première mise en route, l’appareil démarre
en mode confort et lors d’un changement des piles usagées
après une longue durée (plus de 2 minutes), l’appareil dé-
marre et conserve le mode précédent.
La première étape consiste à régler l’heure sur votre télé-
commande. Le réglage peut s’effectuer à partir de tous les
modes et à tout moment.
Appuyez sur la touche OK pendant 5 secondes jusqu’à
apparition de l’heure, relâchez puis appuyez de nouveau
sur le bouton OK.
Les heures clignotent , utilisez les touches «+ ou- »pour
régler puis OK pour valider.
Les minutes clignotent , utilisez les touches «+ ou-
»pour régler puis OK pour valider
Le jour de la semaine clignote , utilisez les touches «+
ou- »pour régler puis OK pour valider
La date clignote, utilisez les touches «+ ou- »pour
régler puis OK pour valider
Le mois clignote, utilisez les touches «+ ou- »pour
régler puis OK pour valider
L’année clignote, utilisez les touches «+ ou- »pour
régler puis OK pour valider.
Vous retournez au mode précédent après la dernière valida-
tion. L’heure, la date et l’année sont maintenant réglées sur
votre télécommande, elles seront utiles pour les modes Auto
et Vacances
Remarque: Le réglage de l’heure n’est pas nécessaire lorsque
votre télécommande est appairée à la centrale de program-
mation E3 (En option) , la synchronisation de l’heure est
automatique.
Pour visualiser l’heure réglée appuyez sur la touche OK pen-
dant 5 secondes jusqu’à l’apparition de l’heure, elle restera
affichée pendant 10 secondes puis retour au mode précé-
dent.
Important: Il est toujours possible d’annuler son dernier
enregistrement en appuyant sur la touche Retour Notez
également que lorsque le rétro-éclairage de votre télécom-
mande est éteint, il suffit simplement d’appuyer sur une
touche pour rallumer.
Pour établir la communication entre l’émetteur (Télécom-
mande) et le récepteur (Thermostat) réalisez les opérations
suivantes, ces opérations sont également appelées appai-
rage. Le radiateur doit être demarré.
Sur le thermostat:
Appuyez et maintenez enfoncer le bouton «B» du thermos-
tat pendant 5 secondes. Le voyant «A» clignote lentement
en orange. C’est le signal pour relâcher le bouton «B», le
radiateur est maintenant en mode appairage.
EMETTEUR
Sur la télécommande :
1. Appuyez et maintenez enfoncer la touche
OK de la télécommande pendant 10s jusqu’à
apparition du menu installateur «bL no», le
symbole apparait.
2. Appuyez une fois sur la touche «+» ,« rF
INI»apparait sur l’écran, vous êtes sur le
menu appairage.
3. Appuyez une fois sur «OK» , «INI» et le sym-
bole clignotent sur l’écran, votre radia-
teur est en cours d’appairage, lorsque l’écran
revient au mode précédent, votre premier
radiateur est appairé.
4. Vous pouvez appairer un autre radiateur en
renouvelant les étapes précédentes (Sur le
thermostat et sur la télécommande).
Remarque: Il est possible d’accéder au menu installa-
teur à partir de tous les modes.
Important: Lorsque dans votre installation vous avez
une centrale de programmation E3 (En option) , ap-
pairé toujours en premier la télécommande puis le
radiateur suivant les modes opératoires décris précé-
demment et la notice de la centrale E3.
Les fonctions programmation
et vacances
sont reprises par la centrale de programmation E3, les
symboles disparaissent de l’écran de la télécommande
MODE DE FONCTIONNEMENT EN TEM-
PÉRATURE DE CONFORT
DESCRIPTION DES
MODES DE L EMETTEUR
19
FR

Destiné à être utilisé quand les personnes sont présentes
ou susceptibles d’être présentes dans la pièce.
Sélectionnez le mode à l’aide des touches «+ ou- »puis
OK, la température de réglage apparait à l’écran. Pour
modier, appuyez de nouveau sur OK, la température cli-
gnote, utilisez les touches «+ ou- »pour régler puis OK
pour valider, la température ambiante apparait pendant 10
secondes puis de nouveau la température réglée. La plage
de température peut être comprise de 5.5°C à 30°C. Un
indicateur visuel comportemental suivant trois couleurs
s’allume pendant votre réglage, il vous indique les plages
de température à faible, moyenne ou forte consommation
d’énergie et ainsi réaliser des économies d’énergie.
Couleur verte: Faible consommation, température de
5.5°C à 19°C
Couleur orange: Moyenne consommation, tempéra-
ture de 19.5°C à 24°C
Couleur rouge: Forte consommation, température de
24.5°C à 30°C
Cet indicateur visuel permet à l’utilisateur d’être conscient
du risque de consommation excessive d’énergie lors du
réglage de la température de confort.
La température que vous avez réglée est la température
désirée dans la pièce et dans ce mode de fonctionnement.
Vous devez attendre quelques heures pour que la tempéra-
ture dans la pièce soit de nouveau stable.
Un appui sur la touche retour fait apparaitre la tempé-
rature ambiante de la pièce pendant 10 secondes, le sym-
bole apparait également.
Destiné à être utilisé quand les personnes désirent un
fonctionnement automatique et autonome du radiateur
suivant:
Priorité 1: Le l pilote si le radiateur a été raccordé:
Ordres envoyés par EDF dans le cadre d’un abonne-
ment Tempo ou par gestionnaire d’énergie types «6
ordres», modications de la température à partir de la
température réglée en mode confort.
Priorité 2: Le programme de la centrale de program-
mation E3 (En option), si la télécommande est appai-
rée avec elle.
Priorité 3: Un programme préalablement sélectionné
dans le mode programme (d1 à d9, U1 à U9) de la
télécommande.
Vous pouvez à tout moment changer la température
réglée dans votre programme, appuyez sur la touche
OK , la température clignote sur l’écran, modiez à
l’aide des touches «+» et «-» , appuyez de nouveau
sur OK pour valider. Vous êtes dans ce cas en dérogation
et le symbole s’affiche sur l’écran. Un appui sur la
touche vous fait sortir de la dérogation et revenir
à la température réglée dans votre programme sinon la
dérogation disparait après 2 heures.
Un appui sur la touche retour fait apparaitre la tempé-
rature ambiante de la pièce pendant 10 secondes, le symbole
apparait également.
Destiné à être utilisé quand les personnes ne sont pas pré-
sentes ou peu probable d’être présentes dans la pièce.
Sélectionnez le mode à l’aide des touches «+ ou- »puis OK,
la température de réglage apparait à l’écran. Pour modier,
appuyez de nouveau sur OK, la température clignote, utili-
sez les touches «+ ou- »pour régler puis OK pour valider, la
température ambiante apparait pendant 10 secondes puis
de nouveau la température réglée. La plage de température
peut être comprise de 5.5°C à 19°C mais toujours inférieur
de 0.5°C par rapport à la température confort.
La température que vous avez réglée est la température dé-
sirée dans la pièce et dans ce mode de fonctionnement. Vous
devez attendre quelques heures pour que la température
dans la pièce soit de nouveau stable.
Un appui sur la touche retour fait apparaitre la tem-
pérature ambiante de la pièce pendant 10 secondes, le sym-
bole apparait également.
MODE DE FONCTIONNEMENT DE LA TEMPÉ-
RATURE EN AUTO
MODE DE FONCTIONNEMENT EN TEMPÉRA-
TURE RÉDUIT
MODE DE FONCTIONNEMENT EN TEMPÉRA-
TURE HORS GEL
20
FR
/