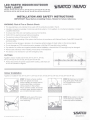
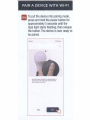
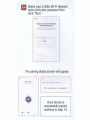
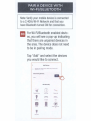
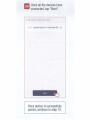
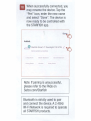
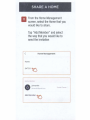
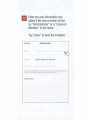
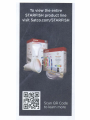
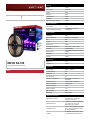
Satco 64-100 is an indoor LED RGBTW tape light perfect for adding a splash of color and ambiance to your home. With a length of 16 feet (5 meters), it's ideal for use under cabinets, behind furniture, or even on your walls. The strip is cuttable every 4.92 inches (125 mm), allowing for easy customization to fit your specific needs. Using the included IR remote or the Starfish app, you can control the strip's brightness, color temperature, and even set dynamic modes for a truly immersive experience.
Satco 64-100 is an indoor LED RGBTW tape light perfect for adding a splash of color and ambiance to your home. With a length of 16 feet (5 meters), it's ideal for use under cabinets, behind furniture, or even on your walls. The strip is cuttable every 4.92 inches (125 mm), allowing for easy customization to fit your specific needs. Using the included IR remote or the Starfish app, you can control the strip's brightness, color temperature, and even set dynamic modes for a truly immersive experience.


-
 1
1
-
 2
2
-
 3
3
-
 4
4
-
 5
5
-
 6
6
-
 7
7
-
 8
8
-
 9
9
-
 10
10
-
 11
11
-
 12
12
-
 13
13
-
 14
14
-
 15
15
-
 16
16
-
 17
17


Satco 64-100 is an indoor LED RGBTW tape light perfect for adding a splash of color and ambiance to your home. With a length of 16 feet (5 meters), it's ideal for use under cabinets, behind furniture, or even on your walls. The strip is cuttable every 4.92 inches (125 mm), allowing for easy customization to fit your specific needs. Using the included IR remote or the Starfish app, you can control the strip's brightness, color temperature, and even set dynamic modes for a truly immersive experience.
Ask a question and I''ll find the answer in the document
Finding information in a document is now easier with AI
Related papers
-
Satco 64-100 User guide
-
Satco StarFish User guide
-
-
Satco Starfish T20 User guide
-
Satco NUVO 0-10V User manual
-
Satco S11259 User manual
-
Satco S11260 Operating instructions
-
-
Satco S11261 Installation guide
-
Other documents
-
SATCO NUVO 64-100 User manual
-
-
-
Govee H61951A1 Operating instructions
-
Filament Design HD-S29336 Operating instructions
-
 Satco Products HID Lamps User manual
-
-
American Lighting SPKPL-BRD4-RGBTW-WH User manual
-
 Satco Products Fluorescent Ballasts User manual
-
LEDYI LY840-CSPRGB-W24 LED RGB Flexible CSP Strip Light Installation guide

