Page is loading ...

High Efficiency Solutions
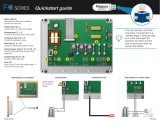
pRack pR300
NO POWER
& SIGNAL
CABLES
TOGETHER
READ CAREFULLY IN THE TEXT!
compressor rack controller
User manual


3
ENG
pRack +0300025EN rel. 1.3 - 17.12.2015
IMPORTANT
CAREL bases the development of its products on decades of experience in
HVAC, on the continuous investments in technological innovations to products,
procedures and strict quality processes with in-circuit and functional testing on
100% of its products, and on the most innovative production technology available
on the market. CAREL and its subsidiaries nonetheless cannot guarantee that all
the aspects of the product and the software included with the product respond
to the requirements of the fi nal application, despite the product being developed
according to start-of-the-art techniques.
The customer (manufacturer, developer or installer of the fi nal equipment) accepts
all liability and risk relating to the confi guration of the product in order to reach
the expected results in relation to the specifi c fi nal installation and/or equipment.
CAREL may, based on specifi c agreements, act as a consultant for the positive
commissioning of the fi nal unit/application, however in no case does it accept
liability for the correct operation of the fi nal equipment/system.
The CAREL product is a state-of-the-art product, whose operation is specifi ed in the
technical documentation supplied with the product or can be downloaded, even
prior to purchase, from the website www.CAREL.com.
Each CAREL product, in relation to its advanced level of technology, requires setup
/ confi guration / programming / commissioning to be able to operate in the best
possible way for the specifi c application. The failure to complete such operations,
which are required/indicated in the user manual, may cause the fi nal product to
malfunction; CAREL accepts no liability in such cases.
Only qualifi ed personnel may install or carry out technical service on the product.
The customer must only use the product in the manner described in the
documentation relating to the product.
In addition to observing any further warnings described in this manual, the
following warnings must be heeded for all CAREL products:
• Prevent the electronic circuits from getting wet. Rain, humidity and all types of
liquids or condensate contain corrosive minerals that may damage the electronic
circuits. In any case, the product should be used or stored in environments that
comply with the temperature and humidity limits specifi ed in the manual.
• Do not install the device in particularly hot environments. Too high temperatures
may reduce the life of electronic devices, damage them and deform or melt the
plastic parts. In any case, the product should be used or stored in environments
that comply with the temperature and humidity limits specifi ed in the manual.
• Do not attempt to open the device in any way other than described in the
manual.
• Do not drop, hit or shake the device, as the internal circuits and mechanisms
may be irreparably damaged.
• Do not use corrosive chemicals, solvents or aggressive detergents to clean the
device.
• Do not use the product for applications other than those specifi ed in the
technical manual.
All of the above suggestions likewise apply to the controllers, serial boards,
programming keys or any other accessory in the CAREL product portfolio.
CAREL adopts a policy of continual development. Consequently, CAREL reserves
the right to make changes and improvements to any product described in this
document without prior warning.
The technical specifi cations shown in the manual may be changed without prior
warning.
The liability of CAREL in relation to its products is specifi ed in the CAREL general
contract conditions, available on the website www.CAREL.com and/or by specifi c
agreements with customers; specifi cally, to the extent where allowed by applicable
legislation, in no case will CAREL, its employees or subsidiaries be liable for any
lost earnings or sales, losses of data and information, costs of replacement
goods or services, damage to things or people, downtime or any direct, indirect,
incidental, actual, punitive, exemplary, special or consequential damage of any
kind whatsoever, whether contractual, extra-contractual or due to negligence, or
any other liabilities deriving from the installation, use or impossibility to use the
product, even if CAREL or its subsidiaries are warned of the possibility of such
damage.
DISPOSAL
INFORMATION FOR USERS ON THE CORRECT HANDLING OF WASTE
ELECTRICAL AND ELECTRONIC EQUIPMENT (WEEE)
In reference to European Union directive 2002/96/EC issued on 27 January 2003
and the related national legislation, please note that:
1. WEEE cannot be disposed of as municipal waste and such waste must be
collected and disposed of separately;
2. the public or private waste collection systems defi ned by local legislation must
be used. In addition, the equipment can be returned to the distributor at the
end of its working life when buying new equipment;
3. the equipment may contain hazardous substances: the improper use or
incorrect disposal of such may have negative eff ects on human health and on
the environment;
4. the symbol (crossed-out wheeled bin) shown on the product or on the
packaging and on the instruction sheet indicates that the equipment has been
introduced onto the market after 13 August 2005 and that it must be disposed
of separately;
5. in the event of illegal disposal of electrical and electronic waste, the penalties
are specifi ed by local waste disposal legislation.
Warranty on the materials: 2 years (from the date of production, excluding
consumables).
Approval: the quality and safety of CAREL INDUSTRIES Hqs products are
guaranteed by the ISO 9001 certifi ed design and production system.
WARNING: separate as much as possible the probe and digital input signal
cables from the cables carrying inductive loads and power cables to avoid
possible electromagnetic disturbance.
Never run power cables (including the electrical panel wiring) and signal
cables in the same conduits.
NO POWER
& SIGNAL
CABLES
TOGETHER
READ CAREFULLY IN THE TEXT!
Key icone
NOTE: to bring attention to a very important subject; in
particular, regarding the practical use of the various
functions of the product.
IMPORTANT: to bring critical issues regarding the use of the
pRack pR300 to the attention of the user.
TUTORIAL: some simple examples to accompany the user in
confi guring the most common settings.


5
ENG
pRack +0300025EN rel. 1.3 - 17.12.2015
Content
1. INTRODUCTION 7
1.1 Main features ............................................................................................................................7
1.2 Components and accessories ........................................................................................7
1.3 Confi guration of the system and confi guration of the inputs ....................
and outputs ...............................................................................................................................8
2. HARDWARE CHARACTERISTICS AND INSTALLATION 9
2.1 pRack pR300 S, M, D, L board description ......................................................................9
2.2 Technical specifi cations ................................................................................................. 11
2.3 pRack pR300 S, M, D, L board dimensions ..........................................................16
2.4 pRack pR300 general connection diagram ........................................................ 17
3. INSTALLATION 22
3.1 General installation instructions ................................................................................ 22
3.2 Power supply .........................................................................................................................22
3.3 Universal inputs/outputs ................................................................................................22
3.4 Connecting the digital inputs ..................................................................................... 24
3.5 Connecting the analogue outputs .......................................................................... 25
3.6 Connecting the digital outputs .................................................................................. 25
3.7 pLAN electrical connections ........................................................................................ 26
4. START UP 27
4.1 Starting the fi rst time ........................................................................................................27
5. USER INTERFACE 29
5.1 Graphic terminal ........................................................................................................................
29
5.2 Description of the display ..............................................................................................29
5.3 Password ...................................................................................................................................31
5.4 Description menu ...............................................................................................................31
6. FUNCTIONS 33
6.1 Unit On-Off ..............................................................................................................................33
6.2 Control ....................................................................................................................................... 33
6.3 Compressors...........................................................................................................................36
6.4 Fans ..............................................................................................................................................42
6.5 Energy saving ........................................................................................................................44
6.6 Accessory functions ...........................................................................................................44
6.7 Settings ......................................................................................................................................50
6.8 Managing the default values ....................................................................................... 50
7. PARAMETERS TABLE 51
8. ALARMS 75
8.1 Alarm management .......................................................................................................... 75
8.2 Compressor alarms ............................................................................................................75
8.3 Pressure and prevent alarms ........................................................................................ 76
9. SUPERVISORY AND COMMISSIONING SYSTEMS 78
9.1 PlantVisor PRO and PlantWatch PRO supervisory systems .......................78
9.2 Commissioning software ...............................................................................................78
10. UPDATING THE SOFTWARE 79
10.1 Updating using pRack Manager ................................................................................ 79
10.2 Updating using SmartKey ..............................................................................................79
10.3 Pendrive: operating instructions ............................................................................... 79
10.4 Confi guring pCOWeb/pCOnet from a system screen ................................ 83
10.5 Saving parameters between diff erent software versions .......................... 84
11. APPENDIX 85

6
ENG
pRack +0300025EN rel. 1.3 - 17.12.2015

7
ENG
pRack +0300025EN rel. 1.3 - 17.12.2015
1. INTRODUCTION
1.1 Main features
pRack pR300 is the evolution of the pR100 electronic controller. The
consolidated software for management of compressor racks is combined
with new functions, on a totally upgraded hardware platform. Below are
the main functions (new and consolidated) and compressor management
features on pRack pR300.
1.1.1 pR300 functionality list
Main features
Direct management via Fieldbus, using either the built-in driver
(PRK300D*) or external driver, of one or two valves for the opera-
tion of heat exchangers typically used in subcritical systems (CO
2
)
Up to 2 suction line and 2 condensing line
Scroll, reciprocating, digital scroll and screw compressors management
Up to 12 scroll compressors, reciprocating for line
Up to 2 screw compressors for line 1, maximum one screw com-
pressors line
Fino a 2 compressori Bitzer CRII (massimo 1 per linea)
Up to 16 fans for line
Inverter for suctione and condensing line
Generic functions easily confi gurable (ON/OFF, modulations,
alarms, scheduler)
Heat recovery
Hardware
S, M, D, L version (based on pRack hardware)
External display (pGDE) or built-in display
Compressors
Up to 12 piston compressors per line, a maximum of 4 diff erent sizes
Up to 4 alarms per compressor
Inverter management, even with modulation inside the dead zone
Pump down
Control of overheating in suction
Languages Italian, English, German, French, Spanish, Russian, Portoguese, Swedish
Unit of
measure
Temperature: °C, °F
Pressure: barg, psig (all pressure values are also converted to
temperature)
Date format settable between: dd/mm/yy, mm/dd/yy, yy.mm.dd
Control
Proportional band (P, PI) available for compressors and fans
Neutral zone available for compressors and fans
Compressor
rotation
FIFO
LIFO
Timed
Fixed (the ON/OFF order can be set as required)
Scheduling by
calendar
Scheduling available: heating/cooling, 4 daily time bands, 5 special
periods (e.g.: closing period), 10 special days (e.g.: holidays)
Schedulable functions: set point compensation for compressors
and fans, split condenser (heating/cooling only), anti noise, heat
recovery, generic functions
Setpoint
Compensation from digital input, from scheduling, fl oating based
on supervisor parameter (compressors) or outside temperature
(fans)
Prevent High pressure, including activation of heat recovery or ChillBooster
Alarms
Automatic and manual management
Confi gurable compressor alarms
Double Signal on digital outputs for high or low priority alarms
Log from application
Supervisor
protocol
Carel
Modbus
£
Tab. 1.a
1.2 Components and accessories
The pRack pR300 is available in 4 hardware sizes listed in the table (for the
detailed description of each size, electrical characteristics and installation,
refer to Chapter 2):
Hardware sizes:
Size Available ana-
log inputs
Available
digital inputs
Available
analog
outputs
Available
digital
outputs
Small 5 8 4 8
Medium 8 14 4 13
Medium + Driver 8 14 4 13
Large 10 18 6 18
Tab. 1.b
For each size the following versions are available:
• with built-in terminal, without terminal
All pRack pR300 models are equipped with:
• integrated RS485 serial interface
• anthracite gray plastic cover
• connector kit
• USB.
pRack pR300 models
Code Description
PRK300S0F0 pRack pR300 small, USB, no display, BMS/FBUS opto, connector
kit,
PRK300S0E0 pRack pR300 small, USB, no display, BMS/FBUS opto, 2 SSR,
connector kit,
PRK300M0F0 pRack pR300 medium, USB, no display, BMS/FBUS opto,
connector kit,
PRK300M0E0 pRack pR300 medium, USB, no display, BMS/FBUS opto, 2 SSR,
connector kit,
PRK300D0F0 pRack pR300 medium, EVD EVO embedded for 2 univ. EXV, USB,
no display, BMS/FBUS opto, connector kit,
PRK300D0E0 pRack pR300 medium, EVD EVO embedded for 2 univ. EXV, USB,
no display, BMS/FBUS opto, 2 SSR, connector kit,
PRK300L0F0 pRack pR300 large, USB, no display, BMS/FBUS opto, connector
kit
PRK300L0E0 pRack pR300 large, USB, no display, BMS/FBUS opto, 6 SSR,
connector kit,
PRK300S3F0 pRack pR300 small, USB, display built-in, BMS/FBUS opto,
connector kit,
PRK300S3E0 pRack pR300 small, USB, display built-in, BMS/FBUS opto, 2 SSR,
connector kit,
PRK300M3F0 pRack pR300 medium, USB, display built-in, BMS/FBUS opto,
connector kit,
PRK300M3E0 pRack pR300 medium, USB, display built-in, BMS/FBUS opto, 2
SSR, connector kit
PRK300D3F0 pRack pR300 medium, EVD EVO embedded for 2 univ. exv, USB,
display built-in, BMS/FBUS opto, connector kit
PRK300D3E0 pRack pR300 medium, EVD EVO embedded for 2 univ. exv, USB,
display built-in, bms/fbus opto, 2 SSR, connector kit
PRK300L3F0 pRack pR300 large, USB, display built-in, BMS/FBUS opto,
connector kit
PRK300L3E0 pRack pR300 large, USB, display built-in, BMS/FBUS opto, 6 ssr,
connector kit
PRK300S3FK pRack pR300 small, USB, external display, BMS/FBUS opto,
connector kit
PRK300M3FK pRack pR300 medium, USB, external display, BMS/FBUS opto,
connector kit
PRK300D3FK pRack pR300 medium, EVD EVO embedded for 2 univ. EXV, USB,
external display, BMS/FBUS opto, connector kit
PRK300L3FK pRack pR300 large, USB, external display, BMS/FBUS opto,
connector kit
Tab. 1.c
Accessories:
Code Description
PGDERK0FX0 pGD evolution user terminal for pRack pR300T
CONVONOFF0 Module to convert a
0...10 V analog output to an SPDT digital output
PCOS004850 RS485 serial connection board
CVSTDUTLF0 USB/RS485 serial convertor with telephone connector
CVSTDUMOR0 USB/RS485 serial converter with 3-way terminal
PCOSO0AKY0 Smart Key programming key
S90CONN002 Connection cable for terminal 1=0.8m
S90CONN000 Connection cable for terminal 1=1.5m
S90CONN001 Connection cable for terminal 1=3 m
SPKT*R* and
SPKC00*
Ratiometric pressure probes 0…5 Vdc
SPK*C*, SPK1*,
SPK2*, SPK3*
Active pressure probes 4…20 mA
NTC* Pressure probe NTC -50T90°C
NTC*HT* Pressure probe NTC -0T150°C
EVD0000E50 EVD EVO universal driver for Carel valves, RS485/Modbus
TM
EVDIS00D*0 Display for EVD EVO
E2VCABS*00 EVD-valve connection cable
Tab. 1.d

8
ENG
pRack +0300025EN rel. 1.3 - 17.12.2015
1.3 Confi guration of the system and
confi guration of the inputs and outputs
pRack pR300 has the same system, input and output confi guration
management as the standard pRack pR100. It is available 22
confi gurations, but it is more ultilised those described in Appendix A.1.
Note: each input/output is completely confi gurable with the only
requirements being those set by the system confi guration. For
example, the suction pressure probe on line 1 can be arbitrarily confi gured
to any one of the analog inputs in the pLAN control board with address 1
compatible with the type of probe.
Refer Cap. 4, to have more ionformation about selection of confi guration
system and pre-confi guration and see Appendix A.1.
1.3.1 System confi gurations available
pRack pR300 can manage system confi gurations with up to 2 suction lines
(maximum 12 scroll or piston compressors for lines 1 and 2, maximum 2
screw compressors for line 1 and maximum 1 BitzerCRII compressor per
line), up to 2 condenser lines (maximum 16 fans per line). When there
are two suction lines, the 2 lines can be managed by the same pRack
board or by separate boards. The condenser lines can be managed by
the board controls the suction lines or by separate boards, depending on
the number of inputs/outputs available. For each suction and condenser
line, pRack pR300 can manage a modulating device (inverter, Digital
Scroll® compressor, compressor with continuous control or BitzerCRII
compressor). pRack pR300 manages up to 1 line with screw compressors,
and the board can control up to 2 compressors.
Some examples of managed system confi gurations are described below,
while for the complete list of confi gurations and its features refer to
Appendix A1.
Example 1: 1 suction line with scroll or piston compressors, 1 high
pressure line:
I/O
I/O
C1
NO1
NO2
NO3
C1
C4
NO4
NO5
NO6
C4
C7
NO7
C7
NO8
C8
NC8
G
G0
U1
U2
U3
GND
+VDC
+Vterm
GND
+5 VREF
U4
GND
U5
GND
VG
VG0
Y1
Y2
Y3
Y4
ID1
ID2
ID3
ID4
ID5
ID6
ID7
ID8
IDC1
J1
J24 J2 J3
J4 J5
J14
J10
J13J12
J15
FieldBus card BMS card
J11 pLAN
J25
BMS2
J26
FBus2
43 21
pR300
Fig. 1.a
Example 2: 2 suction lines on the same board with scroll or piston
compressors, 1 high pressure line:
I/O I/O
I/O
pR300
Fig. 1.b
Example 4: 2 suction lines on board (scroll or piston compressors), 2 high
pressure lines on the board):
I/OI/O
I/OI/O
pR300
Fig. 1.c
Example 4: 2 suction lines on separate boards (scroll or piston
compressors), 2 high pressure lines (on the fi rst suction line board):
I/O
I/O
I/O
I/O
pLAN
C1
NO1
NO2
NO3
C1
C4
NO4
NO5
NO6
C4
C7
NO7
C7
NO8
C8
NC8
G
G0
U1
U2
U3
GND
+VDC
+Vterm
GND
+5 VREF
U4
GND
U5
GND
VG
VG0
Y1
Y2
Y3
Y4
ID1
ID2
ID3
ID4
ID5
ID6
ID7
ID8
IDC1
J1 J24 J2 J3
J4 J5
J14
J10
J13J12
J15
FieldBus card BMS card
J11 pLAN
J25
BMS2
J26
FBus2
43 21
pR300
C1
NO1
NO2
NO3
C1
C4
NO4
NO5
NO6
C4
C7
NO7
C7
NO8
C8
NC8
G
G0
U1
U2
U3
GND
+VDC
+Vterm
GND
+5 VREF
U4
GND
U5
GND
VG
VG0
Y1
Y2
Y3
Y4
ID1
ID2
ID3
ID4
ID5
ID6
ID7
ID8
IDC1
J1 J24 J2 J3
J4 J5
J14
J10
J13J12
J15
FieldBus card BMS card
J11 pLAN
J25
BMS2
J26
FBus2
43 21
pR300
Fig. 1.d
Example 5: 2 suction lines on separate boards with scroll or piston
compressors, 2 high pressure line on separate boar
I/O
I/O
I/O
I/O
pLAN
pLAN
pLAN
C1
NO1
NO2
NO3
C1
C4
NO4
NO5
NO6
C4
C7
NO7
C7
NO8
C8
NC8
G
G0
U1
U2
U3
GND
+VDC
+Vterm
GND
+5 VREF
U4
GND
U5
GND
VG
VG0
Y1
Y2
Y3
Y4
ID1
ID2
ID3
ID4
ID5
ID6
ID7
ID8
IDC1
J1 J24 J2 J3
J4 J5
J14
J10
J13J12
J15
FieldBus card BMS card
J11 pLAN
J25
BMS2
J26
FBus2
43 21
pR300
C1
NO1
NO2
NO3
C1
C4
NO4
NO5
NO6
C4
C7
NO7
C7
NO8
C8
NC8
G
G0
U1
U2
U3
GND
+VDC
+Vterm
GND
+5 VREF
U4
GND
U5
GND
VG
VG0
Y1
Y2
Y3
Y4
ID1
ID2
ID3
ID4
ID5
ID6
ID7
ID8
IDC1
J1 J24 J2 J3
J4 J5
J14
J10
J13J12
J15
FieldBus card BMS card
J11 pLAN
J25
BMS2
J26
FBus2
43 21
pR300
C1
NO1
NO2
NO3
C1
C4
NO4
NO5
NO6
C4
C7
NO7
C7
NO8
C8
NC8
G
G0
U1
U2
U3
GND
+VDC
+Vterm
GND
+5 VREF
U4
GND
U5
GND
VG
VG0
Y1
Y2
Y3
Y4
ID1
ID2
ID3
ID4
ID5
ID6
ID7
ID8
IDC1
J1 J24 J2 J3
J4 J5
J14
J10
J13J12
J15
FieldBus card BMS card
J11 pLAN
J25
BMS2
J26
FBus2
43 21
pR300
C1
NO1
NO2
NO3
C1
C4
NO4
NO5
NO6
C4
C7
NO7
C7
NO8
C8
NC8
G
G0
U1
U2
U3
GND
+VDC
+Vterm
GND
+5 VREF
U4
GND
U5
GND
VG
VG0
Y1
Y2
Y3
Y4
ID1
ID2
ID3
ID4
ID5
ID6
ID7
ID8
IDC1
J1 J24 J2 J3
J4 J5
J14
J10
J13J12
J15
FieldBus card BMS card
J11 pLAN
J25
BMS2
J26
FBus2
43 21
pR300
Fig. 1.e
Note: nel caso di collegamento in pLAN di più schede pRack pR300,
non è possibile realizzare reti miste con schede di taglia Compact insieme
a schede di tipo S, M, L, mentre risultano possibili reti miste che utilizzino
combinazioni di queste ultime.
Important: all the boards connected to the pLAN must have the
same software revision.

9
ENG
pRack +0300025EN rel. 1.3 - 17.12.2015
2. HARDWARE CHARACTERISTICS AND INSTALLATION
2.1 pRack pR300 S, M, D, L board description
pRack pR300 S
C1
NO1
NO2
NO3
C1
C4
NO4
NO5
NO6
C4
C7
NO7
C7
NO8
C8
NC8
G
G0
U1
U2
U3
GND
+VDC
+Vterm
GND
+5 VREF
U4
GND
U5
GND
VG
VG0
Y1
Y2
Y3
Y4
ID1
ID2
ID3
ID4
ID5
ID6
ID7
ID8
IDC1
J1
J24 J2 J3
J4 J5
J14
J10
J13
J12
J15
FieldBus card BMS card
J11 pLAN
J25
BMS2
J26
FBus2
43 2 1
4
5
10
18
1
6
2
16 17
11
12
3
3
7
8
15
13 14
pR300
Fig. 2.a
pRack pR300 M
C1
NO1
NO2
NO3
C1
C4
NO4
NO5
NO6
C4
C7
NO7
C7
NO8
C8
NC8
NO12
C12
NC12
NO13
C13
NC13
C9
NO9
NO10
NO11
C9
G
G0
U1
U2
U3
GND
+VDC
+Vterm
GND
+5 VREF
U4
GND
U5
GND
VG
VG0
Y1
Y2
Y3
Y4
ID1
ID2
ID3
ID4
ID5
ID6
ID7
ID8
IDC1
U6
U7
U8
GND
ID9
ID10
ID11
ID12
IDC9
ID13H
ID13
IDC13
ID14
ID14H
J1
J24 J2 J3
J4 J5 J7
J8
J14
J10
J13
J12
J16
J17
J18
J15
J6
FieldBus card BMS card
J11 pLAN
J25
BMS2
J26
FBus2
43 21
4
5
1
6
2
3
3
3 8
9
7 8
10 13 14
11
12
15
pR300
16
18
17
Fig. 2.b
Legende:
Rif. Description Rif. Description
1 Power supply connector [G(+), G0(-)] 11 pLAN plug-in connector
2
+Vterm: power supply for additional terminal
+5 VREF power supply for ratiometric probes
12 Reserved
3 Universal inputs/outputs 13 Reserved
4 +VDC: power supply for active probes 14 Reserved
5 Button for setting pLAN address, second display, LED 15 Relay digital outputs
6
VG: power supply at voltage A(*) for opto-isolated analogue output
VG0: power to opto-isolated analogue output, 0 Vac/Vdc
16 BMS2 connector
7 Analogue outputs 17 FieldBus2 connector
8 ID: digital inputs for voltage A (*) 18 Jumpers for selecting FieldBus/ BMS
9
ID..: digital inputs for voltage A (*)
IDH..: digital inputs for voltage B (**)
10 pLAN telephone connector for terminal/downloading application
(*) Voltage A: 24 Vac or 28 to 36 Vdc; (**) Voltage B: 230 Vac - 50/60 Hz.
Tab. 2.a

10
ENG
pRack +0300025EN rel. 1.3 - 17.12.2015
pRack pR300 D
C1
NO1
NO2
NO3
A
B
CD
C1
C4
NO4
NO5
NO6
C4
C7
NO7
C7
NO8
C8
NC8
NO12
C12
NC12
NO13
C13
NC13
C9
NO9
NO10
NO11
C9
G
G0
U1
U2
U3
GND
+VDC
+Vterm
GND
+5 VREF
U4
GND
U5
GND
VG
VG0
Y1
Y2
Y3
Y4
ID1
ID2
ID3
ID4
ID5
ID6
ID7
ID8
IDC1
U6
U7
U8
GND
ID9
ID10
ID11
ID12
IDC9
ID13H
ID13
IDC13
ID14
ID14H
J1
J24 J2 J3
J4
J5
J7
J8
J14
J10
J13J12
J16
J17
J18
J15
J6
FieldBus card BMS card
J11 pLAN
J25
BMS2
J26
FBus2
43 2 1
4
5
1
6
2 3
3
3 8
9
7
8
10
11 12
15
18
16
17
13 14
J27
1
3
2
4
J28
1
3
2
4
VBAT
G0
G
J30
GND
VREF
S1
S2
S3
S4
DI1
DI2
J29
pR300
20
21
22
24
23
Fig. 2.c
Legende:
Ref. Description Ref. Description
1 Power supply connector [G(+), G0(-)] 13 Reserved
2
+Vterm: power supply for additional terminal
+5 VREF power supply for ratiometric probes
14 Reserved
3 Universal inputs/outputs 15 Relay digital outputs
4 +VDC: power supply for active probes 16 BMS2 connector
5 Button for setting pLAN address, second display, LED 17 FieldBus2 connector
6
VG: power supply at voltage A(*) for opto-isolated analogue output
VG0: power to opto-isolated analogue output, 0 Vac/Vdc
18 Jumpers for selecting FieldBus/ BMS
7 Analogue outputs 20 Electronic valve A connector
8 ID: digital inputs for voltage A (*) 21 Electronic valve B connector
9 ID..: digital inputs for voltage A (*); IDH..: digital inputs for voltage B (**) 22 Connector for external Ultracap module (accessory)
10 pLAN telephone connector for terminal/downloading application 23 Valve driver analogue and digital inputs
11 pLAN plug-in connector 24 Valve status signal LED
12 Reserved
(*) Voltage A: 24 Vac or 28 to 36 Vdc; (**) Voltage B: 230 Vac - 50/60 Hz.
Tab. 2.b
pRack pR300 L
C1
NO1
NO2
NO3
C1
C4
NO4
NO5
NO6
C4
C7
NO7
C7
NO8
C8
NC8
NO12
C12
NC12
NO13
C13
NC13
C9
NO9
NO10
NO11
C9
G
G0
U1
U2
U3
GND
+VDC
+Vterm
GND
+5 VREF
U4
GND
U5
GND
VG
VG0
Y1
Y2
Y3
Y4
ID1
ID2
ID3
ID4
ID5
ID6
ID7
ID8
IDC1
U6
U7
U8
GND
ID9
ID10
ID11
ID12
IDC9
ID13H
ID13
IDC13
ID14
ID14H
J1
J24 J2 J3
J4 J5 J7
J8
J20
J21
J14
J10
J13
J12
J22
J16
J17
J18
J15
J6
J19
NO14
C14
NC14
NO15
C15
NC15
C16
NO16
NO17
NO18
C16
ID15H
ID15
IDC15
ID16
ID16H
Y5
Y6
ID17
ID18
IDC17
U9
GND
U10
GND
FieldBus card BMS card
J23 FBus2
J11 pLAN
J25
BMS2
J26
FBus2
43 2 1
4
5
1
6
2
3 3
3
8
9
7 8
10
11 12
15
19
15 15
9
7
3 8
13 14
N.O. Model
N.C. Model
J22
C16
NC16
NC17
NC18
C16
pR300
18
16
17
Fig. 2.d
Legende:
Ref. Description Ref. Description
1 Power supply connector [G(+), G0(-)] 11 pLAN plug-in connector
2
+Vterm: power supply for additional terminal
+5 VREF power supply for ratiometric probes
12, 13, 14 Reserved
5 Button for setting pLAN address, second display, LED 15 Relay digital outputs
6
VG: power supply at voltage A(*) for opto-isolated analogue output
VG0: power to opto-isolated analogue output, 0 Vac/Vdc
16 BMS2 connector
7 Analogue outputs 17 FieldBus2 connector
8 ID: digital inputs for voltage A (*) 18 Jumpers for selecting FieldBus/ BMS
9 ID..: digital inputs for voltage A (*); IDH..: digital inputs for voltage B (**) 19 FieldBus2 connector
10 pLAN telephone connector for terminal/downloading application
(*) Voltage A: 24 Vac or 28 to 36 Vdc; (**) Voltage B: 230 Vac - 50/60 Hz.
Tab. 2.c

11
ENG
pRack +0300025EN rel. 1.3 - 17.12.2015
2.2 Technical specifi cations
2.2.1 Physical specifi cations
Dimensions
SMALL 13 DIN modules 110 x 227,5 x 60 mm
MEDIUM, LARGE, 18 DIN modules 110 x 315 x 60 mm
BUILT-IN DRIVER 18 DIN modules 110 x 315 x 75 mm
Plastic case
Assembly fi tted on DIN rail in accordance with DIN 43880 CEI EN 50022
Material technopolymer
Flammability V2 (UL94) and 850 °C (in accordance with IEC 60695)
Ball pressure test 125 °C
Resistance to creeping current ≥ 250 V
Colour White RAL 9016
Built-in terminal PGD1 (132x64 pixel) with backlit keypad
Other features
Operating conditions
PRK300*3**, PRK300*0**(w/o built-in terminal): -40T70 °C, 90% RH non-condensing(*)
PRK300*3*0 (with built-in terminal): -20T60 °C, 90% RH non-condensing
(*) with Ultracap module fi tted: -40T60°C
Storage conditions
PRK300D*** (w/o built-in terminal): -40T70 °C, 90% RH non-condensing
PRK300D*** (with built-in terminal): -30T70 °C, 90% RH non-condensing
Ingress protection
Models with USB port and/or with Ultracap module: IP20 on the front panel only
Models without USB port and without Ultracap module: IP40 on the front panel only
Environmental pollution 2
Class according to protection against electric shock
to be integrated into Class I and/or II appliances in the versions without valve driver,
class I in the versions with valve driver
PTI of the insulating materials PCB: PTI 250 V; insulating material: PTI 175
Period of stress across the insulating parts long
Type of action 1C; 1Y for SSR versions
Type of disconnection or microswitching microswitching
Heat and fi re resistance category Category D (UL94-V2)
Ageing characteristics (operating hours) 80,000
Number of automatic operating cycles 100,000 (EN 60730-1); 30,000 (UL 873)
Overvoltage category category II
Tab. 2.d
2.2.2 Electrical specifi cations
Power supply SMALL, MEDIUM, LARGE: use a dedicated 50 class II safety transformer VA.
BUILT IN DRIVER: use a dedicated 100 VA class II safety transformer.
Vac P (Vac) Vdc P (Vdc)
SMALL 24 Vac (+10/-15%),
50/60 Hz protected
by an external 2.5 A
type T fuse
45 VA 28 to 36 Vdc
(-20/+10%) protected
by an external 2.5 A
type T fuse
30 W
MEDIUM
LARGE
(EXTRALARGE)
BUILT-IN DRIVER
(DRIVER VALVE INTEGRATED)
90 VA Not allowed
Important: only power “PRK300TD***” with alternating current. The power transformer secondary must be earthed.
Terminal block with male/female plug-in connectors
Cable cross-section min 0.5 mm
2
- max 2.5 mm
2
CPU 32 bit, 100 MHz
Non-volatile memory (FLASH) 2 M byte Bios + 11 Mbyte application program
Data memory (RAM) 3.2 Mbyte (1.76 Mbyte Bios + 1.44 Mbyte application program)
T buff er memory (EEPROM) 13 kbyte
P parameter memory(EEPROM) 32 kbyte (not available to the pLAN)
Clock with battery standard, precision 100 ppm
Battery CR2430 3 Vdc lithium button battery (size 24x3 mm)
Software class and structure Class A
Category of immunity to voltage
surges (EN 61000-4-5)
Category III
Device not designed to be hand-held when powered
Tab. 2.e

12
ENG
pRack +0300025EN rel. 1.3 - 17.12.2015
2.2.3 Universal inputs/outputs U...
Analogue inputs,
Lmax = 30 m
(maximum number)
SMALL MEDIUM/ BUILT-IN
DRIVER/EXTRALARGE
LARGE
- CAREL NTC probes (-50T90°C; R/T 10 kΩ±1% at 25°C);
- HT NTC (0T150°C); - PTC (600Ω to 2200Ω)
- PT500 (-100T400°C) - PT1000 (-100T400°C)
58 10
- PT100 probes (-100T200°C)
2 3 (2 on U1...U5,
1 on U6...U8)
4 (2 on U1...U5,
1 on U6...U8, 1 su U9...U10)
- 0 to 1 Vdc/0 to 10 Vdc signals from probes powered by controller
max tot 5
5
max tot 8
6
max tot 10
6
- 0 to 1 Vdc/0 to 10 Vdc signals powered externally
58 10
- 0 to 20 mA /4 to 20 mA inputs from probes powered by the
controller
max tot 4
4
max tot 7
6
(max 4 on U1...U5,
3 on U6...U8)
max tot 9
6
(max 4 on U1...U5,
3 on U6...U8,
2 on U9...U10)
- 0 to 20 mA /4 to 20 mA inputs powered externally
47
(max 4 on U1...U5,
3 on U6...U8)
9
(max 4 on U1...U5,
3 on U6...U8,
2 on U9...U10)
- 0 to 5 V signals from ratiometric probes powered by controller
56 6
Input precision: ± 0.3 % f.s.
Time constant for each input: 0.5 s
Classifi cation of measuring circuits (CEI EN 61010-1): category I
Digital inputs w/o optical isolation,
Lmax = 30 m
(maximum number)
SMALL MEDIUM/ BUILT-IN
DRIVER/EXTRALARGE
LARGE
- voltage-free contacts 5 8 10
- fast digital inputs
type: voltage-free contact
max current: 10 mA
max frequency 2kHz and resolution ±1 Hz
max 2 4
(max 2 on U1...U5,
max 2 on U6...U8)
6
(max 2 on U1...U5,
max 2 on U6...U8,
2 on U9...U10)
Important:
• for active probes powered externally (0 to 1 V, 0 to 10 V, 0 to 20 mA, 4 to 20 mA ), to avoid irreparably damaging the controller, implement adequate current
protection measures that must ensure < 100 mA;
• the ratiometric probes can only be powered by the controller;
• on power-up, the universal inputs/outputs remain shorted to GND for around 500 ms until the end of the confi guration procedure.
Analogue outputs w/o optical isolation
(maximum number), Lmax = 30 m
SMALL MEDIUM/ BUILT-IN
DRIVER/EXTRALARGE
LARGE
0 to 10 Vdc (maximum current 2 mA)
58 10
PWM (output 0/3.3 Vdc, maximum current 2 mA, frequency: 2kHz
asynchronous)
58 10
Tab. 2.f
2.2.4 Power supply to probes and terminals
+Vdc
can be used to power any active probes using the 24/21 Vdc ± 10% (P+5*/P+3*) available at terminal +VDC (J2). The maximum current available is
150 mA, protected against short-circuits.
+5Vref to power the 0 to 5V ratiometric probes, use the 5 Vdc (± 5%) available at terminal +5VREF(J24). The maximum current available is 60 mA.
Vterm
P+3**********: 21 Vdc ± 10%; P+5**********: 24 Vdc ± 10%
Used to power an external terminal as an alternative to the one connected to J10, Pmax = 1.5 W
Important: if the length exceeds 10 m, use shielded cable with the shield connected to earth. In any case, the max length allowed is 30 m.
Tab. 2.g
2.2.5 Digital inputs ID... IDH...
Type Optically-isolated
Lmax 30 m
no. of optically-isolated
inputs, 24 Vac or 24 Vdc
no. of optically-isolated inputs, 24 Vac/Vdc or 230 Vac
- 50/60 Hz
Maximum number
SMALL 8 None
MEDIUM/ BUILT-IN DRIVER/EXTRALARGE 12 2
LARGE 14 4
Minimum digital input pulse
detection time
Normally open (open-closed-open) 200 ms
Normally closed (closed-open-closed) 400 ms
Power supply to the inputs External
IDH...: 230 Vac (+10/-15%) 50/60 Hz
ID...: 24 Vac (+10/-15%) 50/60 Hz o 28 to 36 Vdc (+10/-20%)
Classifi cation of measuring
circuits (CEI EN 61010-1)
Category I: 24 Vac/Vdc (J5, J7, J20)
Category III: 230 Vac (J8, J19)
Digital input current draw at 24 Vac/Vdc 5 mA
Digital input current draw at 230 Vac 5 mA
Tab. 2.h
Note:
• separate as much as possible the probe and digital input cables from cables to inductive loads and power cables, so as to avoid possible electromagnetic
disturbance. Never run power cables (including the electrical panel cables) and signal cables in the same conduits;
• the two 230 Vac or 24 Vac/Vdc inputs on terminals J8 (ID13, ID14) or J19 (ID15, ID16) have the same common pole and therefore both will operate at
230 Vac or 24 Vac/Vdc. There is basic insulation between the two inputs; there is reinforced insulation between the inputs and the rest of the controller;
• ID1...ID8, ID9 to ID12, ID17, ID18 have functional insulation from the rest of the controller;
• for DC voltage inputs (24 Vdc) either the + or the - can be connected to common terminal;
• the rating of the external contact connected to the digital inputs must be at least 5 mA.

13
ENG
pRack +0300025EN rel. 1.3 - 17.12.2015
2.2.6 Analogue outputs Y...
Type 0 to 10 V optically-isolated on Y1...Y6
Lmax 30 m
Maximum number
SMALL, MEDIUM/ BUILT-IN DRIVER 4 Y1...Y4, 0 to 10 V
LARGE 6 Y1...Y6, 0 to 10 V
Power supply external 24 Vac (+10/-15%) or 28 to 36 Vdc on VG(+), VG0(-)
Precision Y1...Y6 ± 2% full scale
Resolution 8 bit
Settling time Y1...Y6 from 1 s (slew rate 10 V/s) to 20 s (slew rate 0.5 V/s) selectable via SW
Maximum load 1 kΩ (10 mA)
Tab. 2.i
Warnings:
• for lengths > 10 m, only use shielded cable, with the shield connected to earth;
• a 0 to 10 Vdc analogue output can be connected in parallel to other outputs of the same type, or alternatively to an external source of voltage. The higher
voltage will be considered. Correct operation is not guaranteed if actuators with voltage inputs are connected;
• power the VG-VG0 analogue outputs at the same voltage on G-G0: Connect G0 to VG0 and G to VG. This is valid for both alternating and direct current
power supplies.
2.2.7 Digital outputs NO..., NC...
Type Relay. Minimum contact current: 50 mA.
Maximum no 8: SMALL; 13: MEDIUM/ BUILT-IN DRIVER; 18: LARGE;
Insulation distance
The relay outputs have diff erent features depending on the model of controller. The outputs can be divided into groups. The relays belonging
to the same group (individual cell in the table) have basic insulation and therefore must have the same voltage. Between groups (cells in the
table) there is double insulation and consequently these may have diff erent voltages. There is also double insulation between each terminal of
the digital outputs and the rest of the controller.
Relays with the same insulation
Group
Makeup of the
groups
Model 1 2 3 4567891011
SMALL 1...3 4...6 7 8 - - - ----
Type of relay Type A Type A Type A Type A - - - ----
MEDIUM/ BUILT-IN DRIVER 1...3 4...6 7 8 9...11 12 13 ----
Type of relay Type A Type A Type A Type A Type A Type A Type A ----
LARGE NO 1...3 4...6 7 8 9...11 12 13 14...15 16...18 --
Type of relay Type A Type A Type A Type A Type A Type A Type A Type A Type A --
LARGE NC 1...3 4...6 7 8 9...11 12 13 14...15 16...18 --
Type of relay Type A Type A Type A Type A Type A Type A Type A Type A Type C --
Number of
changeover
contacts
1: SMALL (relay 8)
3: MEDIUM (relay 8, 12, 13)
5: LARGE NO/NC (relay 8, 12, 13, 14 e 15)
Note: the output relays have diff erent features, depending on the model of controller.
Switchable power
Relay type A
Rated data SPDT, 2000 VA, 250 Vac, 8A resistive
Approval
UL 873 2 A 250 Vac resistive, 2A FLA, 12 LRA, 250 Vac, C300 pilot duty (30,000 cycles)
EN 60730-1 2 A resistive, 2A inductive, cosφ=0.6, 2(2)A (100,000 cycles)
Relay type B
Relay rated data SPST, 1250 VA, 250 Vac, 5A resistive
Approval
UL 873 1 A 250 Vac resistive, 1A FLA, 6 LRA, 250 Vac, C300 pilot duty (30,000 cycles)
EN 60730-1 1 A resistive, 1A inductive, cosφ=0.6, 1(1)A (100,000 cycles)
Relay type C
Relay rated data SPDT, 1250 VA, 250 Vac, 5A resistive
Approval
UL 873 1 A 250 Vac resistive, 1A FLA, 6 LRA, 250 Vac, C300 pilot duty (30,000 cycles)
EN 60730-1 1 A resistive, 1A inductive, cosφ=0.6, 1(1)A (100,000 cycles)
Tab. 2.a
2.2.8 SSR outputs (in models where featured)
Maximum number 2: SMALL (ouputs 7, 8); 2: MEDIUM (ouputs 7, 12); 6: LARGE (ouputs 7, 8, 12, 13, 14, 15)
Working voltage
24 Vac/Vdc
Load current (MAX) 1 A
Impulsive load current (MAX) 1.2 A
Tab. 2.j
Warnings:
• if the load requires higher current, use an external SSR;
• to power external resistive loads via SSRs, use the same power supply as the pRack (supplied to terminals G-G0), which must be dedicated and not shared by other
devices (contactors, coils, etc..);
• the groups that the digital outputs are divided into have two common pole terminals to simplify wiring;
• make sure that the current running through the common terminals does not exceed the rated current of an individual terminal, that is, 8 A.

14
ENG
pRack +0300025EN rel. 1.3 - 17.12.2015
2.2.9 Serial port - Use AWG 20-22 twisted pair shielded cable for the +/-
Serial Type/connectors Features
Serial ZERO pLAN/J10, J11
• Integrated on main board
• HW driver: asynchronous half duplex RS485 pLAN
• Not optically-isolated
• Connectors: 6-pin telephone jack + 3-pin plug-in p. 5.08
• Maximum length: 500 m
• Max data rate: 115200 bit/s
• Maximum number of connectable devices: 3
Serial ONE BMS 1 Serial Card
• Not integrated on main board
• HW driver: not featured
• Can be used with all pRack family optional BMS cards
Serial TWO FieldBus 1 Serial Card
• Not integrated on main board
• HW driver: not present
• Can be used with all pRack family optional FieldBus cards
Serial THREE BMS 2 / J25
• Integrated on main board
• HW driver: asynchronous half duplex RS485 Slave
• Optically-isolated
• 3-pin plug-in connector p. 5.08
• Maximum length: 1000 m
• Max data rate: 384000 bit/s
Serial FOUR FFieldBus 2 / J26 (and
J23 on Large and
Extralarge version)
• Integrated on main board
• J23: not optically-isolated
• J26: optically-isolated
• 3-pin plug-in connector p. 5.08
• J23 and J26 are independent.
Tab. 2.k
Note: in industrial/residential environments, for distances > 10 m, shielded cable is required, with the shield connected to earth. In residential environments (EN
55014), irrespective of the cable length, on versions without valve driver, the connection cable between the controller and the terminal and the serial cable must be
shielded and connected to earth at both ends.
2.2.10 Model with electronic expansion valve driver
Valve compatibility
CAREL: E*V****
ALCO: EX4; EX5; EX6; EX7; EX8 330 Hz (recommended by CAREL); EX8 500 Hz (from ALCO specifi cations)
SPORLAN: SEI 0.5-11; SER 1.5-20; SEI 30; SEI 50; SEH 100; SEH175
Danfoss: ETS 12.5-25B; ETS 50B; ETS 100B; ETS 250; ETS 400 CCM 40, CCM 10-20-30, CCMT 2-4-8
CAREL: two CAREL EXV as for EVD EVOLUTION TWIN
SPORLAN: SER(I) G, J, K
Motor connection
Shielded 4-wire cable CAREL P/N E2VCABS*00, or AWG22 shielded 4-wire cable Lmax =10 m,
or AWG14 shielded 4-wire cable Lmax 50 m
Digital input
connection
Digital input to be activated with voltage-free contact or transistor to GND.
Closing current 5mA; maximum length < 10 m
Sonde
Maximum length 10 m or less than 30 m with shielded cable
S1 ratiometric pressure probe (0 to 5 V) resolution 0.1 % fs measurement error: 2% fs maximum; 1% typical
electronic pressure sensor (4 to 20 mA) resolution 0.5 % fs measurement error: 8% fs maximum; 7% typical
combined ratiometric pressure probe (0 to 5 V) resolution 0.1 % fs measurement error: 2 % fs maximum; 1 % typical
4 to 20 mA input (max. 24 mA) resolution 0.5 % fs measurement error: 8 % fs maximum; 7 % typical
S2 low temperature NTC 10 kΩ at 25 °C, -50T90 °C measurement error: 1°C in the range -50T50 °C; 3°C in the range +50T90 °C
high temperature NTC 50 kΩ at 25 °C,-40T150 °C measurement error: 1.5 °C in the range -20T115°C, 4 °C in range outside of
-20T115 °C
combined NTC 10 kΩ at 25 °C,-40T120 °C measurement error: 1°C in the range -40T50 °C; 3°C in the range +50T90 °C
0 to 10 V input (max 12 V) resolution 0.1 % fs measurement error: 9% fs maximum; 8% typical
S3 ratiometric pressure probe (0 to 5 V): resolution 0.1 % fs measurement error: 2% fs maximum; 1% typical
electronic pressure sensor (4 to 20 mA) resolution 0.5 % fs measurement error: 8% fs maximum; 7% typical
combined ratiometric pressure probe (0 to 5 V) resolution 0.1 % fs measurement error: 2 % fs maximum; 1 % typical
4 to 20 mA input (max. 24 mA) resolution 0.5 % fs measurement error: 8 % fs maximum; 7 % typical
S4 low temperature NTC 10 kΩ at 25 °C,-50T105 °C measurement error: 1 °C in the range -50T50 °C; 3°C in the range 50T90 °C
high temperature NTC 10 kΩ at 25 °C,-40T150 °C measurement error: 1.5 °C in the range -20T115 °C; 4 °C in range outside of
-20T115 °C
combined NTC 10 kΩ at 25 °C, -40T120 °C measurement error 1 °C in the range -40T50 °C; 3°C in the range +50T90 °C
Power to active
probes (VREF)
programmable output: +5 Vdc ±2% or 12 Vdc ±10%, Imax = 50 mA
Emergency power
supply
optional Ultracapacitor module (PCOS00UC20 or EVD0000UC0). If the controller operates constantly at temperatures near the upper limit of
60°C it’s recommended to use the external module EVD0000UC0, where possible located in the coolest point of the panel. The PCOS00UC20
and EVD0000UC0 modules can be connected at the same time to the same controller, thus doubling the energy available to close the valves.
Important: The module only powers the valve driver and not the controller.
Tab. 2.l

15
ENG
pRack +0300025EN rel. 1.3 - 17.12.2015
2.2.11 Meaning of the inputs/outputs on the pRack pR300 S, M, L boards
Version Connector Signal Description
S, M, L
J1-1 G +24 Vdc or 24 Vac power supply
J1-2 G0 power supply reference
J2-1 B1 universal analogue input 1 (NTC, 0 to 1 V, 0 to 5 V ratiometric, 0…10 V, 0…20 mA, 4…20 mA)
J2-2 B2 universal analogue input 2 (NTC, 0 to 1 V, 0 to 5 V ratiometric, 0…10 V, 0…20 mA, 4…20 mA)
J2-3 B3 universal analogue input 3 (NTC, 0 to 1 V, 0 to 5 V ratiometric, 0…10 V, 0…20 mA, 4…20 mA)
J2-4 GND common for analogue inputs
J2-5 +VDC 21 Vdc power supply for active probes (maximum current 200 mA)
J3-1 B4 passive analogue input 4 (NTC, PT1000, ON/OFF)
J3-2 BC4 common for analogue input 4
J3-3 B5 passive analogue input 5 (NTC, PT1000, ON/OFF)
J3-4 BC5 common for analogue input 5
J4-1 VG power to optically-isolated analogue output, 24 Vac/Vdc
J4-2 VG0 power to optically-isolated analogue output, 0 Vac/Vdc
J4-3 Y1 analogue output no. 1, 0…10 V
J4-4 Y2 analogue output no. 2, 0…10 V
J4-5 Y3 analogue output no. 3, 0…10 V
J4-6 Y4 analogue output no. 4, 0…10 V
J5-1 ID1 digital input no. 1, 24 Vac/Vdc
J5-2 ID2 digital input no. 2, 24 Vac/Vdc
J5-3 ID3 digital input no. 3, 24 Vac/Vdc
J5-4 ID4 digital input no. 4, 24 Vac/Vdc
J5-5 ID5 digital input no. 5, 24 Vac/Vdc
J5-6 ID6 digital input no. 6, 24 Vac/Vdc
J5-7 ID7 digital input no. 7, 24 Vac/Vdc
J5-8 ID8 digital input no. 8, 24 Vac/Vdc
J5-9 IDC1 common for digital inputs from 1 to 8 (negative pole for DC power supply)
M, L
J6-1 B6 universal analogue input 6 (NTC, 0 to 1 V, 0 to 5 V ratiometric, 0…10 V, 0…20 mA, 4…20 mA)
J6-2 B7 universal analogue input 7 (NTC, 0 to 1 V, 0 to 5 V ratiometric, 0…10 V, 0…20 mA, 4…20 mA)
J6-3 B8 universal analogue input 8 (NTC, 0 to 1 V, 0 to 5 V ratiometric, 0…10 V, 0…20 mA, 4…20 mA)
J6-4 GND common for analogue inputs
J7-1 ID9 digital input no. 9, 24 Vac/Vdc
J7-2 ID10 digital input no. 10, 24 Vac/Vdc
J7-3 ID11 digital input no. 11, 24 Vac/Vdc
J7-4 ID12 digital input no. 12, 24 Vac/Vdc
J7-5 IDC9 common for digital inputs from 9 to 12 (negative pole for DC power supply)
J8-1 ID13H digital input no. 13, 230 Vac
J8-2 ID13 digital input no. 13, 24 Vac/Vdc
J8-3 IDC13 common for digital inputs 13 and 14 (negative pole for DC power supply)
J8-4 ID14 digital input no. 14, 24 Vac/Vdc
J8-5 ID14H digital input no. 14, 230 Vac
S, M, L
J9 8-pin telephone connector for connecting a display terminal (not used)
J10 6-pin telephone connector for connecting the standard pGDE user terminal
J11-1 RX-/TX- RX-/TX- connector for RS485 connection to the pLAN network
J11-2 RX+/TX+ RX+/TX+ connector for RS485 connection to the pLAN network
J11-3 GND GND connector for RS485 connection to the pLAN network
J12-1 C1 common for relays: 1, 2, 3
J12-2 NO1 normally open contact, relay no. 1
J12-3 NO2 normally open contact, relay no. 2
J12-4 NO3 normally open contact, relay no. 3
J12-5 C1 common for relays: 1, 2, 3
J13-1 C4 common for relays: 4, 5, 6
J13-2 NO4 normally open contact, relay no. 4
J13-3 NO5 normally open contact, relay no. 5
J13-4 NO6 normally open contact, relay no. 6
J13-5 C4 common for relays: 4, 5, 6
J14-1 C7 common for relay no. 7
J14-2 NO7 normally open contact, relay no. 7/ normally open contact, relay no. 7 SSR 24 Vac/Vdc (*)
J14-3 C7 common for relay no. 7
J15-1 NO8 normally open contact, relay no. 8/ only S-board: normally open contact, relay no. 8 SSR 24 Vac/Vdc, S board only (*)
J15-2 C8 common for relay no. 8
J15-3 NC8/--- normally closed contact relay no. 8/ only S-board: not used, S board only (*)
M, L
J16-1 C9 common for relay: 9, 10, 11
J16-2 NO9 normally open contact, relay no. 9
J16-3 NO10 normally open contact, relay no. 10
J16-4 NO11 normally open contact, relay no. 11
J16-5 C9 common for relay: 9, 10, 11
J17-1 NO12 normally open contact, relay no. 12/ normally open contact, relay no. 12 SSR 24 Vac/Vdc (*)
J17-2 C12 common for relay no. 12
J17-3 NC12/--- normally closed contact relay no. 12/ not used (*)
J18-1 NO13 normally open contact, relay no. 13 / normally open contact, relay no. 13 SSR 24 Vac/Vdc (*)
J18-2 C13 common for relay no. 13
J18-3 NC13 normally closed contact relay no. 13 / not used (*)
L
J19-1 ID15H digital input no. 15, 230 Vac
J19-2 ID15 digital input no. 15, 24 Vac/Vdc
J19-3 IDC15 common for digital inputs 15 and 16 (negative pole for DC power supply)
J19-4 ID16 digital input no. 16, 24 Vac/Vdc
J19-5 ID16H digital input no. 16, 230 Vac
J20-1 Y5 digital input no. 5 0…10 V
J20-2 Y6 digital input no. 6 0…10 V
J20-3 B9 passive analogue input 9 (NTC, PT1000, ON/OFF)
J20-4 BC9 common for analogue input 9
J20-5 B10 passive analogue input 10 (NTC, PT1000, ON/OFF)

16
ENG
pRack +0300025EN rel. 1.3 - 17.12.2015
Version Connector Signal Description
L
J20-6 BC10 common for analogue input 10
J20-7 ID17 digital input no. 17, 24 Vac/Vdc
J20-8 ID18 digital input no. 18, 24 Vac/Vdc
J20-9 IDC17 common for digital inputs 17 and 18 (negative pole for DC power supply)
J21-1 NO14 normally open contact, Relais no. 14/ normally open contact, Relais no. 14 SSR 24 Vac/Vdc (*)
J21-2 C14 common for Relais no. 14
J21-3 NC14/--- normally closed contact Relais no. 14/ not used (*)
J21-4 NO15 normally open contact, Relais no. 15/ normally open contact, Relais no. 15 SSR 24 Vac/Vdc (*)
J21-5 C15 common for Relais no. 15
J21-6 NC15/--- normally closed contact Relais no. 15/ not used (*)
J22-1 C16 common for Relais: no. 16, 17, 18
J22-2 NO16 normally open contact, Relais no. 16
J22-3 NO17 normally open contact, Relais no. 17
J22-4 NO18 normally open contact, Relais no.18
J22-5 C16 common for Relais: no. 16, 17, 18
J23-1 E- E- terminal for RS485 connection to the I/O expansion modules (not used)
J23-2 E+ E+ terminal for RS485 connection to the I/O expansion modules (not used)
J23-3 GND GND terminal for RS485 connection to the I/O expansion modules (not used)
L
J23-1 E- E- terminal for RS485 connection to the I/O expansion modules (not used)
J23-2 E+ E+ terminal for RS485 connection to the I/O expansion modules (not used)
J23-3 GND GND terminal for RS485 connection to the I/O expansion modules (not used)
S, M, L, D
J24-1 +V term additional power supply terminal Aria (not used)
J24-2 GND power supply common
J24-3 +5 Vref power supply for 0/5 V ratiometric probes
J25-1 E- E- terminal for RS485, BMS2 connection
J25-2 E+ E+ terminal for RS485, BMS2 connection
J25-3 GND GND terminal for RS485, BMS2 connection
J26-1 E- E- terminal for RS485, FIELDBUS 2 connection
J26-2 E+ E+ terminal for RS485, FIELDBUS 2 connection
J26-3 GND GND terminal for RS485, FIELDBUS 2 connection
D
J27-1 1 ExV connection, stepper motor power supply
J27-2 2 ExV connection, stepper motor power supply
J27-3 3 ExV connection, stepper motor power supply
J27-4 4 ExV connection, stepper motor power supply
J28-1 1 ExV connection, stepper motor power supply
J28-2 2 ExV connection, stepper motor power supply
J28-3 3 ExV connection, stepper motor power supply
J28-4 4 ExV connection, stepper motor power supply
J29-1
GND
Earth for the signals
J29-2
VREF
Active probe power supply
J29-3
S1
Probe 1 (pressure) or external signal 4…20mA
J29-4
S2
Probe 2 (temperature) or external signal 0…10V
J29-5
S3
Probe 3 (pressure) or external signal 4…20mA
J29-6
S4
Probe 4 (temperature)
J29-7
DI1
Digital input 1
J29-8
DI2
Digital input 2
J30-1 VBAT Emergency power supply
J30-2 G0 Electrical power supply
J30-3 G Electrical power supply
(*) depending on model
Tab. 2.m
2.3 pRack pR300 S, M, D, L board dimensions
A
B
44
45
110
pR300
Fig. 2.e
Small Medium Buit-in driver Large
A 227,5 315 315 315
B60606060
B - with USB port and/or built-in terminal 70 70 70 70
B - with Ultracap module - - 75 -
Tab. 2.n

17
pR300
p
R300
C1
NO1
NO2
NO3
C1
C4
NO4
NO5
NO6
C4
C7
NO7
C7
NO8
C8
NC8
G
G0
U1
U2
U3
GND
+VDC
+Vterm
GND
+5 VREF
U4
GND
U5
GND
VG
VG0
Y1
Y2
Y3
Y4
ID1
ID2
ID3
ID4
ID5
ID6
ID7
ID8
IDC1
J1 J24 J2 J3
J4 J5
J14
J10
J13
J12
J15
FieldBus card BMS card
J11 pLAN
J25
BMS2
J26
FBus2
43 2 1
Small
0 Vac/Vdc
24 Vac/Vdc
24 Vac/ Vdc
0 Vac/Vdc
24 Vac/230 Vac
0 Vac/Vdc
24 Vac/Vdc
0 Vac/Vdc
24 Vac/230 Vdc
0 Vac/Vdc
pGDE pRack
GND
+
-
RS485
BMS connections
24 Vac/230 Vac
0 Vac/Vdc
24 Vac/230 Vac
0 Vac/Vdc
U4
GND
U5
GND
J3
U1
U2
U3
GND
+VDC
J2
OUT 4
OUT 3
OUT 2
OUT 1
Ntc/Pt1000 ID
(*)
U1
U2
U3
GND
+VDC
U1
U2
U3
GND
+VDC
ID
AO/DO
4-20 mA Probe:
*NOT USED Refer to technical leaflet to different 4 -20 mA sensors model
Ratiometric probe:
Universal inputs
U1-U2-U3-U4-U5
(max 6 active probes)
Black
White
Green
Green
White
Black
ENG
pRack +0300025EN rel. 1.3 - 17.12.2015
2.4 pRack pR300 general connection diagram

18
pR300
p
R30
0
C1
NO1
NO2
NO3
C1
C4
NO4
NO5
NO6
C4
C7
NO7
C7
NO8
C8
NC8
NO12
C12
NC12
NO13
C13
NC13
C9
NO9
NO10
NO11
C9
G
G0
U1
U2
U3
GND
+VDC
+Vterm
GND
+5 VREF
U4
GND
U5
GND
VG
VG0
Y1
Y2
Y3
Y4
ID1
ID2
ID3
ID4
ID5
ID6
ID7
ID8
IDC1
U6
U7
U8
GND
ID9
ID10
ID11
ID12
IDC9
ID13H
ID13
IDC13
ID14
ID14H
J1
J24 J2 J3
J4 J5 J7 J8
J14
J10
J13
J12
J16
J17
J18
J15
J6
FieldBus card BMS card
J11 pLAN
J25
BMS2
J26
FBus2
43 2 1
Medium
24 Vac/230 Vdc
0 Vac/Vdc
24 Vac/230 Vac
0 Vac/Vdc
24 Vac/230 Vac
0 Vac/Vdc
GND
+
-
RS485
BMS connections
pGDE pRack
24 Vac/Vdc
0 Vac/Vdc
24
24
Vac
Vac
/Vd
/Vd
c
c
0V
0V
0 V
0
ac/
ac/
ac/
ac/
Vdc
Vdc
Vdc
dc
U4
GND
U5
GND
J3
U1
U2
U3
GND
+VDC
J2
Ntc/Pt1000 ID
(*)
U1
U2
U3
GND
+VDC
U1
U2
U3
GND
+VDC
24 Vac/Vdc
0 Vac/Vdc
0 Vac/Vdc
24 Vac/Vdc
230 Vac
0 Vac/Vdc
or
Black
White
Green
Green
White
Black
Ratiometric Probe: 4-20 mA Probe:
*NOT USED Refer to technical leaflet to different 4 -20 mA sensors model
ENG
pRack +0300025EN rel. 1.3 - 17.12.2015

19
pR300
pR
300
C1
NO1
NO2
NO3
C1
NO6
C4
C7
NO7
C7
NO8
C8
NC8
NO12
C12
NC12
NO13
C13
NC13
C9
NO9
NO10
NO11
C9
G
G0
U1
U2
U3
GND
+VDC
+Vterm
GND
+5 VREF
U4
GND
U5
GND
VG
VG0
Y1
Y2
Y3
Y4
ID1
ID2
ID3
ID4
ID5
ID6
ID7
ID8
IDC1
U6
U7
U8
GND
ID9
ID10
ID11
ID12
IDC9
ID13H
ID13
IDC13
ID14
ID14H
J1 J24 J2 J3
J4 J5 J7
J8
J20
J21
J14
J10
J13
J12
J22
J16
J17
J1
8
J15
J6
J19
NO14
C14
NC14
NO15
C15
NC15
C16
NO16
NO17
NO18
C16
ID15H
ID15
IDC15
ID16
ID16H
Y5
Y6
ID17
ID18
IDC17
U9
GND
U10
GND
FieldBus card BMS card
J23 FBus2
J11 pLAN
J25
BMS2
J26
FBus2
43 2 1
NO
2
NO9
NO1
0
1
1
NO1
1
C9
C7
NO8
C
8
N
C
8
J1
5
Large
GND
+
-
RS485
BMS connections
24 Vac/230 Vac
0 Vac/Vdc
24 Vac/230 Vac
0 Vac/Vdc
pGDE pRack
24 Vac/Vdc
0 Vac/Vdc
0 Vac/Vdc
J20
Y5
Y6
ID17
ID18
IDC17
U9
GND
U10
GND
U4
GND
U5
GND
J3
U1
U2
U3
GND
+VDC
J2
Ntc/Pt1000 ID
(*)
U1
U2
U3
GND
+VDC
U1
U2
U3
GND
+VDC
OUT 5
OUT 6
0 Vac/Vdc
24 Vac/Vdc
J20
Y5
Y6
ID17
ID18
IDC17
U9
GND
U10
GND
24 Vac/Vdc
0 Vac/Vdc
230 Vac
0 Vac/Vdc
or
Sonda raziometrica: Sonda 4-20 mA:
*NON USATO Per altri tipi di sensori 4 -20 mA fare riferimento al relativo foglio di istruzioni
Verde
Bianco
Nero
Verde
Bianco
Nero
ENG
pRack +0300025EN rel. 1.3 - 17.12.2015

20
pR300pR300
C1
NO1
NO2
NO3
C1
C4
NO5
NO6
C4
C7
NO7
C7
NO8
C8
NC8
NO12
C12
NC12
NO13
C13
NC13
C9
NO9
NO10
NO11
C9
G
G0
U1
U2
U3
GND
+VDC
+Vterm
GND
+5 VREF
U4
GND
U5
GND
VG
VG0
Y1
Y2
Y3
Y4
ID1
ID2
ID3
ID4
ID5
ID6
ID7
ID8
IDC1
U6
U7
U8
GND
ID9
ID10
ID11
ID12
IDC9
ID13H
ID13
IDC13
ID14
ID14H
J1
J24 J2 J3
J4 J5 J7 J8
J14
J10
J13
J12
J16
J17
J1
8
J15
J6
FieldBus card BMS card
J11 pLAN
J25
BMS2
J26
FBus2
43 2 1
NC1
2
1
1
NO1
3
1
1
C1
3
NC1
3
1
J1
8
1
1
C9
N
O9
NO1
0
1
1
N
O1
1
J1
6
GND
+
-
RS485
BMS connections
pGDE pRack
U4
GND
U5
GND
J3
U1
U2
U3
GND
+VDC
J2
Ntc/Pt1000 ID
(*)
U1
U2
U3
GND
+VDC
U1
U2
U3
GND
+VDC
A
B
CD
J27
1
3
2
4
J28
1
3
2
4
VBAT
G0
G
J30
GND
VREF
S1
S2
S3
S4
DI1
DI2
J29
giallo/yellow
giallo/yellow
verde/green
verde/green
marrone/brown
marrone/brown
bianco/white
bianco/white
shield
CAREL E
x
V valve A
CAREL E
x
V valve B
shield
24 Vac/Vdc
0 Vac/Vdc
G
G0
VBAT
COMA
NOA
1
3
2
4
Sporlan
SEI / SEH / SER
DANFOSS
ETS/CCM/CCMT
ALCO
EX5/6
EX7/8
3
5
4
1
33
2
5
5
6
4
1
NTC driver A
ratiometric pressure
transducer driver A
NTC driver B
ratiometric pressure
transducer driver B
GND
VREF
S1
S2
S3
S4
DI1
J29
4-20 mA Probe:
Nero
Bianco
Verde
Verde
Bianco
Nero
Built-in Driver
Ratiometric probe:
*NOT USED Refer to technical leaflet to different 4 -20 mA sensors model
Key: 1 green 3 white 5 black
2 brown 4 red 6 blue
Connection with other different valve model
ENG
pRack +0300025EN rel. 1.3 - 17.12.2015
/