Page is loading ...

PARTS AND OPERATION MANUAL
Revision #4 (05/29/07)
MODEL ST-70
Structural Concrete Pump
(Hatz Diesel Engine)
THIS MANUAL MUST ACCOMPANY THE EQUIPMENT AT ALL TIMES.
To find the latest revision of this
publication, visit our website at:
www.multiquip.com

PAGE 2 — ST-70 — PARTS & OPERATION MANUAL — REV. #4 (05/29/07)
Diesel engine exhaust and some of

ST-70 — PARTS & OPERATION MANUAL — REV. #4 (05/29/07) — PAGE 3
NOTE PAGE

PAGE 4 — ST-70 — PARTS & OPERATION MANUAL — REV. #4 (05/29/07)
Here's How To Get Help .......................................... 3
Table Of Contents ................................................... 4
Parts Ordering Procedures ..................................... 5
ST-70
Specifications .......................................................... 6
Pump Warranty ....................................................... 7
Safety Instructions ............................................. 8-10
Important Hand Signals ........................................ 11
General Information ......................................... 12-13
Concrete Mix Information ................................ 14-17
Slump Test Procedure ........................................... 18
Operation (How it Works) ...................................... 19
Initial Start-up Procedure ................................. 22-25
Operating Procedures...................................... 26-30
Towing Information ........................................... 31-33
Explanation Of Codes In Remarks Column .......... 34
Suggested Spare Parts ......................................... 35
Decals Safety ................................................... 36-37
Component Illustrations
Control Panel Installation .................................38-39
Control Panel Front ..........................................40-41
Control Panel Interior ....................................... 42-44
Main Drive Pumps ...........................................46-47
Manifold (Control) ............................................48-49
Accumulator .....................................................50-51
Hydraulic/Concrete Cylinders .......................... 52-53
Shuttle Tube Assy ............................................54-55
Hopper Assy .................................................... 56-57
Remixer Control Assy ...................................... 58-59
Throttle Assy .................................................... 60-61
Engine and Frame ........................................... 62-63
Oil Cooler Assy ................................................ 64-65
Fuel and Hydraulic Tank .................................. 66-67
Battery,Tail Lights,Water Separator,Gauges ...68-69
Axle and Brakes...............................................70-71
Hydarulic Surge Brake and Hitch ..................... 72-73
TABLE OF CONTENTS
NOTE: Specification and part number
are subject to change without notice.
Service Information
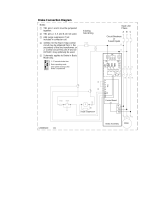
Wiring Schematic:
1) Interior Control Panel (Inside Door) ............... 74
2) Schematic Electrical Control Box .............. 75-76
3) Interconnect Electrical Control Box ................ 77
Hydraulic Diagram ........................................... 78-79
Optional Radio Control.......................................... 80
Safety Service Procedures ................................... 81
Maintenance Check Schedule ......................... 82-83
Pressure Setting Sequence .................................. 84
Accumulator Circuit ............................................... 85
Hydraulic System Troubleshooting ........................ 86
Electrical System ................................................... 87
Changing Concrete Cylinder Piston Cups ............ 88
Changing the Wear Plate and Ring ...................... 89
Wheel Bearings ..................................................... 90
Terms and Conditions Of Sale — Parts ................. 91

ST-70 — PARTS & OPERATION MANUAL — REV. #4 (05/29/07) — PAGE 5
PARTS ORDERING PROCEDURES
www.multiquip.com
Ordering parts has never been easier!
Choose from three easy options:
WE ACCEPT ALL MAJOR CREDIT CARDS!
When ordering parts, please supply:
❒❒
❒❒
❒
Dealer Account Number
❒❒
❒❒
❒
Dealer Name and Address
❒❒
❒❒
❒
Shipping Address (if different than billing address)
❒❒
❒❒
❒
Return Fax Number
❒❒
❒❒
❒
Applicable Model Number
❒❒
❒❒
❒
Quantity, Part Number and Description of Each Part
❒❒
❒❒
❒
Specify Preferred Method of Shipment:
✓
UPS/Fed Ex
✓ DHL
■
Priority One
✓
Tr uck
■
Ground
■ Next Day
■
Second/Third Day
All orders are treated as
Standard Orders
and will ship the same day if received prior
to 3PM PST.
If you have an MQ Account, to obtain a
Username and Password, E-mail us at:
To obtain an MQ Account, contact your
District Sales Manager for more information.
Order via Internet (Dealers Only):
Order parts on-line using Multiquip’s SmartEquip website!
■
View Parts Diagrams
■
Order Parts
■
Print Specification Information
Note: Discounts Are Subject To Change
Goto www.multiquip.com and click on
Order Parts
to log in and save!
Use the
internet
and qualify for a 5% Discount
on
Standard orders
for all orders which include
complete part numbers.*
Order via Fax (Dealers Only):
All customers are welcome to order parts via Fax.
Domestic (US) Customers dial:
1-800-6-PARTS-7 (800-672-7877)
Fax
your order in and qualify for a 2% Discount
on
Standard orders
for all orders which include
complete part numbers.*
Order via Phone:
Domestic (US) Dealers Call:
1-800-427-1244
Best Deal!
International Customers
should contact
their local Multiquip Representatives for
Parts Ordering information.
Non-Dealer Customers:
Contact your local Multiquip Dealer for
parts or call 800-427-1244 for help in
locating a dealer near you.
Note: Discounts Are Subject To Change
NOTE
Effective: January 1
st
, 2006

PAGE 6 — ST-70 — PARTS & OPERATION MANUAL — REV. #4 (05/29/07)
ST-70 SPECIFICATIONS
PERFORMANCE U.S. METRIC
Pumping Rate — Volume Output 70 yd/hr.* (54m/hr)*
Maximum Aggregate Size 1 1/2" minus (38 mm)
Verticle Pumping Height ................................................. 300 ft.* ..................................................................... (91m)*
Horizontal Pumping Distance ......................................... 1200 ft.* ................................................................... (366m)*
Engine — Diesel ............................................................. HATZ 4M40L: 80HP (59.68KW)
Hopper Capacity 10 cu. ft. capacity with optional forward/reverse re-mixer
Line Size ........................................................................ 3", 4" or 5" dia.
Electrical System ............................................................ 12 v D.C.
Hydraulic Oil System ...................................................... 58 gal.
Fuel Tank Capacity ......................................................... 20 gal.
Weight (with fluids) ......................................................... 4700 lb. ................................................................... (2132kg)
Tire Size ......................................................................... 7.35 - 14, 8 ply
Brakes ............................................................................ 12" dia. Hydraulic Surge
All Steel Trailer Frame
DIMENSIONS
L x W x H ........................................................................ 149" X 67" X 55" ...................................................... (356 X 170 X 140cm)
Weight (Shipping)........................................................... 4,700 lbs. ................................................................ (2132kg)
*These figures will vary with Pump Model, concrete mix design, line size, job site conditions and engine option.
Mayco reserves the right to change and modify the above specifications or design without notice or obligation.

ST-70 — PARTS & OPERATION MANUAL — REV. #4 (05/29/07) — PAGE 7
MAYCO PUMP WARRANTY
Mechanical Drive Models
MAYCO PUMP, hereinafter referred to as “Manufacturer’,
warrants each new Mayco Pump sold by the manufacturer to
be free from defects in material and workmanship, under
normal use and service, for a period of one year after the date
of delivery to the original retail purchaser. Manufacturer will, at
its option, replace or repair at a point designated by the
Manufacturer any part or parts which shall appear to the
satisfaction of the Manufacturer upon inspection at such point
to have been defective in material or workmanship. This
warranty does not obligate the Manufacturer to bear any
transportation charges or labor charges in connection with
the replacement or repair the of the defective parts.
This warranty does not apply to any pump if attempts have
been made to pump concrete materials which have
separated, to any pump which has been repaired with other
than Genuine Mayco Parts, nor to any pump which has been
altered, repaired or used in such manner as to adversely affect
its performance, nor to normal service or maintenance or where
blockages have developed within the pump manifold or
placing line or which has been operated in any other manner
not recommended by the Manufacturer. Due to the abrasive
nature of concrete, Mayco does not cover natural component
wear.
THIS WARRANTY AND MANUFACTURER’S OBLIGATION
HEREUNDER, IS IN LIEU OF ALL OTHER WARRANTIES,
EXPRESS, IMPLIED OR STATUTORY AND ALL OTHER
OBLIGATIONS OR LIABILITIES INCLUDING SPECIAL OR
CONSEQUENTIAL DAMAGES OR CONTINGENT LIABILITIES
ARISING OUT OF THE FAILURE OF ANY PUMP OR PART
TO OPERATE PROPERLY, INCLUDING ANY WARRANTIES
OF MERCHANTABILITY OR FITNESS FOR A PARTICULAR
PURPOSE.
Hydraulic Drive Models
MAYCO PUMP, hereinafter referred to as “Manufacturer”,
warrants each new Mayco Pump sold by the manufacturer to
be free from defects in material and workmanship, under
normal use and service, for a period of one year or 2000 hours
after the date of delivery to the original retail purchaser. The
Manufacturer will, at its option, replace or repair at a point
designated by Manufacturer any part or parts which shall
appear to the satisfaction of Manufacturer upon inspection at
such point to have been defective in material or workmanship.
This warranty does not obligate Manufacturer to bear any
transportation charges or labor charges in connection with
the replacement or repair of the defective parts.
This warranty does not apply to any pump if attempts have
been made to pump concrete materials which have
separated, to any pump which has been repaired with other
than Genuine Mayco Parts, nor to any pump which has been
altered, repaired or used in such manner as to adversely affect
it’s performance, nor to normal service or maintenance or
where blockages have developed within the pump manifold
or placing line or which has been operated in any other manner
not recommended by the Manufacturer. Due to the abrasive
nature of concrete, Mayco does not cover natural component
wear.
THIS WARRANTY AND MANUFACTURER’S OBLIGATION
HEREUNDER, IS IN LIEU OF ALL OTHER WARRANTIES,
EXPRESS, IMPLIED OR STATUTORY AND ALL OTHER
OBLIGATIONS OR LIABILITIES INCLUDING SPECIAL OR
CONSEQUENTIAL DAMAGES OR CONTINGENT LIABILITIES
ARISING OUT OF THE FAILURE OF ANY PUMP OR PART
TO OPERATE PROPERLY, INCLUDING ANY WARRANTIES
OF MERCHANTABILITY OR FITNESS FOR A PARTICULAR
PURPOSE.

PAGE 8 — ST-70 — PARTS & OPERATION MANUAL — REV. #4 (05/29/07)
READ THIS PARTS AND OPERATION MANUAL
THOROUGHLY BEFORE USING THIS MACHINE. It describes
the safe, proper and most efficient way to operate it. KNOW
YOUR MACHINE!
When operating concrete pumps the safety regulations of
the responsible employers’ liability insurance company must
be observed. The observation of these regulations shall be
the responsibility of the contractor and operator.
The following are some supplementary recommendations:
All safety devices and provisions against accidents such as
warning labels and information signs, coverings, etc. must
be in place. Do not remove or tamper with them. If they are
missing, replace them.
Check the operational reliability of the machine each time
before it is put into operation. Any defects found must be
repaired immediately.
Allow the machine to be operated and maintained by qualified
personnel only.
Before leaving the machine, protect it from unauthorized use
and unintentional movements.
Unauthorized presence in the immediate area of the concrete
pump is not allowed. Warn persons who are in the immediate
area. Stop work if persons do not leave the area after having
been warned.
Wear personal protective equipment when operating the
machine.
WW
WW
W
ARNING! DANGER OF AMPUTARNING! DANGER OF AMPUT
ARNING! DANGER OF AMPUTARNING! DANGER OF AMPUT
ARNING! DANGER OF AMPUT
AA
AA
A
TION!TION!
TION!TION!
TION!
Never place your hands or any part of your body in the hopper
or allow anyone else to do so while the engine is running or
when there is accumulator hydraulic pressure or series injury
could result.
ST-70 — SAFETY INSTRUCTIONS
TRAVEL AND TRANSPORTATION
The machine must not be moved with extended outriggers.
Before traveling, check the transportation safety devices of
the outriggers, the tire pressure and the functioning of the
brakes.
Use hoisting units with transport devices complying with safety
requirements.
Hoisting cables or equipment are to be applied only at the
lifting points provided.
TOWING:
1. Read the Atwood Hydraulic Surge Brake Installation
Instructions.
2. The pump should not be towed in excess of 55 MPH (less
depending on road conditions). It can be towed with any
truck rated to pull a 5000 lb. load.
3. Before towing, check with local and state laws for proper
compliance. (Refer to page 31)
a. Secure the hitch on the ball and attach the breakaway
cable and safety chain to the towing vehicle.
b. Raise all stand pipes and secure.
4. Use only a 2” one-piece, all-steel, machined or forged ball
rated at 5000 lbs. minimum capacity.
5. Do not tow the pump with concrete in the hopper.
6. Do not tow the pump with the concrete reducers attached.
7. Check all wheel lug bolts for proper tightness prior to towing.

ST-70 — PARTS & OPERATION MANUAL — REV. #4 (05/29/07) — PAGE 9
ST-70 — SAFETY INSTRUCTIONS
STABILIZER JACK
Prior to jacking check the soil conditions. If necessary, enlarge
the support foot area by placing square timbers underneath.
Keep a sufficient distance from excavations; slopes could break
away because of support pressures.
On inclines and slopes place chocks behind the wheels.
Jack the pump in such a manner that it is in a horizontal (level)
position. Check the position of the pump frequently.
CONCRETE PUMP
To avoid splashes due to suction of air, the agitator hopper
must always be filled with concrete up to the mixing shaft.
DO NOT OPERATE ANY CONCRETE PUMP
WITHOUT THE HOPPER GRILL FIRMLY IN
PLACE.
NEVER ALLOW ANY HANDS NEAR THE
SHUTTLE CRANK VALVE OR IN THE
AGITATOR HOPPER WHILE THE MACHINE
IS RUNNING.
WARNING! DANGER OFWARNING! DANGER OF
WARNING! DANGER OFWARNING! DANGER OF
WARNING! DANGER OF
AMPUTAMPUT
AMPUTAMPUT
AMPUT
AA
AA
A
TION!TION!
TION!TION!
TION!
Never place your hands or any part of your
body in the hopper or allow anyone else to do
so while the engine is running or when there
is accumulator hydraulic pressure or series
injury could result.
Refer to Operation section of this manual for more details.
PIPELINES
PIPELINES AND CLAMPS MUST BE OF SUFFICIENT SIZE
FOR THE PUMP’S CAPACITY.
The pipeline connections must not be opened under working
pressure. Before the pipeline is opened, pressure must be
relieved by sucking back the concrete. Secure the couplings
after the assembly of the pipeline.
When laying pipeline use as few bends as possible. Horizontal
pipelines must be adequately supported. When installing a
vertical pipeline, the best method is to use upright struts that
can be anchored to the building.
It is preferable to install pipelines within the building whenever
possible. See Operator’s Manual and “Pumping Concrete”
booklets for more information on pipeline installations.
MAINTENANCE AND REPAIR
TURN OFF THE ENGINE AND
DISCONNECT THE BATTERY CABLES
BEFORE PERFORMING ANY
MAINTENANCE OR REPAIRS.
MAKE SURE THAT THE ACCUMULATOR PRESSURE GAUGE
READS ZERO BEFORE ALLOWING ANYBODY TO PUT
THEIR HANDS INTO HOPPER OR SHUTTLE AREA.
Refer to maintenance section of this manual for more details.
CAUTION:
If the hoses or lines are blocked for any
reason, or if the lines are kinked when
starting up or during the pumping cycle, the
pump pressure could straighten out the kink
or force out the blockage. This rapid surge of
material could cause the lines to whip or move in such a manner
that it could cause injury to anyone working near the hosses
or lines.
When moving hoses from one site application to another, it is
important to walk the entire system and visually inspect for
any kinks or sharp bends in the hose. You must and straighten
them before starting or resuming the pumping operation.
Inspect the lines at all times to prevent the above conditions.

PAGE 10 — ST-70 — PARTS & OPERATION MANUAL — REV. #4 (05/29/07)
MODEL ST-70
THE OPERATOR IS IN COMPLETE CHARGE OF THE PUMP
AND DELIVERY SYSTEM AND IS RESPONSIBLE FOR HIS/
HER OWN SAFETY AND TO WARN AND KEEP ALL OTHERS
OUT OF DANGER.
Do not attempt to operate this equipment without a
thorough understanding of this Parts and Operation
Manual:
1. To prevent damage to equipment or injury to personnel, the
following instruction must be followed carefully:
A. A copy of this manual and all others shall accompany the
pump at all times.
B. This equipment shall be operated only by experienced
operators or students under the direct supervision of an
experienced operator.
C. No unauthorized persons shall be permitted to assist or
remain in the vicinity of the unit while it is in operation, or
during the, inspection, cleaning or repair for the make-ready
operation.
D. This equipment shall not be towed or operated by individuals
who cannot read and understand the signs, decals or
operating instructions.
E. This equipment shall not be operated by individuals under
the influence of alcohol or drugs.
F. Before towing, check the hitch and secure the breakaway
cable and safety chain to the towing vehicle.
G. Tow only with a vehicle and hitch rated to pull a 5000 lb.
load.
H. Use only a 2" one-piece, all-steel machined or forged ball
rated for a minimum of 5000 lbs.
I. Before start-up, check the hopper and remove all
obstructions.
J. Keep hands, feet and human body parts out of the hopper
when the engine is running.
K. The engine must be turned off before performing any
service operations. The engine is remote controlled and
may start pumping any time the engine is running.
L. Do not use worn hoses or hose couplings – inspect daily.
M. Replace any worn or damaged hoses, or couplings,
immediately.
N. Do not disconnect the hose couplings or nozzles while
under pressure.
ST-70 — SAFETY INSTRUCTIONS
O. Never fill the fuel tank while the engine is running or hot.
Avoid the possibility of spilled fuel which may cause a fire.
P. Always carry a fire extinguisher of adequate size and a
first aid kit.
Q. Always wear a safety helmet and safety glasses when on
a job site pumping.
R. Always have the hopper grate securely in place when
pumping.
S. Pump in reverse when the shuttle valve or delivery system
is plugged.
T. Guards, grates, covers, etc. MUST NOT be removed or
altered.
U. If a failure or malfunction occurs, stop the pump and make
all necessary repairs immediately.
V. Electrical and manual controls must always be in working
order.
W. NEVER stand on the hopper grate.
X. Always position the pump on safe, solid, level ground, using
the jack stands.

ST-70 — PARTS & OPERATION MANUAL — REV. #4 (05/29/07) — PAGE 11
IMPORTANT HAND SIGNALS

PAGE 12 — ST-70 — PARTS & OPERATION MANUAL — REV. #4 (05/29/07)
ST-70 — GENERAL INFORMATION
CONCRETE MIX DESIGN
Mix design is most important to achieve maximum pumpability.
Pumpability is affected by, among other factors, the type and
gradation of aggregate used. Natural aggregates make a more
workable mix and pump more readily than crushed aggregates.
A blend of natural and crushed aggregates will produce a
workable mix. The type and gradation of aggregates is equally
important for workability as the size and percentage of coarse
aggregates in the mix.
The term “aggregates” describes all of the solid materials, from
the largest rock to the smallest grain of sand, contained in the
concrete mix.
Concrete mixes with a consistency as dry as one-inch slump
and as wet as ten-inch slump have been pumped; but for
maximum efficiency from the pump, a slump ranging from two
to six inches will produce a more workable mix than one that
contains more or less water.
A slump rating should be used with discretion; it is not always a
real indication of the pumpability of the mix. The concrete may
be workable in the sense that it will readily flow into place, but
the same mix may not respond to pressure. Overly wet mixes
tend to separate. In addition to affecting the strength and quality
of the concrete, the delivery system will not tolerate separation.
Overly dry mixes are similarly unsatisfactory if they lack plasticity
and tend to be crumbly. To be properly pumped, the mix must be
able to continuously coat the inside of the line with a lubricating
seal of mortar.
The principle of concrete pumping is based on self-lubrication.
As it moves through the transfer line, the concrete takes the
shape of a plastic cylinder. It is forced through the transfer line
on a film of mortar that is self-troweled to the service of the
transfer line around its full periphery by the slug of concrete
itself.
There are four ways in which this seal can be lost:
1. By pumping excessively wet mixes which do not have
enough cohesion to hold together.
2. By pumping harsh undersanded concrete with poorly graded
aggregates which can jam together when the pressure
becomes too great for the insufficient amount of sand to
hold the aggregates apart.
3. By getting a rock pocket, such as mixer tailings, into the
pump valve. This rock pocket will have an insufficient coating
of mortar and the mix will not be plastic enough to allow the
valve to operate or the mix to move in the line.
4. Through excessive bleeding. If the mix is short or fines, but
the sand is otherwise fairly well graded, bleeding will not
normally create any problems as long as the pump continues
operation. But, if the pump is shut down, bleeding can result
in a loss of lubrication and blocked erratic flow.
The above are bad concrete practices, regardless of how the
mix is to be placed. But, these points do show that special
mixes are not always needed, within limits, for pumping
concrete. Good aggregate gradation is most important to
pump concrete the maximum distance.
The use of admixtures can have a beneficial effect on
pumpability. Most of the dispersing agents will fatten, retard
bleeding, and increase workability. Thus, the average concrete
can be pumped for appreciably longer distances. Air entraining
agents will also improve workability, although they cannot be
used as a substitute for good gradation of the aggregate.
Pumping will not appreciably affect the final air content of the
mix. High-early cement tends to give a more readily pumpable
mix with superior water retaining qualities. However, if delays
are likely to occur, extra care must be exercised due to the
faster setting time over regular cement.
The Mayco Model ST-70 will pump a wide variety of concrete
pump mixes. But, there are guidelines that must be followed.
Use this information in conjunction with “The Delivery System”
on page 32, Sections 18 thru 18.10.

ST-70 — PARTS & OPERATION MANUAL — REV. #4 (05/29/07) — PAGE 13
ST-70 — GENERAL INFORMATION
REGIONAL DIFFERENCES
Concrete is made by mixing locally available rock and sand
with cement and water. For this reason there are great
differences in the pumpability of concrete from one region of
the country to another.
It is impossible to define a specific mix for each region that the
Model ST-70 be will working in. Therefore, the mixes on pages
14 through 17 will provide a basic guideline for establishing
the proper mix design for your area.
Use this information to specify your requirements to your local
ready-mix batch plant, contractor and civil engineer. It may take
minor adjustments to make a mix pumpable, so you should
explain your needs.
The elements that have to be controlled and consistently
maintained by the batch plant are:
1. The sizing and mix percentage of rocks, gap graded from
the largest down through the smallest sizes.
2. Sand with a sieve analysis that has the proper percentage
of fines, ASTM C33 spec.
3. Sufficient cement to produce the required design strength
of the concrete and provide the lubricating binder to pump
the concrete through the delivery system.
Use a minimum of:
500 lbs. of cement/cu yd for 2500 p.s.i. concrete
after 28 days.
530 lbs. of cement/cu yd for 3000 p.s.i. concrete
after 28 days.
600 lbs. of cement/cu yd for 4000 p.s.i. concrete
after 28 days.
4. Admixture pump-aid if necessary.
5. The proper amount of water to make a workable slump
and plasticize the mix.
In addition, the Mayco Structural Concrete ST-70 Pump can be
used to pump a large aggregate hard rock as follows:
1. Pea rock (1/2" minus) pump with mixes being as low as
30% rock and 70% sand. (See page 30, for comments on
cleaning the pump.)
2. Shortening pea rock when used with an air compressor
and nozzle. (See back pages for recommended set-up.)
3. “Mud Jacking”, high pressure grouting.

PAGE 14 — ST-70 — PARTS & OPERATION MANUAL — REV. #4 (05/29/07)
ST-70 — CONCRETE MIX INFORMATION
Job Identification* _______________________________________ Date* ______________________________________
Architect* ______________________________________________ General Contractor* ___________________________
Structural Engineer* ______________________________________ Concrete by* ________________________________
THE PROPORTIONS SHOWN HERE ARE A RECOMMENDATION BASED ON TESTS OF SAMPLES RECEIVED BY THE
LABORATORY. TESTS PERFORMED BY SUPPLIERS OR MANUFACTURERS OR ON PRIOR KNOWLEDGE OF THE
MATERIALS INVOLVED AND IS LIMITED TO INFORMATION DERIVED FROM THESE SAMPLES TESTS BY OTHERS OR
TO THAT PRIOR KNOWLEDGE.
IT IS UNDERSTOOD THAT THE CHEMICAL AND/OR PHYSICAL CHARACTERISTICS OF THESE MATERIALS ARE
SUBJECT TO VARIATIONS THAT MAY ADVERSELY AFFECT THE FINISHED PRODUCT AND THAT THIS MIX DESIGN IS
NOT TO BE USED EXCEPT AT THE USERS OWN RISK UNLESS THESE VARIATIONS ARE DETERMINED AND
COMPENSATED FOR IN A MANNER APPROVED BY THE LABORATORY IN WRITING.
Specifications requirements: 2500 P.S.I. in 28 DAYS 3" SLUMP PUMP MIX 4" DIA LINE
SIEVE ANALYSIS PER CENT PASSING U.S. STANDARD SIEVE
MATERIAL ......... 1 1/2 ............ 1 ............... 3/4 ..................................................................................................................
FAI WCS ....................................................................... 100 ........ 97 ............ 84 ........... 70 ....... 45 ........25 ..... 10 ....... 97.5
FA2 ...................................................................................................................................................................................
CA1 #4-3/8" ..............................................100 ............. 95 .......... 13 ............ 3 ............................................................... 90.5
CA2 #3-1 ................................ 100 ........... 96 ............... 61 ..........6 .............. 1 ............................................................... 91.0
CA3 ..................................................................................................................................................................................
............................................... 100 ........... 98 ............... 85 .......... 50 ............ 40 ........... 33 ....... 21 ........12 ..... 4 .........
Source of Coarse & Fine Aggregates -* Cement – Type* Mix No*
Cement Sks/Cu. Yd. ................................................................ 5.3
Cement – Lbs. ........................................................................ 500
Sand, Lbs. W.C.S. ................................................................... 1550
No. 4 Gravel (3/8"), Lbs. .......................................................... 500
No. 3 Gravel (1"), Lbs. ............................................................. 1220
No. 2 Gravel (1-1/2"), Lbs. .......................................................
Water, Lbs............................................................................... 290
Total Weight ........................................................................... 4060
Water, gal. per yd. ................................................................... 34.8
Water, gal./Sk. per yd. ............................................................. 6.5
Slump, calculated ................................................................... 3"
Admixture ............................................................................... 3 fl. oz. POZZOLITH 300N/100 * OF CEMENT
Max. Water Allowable ............................................................. *
* THIS INFORMATION PROVIDED BY ENGINEER OR BATCH PLANT
THE ABOVE MIX DESIGN IS TYPICAL OF A PUMPABLE MIX. TO BE USED AS A GUIDELINE ONLY. REFER TO LOCAL
AGENCY FOR JOB SPECIFICATION.
3-5

ST-70 — PARTS & OPERATION MANUAL — REV. #4 (05/29/07) — PAGE 15
ST-70 — CONCRETE MIX INFORMATION
Job Identification* _______________________________________ Date* ______________________________________
Architect* ______________________________________________ General Contractor* ___________________________
Structural Engineer* _____________________________________ Concrete by* ________________________________
THE PROPORTIONS SHOWN HERE ARE A RECOMMENDATION BASED ON TESTS OF SAMPLES RECEIVED BY THE
LABORATORY. TESTS PERFORMED BY SUPPLIERS OR MANUFACTURERS OR ON PRIOR KNOWLEDGE OF THE
MATERIALS INVOLVED AND IS LIMITED TO INFORMATION DERIVED FROM THESE SAMPLES TESTS BY OTHERS OR
TO THAT PRIOR KNOWLEDGE.
IT IS UNDERSTOOD THAT THE CHEMICAL AND/OR PHYSICAL CHARACTERISTICS OF THESE MATERIALS ARE
SUBJECT TO VARIATIONS THAT MAY ADVERSELY AFFECT THE FINISHED PRODUCT AND THAT THIS MIX DESIGN IS
NOT TO BE USED EXCEPT AT THE USERS OWN RISK UNLESS THESE VARIATIONS ARE DETERMINED AND
COMPENSATED FOR IN A MANNER APPROVED BY THE LABORATORY IN WRITING.
Specifications requirements: 3000 P.S.I. in 28 DAYS 4" SLUMP PUMP MIX 4" DIA LINE
SIEVE ANALYSIS PER CENT PASSING U.S. STANDARD SIEVE
MATERIAL ......... 1 1/2 ............ 1 ............... 3/4 ..................................................................................................................
FAI WCS ....................................................................... 100 ........ 98 ............ 86 ........... 70 ....... 48 ........24 ..... 8 ......... 97.5
FA2 ...................................................................................................................................................................................
CA1 #4-3/8" ..............................................100 ............. 94 .......... 16 ............ 4 ............................................................... 90.5
CA2 #3-1 ................................ 100 ........... 93 ............... 57 ..........6 .............. 1 ............................................................... 91.0
CA3 ..................................................................................................................................................................................
............................................... 100 ........... 97 ............... 83 .......... 51 ............ 41 ........... 33 ....... 23 ........11 ..... 4 .........
Source of Coarse & Fine Aggregates -* Cement – Type* Mix No*
Cement Sks/Cu. Yd. ................................................................ 5.
Cement – Lbs. ........................................................................ 525
Sand, Lbs. W.C.S. ................................................................... 1520
No. 4 Gravel (3/8"), Lbs. .......................................................... 480
No. 3 Gravel (1"), Lbs. ............................................................. 1230
No. 2 Gravel (1-1/2"), Lbs. .......................................................
Water, Lbs............................................................................... 295
Total Weight .................................................................... 4050
Water, gal. per yd. ................................................................... 35.4
Water, gal./Sk. per yd. ............................................................. 6.3
Slump, calculated ................................................................... 4"
Admixture ............................................................................... 3 fl. oz. POZZOLITH 300N/100 * OF CEMENT
Max. Water Allowable ............................................................. *
* THIS INFORMATION PROVIDED BY ENGINEER OR BATCH PLANT
THE ABOVE MIX DESIGN IS TYPICAL OF A PUMPABLE MIX. TO BE USED AS A GUIDELINE ONLY. REFER TO LOCAL
AGENCY FOR JOB SPECIFICATION.

PAGE 16 — ST-70 — PARTS & OPERATION MANUAL — REV. #4 (05/29/07)
ST-70 — CONCRETE MIX INFORMATION
Job Identification* _______________________________________ Date* ______________________________________
Architect* ______________________________________________ General Contractor* ___________________________
Structural Engineer* _____________________________________ Concrete by* ________________________________
THE PROPORTIONS SHOWN HERE ARE A RECOMMENDATION BASED ON TESTS OF SAMPLES RECEIVED BY THE
LABORATORY. TESTS PERFORMED BY SUPPLIERS OR MANUFACTURERS OR ON PRIOR KNOWLEDGE OF THE
MATERIALS INVOLVED AND IS LIMITED TO INFORMATION DERIVED FROM THESE SAMPLES TESTS BY OTHERS OR
TO THAT PRIOR KNOWLEDGE.
IT IS UNDERSTOOD THAT THE CHEMICAL AND/OR PHYSICAL CHARACTERISTICS OF THESE MATERIALS ARE
SUBJECT TO VARIATIONS THAT MAY ADVERSELY AFFECT THE FINISHED PRODUCT AND THAT THIS MIX DESIGN IS
NOT TO BE USED EXCEPT AT THE USERS OWN RISK UNLESS THESE VARIATIONS ARE DETERMINED AND
COMPENSATED FOR IN A MANNER APPROVED BY THE LABORATORY IN WRITING.
Specifications requirements: 4000 P.S.I. in 28 DAYS 4" SLUMP PUMP MIX 5" DIA LINE
SIEVE ANALYSIS PER CENT PASSING U.S. STANDARD SIEVE
MATERIAL ......... 1 1/2 ............ 1 ............... 3/4 ..................................................................................................................
FAI WCS ....................................................................... 100 ........ 97 ............ 84 ........... 56 ....... 36 ........22 ..... 8 ......... 97.5
FA2 ...................................................................................................................................................................................
CA1 #4-3/8" ..............................................100 ............. 95 .......... 13 ............ 3 ............................................................... 90.5
CA2 #3-1 ................................ 100 ........... 95 ............... 64 ..........8 .............. 1 ............................................................... 91.0
CA3 ................... 100 .............93 ............. 64 ............... 18 .......... 2 ................................................................................. 90.0
.......................... 100 ............. 98 ............. 90 ............... 73 .......... 49 ............ 40 ........... 26 ....... 17 ........10 ..... 4 .........
Source of Coarse & Fine Aggregates -* Cement – Type* Mix No*
Cement Sks/Cu. Yd. ................................................................ 6.4
Cement – Lbs. ........................................................................ 600
Sand, Lbs. W.C.S. ................................................................... 1480
No. 4 Gravel (3/8"), Lbs. .......................................................... 400
No. 3 Gravel (1"), Lbs. ............................................................. 470
No. 2 Gravel (1-1/2"), Lbs. ....................................................... 800
Water, Lbs............................................................................... 300
Total Weight .................................................................... 4050
Water, gal. per yd. ................................................................... 36
Water, gal./Sk. per yd. ............................................................. 5.6
Slump, calculated ................................................................... 4"
Admixture ............................................................................... 3 fl. oz. POZZOLITH 300N/100 * OF CEMENT
Max. Water Allowable ............................................................. *
* THIS INFORMATION PROVIDED BY ENGINEER OR BATCH PLANT
THE ABOVE MIX DESIGN IS TYPICAL OF A PUMPABLE MIX. TO BE USED AS A GUIDELINE ONLY. REFER TO LOCAL
AGENCY FOR JOB SPECIFICATION.

ST-70 — PARTS & OPERATION MANUAL — REV. #4 (05/29/07) — PAGE 17
ST-70 — CONCRETE MIX INFORMATION
The sand content of pumpable concrete is very important. It is
one of the two major ingredients that change due to regional
location (the other is the rock or gravel).
Above is a typical sieve analysis of washed concrete sand
(W.C.S.) to A.S.T.M. C33 specifications.
The total of the “Accumulated % Retained” is the Fineness
Modulus (F.M.). The ideal F.M. is between 2.50 and 2.75, but the
correct F.M. does not guarantee pumpability. Besides having a
correct F.M. the percentage of sand by weight that passes through
the No. 50 sieve must be between 15 and 30 and through the
No. 100 sieve 5 and 10. The total of #50 and 100 mesh particles
must be between 25 and 35 percent.
This fine material plus the cement will provide the necessary
film of lubrication to move the concrete inside the delivery system.
DNASETERCNOC—SISYLANAEVEIS
EZISEVEIS
33CMTSA
SCEPS
SSAP%
MUCCA
1#ELPMAS
%VIDNI
TER
4# 001-59 89 2 2
8 001-08 98 11 9
61 58-05 17 92 81
03 06-52 74 35 42
05 03-01 32 77 42
001 01-2 7 39 61
002
56.2=.M.FsuludoMsseneniF 56.2

PAGE 18 — ST-70 — PARTS & OPERATION MANUAL — REV. #4 (05/29/07)
1. To obtain a representative sample, take samples at three or
more regular intervals throughout the discharge of the mixer
or truck. DO NOT take samples at the beginning or end of the
discharge.
2. Dampen the inside of the cone and place it on a smooth,
moist, nonabsorbent, level surface large enough to
accommodate both the slumped concrete and the slump cone.
Stand on the “foot pieces” throughout the test procedure to
hold the cone firmly in place.
3. Fill the cone
!/3
full by volume and rod 25 times with a 1/2"
dia x 24" lg. bullet-pointed steel rod. (This is a specific
requirement which will produce non-standard results unless
followed exactly.) Distribute rodding evenly over the entire cross
section of the sample. (See figure A.)
4. Fill cone another
!/3
which will make the cone
@/3
full by
volume. Rod this second layer 25 times with the rod penetrating
into, but not through, the first layer. Distribute rodding evenly
over the entire cross section of the layer. (See figure B.)
5. Fill cone to overflowing. Rod this layer 25 times with rod
penetrating into but not through, the second layer. Distribute
rodding evenly over the entire cross section of this layer. (See
figure C.)
6. Remove the excess concrete from the top of the cone, using
the tamping rod as a screed. (See figure D.)
7. Lift the cone vertically with a slow even motion. Do not jar
the concrete or tilt the cone during this process. (See figure
E.) Invert the withdrawn cone, and place it next to, but not
touching the slumped concrete.
8. Lay a straight edge across the top of the slumped cone.
Measure the amount of slump in inches from the bottom of
the straight edge to the top of the slumped concrete at a point
over the original center of the base (See Figure F). The slump
operation must be complete in a maximum elapsed time of 1-
½ minutes. Discard the concrete. DO NOT use it in any other
tests.
SLUMP TEST PROCEDURE

ST-70 — PARTS & OPERATION MANUAL — REV. #4 (05/29/07) — PAGE 19
ST-70 — OPERATION (How it Works)
The following is a brief explanation of
how the concrete cylinders, hydraulic
cylinders, shuttle tube, valves and
hopper work in sequence to pump
concrete.
The hydraulic pressure is generated by
a variable volume, pressure
compensated, axial piston pump that is
driven by a diesel engine. The hydraulic
pressure is applied to one of the two
hydraulic cylinders causing the
hydraulic piston, which is connected to
the concrete piston, to discharge
concrete into the delivery line. The rod
sides of the drive cylinders are
hydraulically connected together
creating a “slave circuit.” As one cylinder
is discharging concrete, the hydraulic oil
from the rod side of the drive cylinders
is being transferred through the slave
circuit causing the opposite cylinder to
move back on the suction stroke filling
the cylinder with concrete. This
operation is made possible by the
shuttle tube located in the hopper and
is sequenced to operate in conjunction
with the cycling of the drive cylinders.
The ST-70 cycling sequence is initiated
by an electrical signal generated by two
proximity switches located in the drive
cylinder. The proximity switches are
normally open, magnetically sensing the
movement of the main drive cylinder. As
the drive cylinder piston head passes
the proximity switch, an electrical signal
is sent to the solenoid operated pilot
valve which in turn directs pilot oil to the
four valves controlling the drive cylinder
and the shuttle cylinder.
A one-gallon accumulator assists the
movement of the shuttle tube. This circuit
assures that the shuttle tube will throw
with the same intensity of each stroke
regardless of how fast the main drive
cylinders are cycling.
TO TANK
HIGH PRESSURE
OIL FROM PUMP
TO TANK
HYDRAULIC
CYLINDERS
PISTON
CUP
CONCRETE
CYLINDERS
SLAVE
OIL
SLAVE
OIL
A
A
B
B
Figure 1
CYLINDER A — INTAKE STROKE
CYLINDER B — DISCHARGE STROKE
CYLINDER A — DISCHARGE STROKE
CYLINDER B — INTAKE STROKE
Figure 2
PROXIMITY SWITCH
PROXIMITY
SWITCH
SHUTTLE TUBE

PAGE 20 — ST-70 — PARTS & OPERATION MANUAL — REV. #4 (05/29/07)
This section is intended to assist the operator with the initial
start-up of the MAYCO ST-70 Concrete Pump. It is extremely
important that this section be read carefully before attempting
to use the pump in the field.
DO NOT proceed to the Operating Procedures (field use) of
this manual until this section is thoroughly understood.
NOTE:
Failure to understand the operation of the MAYCO ST-70
Concrete pump could result in severe damage to the pump or
personal injury.
Figure 1 illustrates the basic operating controls and indicators
on the MAYCO ST-70 Concrete pump. Each of the items
referenced will be discussed. The sequence will be as follows:
1. Engine Oil
2. Hydraulic Oil
3. Fuel
4. Rear Stabilizer Stands
5. Emergency Stop Switch
6. Ignition Switch
7. Status Indicators
8. Control Switch, Engine Throttle Control
9. Volume Control
10. Engine Speed, Cooling Fan
11. Pressure Test
12. Hopper Remixer Control Lever
13. Manual and Radio Control
14. Cylinder Lubrication
INITIAL START-UP PROCEDURE
Figure 1. MAYCO ST–70
Controls and Indicators
/