Page is loading ...
TREAD® - SXS EDITION
Owner’s Manual

© 2021 Garmin Ltd. or its subsidiaries
All rights reserved. Under the copyright laws, this manual may not be copied, in whole or in part, without the written consent of Garmin. Garmin reserves the right to change
or improve its products and to make changes in the content of this manual without obligation to notify any person or organization of such changes or improvements. Go to
www.garmin.com for current updates and supplemental information concerning the use of this product.
Garmin®, the Garmin logo, inReach®, TracBack®, and Tread® are trademarks of Garmin Ltd. or its subsidiaries, registered in the USA and other countries. BaseCamp™, Garmin
Adventurous Routing™, Garmin Drive™, Garmin Explore™, Garmin Express™, Garmin PowerSwitch™, and myTrends™ are trademarks of Garmin Ltd. or its subsidiaries. These
trademarks may not be used without the express permission of Garmin.
Android™ is a trademark of Google Inc. Apple® and Mac® are trademarks of Apple Inc., registered in the U.S. and other countries. The BLUETOOTH® word mark and logos are owned
by the Bluetooth SIG, Inc., and any use of such name by Garmin is under license. iOverlander™ is a trademark of iOverlander. microSD® and the microSD logo are trademarks of
SD-3C, LLC. Tripadvisor® is a registered trademark of Tripadvisor LLC. Windows® is a registered trademark of Microsoft Corporation in the United States and other countries. Wi‑Fi® is
a registered trademark of Wi-Fi Alliance. Other trademarks and trade names are those of their respective owners.

Table of Contents
Getting Started................................. 1
Device Overview...................................... 1
Turning the Device On or Off.................. 2
Acquiring GPS Signals............................ 2
Status Bar Icons...................................... 3
Using the Touchscreen........................... 3
Using the On-Screen Buttons................. 3
Adjusting the Screen Brightness............ 3
Vehicle Profiles....................................... 4
Adding a Vehicle Profile...................... 4
Choosing a Vehicle Profile.................. 4
Editing a Vehicle Profile...................... 5
Adding Propane Tanks........................ 5
Installation....................................... 5
Mounting Your Device in an ATV or Side-
by-Side..................................................... 5
Power Cable Overview........................ 5
Mounting Considerations................... 6
Mounting the Device on a Roll Bar..... 6
Mounting the Antenna.........................7
Installing the Antenna on the Group
Ride Mount........................................... 8
Installing the Fist Microphone and
Mount................................................... 8
Off-Road Navigation Features........ 10
Routes.................................................... 10
Adventure Roads and Trails................. 10
Straight Line Routes..............................11
Skipping the Next Stop on Your
Route.................................................. 11
Stopping the Route............................ 11
Tracks.................................................... 11
Recording Tracks.............................. 12
Recording Tracks with
inReach®........................................12
Navigating a Track............................ 12
Viewing Your Collections on the
Map.................................................... 12
Pitch and Roll........................................ 12
Calibrating Pitch and Roll................. 12
Adjusting Warning Angles................ 13
Enabling or Disabling Warning Angle
Alerts.................................................. 13
Viewing the Altimeter, Barometer, and
Compass................................................13
Calibrating the Compass.................. 13
Group Ride............................................. 13
Starting a Group Ride........................ 13
Joining a Group Ride......................... 14
Rejoining a Recent Group Ride......... 14
Adding Riders to a Group Ride......... 14
Broadcasting a Message.................. 14
Broadcasting a Location................... 14
Viewing a Group Ride Notification... 15
Exiting a Group Ride.......................... 15
Group Ride Settings.......................... 15
Radio...................................................... 15
Selecting a Preset............................. 15
Selecting a Radio Channel................ 15
Adjusting the Squelch....................... 15
Adding a Custom Radio Preset........ 16
Selecting a Roger Tone..................... 16
Turning the Radio Off........................ 16
Enabling Push-to-Talk with a
Headset.............................................. 16
Transmitting Your Voice................... 16
Adjusting the Radio Volume............. 16
Radio Settings................................... 16
inReach Features............................17
Messages.............................................. 17
Sending a Preset inReach
Message............................................ 17
Sending a Text Message.................. 17
Replying to a Message...................... 17
Checking for Messages.................... 17
Navigating to a Message Location.. 18
Deleting a Message...........................18
Tracking................................................. 18
Starting Tracking............................... 18
Stopping Tracking............................. 18
Sharing Your MapShare Web Page.. 18
inReach Tracking Settings................ 18
SOS.........................................................19
Initiating an SOS Rescue...................19
Canceling an SOS Rescue.................20
Syncing inReach Data........................... 20
Contacts................................................ 20
Adding a Contact............................... 20
Editing a Contact............................... 20
Table of Contents i

Deleting a Contact............................. 20
Data Use and History............................ 20
Viewing Plan and Usage Details.......20
Using the Map................................ 21
Map Tools.............................................. 21
Viewing a Map Tool...........................21
Up Ahead............................................... 22
Viewing Upcoming Locations........... 22
Customizing the Up Ahead
Categories..........................................22
Cities Ahead.......................................... 22
Viewing Upcoming Cities and Exit
Services..............................................22
Trip Information.................................... 22
Viewing Trip Data from the Map...... 22
Customizing the Trip Data
Fields.............................................. 23
Resetting Trip Information................23
Viewing Upcoming Elevation
Changes................................................. 23
Viewing Upcoming Traffic.................... 23
Viewing Traffic on the Map.............. 23
Searching for Traffic Incidents......... 23
Customizing the Map............................ 24
Customizing the Map Layers............ 24
Viewing the Public Lands Map
Key.................................................. 24
Enabling Adventure Roads and Trails
Map Layers........................................ 24
Changing the Map Data Field........... 24
Changing the Map Buttons............... 24
Changing the Map Perspective........ 24
Dog Tracking.................................. 24
Receiving Data From Your Handheld
Device.................................................... 25
Tracking Your Dogs.............................. 25
Dog Status Icons............................... 25
Viewing Your Dogs on the Map............ 25
Using the Apps............................... 26
Viewing the Owner's Manual on
YourDevice............................................26
Music Player.......................................... 26
Adding the Music Player Tool to the
Map.................................................... 26
BirdsEye Imagery.................................. 26
Downloading BirdsEye Imagery........27
Route Planner........................................ 27
Planning a Route............................... 27
Editing and Reordering Locations in a
Route.................................................. 27
Changing Routing Options for a
Route.................................................. 28
Navigating to a Saved Route............ 28
Editing and Saving Your Active
Route.................................................. 28
TracBack®............................................. 28
Following Your Recent Track............28
Saving Your Recent Track as a
Route.................................................. 28
Viewing the Weather Forecast............. 28
Viewing Weather Near a Different
City..................................................... 29
Viewing the Weather Radar.............. 29
Viewing Weather Alerts.....................29
Checking Road Conditions............... 29
Creating a Round-Trip Route................ 30
Garmin PowerSwitch™ App.................. 31
Activating a Power Switch................ 31
Turning Off All Switches................... 31
Customizing a Button....................... 32
Assigning a Switch to a Control
Input................................................... 32
Adding a Custom Layout.................. 32
Adding a Button to a Custom
Layout.............................................33
Arranging Buttons In a Custom
Layout.............................................33
Deleting a Custom Layout or
Button............................................. 33
Routines............................................. 33
Adding a Routine........................... 34
Editing a Routine............................34
Deleting a Routine......................... 34
Tread Audio App................................... 35
LED Controls...................................... 35
Enabling LED Groups..................... 36
Changing the Media Source..........36
LED Light Settings......................... 36
Audio Zone Settings.......................... 36
Live Services, Traffic, and
Smartphone Features..................... 37
ii Table of Contents

Bluetooth Feature Status Icons............37
Pairing with Your Smartphone............. 37
Tips After Pairing the Devices.......... 38
Pairing Additional Bluetooth
Devices...............................................38
Smart Notifications............................... 38
Receiving Notifications..................... 38
Receiving Notifications while
Viewing the Map............................ 39
Viewing the List of Notifications...... 39
Hands-Free Calling................................ 39
Placing a Call..................................... 39
Using In-Call Options......................... 40
Saving a Phone Number as a
Preset................................................. 40
Enabling or Disabling Bluetooth
Features................................................. 40
Showing or Hiding App Notifications
(Android™)..........................................40
Showing or Hiding Notification
Categories for Your Apple®
Device.................................................40
Enabling or Disabling Bluetooth Features
for Your Headset................................... 41
Disconnecting a Bluetooth Device....... 41
Deleting a Paired Phone....................... 41
Street Navigation............................41
Starting a Route.....................................41
Starting a Route by Using the Map...41
Your Route on the Map......................... 42
Active Lane Guidance....................... 43
Viewing Turns and Directions...........43
Viewing the Entire Route on the
Map.................................................... 43
Changing Your Active Route.................44
Adding a Location to Your Route..... 44
Shaping Your Route...........................44
Avoiding Delays, Tolls, and Areas........ 44
Avoiding Traffic Delays on Your
Route.................................................. 44
Avoiding Toll Roads.......................... 44
Avoiding Toll Stickers....................... 45
Avoiding Road Features.................... 45
Custom Avoidances.......................... 45
Avoiding a Road............................. 45
Avoiding an Area........................... 45
Disabling a Custom Avoidance.....45
Deleting Custom Avoidances....... 45
Arriving at Your Destination.............. 46
Changing the Route Calculation
Mode...................................................... 46
Taking a Route Using Garmin
Adventurous Routing™.......................... 46
Taking a Detour..................................... 46
Going Home...........................................46
Editing Your Home Location.............46
Parking Near Your Destination............. 47
Traffic.................................................... 47
Receiving Traffic Data Using Your
Smartphone....................................... 47
Viewing Traffic on the Map.............. 47
Searching for Traffic Incidents..... 47
Finding and Saving Locations......... 48
Finding a Location Using the Search
Bar.......................................................... 48
Location Search Results....................... 49
Changing the Search Area.................... 49
Finding a Location by Category............50
Navigating to Points of Interest Within
a Venue.............................................. 50
Points of Interest...................................50
Viewing Your Garmin Explore
Waypoints.......................................... 50
Synchronizing Garmin Explore
Account Data................................. 50
Finding National Parks...................... 51
Finding Campgrounds.......................51
Finding Ultimate Campgrounds Points
of Interest...........................................51
Finding RV Parks............................... 51
Finding RV Services...........................51
Finding iOverlander™ Points
of Interest...........................................52
Finding Powersport Points of
Interest............................................... 52
Finding Adventure Points..................52
Tripadvisor......................................... 52
Finding Tripadvisor Points of
Interest........................................... 52
Finding Parking Near Your Current
Location................................................. 53
Finding Parking Near a Specified
Location................................................. 53
Search Tools..........................................53
Table of Contents iii

Finding an Address........................... 53
Finding a Location Using
Coordinates....................................... 53
Finding Fuel Stations and Prices...... 53
Viewing Recently Found Locations...... 53
Clearing the List of Recently Found
Locations........................................... 54
Viewing Current Location
Information............................................ 54
Finding Emergency Services and
Fuel..................................................... 54
Getting Directions to Your Current
Location............................................. 54
Adding a Shortcut................................. 54
Removing a Shortcut......................... 54
Saving Locations................................... 54
Saving a Location.............................. 54
Saving Your Current Location........... 55
Saving a Waypoint on the Map......... 55
Editing a Saved Location.................. 55
Assigning Categories to a Saved
Location............................................. 55
Deleting a Saved Location................ 55
Driver Awareness Features and
Alerts............................................. 56
Enabling or Disabling Driver Alerts.......56
Settings..........................................57
Navigation Settings............................... 57
Map and Vehicle Settings..................... 57
Enabling Maps................................... 57
Connecting to a Wireless Network.......57
Enabling Bluetooth Wireless
Technology............................................ 57
Driver Assistance Settings................... 58
Traffic Settings...................................... 58
Display Settings.....................................58
Adjusting Sound and Notification
Volume................................................... 58
Setting the Text Language....................58
Date and Time Settings........................ 58
Device Settings......................................59
Enabling or Disabling Location
Services................................................. 59
Device Information......................... 59
Viewing E-label Regulatory and
Compliance Information....................... 59
Tread - SXS Edition Specifications.......59
Group Ride Specifications.................... 59
Charging the Device.............................. 60
Device Maintenance....................... 60
Garmin Support Center......................... 60
Map and Software Updates.................. 60
Updating Maps and Software Using a
Wi‑Fi Network.................................... 61
Product Updates................................61
Updating Maps and Software with
Garmin Express............................. 62
Device Care............................................63
Cleaning the Outer Casing................ 63
Cleaning the Touchscreen................ 63
Avoiding Theft................................... 63
Restarting the Device............................ 63
Removing the Device from the
Mount..................................................... 63
Troubleshooting............................. 63
My device is not acquiring satellite
signals....................................................63
My battery does not stay charged for
very long................................................ 64
My device does not connect to my
phone..................................................... 64
My device does not appear as a
removable drive on my computer........ 64
My device does not appear as either a
portable device or a removable drive or
volume on my computer....................... 64
Appendix........................................ 64
Garmin PowerSwitch............................ 64
Mounting Considerations................. 65
Mounting the Device......................... 65
Opening the Front Cover................... 66
Connecting Accessories................... 67
Connecting a Control Input............... 67
Connecting the Device to Vehicle
Power................................................. 68
Pairing with a Garmin Navigation
Device.................................................68
Garmin PowerSwitch
Specifications.................................... 69
iv Table of Contents

Troubleshooting................................ 69
My Garmin PowerSwitch will not
stay connected.............................. 69
My accessories are not receiving
power..............................................69
Tread Audio........................................... 69
Tools and Materials Needed............ 70
Tread Audio Box Mounting
Considerations.................................. 70
Mounting the Tread Audio Box Black
Box Device..................................... 70
Connections................................... 70
Port Identification...................... 71
Speaker and LED Wiring Harness
Wire and Connector
Identification.............................. 72
RCA Wiring Harness Wire and
Connector Identification............73
Connecting the Device to Vehicle
Power..........................................74
Using the Heat-Shrink Crimp
Connectors................................. 75
Complete System Wiring........... 75
Speaker Zones........................... 76
Single-Zone System Wiring
Example...................................... 76
Wireless Remote Mounting
Considerations.................................. 77
Mounting the Wireless Remote.... 77
Mounting the Speakers and
Brackets............................................. 78
Wiring............................................. 79
Wire Gauge Guide...................... 79
Additional Speakers...................79
Wireless Remote Overview............... 80
Connecting the Wireless Remote to
your Tread Audio Box.................... 80
Pairing with a Garmin Navigation
Device.................................................81
Tread Audio Box Specifications....... 81
Tread 6.5" XS-LED Tower Speakers
Specifications.................................... 82
Dimensions.................................... 82
Bracket Specifications...................... 83
Bracket Side Dimensions.............. 83
Bracket Top Dimensions............... 83
Data Management................................ 83
About Memory Cards........................ 84
Installing a Memory Card for Maps
and Data............................................. 84
Formatting the Memory Card........... 84
Connecting the Device to Your
Computer........................................... 84
Transferring GPX Files From Your
Computer........................................... 84
Transferring Data From Your
Computer........................................... 85
Disconnecting the USB Cable........... 85
Adding BaseCamp™ Data to
Garmin Explore.................................. 85
Exporting Data from BaseCamp with
a PC................................................ 85
Exporting Data from BaseCamp with
an Apple Computer........................85
Importing Data to Garmin
Explore........................................... 86
Purchasing Additional Maps................ 86
Table of Contents v

Getting Started
WARNING
See the Important Safety and Product Information guide in the product box for product warnings and other
important information.
1Connect to a Wi‑Fi® network (Connecting to a Wireless Network, page57)(optional).
2Pair your Bluetooth® phone and headset (Pairing with Your Smartphone, page37) (optional).
3Update the maps and software on your device (Product Updates, page61).
4Acquire GPS signals.
5Mount the device and connect it to power (Installation, page5).
6Adjust the screen brightness (Adjusting the Screen Brightness, page3).
7Navigate to your destination (Starting a Route, page41).
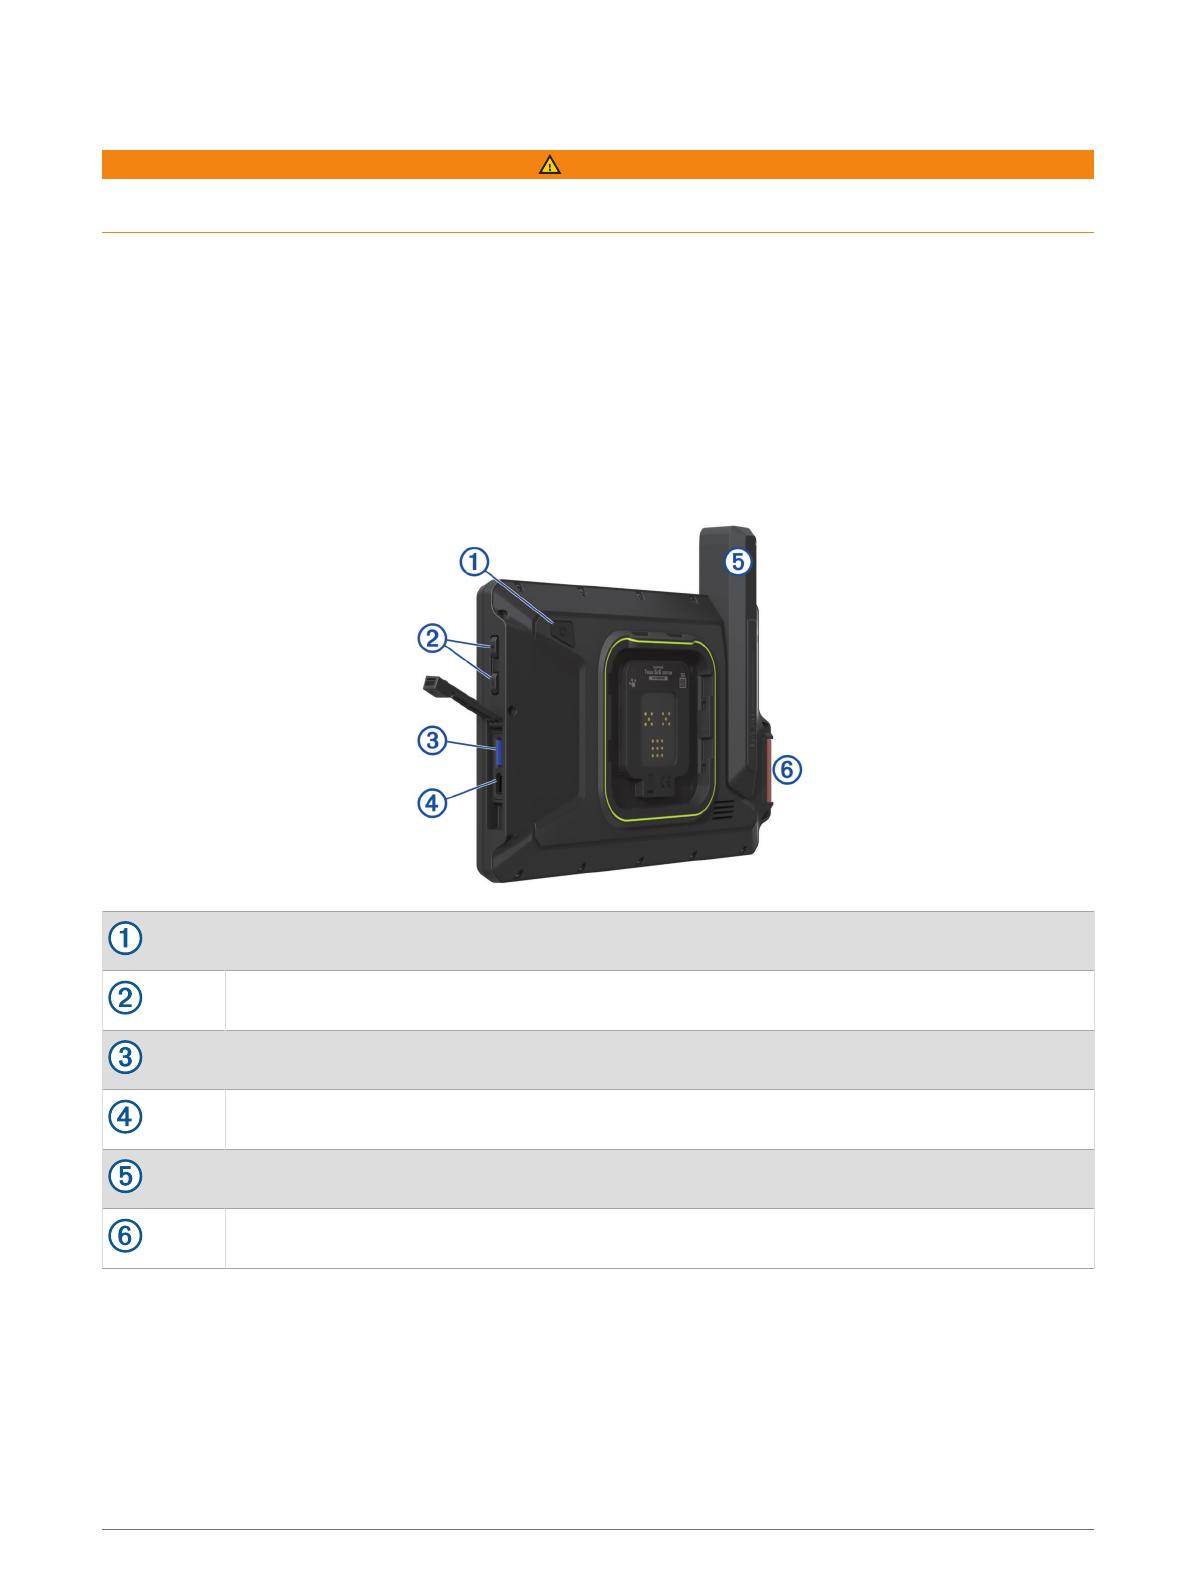
Device Overview
Power button
Volume control
microSD® memory card slot
USB power and data port
Iridium® antenna
SOS button (under protective cover)
Getting Started 1
Turning the Device On or Off
• To turn the device on, press the power key , or connect the device to power.
• To put the device in power saving mode, press the power key while the device is on.
While in power saving mode, the screen is off and the device uses very little power, but it can wake instantly
for use.
TIP: You can charge your device faster by putting it in power saving mode while charging the battery.
• To turn off the device completely, hold the power key until a prompt appears on the screen, and select Power
off.
Acquiring GPS Signals
When you turn on your navigation device, the GPS receiver must collect satellite data and establish the current
location. The time required to acquire satellite signals varies based on several factors, including how far you are
from the location where you last used your navigation device, whether you have a clear view of the sky, and how
long it has been since you last used your navigation device. The first time you turn on your navigation device, it
may take several minutes to acquire satellite signals.
1Turn on the device.
2Verify appears in the status bar, and enable location services if it does not (Enabling or Disabling Location
Services, page59).
3If necessary, go to an open area with a clear view of the sky, away from tall buildings and trees.
appears at the top of the navigation map until the device determines your location.
2 Getting Started
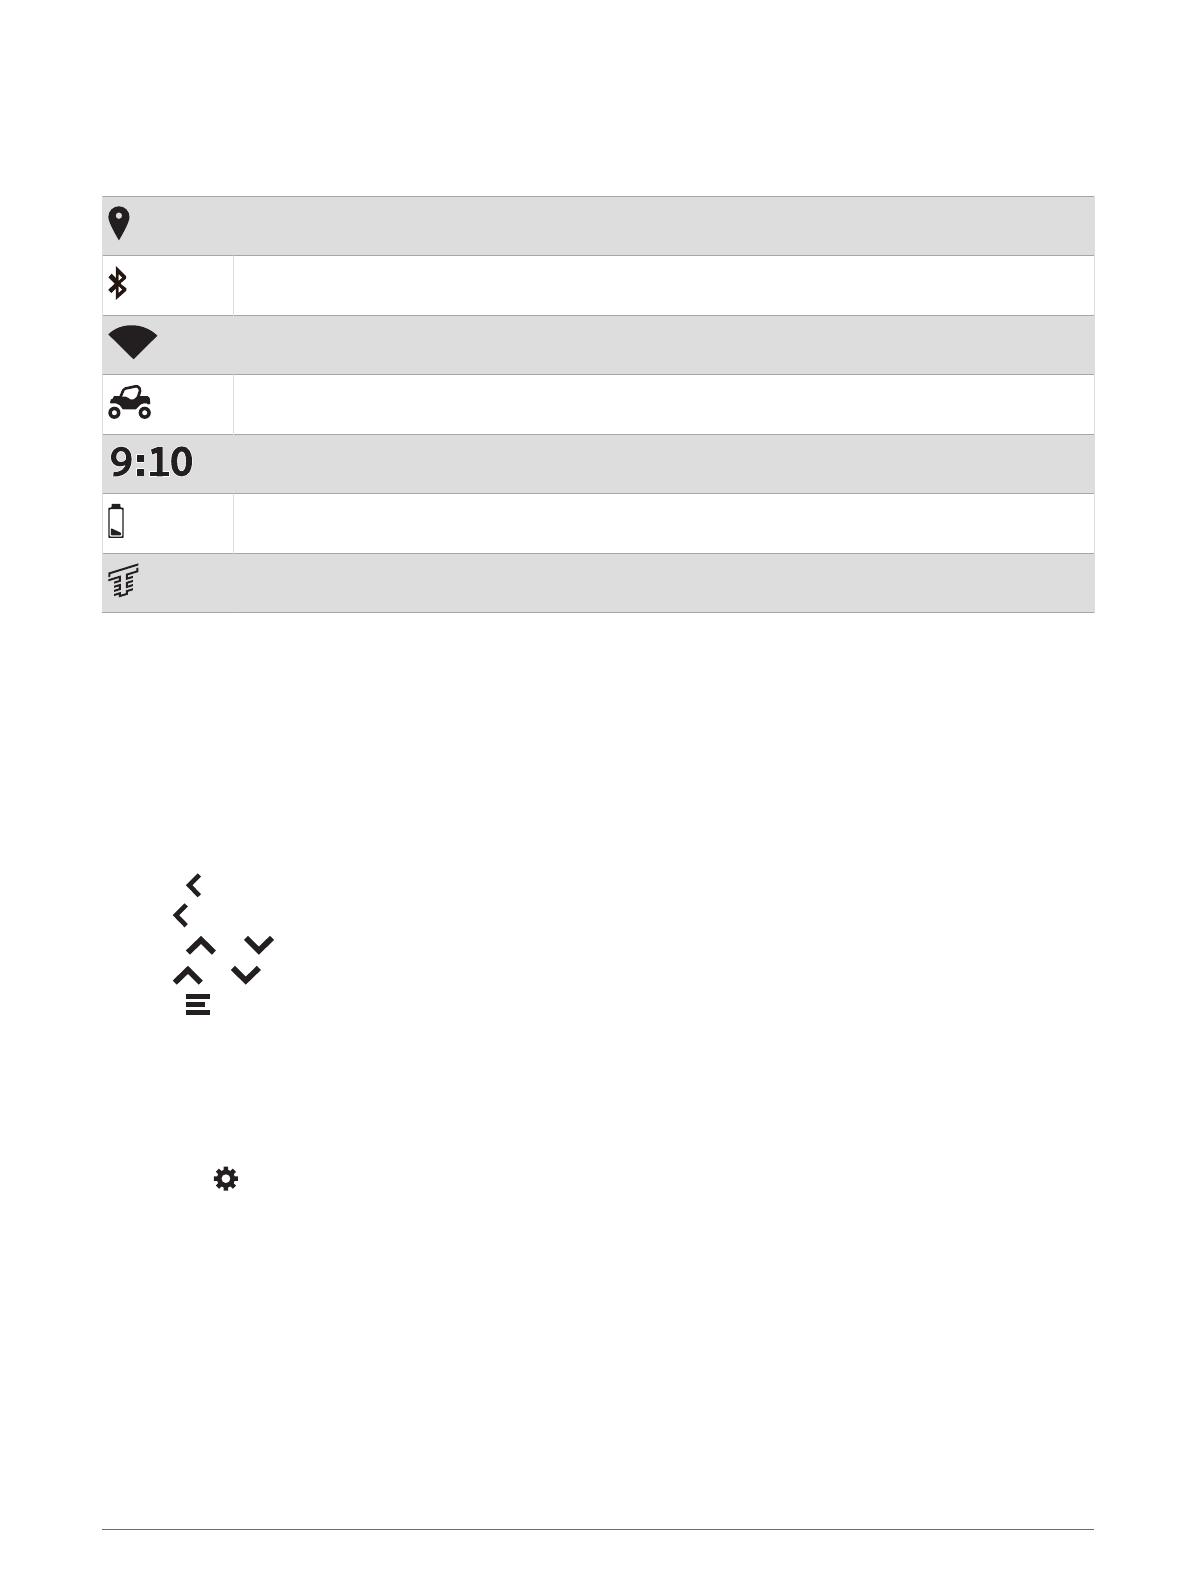
Status Bar Icons
The status bar is located at the top of the main menu. The status bar icons display information about features
on the device. You can select some icons to change settings or view additional information.
Location services status. Indicates your location has been established.
Bluetooth technology status.
Wi‑Fi signal strength.
Active vehicle profile.
Current time.
Battery charge level.
Tread app connection status (Pairing with Your Smartphone, page37).
Using the Touchscreen
• Tap the screen to select an item.
• Drag or swipe your finger across the screen to pan or scroll.
• Pinch two fingers together to zoom out.
• Spread two fingers apart to zoom in.
Using the On-Screen Buttons
On-screen buttons allow you to navigate the pages, menus, and menu options on your device.
• Select to return to the previous menu screen.
• Hold to quickly return to the main menu.
• Select or to scroll through lists or menus.
• Hold or to scroll faster.
• Select to see a context-based menu of options for the current screen.
Adjusting the Screen Brightness
You can adjust the brightness manually, using either the notification panel or the settings menu.
1Select an option:
• Swipe down twice from the top of the screen to expand the quick settings in the notification panel.
• Select > Device > Display > Brightness level.
2Use the slider bar to adjust the brightness.
Getting Started 3
Vehicle Profiles
WARNING
Entering your vehicle profile characteristics does not guarantee that your vehicle’s characteristics will be
accounted for in all route suggestions. Limitations may exist in map data for some route suggestions. Always
defer to all posted road signs and conditions during vehicle operation. Failure to do so could lead to an accident
involving personal injury or death.
Vehicle profiles allow you to choose different settings based on each vehicle you use with the device. The
current vehicle profile is indicated by an icon in the status bar. If your vehicle profile includes a trailer, an icon of
the trailer appears with the vehicle icon.
RV or motor home profile
Motorcycle profile
ATV profile
Side-by-side profile
Full size profile
Snowmobile profile
Other profile
Profile with trailer
Profile with travel trailer
Profile with boat trailer
Adding a Vehicle Profile
You can add a vehicle profile for each vehicle to be used with your device.
1Select > Navigation > Vehicle Profile > .
2Select your current vehicle.
3Follow the on-screen instructions to enter the vehicle characteristics.
Choosing a Vehicle Profile
1Swipe down twice from the top of the screen.
2Select the vehicle profile icon on the status bar.
4 Getting Started
Editing a Vehicle Profile
You can change basic vehicle profile information or add detailed information to a vehicle profile, such as
maximum speed.
1Select > Navigation > Vehicle Profile.
2Select the vehicle profile to edit.
3Select an option:
• To edit the vehicle profile information, select , and select a field to edit.
• To rename the vehicle profile, select > > Rename Profile.
• To delete the vehicle profile, select > > Delete.
Adding Propane Tanks
NOTE: This feature is not available on all product models.
When you add your propane tanks to your vehicle profile, the device avoids routing through areas with propane
tank restrictions that may affect your route. The device also alerts you when you approach areas that require
you to shut off your propane tanks.
1From the vehicle profile, select > Propane Tanks > Add Tank.
2Enter the weight of the propane tank, and select Save.
Installation
Mounting Your Device in an ATV or Side-by-Side
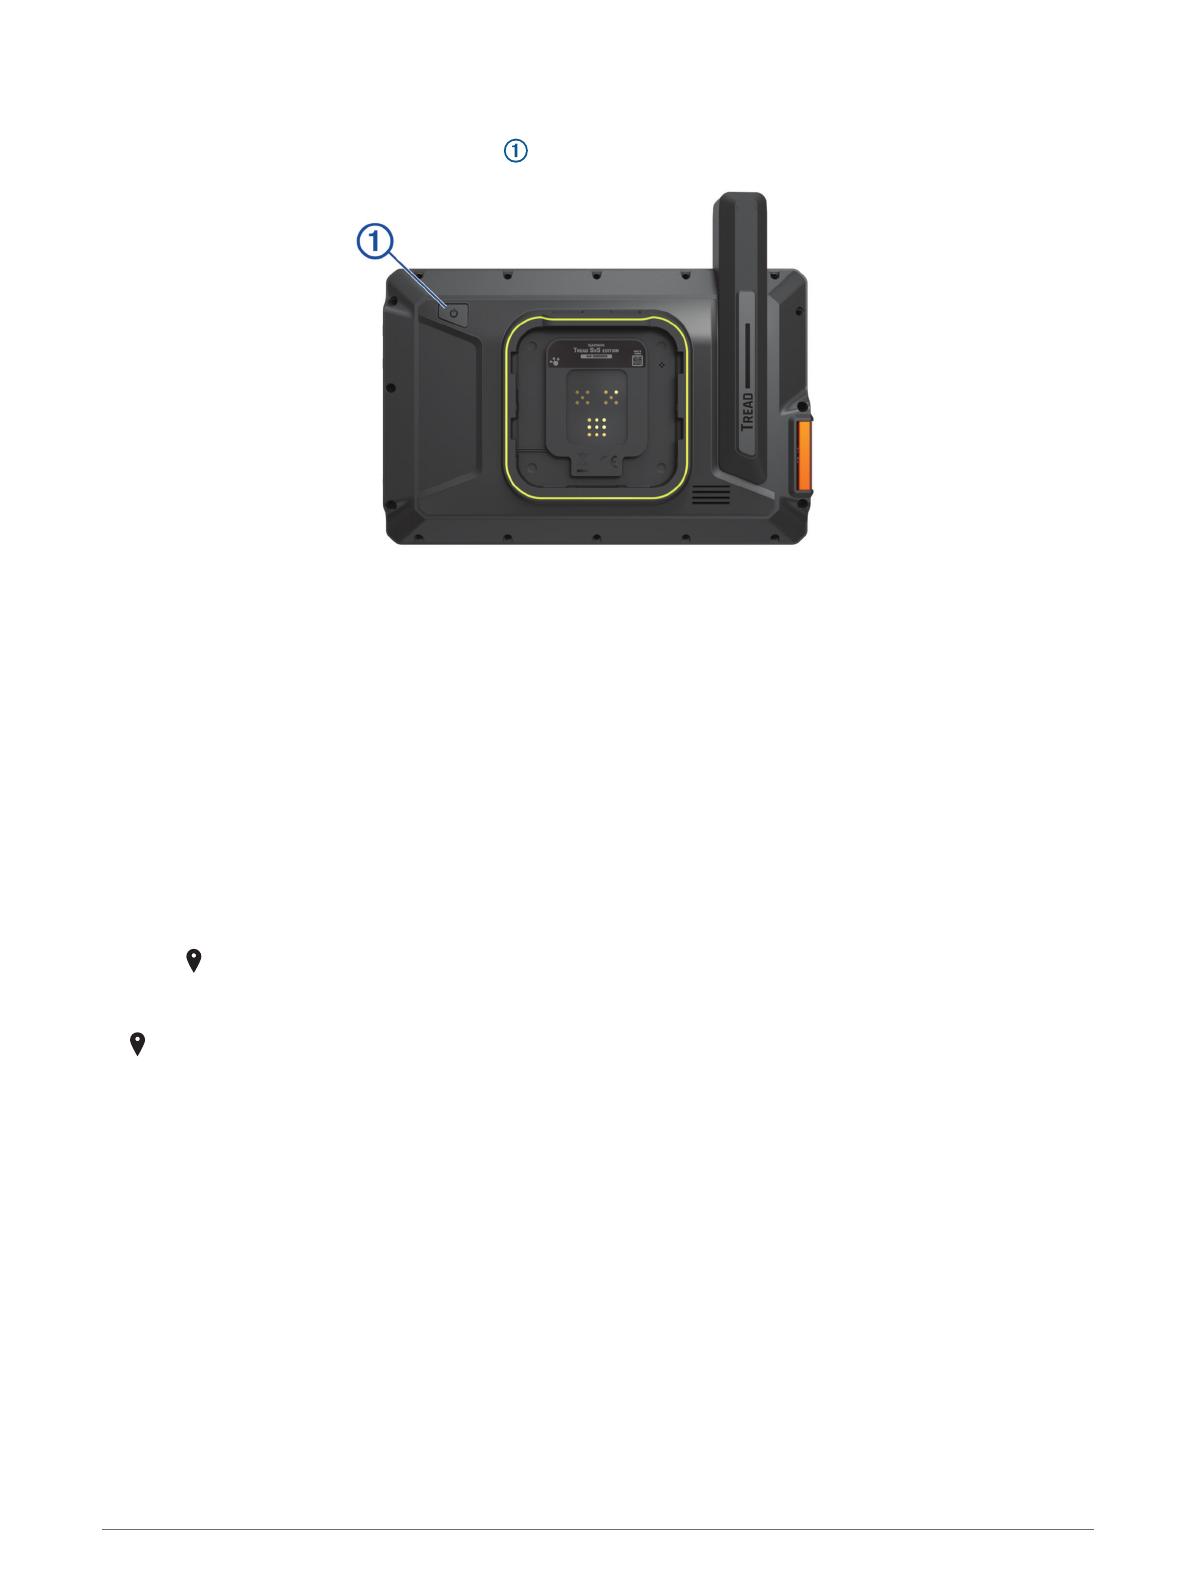
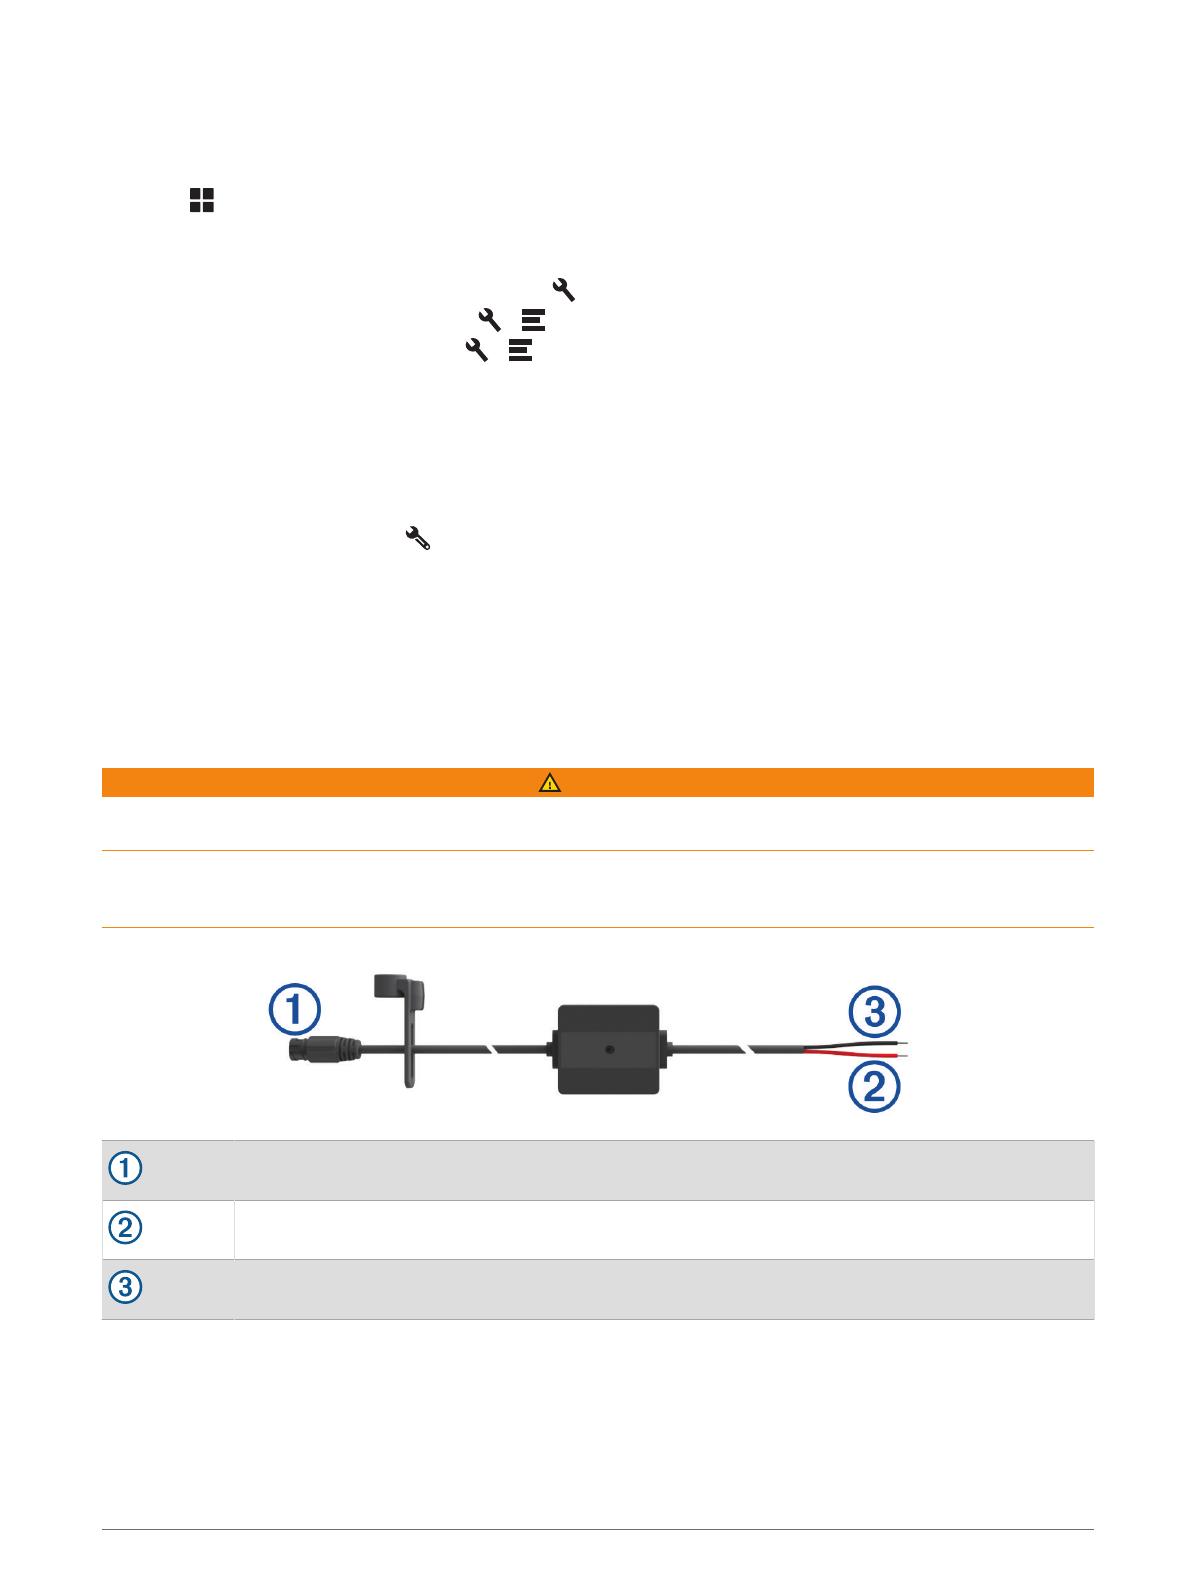
Power Cable Overview
WARNING
See the Important Safety and Product Information guide in the product box for product warnings and other
important information.
Garmin® strongly recommends having an experienced installer with the proper knowledge of electrical systems
install the device. Incorrectly wiring the power cable can result in damage to the vehicle or the battery and can
cause bodily injury.
Mount connector
12to24 Vdc system power (red)
System ground (black)
Installation 5

Mounting Considerations
• The device must be mounted close to the bus bar or battery and within the range of the supplied power cable.
• The mounting location must allow for the routing and connection of all cables.
• Excess wire should be bundled and secured using the included zip ties.
• The electrical contacts must be free from paint.
Mounting the Device on a Roll Bar
WARNING
Both the device and its mount contain magnets. Under certain circumstances, magnets may cause interference
with some internal medical devices and electronic devices, including pacemakers, insulin pumps, or hard drives
in laptop computers. Keep the device away from medical devices and electronic devices.
1Loosen the knob on the roll bar mount.
2Place the mount around the roll bar.
3Tighten the knob on the mount until the clamp is secure.
4Insert the ball on the Group Ride mount into the double-socket arm .
5Tighten the knob slightly.
6If necessary, adjust the Group Ride mount for better viewing and operation.
7Tighten the knob to secure the mount.
8Place the device onto the magnetic mount, and push the lock down to secure the device to the mount.
9Connect the Group Ride power cable to the connector on the vehicle wiring harness.
6 Installation
10 Tighten the collar around the connected power cables.
11 Route the power cable along a suitable path in your vehicle, and secure it using the included zip ties.
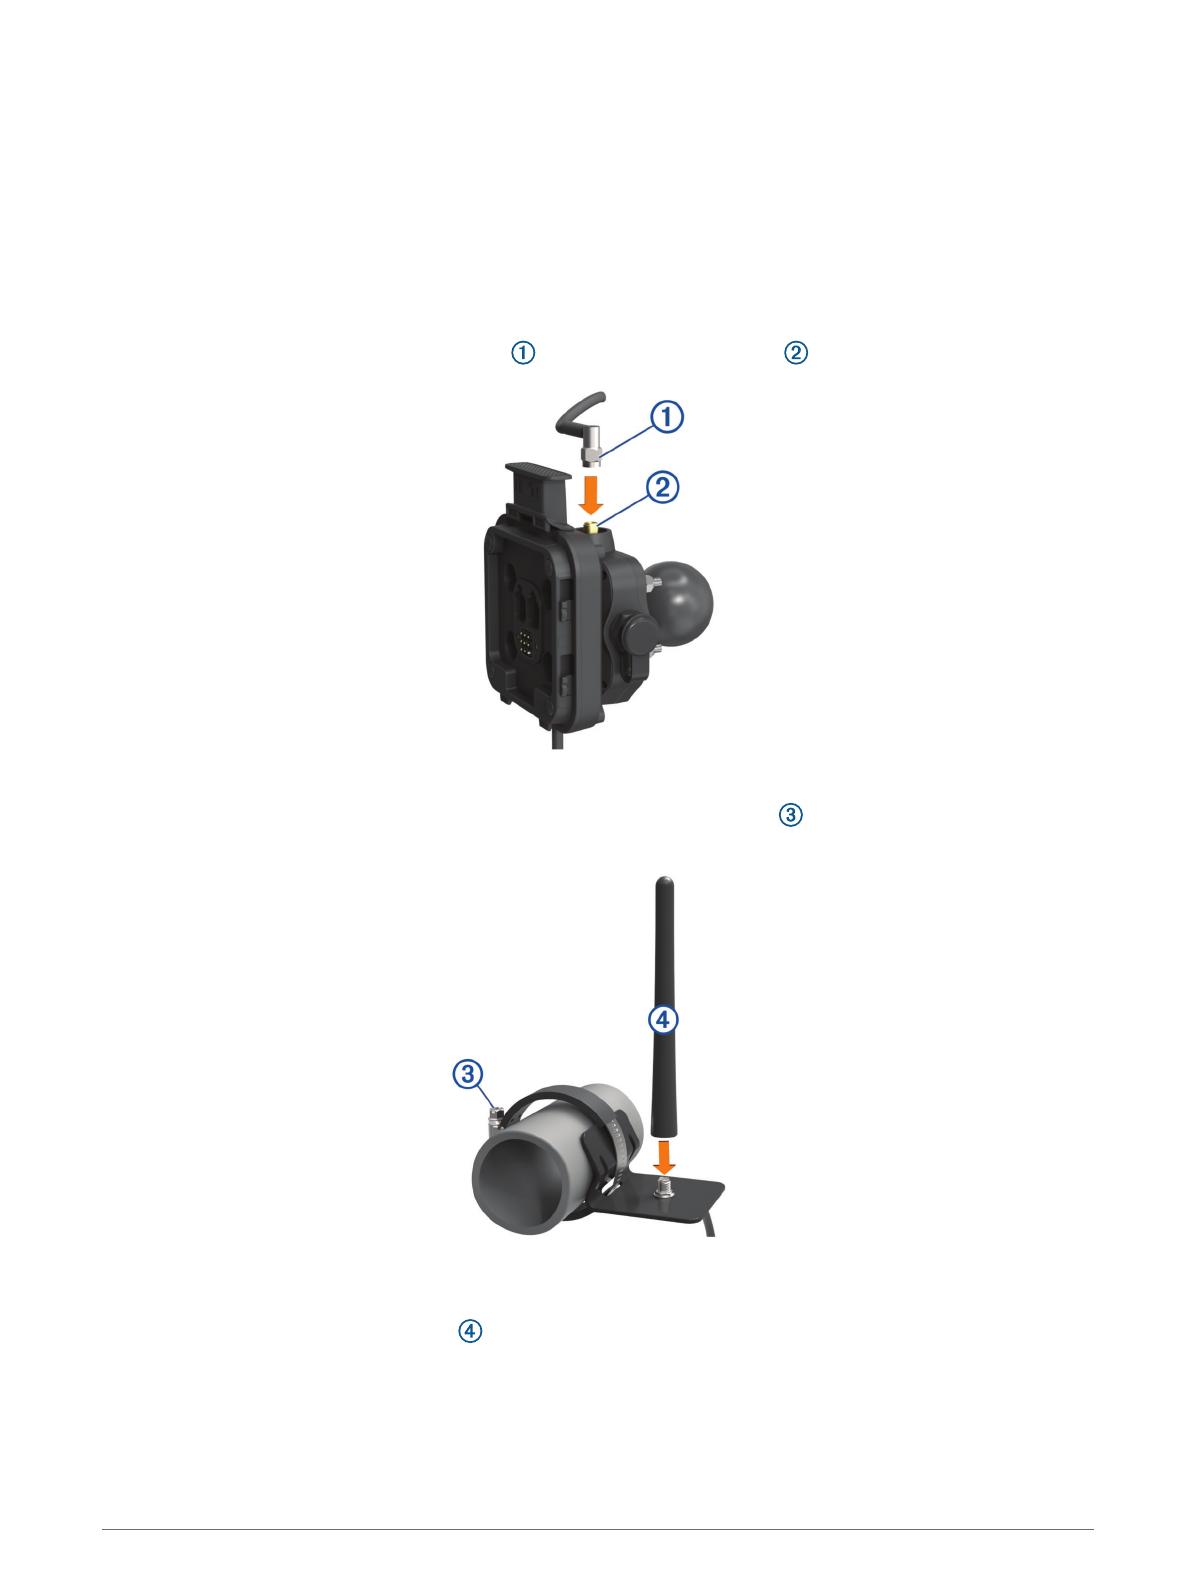
Mounting the Antenna
NOTE: The mounted antenna must be at least 4 cm (1.57 in.) away from the nearest roll bar or metal surface to
avoid radio interference.
You can use the external antenna mount to mount your antenna in a more suitable location for your vehicle,
such as a roll bar at the rear of your vehicle, to receive better radio reception. For the best results, use this
method for vehicles that have a roll cage.
1Screw down and tighten the antenna cable onto the Group Ride mount .
2Find a suitable location for the antenna.
3Using a flat head screwdriver or 5/16 in. (8 mm) nut driver, loosen the bolt on the external antenna mount
until the ring separates.
4Place the mount around the roll bar.
5Tighten the bolt on the mount until the ring is secure.
6Screw down and tighten the antenna onto the external antenna mount plate.
7Route the antenna cable along a suitable path using the roll bars in your vehicle, and secure it using the
included zip ties.
8Secure any loose cable to the roll bar using the included zip ties.
NOTE: You should avoid bundling loose cable behind body panels to reduce antenna interference.
Installation 7

Installing the Antenna on the Group Ride Mount
NOTE: The mounted antenna must be at least 4 cm (1.57 in.) away from the nearest roll bar or metal surface to
avoid radio interference.
For the best range performance, use the external antenna mount. You can mount the antenna directly onto the
Group Ride mount when it is not possible to use the external antenna mount (Mounting the Antenna, page7).
Screw down and tighten the antenna onto the Group Ride mount.
Installing the Fist Microphone and Mount
Before you can attach the fist microphone mount to your dashboard, you must select a suitable location on the
dashboard.
WARNING
It is your responsibility to ensure the mounting location complies with all applicable laws and ordinances, and
does not block your view of the road during the safe operation of your vehicle.
NOTICE
Avoid wires, gauges, air bags, air bag covers, HVAC, and other items when drilling pilot holes and attaching the
mount to the vehicle. Garmin is not responsible for any damages or consequences arising from the installation.
NOTE: This feature is not available on all product models.
1Align and insert the connector on the fist microphone onto the Group Ride mount.
2Tighten the collar around the connected cable.
8 Installation

3Place the mount on the selected location.
4Using the mount as a template, mark the three screw locations.
5Drill pilot holes (optional).
For some types of mounting material, drilling pilot holes is necessary.
6Securely fasten the mount to the surface using the supplied screws .
7Slide the fist microphone onto the mount.
Installation 9
Off-Road Navigation Features
Routes
A route is a path from your current location to one or more destinations.
• For off-road use, you can set the device to calculate point-to-point routes in a straight line (Straight Line
Routes, page11).
• The device calculates a recommended route to your destination based on the preferences you set, including
the route calculation mode (Changing the Route Calculation Mode, page46) and avoidances (Avoiding
Delays, Tolls, and Areas, page44).
• You can start navigating to your destination quickly using the recommended route, or you can select an
alternate route (Starting a Route, page41).
• If there are specific roads you need to use or avoid, you can customize the route (Adding a Location to Your
Route, page44).
• You can add multiple destinations to a route (Adding a Location to Your Route, page44).
Adventure Roads and Trails
WARNING
Entering your vehicle profile characteristics does not guarantee that your vehicle's characteristics will be
accounted for in all route suggestions. Limitations may exist in map data for some route suggestions. Always
defer to all posted road signs and conditions during vehicle operation. Failure to do so could lead to an accident
involving personal injury or death.
This device can navigate off-highway roads and trails based on your vehicle profile. Trails are color coded
based on accessibility. You can select to set which adventure roads and trails appear on the map.
10 Off-Road Navigation Features
Straight Line Routes
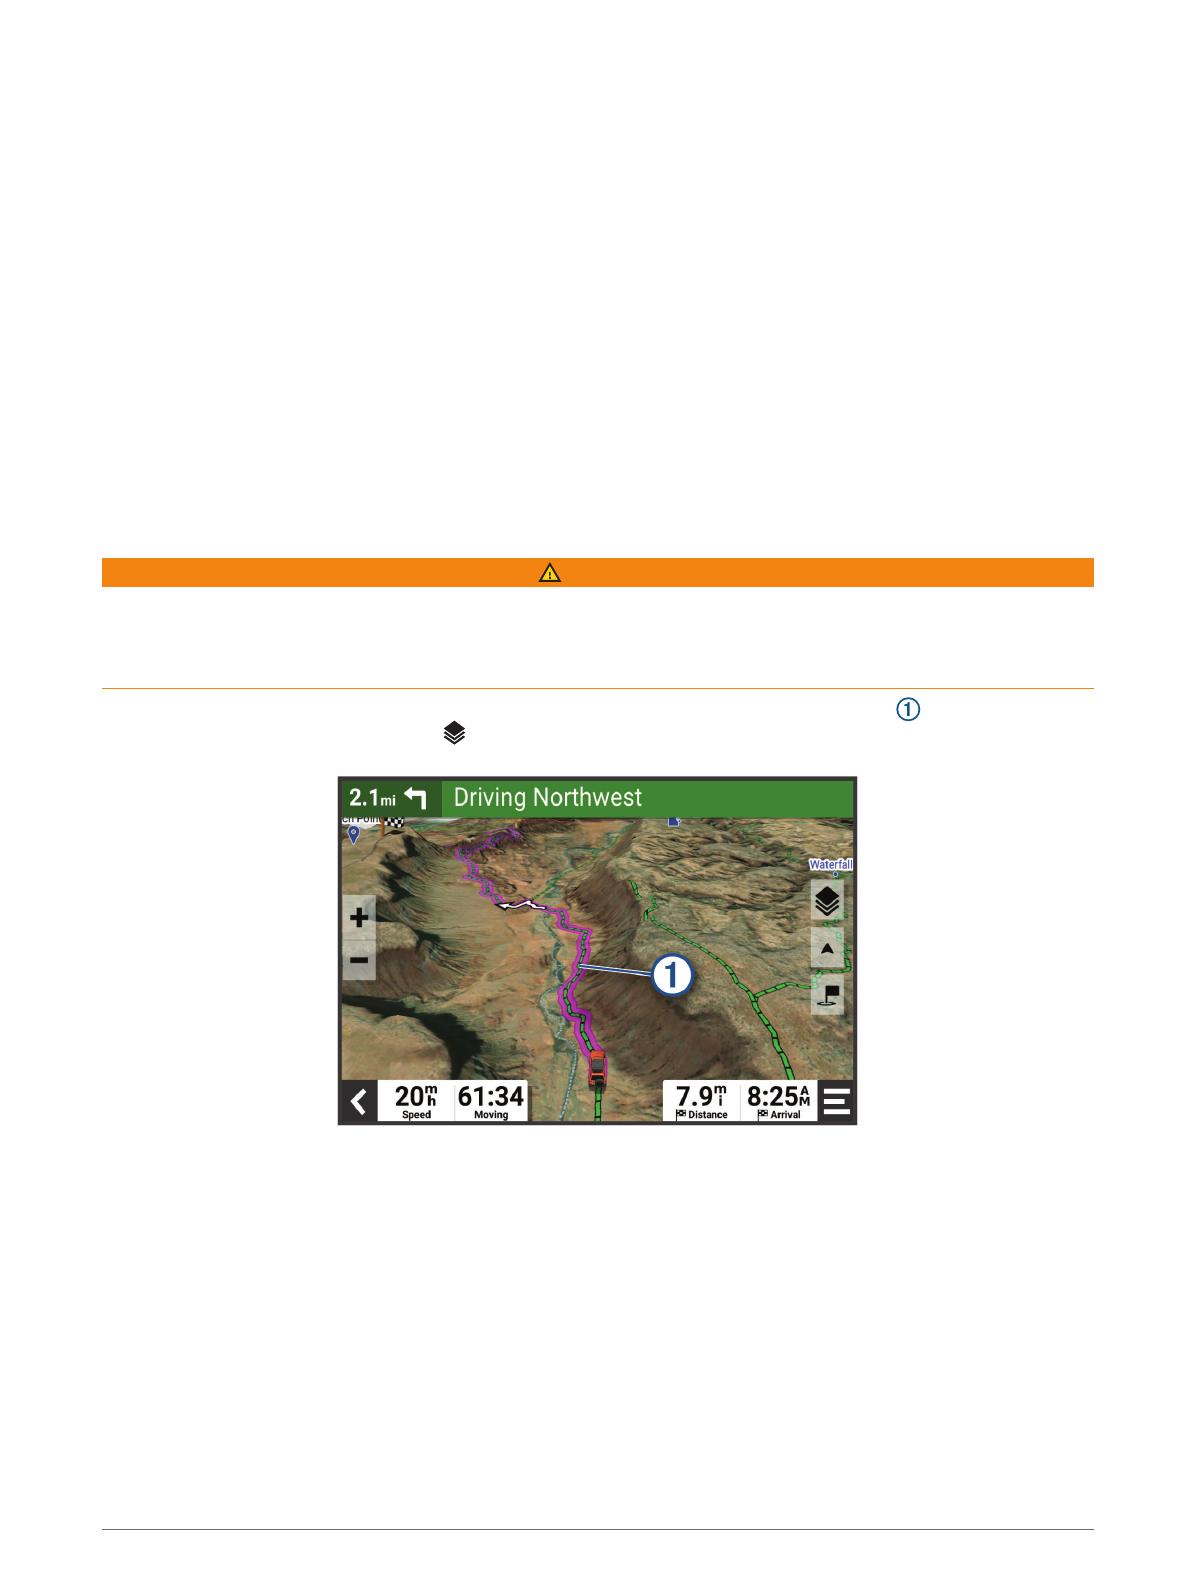
For areas without defined roads or trails, the device guides you to your destination using a straight line route.
You can set multiple waypoints to navigate a route through areas without roads.
Distance to the destination.
Route highlighted on the map.
Vehicle speed.
Map tools. Provides tools to show you more information about your route and surroundings.
Map layers. Allows you to change the map orientation and add topographic and BirdsEye imagery to your
map view.
Skipping the Next Stop on Your Route
You can skip an upcoming location you previously added to your route.
From the map, select > Yes.
Stopping the Route
From the map, select > Stop.
Tracks
A track is a recording of your path. The track log contains information about the recorded path, including time,
location, and elevation information.
Off-Road Navigation Features 11

Recording Tracks
Tracking records your path. When you start tracking, your device logs your location and updates the track line. If
your device is paired with a Garmin Explore™ account, your device periodically synchronizes recorded tracks with
the app.
1From the main menu, swipe to the left and select Track Recorder.
2Select Start.
Recording Tracks with inReach®
You can record your path using the track recorder and inReach team tracking simultaneously.
From the main menu, swipe to the left, and select inReach > > Tracking Sync.
Navigating a Track
You can navigate a saved track using the Garmin Explore app on your device.
1Select > Adventure > Explore > Tracks.
2Select a track.
3Select Go!.
Viewing Your Collections on the Map
You can view your Garmin Explore collections directly on the map. You must enable the collections map layer to
use this feature.
NOTE: If you do not assign a collection category to your Garmin Explore data, it appears as an unorganized
collection.
1Select View Map > > Collections.
2Select one or more collection categories from the list.
3Select Save.
Your collections appear as icons on the map.
Pitch and Roll
WARNING
The Pitch and Roll application is intended to show vehicle angles based on calibrated measurements only. You
are responsible for calibrating the device. Changes to the position of the device after calibration may affect
the accuracy of its measurements. Measured values are suggestions only based on your input into the device.
Take readings often and carefully, and allow the readings to stabilize after significant changes in environmental
conditions. Always allow a margin of safety for changing conditions and reading errors. Failure to account for
your vehicle and your environment could cause an incident resulting in death or serious injury.
The device alerts you if your vehicle pitches or rolls at an angle that could affect the vehicle's stability.
Calibrating Pitch and Roll
You can set the angle of your vehicle to zero at any time.
1Park your vehicle on a flat, level surface.
2Adjust the position of your device in the mount so you can comfortably view the screen.
3From the main menu, swipe to the left and select Pitch and Roll > Calibrate.
The values for pitch and roll reset to 0 degrees.
WARNING
To maintain the best accuracy, you must calibrate pitch and roll each time you reposition your device.
12 Off-Road Navigation Features
/