Simmons DA350 User manual
- Category
- Supplementary music equipment
- Type
- User manual

owner’s manual
www.simmonsdrums.net
www.SimmonsDrums.net
DA350
Electronic Drum Monitor System

2
DA350 Electronic Drum Monitor System
OWNER’S MANUAL
safety instructions
Please keep this instruction manual for future reference and for the duration
of owning the DA350 Electronic Drum Monitor System. Please carefully
read and understand the instructions inside this owner’s manual before
attempting to operate your new electronic drum monitor system.
This instruction manual includes essential safety information regarding the
use and maintenance of the amplifier. Take special care to heed all warning
symbols and signs inside this manual and those printed on the amplifier on
the back of the loudspeaker.
WARNING
TO PREVENT FIRE OR SHOCK HAZARD, DO NOT EXPOSE THE AMPLIFIER
TO WATER/MOISTURE, NOR SHOULD YOU OPERATE THE AMPLIFIER
NEAR ANY WATER SOURCE.
The exclamation point triangular symbol is intended to alert the user to the
presence of important operating and maintenance(servicing) instructions in
the user manual accompanying the Amplifier.
The lightning flash with an arrow triangular symbol is intended to alert
the user to the presence of non-insulated “dangerous voltage” within the
product’s enclosure, and may be of sufficient magnitude to constitute a risk
of electric shock.
WARNING
Handle the power supply cord with care.
Do not damage or deform it as it may cause electric shock or malfunction
when used. Hold the plug attachment when removing from wall outlet. Do
not pull on the power cord.
IMPORTANT SAFETY PRECAUTIONS
1. Read these instructions.
2. Keep these instructions.
3. Heed all warnings.
4. Follow all Instructions.
5. Do not use this apparatus near water.
6. Clean only with dry cloth.
7. Do not block any ventilation openings. Install in accordance with the
manufacturer's instructions. DO NOT turn on the amplifier module before
connecting all other external devices.
8. Do not install near any heat sources such as radiators, heat registers,
stoves, or other apparatus (including amplifiers) that produce heat.
9. Do not defeat the safety purpose of the polarized or grounding-type
plug. A polarized plug has two blades with one wider than the other. A
grounding type plug has two blades and a third grounding prong. The
wide blade or the third prong is provided for your safety. If the provided
plug does not fit into your outlet, consult an electrician for replacement
of the obsolete outlet.
10. Protect the power cord from being walked on or pinched particularly
at plugs, convenience receptacles, and the point where they exit from
the apparatus.
11. Only use attachment/accessories specified by the manufacturer.
12. Use only the cart, stand, tripod, bracket or table specified
by the manufacturer, or sold with the apparatus. When a
cart is used, use caution when moving the cart/apparatus
combination to avoid injury from tip-over.
13. Unplug this apparatus during lightning storms or when unused for long
periods of time.
14. Refer all servicing to qualified service personnel. Servicing is required
when the apparatus has been damaged in any way, such as power-
supply cord or plug is damaged, liquid has been spilled or objects have
fallen into the apparatus, the apparatus has been exposed to rain or
moisture, does not operate normally, or has been dropped.
15. POWER SOURCES – This product should be operated only from the
type of power source indicated on the rating label. If you are not sure
of the type of power supply to your home, consult your product dealer
or local power company.
16. Where the mains plug or an appliance coupler is used as the disconnect
device, the disconnect device shall remain readily operable.
17. OBJECT AND LIQUID ENTRY – Care should be taken so that objects do
not fall and liquids are not spilled into the enclosure through openings.
18. Water and Moisture: This product should be kept away from direct
contact with liquids. The apparatus shall not be exposed to dripping or
splashing and that no objects filled with liquids, such as vases, shall be
placed on the apparatus.
19. Keep the speaker system out of extended or intense direct sun light.
20. No containers filled with any type of liquid should be placed on or near
the speaker system.
21. SERVICING – The user should not attempt any service to the speaker
and/or amplifier beyond that described in the operating instructions.
All other servicing should be referred to qualified service personnel.
22. VENTILATION – Slots and openings in the amplifier are provided
for ventilation and to ensure reliable operation of the product and to
protect it from overheating. These openings must not be blocked or
covered. The openings should never be blocked by placing the product
on a bed, sofa, rug, or other similar surface. This product should not be
placed in a built-in installation such as a bookcase or rack.
23. Protective earthing terminal: The apparatus should be
connected to a main socket outlet with a protective earthing
connection.
24. ACCESSORIES – Do not place this product on an unstable cart, stand,
tripod, bracket, or table. The product may fall, causing serious injury to
a child or adult, and serious damage to the product. Use only with a
cart, stand, tripod, bracket, or table recommended by the manufacturer,
or sold with the product.
25. When moving or not using the appliance, secure the power cord
(e.g., wrap it with a cable tie). Be careful not to damage the power
cord. Before using it again, make sure the power cord has not been
damaged. If the power cord has been damaged at all, bring the unit
and cord to a qualified service technician for repair or replacement as
specified by the manufacturer.
26. LIGHTNING – For added protection during a lightning storm, or when
it is left unattended and unused for long periods of time, unplug it from
the wall outlet. This will prevent damage to the product due to lightning
and power-line surges.
27. REPLACEMENT PARTS – When replacement parts are required, be
sure the service technician has used replacement parts specified by
the manufacturer or have the same characteristics as the original part.
Unauthorized substitutions may result in fire, electric shock, or other
hazards.
CAUTION: TO REDUCE THE RISK OF ELECTRIC
SHOCK DO NOT REMOVE COVER (OR BACK) NO
USER-SERVICEABLE PARTS INSIDE REFER
SERVICING TO QUALIFIED PERSONAL

3
www.simmonsdrums.net
safety instructions
WARNING: To reduce the risk of fire or shock do
not expose this equipment to rain or moisture.
AVERTISEEMENT: Pour réduire les risques
d’incendie et d’électrocution, ne pas exposer ce
matérial à la pluie ou à l’humidité.
RISK OF
ELECTRIC SHOCK
DO NOT OPEN
RISQUE DE CHOC
ELECTRIQUE NE
PAS OUVRIR
RISK OF
ELECTRIC SHOCK
DO NOT OPEN
RISQUE DE CHOC
ELECTRIQUE NE
PAS OUVRIR
CAUTION: To reduce the risk of electric shock, do not
remove chassis. No user-serviceable parts inside.
Refer servicing to qualified service personnel.
AVERTISEEMENT: Pour réduire les risques d’incendie et
d’électrocution, ne pas exposer ce matérial à la pluie ou
à l’humidité.
THIS SYMBOL IS INTENDED TO ALERT THE USER TO THE PRESENCE
OF IMPORTANT OPERATING AND MAINTENANCE (SERVICING)
INSTRUCTIONS IN THE LITERATURE ACCOMPANYING THE UNIT.
WARNING: To reduce the risk of fire or shock do
not expose this equipment to rain or moisture.
AVERTISEEMENT: Pour réduire les risques
d’incendie et d’électrocution, ne pas exposer ce
matérial à la pluie ou à l’humidité.
RISK OF
ELECTRIC SHOCK
DO NOT OPEN
RISQUE DE CHOC
ELECTRIQUE NE
PAS OUVRIR
RISK OF
ELECTRIC SHOCK
DO NOT OPEN
RISQUE DE CHOC
ELECTRIQUE NE
PAS OUVRIR
CAUTION: To reduce the risk of electric shock, do not
remove chassis. No user-serviceable parts inside.
Refer servicing to qualified service personnel.
AVERTISEEMENT: Pour réduire les risques d’incendie et
d’électrocution, ne pas exposer ce matérial à la pluie ou
à l’humidité.
APPARATUS SHALL NOT BE EXPOSED TO DRIPPING OR SPLASHING
AND THAT NO OBJECTS FILLED WITH LIQUIDS, SUCH AS VASES,
SHALL BE PLACED ON THE APPARATUS.
To prevent electric shock, do not use a polarized plug with an extension
cord, receptacle or other outlet unless the blades can be fully inserted to
prevent blade exposure.
Caution - To prevent electric shock hazard, do not connect to mains power
supply while grille is removed.
Caution - To prevent electric shock hazard, replace grille.
Table of Contents
SAFETY INSTRUCTIONS ................................................ 2
FEATURES .................................................................... 4
DRUM MONITOR SYSTEM MAINTENANCE ...................... 5
SYSTEM CONFIGURATIONS .......................................... 6
WHAT’S IN THE BOXES ................................................. 7
SETTING UP THE SYSTEM ............................................... 8
PANEL CONTROLS ........................................................ 9
TROUBLESHOOTING ................................................... 12
BLOCK DIAGRAM ........................................................ 13
SPECIFICATIONS ......................................................... 14
WARRANTY ................................................................ 15

4
DA350 Electronic Drum Monitor System
OWNER’S MANUAL
Congratulations!
FEATURES
…on your purchase of a Simmons DA350 Electronic Drum Monitor System. By following these guidelines and suggestions, your new Simmons
amplifier will provide you with many years of great sound and reliable service.
• 350 Watts RMS (1100 watts peak); Class-D power
• 10” Subwoofer and two 4” satellite speakers
• 3-channel mixer with 1/4” stereo inputs for multiple sound sources
• 2-band shelving EQ provides complete tone control
• Subwoofer level knob dials in the perfect amount of low-end boom
• Aux inputs and Bluetooth® audio
• Weighs only 51 pounds for easy transport
• Includes stands and stand-transport bags

5
www.simmonsdrums.net
Drum Monitor system maintenance
Location
• To avoid deformation, discoloration, or more serious damage, do not expose the unit
to direct sunlight, high temperature sources, or excessive humidity.
Power supply
• Turn the power switch off when the DA350 is not in use.
• The AC cable should be unplugged from the AC outlet if the DA350 will not be used
for an extended period.
• Avoid plugging the AC adapter into an AC outlet that is also powering high-
consumption appliances such as electric heaters or televisions.
• To avoid damage, turn off the DA350 power switch and all related devices prior to
connecting or disconnecting cables.
Handling and transport
• Never apply excessive force to any parts.
• Unplug cables by gripping the plugs firmly. Do not pull on cables.
• Physical shocks caused by dropping or bumping can result in serious damage to the unit.
Cleaning
• Clean with a dry, soft cloth.
• A slightly damp cloth may be used to remove stubborn grime and dirt. Never use
cleaners such as alcohol or thinner.
• The DA350 contains electronic circuitry that may cause interference if placed too
close to radio or television receivers. If this occurs, move the DA350 further away from
the affected equipment.
Service and modification
• There are no user serviceable parts in the DA350.
• Do not attempt to open the DA350 or make any change to circuits or parts. This will
void the warranty.
Protective circuit (poly switch)
The DA350 is fitted with a self-resetting poly switch that protects the high-frequency driver
from damage caused by excessive power. If a loudspeaker cabinet loses high-frequency
output, immediately remove power from the unit and wait for two to three minutes. This
should be long enough to allow the poly switch to reset. Reapply power and check the
performance of the high frequency driver before continuing, with the power reduced to a
level that does not cause the poly switch to interrupt the signal.
Interference from cell phone
Using a cell phone near the speaker system can induce noise. If this occurs, move the cell
phone further away from the speaker system.

6
DA350 Electronic Drum Monitor System
OWNER’S MANUAL
System Configurations
The DA350 Electronic Drum Monitor System can be set up for
optimal sound in any studio, stage or practice room.
2.1 STEREO SETUP
Place the subwoofer/amp module in the center of your setup,
just in front of your kick drum. Place the two satellite speakers
on their respective tripods and position them equidistant from
the subwoofer for realistic spatial realism. Attach the speaker
cables.
COMPACT MONO SETUP
When space is at a premium, use this compact, cable-less
method. Place the subwoofer/amp module on a table or the
floor. Place the satellite speakers directly on top, making sure
to slide the speakers into their power/audio contacts.
STANDARD MONO SETUP
This method is similar to the compact method, but allows
the speakers to sit above the audience, dance floor or other
speakers. Place the subwoofer/module on the floor, then
insert one of the speaker poles (taken from one of the speaker
tripods) and insert it into the mounting hole. Place one satellite
speaker onto the pole, and slide the other satellite speaker on
top. This method only uses a single cable.
2.1 Stereo setup
Compact mono setup
Standard mono setup

7
www.simmonsdrums.net
What’s in the boxes
Box #1
Box #2
Speaker cables
AC cable
Speaker stands
Speaker mounts and satellite speakers
Carrying case
(for the stands and mounts)
The main sub speaker/amp/mixer

8
DA350 Electronic Drum Monitor System
OWNER’S MANUAL
Setting up the System
1. You will need to place the flat sections with the pole receptacle
onto the top of the speaker pole.
2. Extend the speaker stand legs and place each stand on either
side of your electronic drum set.
3. Once the stands are set up slide the small speakers onto the
speaker stands.
4. Connect the included 1/4” to 1/4” speaker cables to the
speaker outputs on the bottom section of the sub speaker/mixer
cabinet.
5. Plug the audio outputs of your drum module into the two 1/4”
input channels on the mixer.
6. Plug the power cable into the AC jack on your sub speaker/
mixer cabinet and plug the other end of the cable into your
power mains.
7. Turn on the power of the sub speaker/mixer. Slowly increase the
level on the channel you’ve connected.
8. Turn the sub knob up to the desired level to set the low frequency
response for the entire system.
2.
3.

9
www.simmonsdrums.net
panel controls
4
DA350
ELECTRONIC DRUM MONITOR SYSTEM
5
1
76 8
3
2
1
Monitor Out Level
Each channel has separate monitor output level controls to manage monitor signals to each out.
2
Balance
This allows you to adjust the stereo balance of the speaker system.
3
Power LED
The Power LED is green to indicate that the DA350’s power cable is connected to an
electrical outlet, and the Power Switch is turned on.
4
EQ Controls
The LOW EQ will provide +/- 15dB of boost or cut below 100Hz. Turn the LOW EQ
up to add bass or warmth to the speaker. The HIGH EQ will provide +/- 15dB of boost
or cut above 10kHz. Turn the HIGH EQ up to increase the volume of cymbals or other
high frequency sounds.
5
Channel Volume Controls
Each channel has separate volume controls to allow discrete mixing of each audio source.
6
Aux/Bluetooth Selector Switch and Pair button
This changes the Channel 3 input to Bluetooth from the physical inputs.
See
10
Bluetooth Controls for details
7
Subwoofer Volume
This controls the Subwoofer volume. The “Flat” indication on the markings around the
knob indicates that the system-wide balance between the high and low frequencies are
equal. If you want more low frequencies turn the knob towards the Max indicator.
8
Setup Switch
Sets the system into either a mono or stereo speaker configuration.

10
DA350 Electronic Drum Monitor System
OWNER’S MANUAL
panel controls
10 119
9
Channel Inputs
Channels 1 and 2 are intended for line level inputs from products such as
drum modules.
Channel 3 can either be a physical input source that comes into the RCA
inputs or the 1/8” TRS input or you can switch it to Bluetooth® for wireless
connectivity.
10
Bluetooth Controls
To use a Bluetooth-enabled device like your phone or computer as the
source for Input 3, you must first “pair” it with your DA350.
• Power on your DA350, and enable Bluetooth on your source device
(phone, computer or other mobile device).
• From your source device, display its list of discovered Bluetooth devices,
and look for “Simmons DA350” there. If you don’t see it, try scrolling
the list to make sure it’s not hidden off-screen. If it’s not listed, push and
release the PAIR/play/pause button on your DA350.
• Once you do see “Simmons DA350” on the list, select it, and your source
device and your DA350 will pair, while the DA350 plays a chime and
lights the Bluetooth LED blue.
• Play audio from your Bluetooth source device, and you’ll now hear it via
INPUT 3 of your DA350, as the Bluetooth LED slowly flashes.
• Pressing the PAIR/play/pause button will now remotely control the play/
pause action of your device, with the Bluetooth LED flashing during play,
and solid while paused.
• To “disconnect” your Bluetooth device from Input 3, press and hold the
PAIR/play/pause button. The LED will turn off and you will hear a chime.
• When you power on your DA350, it will look for any previously paired
device, and pair with it automatically if available.
11
Monitor Outputs
Use to connect the DA350 to a Mixer or PA system.

11
www.simmonsdrums.net
panel controls
1413 1512
16
12
Power Switch
Turns the DA350 ON or OFF
13
Voltage Selector
Use to switch to different voltages. Normally set at the factory at 100-120 voltage.
14
Fuse Holder
Disconnect the DA350 from mains before replacing fuse. Only use fuse of the same
rating and power. The correct fuse is specified on the rear panel.
15
Power Cable Input
Plug in the supplied power cable here.
16
Speaker Outputs
Powered speaker outputs. This is where you connect your satellite speakers.

12
DA350 Electronic Drum Monitor System
OWNER’S MANUAL
Troubleshooting
1. Mixer and Amplifier Will Not Turn On.
Is the included power cord correctly connected to a power outlet?
2. No Sound From the Speaker(s).
Are external instruments or speakers correctly connected to the mixer?
Are the LEVEL controls of all relevant channels set to appropriate levels?
3. Distortion or Noise in the Audio Signal.
Are the LEVEL controls of all relevant channels set to appropriate levels?
4. Output Level is Low.
Are the LEVEL controls of all relevant channels set to appropriate levels?
Is the input signal from the connected device set to an appropriate level?
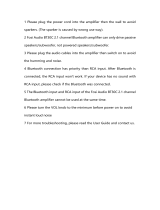
5. Bluetooth not working.
Be sure your device is paired. See page 10.

13
www.simmonsdrums.net
Block Diagram
2 Band EQ
Balance
L
R
LEFT
RIGHT
LEFT MAIN BUS
RIGHT MAIN BUS
LINE IN LEFT (MONO)
LINE IN RIGHT
–10
LEVEL
Ch 1-2 - STEREO CHANNELS
Monitor Outs 1/4”
LEFT MAIN
RIGHT MAIN
To Crossover/Amp Speaker
1/8” Aux Input
LEFT
RIGHT
–10
Setup Switch
1:1 or 2:1
LEVEL
Monitor Send
Monitor Send
LEFT Monitor
RIGHT Monitor
LEFT
RIGHT
Bluetooth Input
LEFT Monitor
RIGHT Monitor
–10
–10
Ch 3 - STEREO CHANNEL

14
DA350 Electronic Drum Monitor System
OWNER’S MANUAL
Specifications
Inputs 2 stereo pairs - 1/4” TRS (ch 1 & 2), 1/8” TRS, 2-RCA inputs (ch 3), Bluetooth
Outputs Monitor - Out 2 1/4” TRS line outputs -
external no power
2 1/4” speaker outputs (powered)
Drivers Sub - 10” Hi Frequency - 2 x 4.75” and 2 x 1” tweeter
Output Wattage Total peak
power 1100 Watts
Subwoofer - 250 Watts into 4 ohms High Frequency Drivers
Single Mode: 60 Watt at 8 Ohm
Twin mode: 120 Watt at 4 Ohm
Amplifier Class-D amplifier and switching power design
Frequency Response Sub - 50Hz – 160Hz Satellites - Single mode: 155Hz – 20kHz
Max output SPL 116dB
Power 100-240V ~50/60Hz swithchable
Dimensions and Weight 18” x 13” x 16” 51 Ibs.

15
www.simmonsdrums.net
warranty
3 Year Limited Warranty
Subject to the limitations set forth below, Simmons hereby represents and warrants that
the components of this product shall be free from defects in workmanship and materials,
including implied warranties of merchantability or fitness for a particular purpose,
subject to normal use and service, for three (3) years to the original owner from the
date of purchase.
Retailer and manufacturer shall not be liable for damages based upon inconvenience,
loss of use of product, loss of time, interrupted operation or commercial loss
or any other incidental or consequential damages including but not limited to
lost profits, downtime, goodwill, damage to or replacement of equipment and property,
and any costs of recovering, reprogramming, or reproducing any program or data stored
in equipment that is used with Simmons products. This guarantee gives you specific legal
rights. You may have other legal rights which vary from state to state. Some states do
not allow limitations on how long an implied warranty lasts, so the above limitation may
not apply to you.

DA350 Electronic Drum Monitor System
OWNER’S MANUAL
Simmons
P.O. Box 5111
Thousand Oaks, CA 91359-5111
All trademarks and registered trademarks mentioned herein are
recognized as the property of their respective holders.
1610-16117902
-
 1
1
-
 2
2
-
 3
3
-
 4
4
-
 5
5
-
 6
6
-
 7
7
-
 8
8
-
 9
9
-
 10
10
-
 11
11
-
 12
12
-
 13
13
-
 14
14
-
 15
15
-
 16
16


Simmons DA350 User manual
- Category
- Supplementary music equipment
- Type
- User manual
Ask a question and I''ll find the answer in the document
Finding information in a document is now easier with AI
Related papers
Other documents
-
Emerson PD6548SL Owner's manual
-
Pure Acoustics SN-10 SUB User manual
-
Pure Acoustics SN 10 User manual
-
 SeeYing TT-185BT User manual
-
 Fosi Audio BT30C Bluetooth 5.0 Stereo Amplifier 2.1 Channel Class D Audio Power Receiver Amp User guide
-
 Delta Children Vancouver Double Dresser Assembly Instructions
-
 Delta Children Vancouver Night Stand Assembly Instructions
-
Harbinger L2404FX-USB LvL series User manual
-
actpro-hd ACTPRO-212S HD User manual
-


