
Maintenance and Service Guide
HP ProDesk 400 G2 Microtower
HP ProDesk 480 G2 Microtower
HP ProDesk 490 G2 Microtower

© Copyright 2014 Hewlett-Packard
Development Company, L.P. The information
contained herein is subject to change without
notice.
Intel and Pentium are trademarks of Intel
Corporation in the U.S. and other countries.
Bluetooth is a trademark owned by its
proprietor and used by Hewlett-Packard
Company under license. Microsoft, Windows,
WIndows 7, and Windows 8 are U.S. registered
trademarks of the Microsoft group of
companies. SD Logo is a trademark of its
proprietor.
The only warranties for HP products and
services are set forth in the express warranty
statements accompanying such products and
services. Nothing herein should be construed
as constituting an additional warranty. HP shall
not be liable for technical or editorial errors or
omissions contained herein.
This document contains proprietary
information that is protected by copyright. No
part of this document may be photocopied,
reproduced, or translated to another language
without the prior written consent of Hewlett-
Packard Company.
Second Edition (December 2014)
First Edition (July 2014)
Document Part Number: 762902-002
Product notice
This guide describes features that are common
to most models. Some features may not be
available on your computer.
Not all features are available on all editions of
Windows 8. This computer may require
upgraded and/or separately purchased
hardware, drivers, and/or software to take full
advantage of Windows 8 functionality. See
http://www.microsoft.com for details.
This computer may require upgraded and/ or
separately purchased hardware and/or a DVD
drive to install the Windows 7 software and
take full advantage of Windows 7 functionality.
See http://windows.microsoft.com/en-us/
windows7/get-know-windows-7 for details.

Safety warning notice
WARNING! To reduce the possibility of heat-related injuries or of overheating the device, do not place
the device directly on your lap or obstruct the device air vents. Use the device only on a hard, flat surface. Do
not allow another hard surface, such as an adjoining optional printer, or a soft surface, such as pillows or
rugs or clothing, to block airflow. Also, do not allow the AC adapter to contact the skin or a soft surface, such
as pillows or rugs or clothing, during operation. The device and the AC adapter comply with the user-
accessible surface temperature limits defined by the International Standard for Safety of Information
Technology Equipment (IEC 60950-1).
iii

iv Safety warning notice

Table of contents
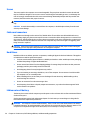
1 Product features ........................................................................................................................................... 1
Standard configuration features ........................................................................................................................... 1
Front panel components ....................................................................................................................................... 2
Rear panel components — HP ProDesk 400 G2 and 480 G2 models ................................................................... 3
Rear panel components — HP ProDesk 490 G2 models ...................................................................................... 6
Serial number location .......................................................................................................................................... 7
2 Activating and Customizing the Software ........................................................................................................ 8
Activating and customizing the software in Windows 7 ....................................................................................... 8
Activating the Windows operating system ......................................................................................... 8
Downloading Windows 7 updates ....................................................................................................... 8
Installing or upgrading device drivers ................................................................................................ 9
Customizing the monitor display ........................................................................................................ 9
Activating and customizing the software in Windows 8 ....................................................................................... 9
Activating the Windows Operating System ........................................................................................ 9
Downloading Windows 8 updates ....................................................................................................... 9
Customizing the monitor display ...................................................................................................... 10
3 Illustrated parts catalog .............................................................................................................................. 11
Computer major components ............................................................................................................................. 11
Cables ................................................................................................................................................................... 14
Misc parts ............................................................................................................................................................. 15
Drives ................................................................................................................................................................... 17
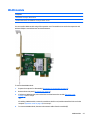
PCI boards ............................................................................................................................................................ 18
4 Routine care, SATA drive guidelines, and disassembly preparation .................................................................. 19
Electrostatic discharge information ................................................................................................................... 19
Generating static ............................................................................................................................... 19
Preventing electrostatic damage to equipment .............................................................................. 20
Personal grounding methods and equipment .................................................................................. 20
Grounding the work area .................................................................................................................. 20
Recommended materials and equipment ........................................................................................ 21
Operating guidelines ........................................................................................................................................... 21
Routine care ......................................................................................................................................................... 22
General cleaning safety precautions ................................................................................................ 22
Cleaning the Computer Case ............................................................................................................. 22
v

Cleaning the keyboard ...................................................................................................................... 22
Cleaning the monitor ......................................................................................................................... 23
Cleaning the mouse ........................................................................................................................... 23
Service considerations ........................................................................................................................................ 23
Power supply fan ............................................................................................................................... 23
Tools and software Requirements ................................................................................................... 23
Screws ............................................................................................................................................... 24
Cables and connectors ...................................................................................................................... 24
Hard Drives ........................................................................................................................................ 24
Lithium coin cell battery ................................................................................................................... 24
SATA hard drives .................................................................................................................................................. 25
SATA hard drive cables ........................................................................................................................................ 25
SATA data cable ................................................................................................................................. 25
SMART ATA drives ................................................................................................................................................ 25
Cable management .............................................................................................................................................. 25
5 Removal and replacement procedures: Microtower ........................................................................................ 27
Preparation for disassembly ............................................................................................................................... 27
Access panel ........................................................................................................................................................ 28
Front bezel ........................................................................................................................................................... 29
Optical drive bezel blank ..................................................................................................................................... 30
Memory ................................................................................................................................................................ 31
DIMMs ................................................................................................................................................ 31
DDR3-SDRAM DIMMs ......................................................................................................................... 31
Populating DIMM sockets (HP ProDesk 400 G2 and 480 G2 models) .............................................. 32
Populating DIMM sockets (HP ProDesk 490 G2 models) .................................................................. 32
Installing DIMMs ................................................................................................................................ 33
Expansion cards ................................................................................................................................................... 34
Drives ................................................................................................................................................................... 38
Drive positions ................................................................................................................................... 40
Removing a slim optical drive ........................................................................................................... 41
Installing a slim optical drive ............................................................................................................ 41
Removing a 3.5-inch hard drive ........................................................................................................ 43
Installing a 3.5-inch hard drive ......................................................................................................... 44
Removing a 2.5-inch hard drive ........................................................................................................ 45
Installing a 2.5-inch hard drive ......................................................................................................... 46
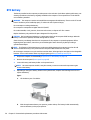
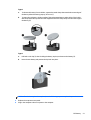
WLAN module ...................................................................................................................................................... 47
RTC battery .......................................................................................................................................................... 50
DisplayPort connector module ............................................................................................................................ 52
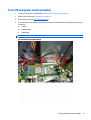
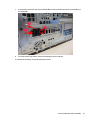
Front I/O and power switch assembly ................................................................................................................. 53
Fan sink ................................................................................................................................................................ 56
vi

Processor ............................................................................................................................................................. 58
Speaker ................................................................................................................................................................ 60
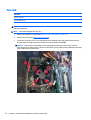
Fan ....................................................................................................................................................................... 62
Power supply ....................................................................................................................................................... 64
System board ....................................................................................................................................................... 68
HP ProDesk 400 G2 system board callouts ...................................................................................... 70
HP ProDesk 480 G2 system board callouts ...................................................................................... 71
HP ProDesk 490 G2 system board callouts ...................................................................................... 73
6 Computer Setup (F10) Utility ........................................................................................................................ 75
Computer Setup (F10) Utilities ............................................................................................................................ 75
Using Computer Setup (F10) Utilities ............................................................................................... 76
Computer Setup—File ...................................................................................................................... 77
Computer Setup—Storage ............................................................................................................... 78
Computer Setup—Security ............................................................................................................... 79
Computer Setup—Power .................................................................................................................. 82
Computer Setup—Advanced ............................................................................................................ 83
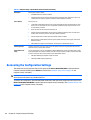
Recovering the Configuration Settings ............................................................................................................... 84
7 Troubleshooting without diagnostics ............................................................................................................ 85
Safety and comfort .............................................................................................................................................. 85
Before you call for technical support .................................................................................................................. 85
Helpful hints ........................................................................................................................................................ 86
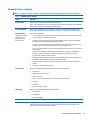
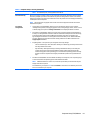
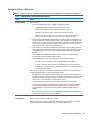
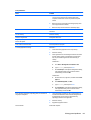
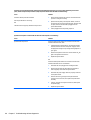
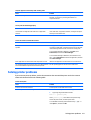
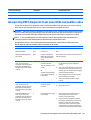
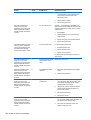
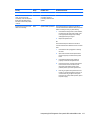
Solving general problems ................................................................................................................................... 87
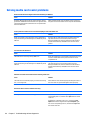
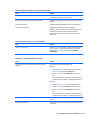
Solving power problems ...................................................................................................................................... 91
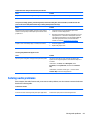
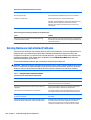
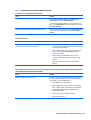
Solving hard drive problems ............................................................................................................................... 92
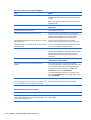
Solving media card reader problems .................................................................................................................. 94
Solving display problems .................................................................................................................................... 95
Solving audio problems ....................................................................................................................................... 99
Solving printer problems ................................................................................................................................... 101
Solving keyboard and mouse problems ........................................................................................................... 102
Solving Hardware Installation Problems .......................................................................................................... 104
Solving Network Problems ................................................................................................................................ 106
Solving memory problems ................................................................................................................................ 110
Solving processor problems .............................................................................................................................. 111
Solving CD-ROM and DVD problems ................................................................................................................. 112
Solving USB flash drive problems ..................................................................................................................... 114
Solving front panel component problems ........................................................................................................ 114
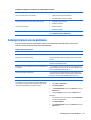
Solving Internet access problems ..................................................................................................................... 115
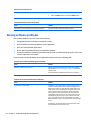
Solving software problems ............................................................................................................................... 116
vii

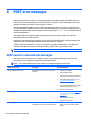
8 POST error messages ................................................................................................................................. 118
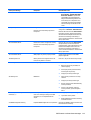
POST numeric codes and text messages .......................................................................................................... 118
Interpreting POST diagnostic front panel LEDs and audible codes .................................................................. 125
9 Password security and resetting CMOS ........................................................................................................ 128
Resetting the password jumper ........................................................................................................................ 128
Changing a Setup or Power-On password ........................................................................................................ 129
Deleting a Setup or Power-On password .......................................................................................................... 130
Clearing and resetting the CMOS ....................................................................................................................... 130
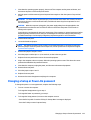
10 HP PC Hardware Diagnostics ..................................................................................................................... 132
Why run HP PC Hardware Diagnostics .............................................................................................................. 132
How to access and run HP PC Hardware Diagnostics ....................................................................................... 132
Downloading HP PC Hardware Diagnostics (UEFI) to a USB device .................................................................. 132
11 System backup and recovery .................................................................................................................... 134
Backing up, restoring, and recovering in Windows 8.1 or Windows 8 ............................................................. 134
Creating recovery media and backups ........................................................................................... 134
Restoring and recovering using Windows tools ............................................................................. 134
Using Reset when the system is not responding ......................................................... 135
Recovery using the Windows recovery USB flash drive ............................................... 135
Recovery using Windows operating system media (purchased separately) .............. 136
Backing up, restoring, and recovering in Windows 7 ........................................................................................ 136
Creating recovery media ................................................................................................................. 137
Creating recovery media using HP Recovery Manager (select models only) .............. 137
Creating recovery discs with HP Recovery Disc Creator (select models only) ............ 138
Creating recovery discs .............................................................................. 138
Backing up your information ........................................................................................ 139
System Restore ............................................................................................................................... 139
System Recovery ............................................................................................................................. 140
System Recovery when Windows is responding .......................................................... 140
System Recovery when Windows is not responding ................................................... 141
System Recovery using recovery media (select models only) .................................... 141
Using HP Recovery Disc operating system discs (select models only) ....................... 142
Appendix A Power cord set requirements ....................................................................................................... 144
General requirements ....................................................................................................................................... 144
Japanese power cord requirements ................................................................................................................. 144
Country-specific requirements ......................................................................................................................... 145
viii

Appendix B Statement of Volatility ................................................................................................................ 146
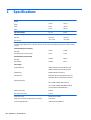
Appendix C Specifications ............................................................................................................................. 148
Index ........................................................................................................................................................... 150
ix

x

1 Product features
Standard configuration features
Features may vary depending on the model. For support assistance and to learn more about the hardware
and software installed on your computer model, run the HP Support Assistant utility.
Standard configuration features 1

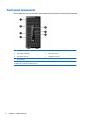
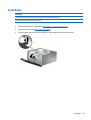
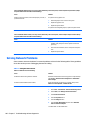
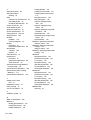
Front panel components
Drive configuration may vary by model. Some models have a bezel blank covering the optical drive bay.
1 Slim Optical Drive (optional) 5 Hard Drive Activity Light
2 Dual-State Power Button 6 USB 3.0 Ports (blue)
3 Microphone Connector 7 Headphone Connector
4SD Card Reader
NOTE: The Power On Light is normally white when the power is on. If it is flashing red, there is a problem with the
computer and it is displaying a diagnostic code.
2 Chapter 1 Product features

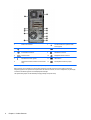
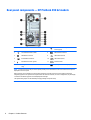
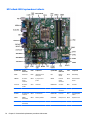
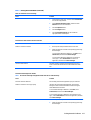
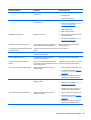
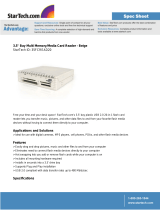
Rear panel components — HP ProDesk 400 G2 and 480 G2
models
Several different rear panels are available. Refer to the following image that matches your computer.
1 Power Cord Connector 7 Line-Out Connector for powered audio
devices (green)
2
Line-In Audio Connector (blue) 8 DVI-D Monitor Connector
3
VGA Monitor Connector 9 USB 2.0 Ports (black)
4
RJ-45 Network Connector 10 Serial Connector
5
PS/2 Mouse Connector (green) 11 PS/2 Keyboard Connector (purple)
6 Voltage Select Switch (included on some models
only)
NOTE: An optional second serial port and an optional parallel port are available from HP.
When a graphics card is installed in one of the system board slots, the video connectors on the graphics card and the
integrated graphics on the system board may be used at the same time. However, for such a configuration, only the display
connected to the discrete graphics card will display POST messages.
The system board graphics can be disabled by changing settings in Computer Setup.
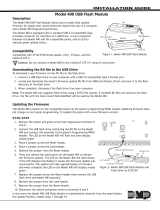
Rear panel components — HP ProDesk 400 G2 and 480 G2 models 3

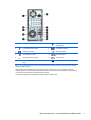
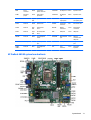
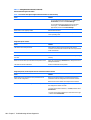
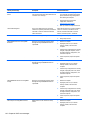
1 Power Cord Connector 7 Line-Out Connector for powered audio
devices (green)
2
Line-In Audio Connector (blue) 8 USB 2.0 Ports (black)
3
RJ-45 Network Connector 9 VGA Monitor Connector
4
Serial Connector 10 DisplayPort Monitor Connector
5
PS/2 Mouse Connector (green) 11 USB 2.0 Ports
6 Voltage Select Switch (included on some models
only)
12
PS/2 Keyboard Connector (purple)
NOTE: An optional second serial port and an optional parallel port are available from HP.
When a graphics card is installed in one of the system board slots, the video connectors on the graphics card and the
integrated graphics on the system board may be used at the same time. However, for such a configuration, only the display
connected to the discrete graphics card will display POST messages.
The system board graphics can be disabled by changing settings in Computer Setup.
4 Chapter 1 Product features

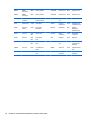
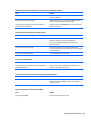
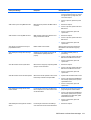
1 Power Cord Connector 7 Line-Out Connector for powered audio
devices (green)
2
Line-In Audio Connector (blue) 8 DVI-D Monitor Connector
3
VGA Monitor Connector 9 USB 2.0 Ports (black)
4
RJ-45 Network Connector 10 USB 3.0 Ports (blue)
5
PS/2 Mouse Connector (green) 11 Serial Connector
6 Voltage Select Switch (included on some models
only)
12
PS/2 Keyboard Connector (purple)
NOTE: An optional second serial port and an optional parallel port are available from HP. Some models have an optional
DisplayPort on the rear panel.
When a graphics card is installed in one of the system board slots, the video connectors on the graphics card and the
integrated graphics on the system board may be used at the same time. However, for such a configuration, only the display
connected to the discrete graphics card will display POST messages.
The system board graphics can be disabled by changing settings in Computer Setup.
Rear panel components — HP ProDesk 400 G2 and 480 G2 models 5

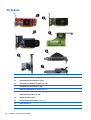
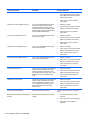
Rear panel components — HP ProDesk 490 G2 models
1 Power Cord Connector 7 Line-Out Connector for powered audio
devices (green)
2
Line-In Audio Connector (blue) 8 DVI-D Monitor Connector
3
VGA Monitor Connector 9 USB 2.0 Ports (black)
4
RJ-45 Network Connector 10 USB 3.0 Ports (blue)
5
PS/2 Mouse Connector (green) 11 Serial Connector
6 Voltage Select Switch (included on some models
only)
12
PS/2 Keyboard Connector (purple)
NOTE: An optional second serial port and an optional parallel port are available from HP. Some models have an optional
DisplayPort on the rear panel.
When a graphics card is installed in one of the system board slots, the video connectors on the graphics card and the
integrated graphics on the system board may be used at the same time. However, for such a configuration, only the display
connected to the discrete graphics card will display POST messages.
The system board graphics can be disabled by changing settings in Computer Setup.
6 Chapter 1 Product features

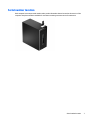
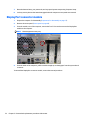
Serial number location
Each computer has a unique serial number and a product ID number that are located on the exterior of the
computer. Keep these numbers available for use when contacting customer service for assistance.
Serial number location 7

2 Activating and Customizing the Software
NOTE: This chapter provides information for both Windows 7 and Windows 8.
Activating and customizing the software in Windows 7
If your computer was not shipped with a Windows® operating system, some portions of this documentation
do not apply. Additional information is available in online help after you activate the operating system.
CAUTION: Do not add optional hardware or third-party devices to the computer until the operating system
is successfully activated. Doing so may cause errors and prevent the operating system from installing
properly.
NOTE: Be sure there is a 10.2 cm (4 inch) clearance at the back of the unit and above the monitor to permit
the required airflow.
Activating the Windows operating system
The first time you turn on the computer, the operating system is set up and activated automatically. This
process takes about 5 to 10 minutes. Carefully read and follow the instructions on the screen to complete the
activation.
We recommend that you register your computer with HP during operating system setup so you can receive
important software updates, facilitate support questions, and sign up for special offers.
CAUTION: After the activation process has begun, DO NOT TURN OFF THE COMPUTER UNTIL THE PROCESS IS
COMPLETE. Turning off the computer during the activation process may damage the software that runs the
computer or prevent its proper installation.
NOTE: If the computer shipped with more than one operating system language on the hard drive, the
activation process could take up to 60 minutes.
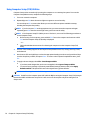
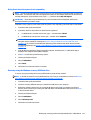
Downloading Windows 7 updates
Microsoft may release updates to the operating system. To help keep the computer running optimally, HP
recommends checking for the latest updates during the initial installation and periodically throughout the life
of the computer.
1. To set up your Internet connection, click Start > Internet Explorer and follow the instructions on the
screen.
2. After an Internet connection has been established, click the Start > All Programs > Windows Update.
3. Run Windows Update monthly thereafter.
8 Chapter 2 Activating and Customizing the Software

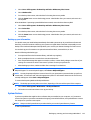
Installing or upgrading device drivers
When installing optional hardware devices after the operating system installation is complete, you must also
install the drivers for each of the devices.
In Windows 7, if prompted for the i386 directory, replace the path specification with C:\i386, or use the
Browse button in the dialog box to locate the i386 folder. This action points the operating system to the
appropriate drivers.
Obtain the latest support software, including support software for the operating system, from
http://www.hp.com/support. Select your country and language, select Download drivers and software (and
firmware), enter the model number of the computer, and press Enter.
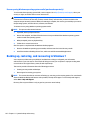
Customizing the monitor display
If you wish, you can select or change the monitor refresh rates, screen resolution, color settings, font sizes,
and power management settings.
For more information, refer to the online documentation provided with the graphics controller utility or the
documentation that came with your monitor.
Right-click on the Windows desktop, then click Personalize to change display settings.
Activating and customizing the software in Windows 8
Additional information is available in online help after you activate the operating system.
NOTE: Be sure there is a 10.2 cm (4 inch) clearance at the back of the unit and above the monitor to permit
the required airflow.
Activating the Windows Operating System
The first time you turn on the computer, the operating system is set up and activated automatically. This
process takes about 5 to 10 minutes. Carefully read and follow the instructions on the screen to complete the
activation.
We recommend that you register your computer with HP during operating system set up so you can receive
important software updates, facilitate support questions, and sign up for special offers. You can also register
your computer with HP using the Register with HP app on the Start screen.
CAUTION: After the activation process has begun, DO NOT TURN OFF THE COMPUTER UNTIL THE PROCESS IS
COMPLETE. Turning off the computer during the activation process may damage the software that runs the
computer or prevent its proper installation.
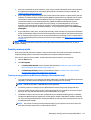
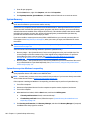
Downloading Windows 8 updates
Microsoft may release updates to the operating system. To help keep the computer running optimally, HP
recommends checking for the latest updates during the initial installation and periodically throughout the life
of the computer.
Run Windows Update as soon as possible after you set up your computer.
1. Point to the upper-right or lower-right corner of the Start screen to display the charms.
2. Click Settings > Change PC Settings > Windows Update.
3. Run Windows Update monthly thereafter.
Activating and customizing the software in Windows 8 9

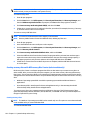
Customizing the monitor display
You can customize display settings for Windows 8 separately for the Start screen and the Desktop.
To customize the Start screen:
1. Point to the upper-right or lower-right corner of the Start screen to display the charms.
2. Click Settings > Change PC Settings.
3. Click Personalize to change the display settings.
To customize the Desktop:
1. Click the Desktop app on the Start screen.
2. Right-click on the desktop, and then click Personalize to change display settings.
10 Chapter 2 Activating and Customizing the Software
Page is loading ...
Page is loading ...
Page is loading ...
Page is loading ...
Page is loading ...
Page is loading ...
Page is loading ...
Page is loading ...
Page is loading ...
Page is loading ...
Page is loading ...
Page is loading ...
Page is loading ...
Page is loading ...
Page is loading ...
Page is loading ...
Page is loading ...
Page is loading ...
Page is loading ...
Page is loading ...
Page is loading ...
Page is loading ...
Page is loading ...
Page is loading ...
Page is loading ...
Page is loading ...
Page is loading ...
Page is loading ...
Page is loading ...
Page is loading ...
Page is loading ...
Page is loading ...
Page is loading ...
Page is loading ...
Page is loading ...
Page is loading ...
Page is loading ...
Page is loading ...
Page is loading ...
Page is loading ...
Page is loading ...
Page is loading ...
Page is loading ...
Page is loading ...
Page is loading ...
Page is loading ...
Page is loading ...
Page is loading ...
Page is loading ...
Page is loading ...
Page is loading ...
Page is loading ...
Page is loading ...
Page is loading ...
Page is loading ...
Page is loading ...
Page is loading ...
Page is loading ...
Page is loading ...
Page is loading ...
Page is loading ...
Page is loading ...
Page is loading ...
Page is loading ...
Page is loading ...
Page is loading ...
Page is loading ...
Page is loading ...
Page is loading ...
Page is loading ...
Page is loading ...
Page is loading ...
Page is loading ...
Page is loading ...
Page is loading ...
Page is loading ...
Page is loading ...
Page is loading ...
Page is loading ...
Page is loading ...
Page is loading ...
Page is loading ...
Page is loading ...
Page is loading ...
Page is loading ...
Page is loading ...
Page is loading ...
Page is loading ...
Page is loading ...
Page is loading ...
Page is loading ...
Page is loading ...
Page is loading ...
Page is loading ...
Page is loading ...
Page is loading ...
Page is loading ...
Page is loading ...
Page is loading ...
Page is loading ...
Page is loading ...
Page is loading ...
Page is loading ...
Page is loading ...
Page is loading ...
Page is loading ...
Page is loading ...
Page is loading ...
Page is loading ...
Page is loading ...
Page is loading ...
Page is loading ...
Page is loading ...
Page is loading ...
Page is loading ...
Page is loading ...
Page is loading ...
Page is loading ...
Page is loading ...
Page is loading ...
Page is loading ...
Page is loading ...
Page is loading ...
Page is loading ...
Page is loading ...
Page is loading ...
Page is loading ...
Page is loading ...
Page is loading ...
Page is loading ...
Page is loading ...
Page is loading ...
Page is loading ...
Page is loading ...
Page is loading ...
Page is loading ...
Page is loading ...
Page is loading ...
Page is loading ...
Page is loading ...
Page is loading ...
Page is loading ...
-
 1
1
-
 2
2
-
 3
3
-
 4
4
-
 5
5
-
 6
6
-
 7
7
-
 8
8
-
 9
9
-
 10
10
-
 11
11
-
 12
12
-
 13
13
-
 14
14
-
 15
15
-
 16
16
-
 17
17
-
 18
18
-
 19
19
-
 20
20
-
 21
21
-
 22
22
-
 23
23
-
 24
24
-
 25
25
-
 26
26
-
 27
27
-
 28
28
-
 29
29
-
 30
30
-
 31
31
-
 32
32
-
 33
33
-
 34
34
-
 35
35
-
 36
36
-
 37
37
-
 38
38
-
 39
39
-
 40
40
-
 41
41
-
 42
42
-
 43
43
-
 44
44
-
 45
45
-
 46
46
-
 47
47
-
 48
48
-
 49
49
-
 50
50
-
 51
51
-
 52
52
-
 53
53
-
 54
54
-
 55
55
-
 56
56
-
 57
57
-
 58
58
-
 59
59
-
 60
60
-
 61
61
-
 62
62
-
 63
63
-
 64
64
-
 65
65
-
 66
66
-
 67
67
-
 68
68
-
 69
69
-
 70
70
-
 71
71
-
 72
72
-
 73
73
-
 74
74
-
 75
75
-
 76
76
-
 77
77
-
 78
78
-
 79
79
-
 80
80
-
 81
81
-
 82
82
-
 83
83
-
 84
84
-
 85
85
-
 86
86
-
 87
87
-
 88
88
-
 89
89
-
 90
90
-
 91
91
-
 92
92
-
 93
93
-
 94
94
-
 95
95
-
 96
96
-
 97
97
-
 98
98
-
 99
99
-
 100
100
-
 101
101
-
 102
102
-
 103
103
-
 104
104
-
 105
105
-
 106
106
-
 107
107
-
 108
108
-
 109
109
-
 110
110
-
 111
111
-
 112
112
-
 113
113
-
 114
114
-
 115
115
-
 116
116
-
 117
117
-
 118
118
-
 119
119
-
 120
120
-
 121
121
-
 122
122
-
 123
123
-
 124
124
-
 125
125
-
 126
126
-
 127
127
-
 128
128
-
 129
129
-
 130
130
-
 131
131
-
 132
132
-
 133
133
-
 134
134
-
 135
135
-
 136
136
-
 137
137
-
 138
138
-
 139
139
-
 140
140
-
 141
141
-
 142
142
-
 143
143
-
 144
144
-
 145
145
-
 146
146
-
 147
147
-
 148
148
-
 149
149
-
 150
150
-
 151
151
-
 152
152
-
 153
153
-
 154
154
-
 155
155
-
 156
156
-
 157
157
-
 158
158
-
 159
159
-
 160
160
-
 161
161
-
 162
162


Ask a question and I''ll find the answer in the document
Finding information in a document is now easier with AI
Related papers
-
HP 202 G1 Microtower PC Maintenance & Service Guide
-
HP ProDesk 400 G2.5 Base Model Small Form Factor PC User guide
-
HP 402 G1 Small Form Factor PC Maintenance & Service Guide
-
HP 280 G1 ST Business User guide
-
HP EliteDesk 700 G1 Base Model Small Form Factor PC User guide
-
HP 406 Microtower PC User guide
-
HP EliteDesk 700 G1 Base Model Microtower PC User guide
-
HP EliteDesk 800 G3 Small Form Factor PC User guide
-
Compaq dc5800 - Microtower PC User guide
-
HP 280 G2 Microtower PC User guide
Other documents
-
Panasonic DMPBD65 Operating instructions
-
-
Compaq Compaq Pro 6305 Hardware Reference Manual
-
Approx APPHDD04W Datasheet
-
 StarTech.com 35FCREAD20 Datasheet
-
Acer SO.BUDS5.B03 Datasheet
-
 DMP Electronics 400 Installation Manuals
-
Linksys NSS6000 Series Technical Bulletin

