Page is loading ...

K7
February ’07 Printed in Japan (TK) 19
99505-01107-01E
FOREWORD
This motorcycle has been designed and produced utilizing Suzuki’s most modern
technology. The finest product, however, cannot perform properly unless it is cor-
rectly assembled and serviced. This set-up manual has been produced to aid you in
properly assembling and servicing this motorcycle.
Please review this set-up manual carefully before performing any work. Take spe-
cial care to properly perform the required assembly and servicing marked by either
a Warning or a Caution. Failure to follow the directions in either of these two (2) cat-
egories could lead to serious problems. # and areas are
denoted to emphasize certain areas and carry the following meanings:
#
Indicates a potential hazard that could result in death or injury.
Indicates a potential hazard that could result in motorcycle damage.
This set-up manual is based on a motorcycle of standard specification. Some minor
differences from this manual may be found in other specifications.

1
PREPARATION
WORKSHOP
#
A: Packed motorcycle
B: Working space
SELF PROTECTION
#
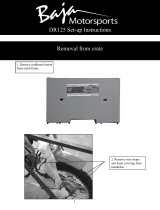
UNCRATING THE MOTORCYCLE
Remove the carton.
#
A: Crate
Remove the strap.
Take out the front wheel assembly and component
parts from the crate base.
A: Strap
B: Front wheel assembly
C: Component parts
The workshop where the machine is assembled
should be clean, spacious, and have a level
floor.
The technician should wear protective clothing
such as leather gloves, a long sleeve shirt, eye
protection and safety shoes as shown in the
illustration when handling metal crates.
Metal crates may have sharp edges and may
cause injury.

2
Remove the nut to take off the handlebar holding
bracket and stay.
A: Nut
B: Bracket
C: Stay
D: Protection cover
Remove the bolts
A used to mount the steel frame on
the crate base.
Lift the steel frame to separate it from the base of the
crate.
#
A: Steel frame
B: Crate base
NOTE:
The brackets, stay and nuts are no longer
needed and these may be discarded.
Remove the protection cover after taking out
the motorcycle.
Don’t remove the bolt
B of the motorcycle sup-
porting bracket
C.
Handling crates requires two operators.
Be careful not to scratch the motorcycle.

3
LOCATION OF PARTS
Check all the components which have been removed from the crate.
Parts listed above are installed respectively into the positions as follows.
Item Part Name Q’ty Remarks
A
Front fender front 1
Stepped screw 1 6 × 16 mm
Screw 2 6 × 16 mm
Stepped washer 2
OD:16.0 ID:6.5
T:5.0
B Rear view mirror 2 Right and Left
C Front wheel spacer 1
Item Part Name Q’ty Remarks
D
Speedometer drive
gearbox
1
E Front wheel assembly 1
F
Battery electrolyte
container
1
G Owner’s manual set 1
OD : Outside diameter (mm)
ID : Inside diameter (mm)
L : Length (mm)
T : Thickness (mm)
T
L
OD ID
B
D
AE
B
C

4
The photograph shown indicates the parts dismounted
from the motorcycle in addition to the items shown in
the preceding page.
A: Speedometer cable
Before assembling the motorcycle, thoroughly
understand the “Safety Check Out” described on
page 26.
After completion of assembly, carefully check the
motorcycle referring to the “Safety Check Out”,
then deliver the motorcycle to the customer.
F
F
G
G
E
E
C
C
A
A
B
B
D
D

5
ASSEMBLY
Loosen the rear axle nut.
Remove the bolt.
Remove the motorcycle supporting bracket.
A: Bracket
B: Bolt
C: Rear axle nut
Make sure that the washer is placed on the rear axle.
Tighten the axle nut to the specified torque.
" Rear axle nut: 54 N·m (5.4 kgf-m)
A: Washer
B: Rear axle nut
Attach a hoist band onto the handlebar as shown in
the photograph.
A: Hoist band
B: Protection cover
NOTE:
The bracket and bolt are no longer needed and
may be discarded.

6
Remove the crate axle bracket from the crate base.
A: Crate axle bracket
B: Bolt
1. Lift the front of motorcycle by using a hoist.
2. Raise the rear of motorcycle.
3. Take out the motorcycle from the crate base, then
balance the motorcycle.
FRONT FENDER
Remove the bolt of front brake hose guide.
A: Bolt
B: Front brake hose guide
Set the front fender front to the front fender rear.
A: Front fender front
B: Front fender rear
C: Hook
D: Hole
NOTE:
The bracket and bolts are no longer needed and
these may be discarded.

7
Install the front fender front to the front fork lower
bracket.
A: Front fender front
B: 6 × 16 mm stepped screw
C: 6 × 16 mm screw
D: Stepped washer OD:16.0 mm ID:6.5 mm T:5.0 mm
Reinstall the front brake hose guide.
A: Bolt
B: Front brake hose guide
BRAKE DISC
To prevent brake squeaking and pad contamination,
carefully clean the front brake disc plate with alcohol or
other non-petroleum based solvent.
This will remove the rust-preventive coating and dirt.
FRONT WHEEL
Remove the front axle nut.
Remove the front axle from the fork legs.
A: Front axle nut
B: Front axle
C: Rubber spacer
D: Vinyl tube
NOTE:
The rubber spacer and vinyl tube are no longer
needed and these may be discarded.

8
Mount the front wheel assembly properly.
A: Right fork leg
B: Left fork leg
C: Front axle
D: Front axle nut
E: Front wheel spacer
F: Speedometer drive gear box
Remove the supporter from the brake pad of the front
brake caliper.
A: Supporter
Carefully insert the front brake disc plate between the
caliper brake pads.
Attach the front wheel spacer between the front wheel
hub and right fork leg.
A: Pads
B: Disc plate
C: Front wheel spacer
Insert tabs of the speedometer drive gearbox into front
wheel hub grooves.
A: Tabs
B: Grooves
NOTE:
The flange side of the spacer faces the hub.

9
Insert the front axle from the right side of fork leg.
Fix the front wheel assembly to the front fork.
A: Front axle
Align the edge slit of the meter cable with the blade in
the gearbox.
Connect the speedometer cable to the drive gearbox.
Tighten the nut securely.
A: Speedometer cable
B: Speedometer drive gearbox
C: Nut
Before tightening the front axle nut, position the speed-
ometer drive gearbox correctly.
A: Speedometer drive gearbox
B: Left fork leg
Tighten the front axle nut to the specified torque.
" Front axle nut: 42 N·m (4.2 kgf-m)
A: Front axle nut
Never use force to install the front axle.
If it cannot be installed by hand, it is not cor-
rectly aligned.
Align the curved surface of speedometer drive
gearbox to curved surface of left fork leg, with
the clearances equalized as shown in the pho-
tograph.

10
Place the motorcycle on the center-stand, then remove
the hoist hook.
Remove the protection cover from the motorcycle.
A: Protection cover
REAR VIEW MIRROR
Remove the lock bolt.
A: Lock bolt
B: Rear view mirror stay
C: Lock nut
D: Opposite thread
Tighten the lock bolt.
Install the rear view mirror and tighten lock nuts
securely after positioning them properly.
Reinstall the rubber boots in the correct position.
A: Lock bolt
B: Rear view mirror
C: Lock nut
D: Rubber boots
E: Flange (Rubber boot)
NOTE:
Part
D of the rear view mirror stay is opposite
threaded.
NOTE:
Fix the mirror in the position so as to secure
rear view.
Align the flange of rubber boots face with han-
dlebar cover.

11
OWNER’S MANUAL
Push down and turn the key clockwise to release the
seat lock.
Open the seat.
A: Key
B: Seat
Store the owner’s manual in place.
A: Trunk
B: Owner’s manual

12
SERVICING
BATTERY
The battery is located under the seat.
Open the seat.
Remove the screws to take off the battery box lid.
Remove the battery from the motorcycle.
A: Battery box lid
B: Screw
Filling electrolyte
Remove the aluminium tape sealing the battery elec-
trolyte filler holes.
A: Aluminium tape
B: Electrolyte filler hole
Remove the caps from the electrolyte container.
A: Caps
B: Sealed area
NOTE:
Use the removed caps as the sealed caps of
battery filler holes.
Do not remove or pierce the sealed areas of the
electrolyte container.

13
With just enough force to break the nozzle seal of elec-
trolyte container, push each nozzle of the electrolyte
container into the battery’s electrolyte filler ports and
hold the container firmly so that it does not fall.
Take precaution not to allow any of the fluid to spill.
A: Electrolyte containers
Make sure air bubbles are coming up in each electro-
lyte container, and leave in this position for about 20
minutes.
A: Air bubbles
After confirming that the electrolyte has entered the
battery completely, remove the electrolyte containers
from the battery.
Wait for around 20 minutes.
Insert the caps into the filler holes, pressing in firmly so
that the top of the each caps does not protrude above
the upper surface of the battery’s top cover.
A: Caps
NOTE:
If no air bubbles are coming up from a filler
port, tap the bottom of the container two or
three times.
Never remove the container from the battery.
Never use anything except the specified battery
electrolyte.
Once the sealing cap has been installed in the
battery, do not remove the sealing cap.

14
Charge the battery with a battery charger.
After charging the battery, install the battery in the
motorcycle as follows.
1. Reinstall the battery in the motorcycle.
2. First connect the
+ lead to the + positive terminal
of the battery.
3. Cover
+ terminal with rubber boot.
4. Connect the
- lead to the - negative terminal of
the battery.
5. Reinstall the battery box lid.
A: + lead
B:
- lead
C: Rubber boot
For charging the battery, make sure to use the
charger specially designed for MF battery.
Otherwise, the battery may be overcharged
resulting in shortened service life.
Do not remove the cap during charging.
Position the battery with the cap facing upward
during charging.
When attaching the wiring harness battery
leads to the battery terminals, observe the cor-
rect polarity.
NOTE:
The terminal bolts and nuts are attached to the
battery.

15
BRAKE FLUID
Keep the motorcycle upright and place the handlebars
straight.
Check the brake fluid level in the front master cylinder
reservoirs.
If the fluid level is below the “LOWER” level indicated
in the figure, add the correct type of brake fluid as fol-
lows.
LEFT RIGHT
Remove the rear view mirror assembly.
Remove the fastener.
A: Fastener
B: Outer
C: Center pin
D: Handlebar cover rear
Remove the screws.
A: Handlebar cover rear
B: Handlebar cover upper
C: Screw
D: Screw
LOWER
LOWER
NOTE:
To remove the fastener, turn the center pin
counter clockwise while holding outer.

16
Remove the boss.
A: Handlebar cover front
B: Boss
Disconnect the headlight lead wire coupler to take off
the handlebar cover front.
A: Handlebar cover front
B: Coupler
Remove the front brake master cylinder reservoir tank
cap.
Add the correct type of brake fluid.
Refer to the chart below for the proper selection.
Reinstall the front brake master cylinder reservoir tank
cap.
Connect the headlight lead wire coupler.
Reinstall the handlebar cover front using the screw
and fastener.
A: Front brake master cylinder reservoir tank cap
Specification and Classification
DOT 4
Be careful not to spill any brake fluid on the
paint or plastic components as they will be
damaged.
Be careful not to pinch the lead wire.
NOTE:
To install the fastener, pull the center pin and
fix the fastener by pushing the center pin.

17
BRAKE AIR BLEEDING
Any air which may have been trapped in the brake fluid
circuit must be bled completely.
If the brake lever feels spongy or weak, then most
likely there is air in the hydraulic circuit.
To bleed the air from the front brake, use the following
procedure:
1. Connect a clear hose to the air bleeder valve and
run the hose into a suitable clear container.
2. Pour approximately 1/2 in of brake fluid into the con-
tainer so that the end of the clear hose is sub-
merged and cannot draw any additional air back into
the circuit during the air bleeding servicing.
3. Close the valve, pump and squeeze the lever, and
open the valve while squeezing brake lever.
4. Repeat this process until the fluid flowing into the
receptacle no longer contains air bubbles.
5. After bleeding the brake circuit, tighten the bleeder
valve to the specified torque.
Reinstall the rubber protective cap.
6. Be sure to check the brake fluid level in the reservoir
tank.
" Brake caliper air bleeder valve:
6.0 N·m (0.60 kgf-m)
A: Bleeder valve
NOTE:
Do not drop brake fluid level below lower level
line while bleeding air.

18
THROTTLE CABLE
This motorcycle has a twin throttle cable system.
Cable
A is for pulling cable and cable B is for return-
ing.
Check the throttle cable play at the throttle grip.
Throttle cable play: 2.0–4.0 mm
If adjustment is necessary, carry out the procedure
below:
1. Loosen the throttle cable adjuster lock nut
C.
2. Turn the adjuster
D in or out until the correct play.
3. Tighten the lock nut
C while holding the adjuster D.
4. Place the rubber boot
E.
#
DRIVE CHAIN
Remove the inspection hole cap.
Check the drive chain slack through the inspection
hole.
Drive chain slack: 15–25 mm
A: Inspection hole cap
B: Inspection hole
If it is too tight or too loose, follow these procedures.
1. Loosen the axle nut.
2. Turn the adjuster nuts and adjust the chain slack by
aligning the reference marks on the swingarm, right
and left pointing at the same position.
3. After adjusting, tighten the axle nut to the specified
torque.
4. Tighten the adjuster nuts securely.
5. Reinstall the inspection hole cap.
" Rear axle nut: 54 N·m (5.4 kgf-m)
A: Axle nut
B: Adjuster nut
C: Reference marks
2.0–4.0 mm
After the adjustment is completed, check that
handlebar movement does not raise the engine
idle speed and that the throttle grip returns
smoothly and automatically.

19
REAR BRAKE PEDAL
After the drive chain slack has been checked or
adjusted, check the brake pedal free travel.
Rear brake pedal free travel: 20–30 mm
If adjustment is necessary, adjust the free travel by
turning the brake rod adjuster nut
A.
TIRE PRESSURE
Using an accurate air gauge, check the air pressure of
the front and rear tires.
The pressure should be as shown.
COLD INFLATION TIRE PRESSURE
HEADLIGHT BEAM ADJUSTMENT
The headlight beam can be adjusted vertically if nec-
essary.
To adjust the beam vertically:
Loosen the headlight fitting bolts and move the head-
light up or down as required.
Tighten the bolts.
A: Bolt
SOLO RIDING DUAL RIDING
FRONT
175 kPa
1.75 kgf/cm
2
25 psi
175 kPa
1.75 kgf/cm
2
25 psi
REAR
200 kPa
2.00 kgf/cm
2
29 psi
280 kPa
2.80 kgf/cm
2
41 psi
/