Page is loading ...

WARNING
Servicing a vehicle can be dangerous. If you have not received service-related
trainin
g
, the risks of in
j
ur
y
, propert
y
dama
g
e, and failure of servicin
g
increase. The recommended servicin
g
procedures for the vehicle in this
service manual were developed with Chery-trained technicians in mind. This
manual may be useful to non-Cher
y
trained technicians, but a technician
with our service-related trainin
g
and experience will be at less risk when
performing service operations. However, all users of this manual are
expected to at least know general safety procedures.
This manual contains “Warnings” and “Cautions” applicable to risks not
normally encountered in a general technician’s experience. The
y
should be
followed to reduce the risk of injury and the risk that improper service o
r
repair ma
y
dama
g
e the vehicle or render it unsafe. It is also important to
understand that the “Warnings” and “Cautions” are not exhaustive. It is
impossible to warn of all the hazardous consequences that mi
g
ht result from
failure to follow the procedures.
The procedures recommended and described in this manual are effective
methods of performin
g
service and repair. Some require tools specificall
y
desi
g
ned for a specific purpose. Persons usin
g
procedures and tools which
are not recommended b
y
Cher
y
Compan
y
must satisf
y
themselves
thorou
g
hl
y
that neither personal safet
y
nor safet
y
of the vehicle will be
j
eopardized.
The contents of this manual, includin
g
drawin
g
s and specifications, are the
latest available at the time of printing, and Cher
y
Compan
y
reserves the
ri
g
ht to chan
g
e the vehicle desi
g
ns and alter the contents of this manual
without notice and without incurring obligation.
Parts should be replaced with
g
enuine Cher
y
replacement parts. Persons
using replacement parts of lesser qualit
y
than that of
g
enuine Cher
y
replacement parts must take all the consequences.
Cher
y
Compan
y
is not responsible for an
y
problems which ma
y
arise from
the use of this manual. The cause of such problems includes but is not limited
to insufficient service-related trainin
g
, use of improper tools, use o
f
replacement parts of lesser qualit
y
than that of
g
enuine Cher
y
replacement
parts, or not being aware of any revision of this manual.

Chery A series car service manual
FOREWORD
This manual contains on-vehicle service and diagnosis for Chery A series cars.
For proper repair and maintenance, a thorough familiarization with this manual is important,
and it should always be kept in a handy place for quick and easy reference.
All the contents of this manual, including drawings and specifications, are at latest available
at the time of printing. As modification affecting repair or maintenance occur, relevant
information supplementary to this volume will be made available at Chery dealers. This
manual should be kept up-to-date.
Chery company reserves the right to alter the specifications and contents of this manual
without obligation or advanced notice.
CHERY AUTOMOBLE CO., LTD
ANHUI CHINA
CONTENT
Title Section
General Information
GI
Engine
B
Lubrication System
D
Cooling System
E
Fuel and Emission Control System
F
Engine Electrical System
G
Clutch
H
Manual Transmission
J
Axles And Suspension System
M
Steering System
N
Braking System
P
Body
S
Body Electrical System
T
Air Conditioner System
U
Technical Data
TD
Special Tools
ST

GENERAL INFORMATION
HOW TO USE THIS MANUAL… … … … … … … … … … … … … … … … GI-2
RANGE OF TOPICS… … … … … … … … … … … … … … … … … … …GI-2
SERVICE PROCEDURE … … … … … … … … … … … … … … … … ………GI-2
ADVISORY MESSAGES… … … … … … … … … … … … … … … … ………GI-2
UNITS… … … … … …… … … … … … … … … … … … … … … …GI-4
UNITS …………………… … … … … … … … … … … … … … … … ………GI-4
FUNDAMENTAL PROCEDURE… … … … … … … … … …… … … … …GI-5
PROTECTION OF VEHICLE… … … … …… … … … … … … … … …………GI-5
PREPARATION OF TOOLS AND MEASURING EQUIPMENT …………………GI-5
DISASSEMBLY …………………………………………………………………… GI-5
INSPECTION DURING REMOVAL, DISASSEMBLY ……………………………GI-5
ARRANGEMENT OF PARTS…………………………………………………… GI-6
CLEANING OF PARTS ……………………………………………………………GI-6
REASSEMBLY ……………………………………………………………………GI-6
ADJUSTMENT …………………………………………………………………… GI-7
RUBBER PARTS AND TUBING………………………………………………… GI-7
HOSE CLAMPS …………………………………………………………………… GI-7
VISE ……………………………………………………………………………… GI-7
ELECTRICAL SYSTEM … … … … … … … … … …… … … ……………………GI-8
ELECTRICAL PARTS … … … … … … … … … …… … … … ………………GI-8
CONNECTOR … … … … … … … … … …… … … … …………………………GI-8
ELECTRICAL TROUBLESHOOTING TOOL… … ……… … … … … … … …GI-11
TOWING … … … … … … … … … …… … … … …………………………………GI-12
TOWING… … … … … … … … … …… … … … ……………………………GI-12
TOWING HOOKS… … … … … … … … … …… … … … ……………………GI-12
IDENTIFICATION NUMBER LOCATION… … … … … … … … … … … …GI-14
VEHICLE IDENTIFICATION NUMBER (VIN) … … … … … … … …GI-14
DESCRIPTION OF VIN … … … … … … … … … …… … … ……GI-14
ENGINE IDENTIFICATION NUMBER … … … … … … … … …… … … …GI-15
PRE-DELIVERY INSPECTION… … … … … … … … …… … … … …………GI-16
PRE-DELIVERY INSPECTION … … … … … … … … … … … … … … … …GI-16
SCHEDULE MAINTENANCE … … … … … … … … … …… … … … …………GI-17
SCHEDULE MAINTENANCE TABLE … … … … … …… …… … … … ……GI-17
GI-1

HOW TO USE THIS MUNUAL
RANGE OF TOPICS
·This manual contains procedures for performing all required service operations. The
procedures are divided into the following five basic operations:
Removal/Installation
Disassembly/Assembly
Replacement
Inspection
Adjustment
·Simple operations which can be performing easily just by looking at the vehicle (i.e.,
removal/installation of parts, jacking, vehicle lifting, cleaning of parts and visual
inspection) have been omitted.
SERVICE PROCEDURE
Inspection, adjustment
·Inspection and adjustment procedures are divided into steps. Important points regarding the
location and contents of the procedures are explained in detail.
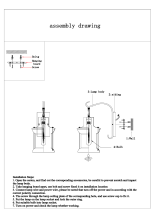
Repair procedure
1. Most repair operations begin with an overview illustration. It identifies the components.,
show how the parts fit together and describes visual part inspection. However, only
removal/ installation procedures that need to be performed methodically have written
instructions.
2. Expendable parts, tightening torques and symbols for oil, grease and sealant are shown in
the overview illustration. In addition, symbols indicating parts requiring the use of special
service tools or equivalent are also shown.
3. Procedures steps are numbered and the part that is the main point of that procedure is
shown in the illustration with the corresponding number. Occasionally, there are
important points or additional or additional information concerning a procedure. Refer to
this information when serving the related part.
ADVISORY MESSAGES
·You’ll find several Warnings, Cautions, Notes, Specifications and Upper and Lower
Limits in this manual.
Warning
·A Warning indicates a situation in which serious injury or death could result if the warning
is ignored.
Caution
·A Caution indicates a situation in which damage to the vehicle or parts could result if the
caution is ignored.
GI-2

Note
·A Note provides added information that will help you to complete a particular procedure.
Specification
·The values indicate the allowable range when performing inspections or adjustments.
Upper and lower limits
·The values indicate the upper and lower limits that must not be exceeded when performing
inspections or adjustments.
GI-3

UNIT
UNIT
Electric current A ampere
Electric power W watt
Electric resistance ohm
Electric voltage V volt
Length mm millimeter
kPa kilo pascal
Kg/cm
2
kilogram force per square centimeter
Negative pressure
Bar (bar)
kPa kilo pascal
Positive pressure
Kg/cm
2
kg/square centimeter
Torque N.m Newton meter
L liter
Vo lu m e
ml milliliter
g gram
Weight
Kg (kilogram)
GI-4

FUNDAMENTAL PROCEDURES
PROTECTION OF VEHICLE
·Always be sure to cover fenders, seats and floor
areas before starting work.
PREPARATION OF TOOLS AND MEASURING EQUIPMENT
·Be sure that all necessary tools and measuring
equipment are available before starting any work.
DISASSEMBLY
·If the disassembly procedure is complex,
requiring many parts to be disassembled ,all parts
should be marked in a place that will not affect
their performance or external appearance and
identified so that reassembly can be performed
easily and efficiently.
INSPECTION DURING REMOVAL, DISASSEMBLY
·When removed, each part should be carefully
inspected for malfunction, deformation, damage,
and other problems.
GI-5

ARRANGEMENT OF PARTS
·All disassembled parts should be carefully
arranged for reassembly.
·Be sure to separate or otherwise identify the parts
to be replaced from those that will be reused.
CLEANING OF PARTS
·All parts to be reused should be carefully and
thoroughly cleaned in the appropriate method.
Warning
·Using compressed air can cause dirt and
other particles to fly out causing injury to
the eyes. Wear protective eye wear
whenever using compressed air.
REASSEMBLY
·Standard values, such as torques and certain
adjustments, must be strictly observed in the
reassembly of all parts.
·If removed, these parts should replace with new ones.
Oil seals
Gaskets
O-rings
Lockwashers
Cotter pins
Nylon nuts
·Depending on location:
Sealant and gaskets, or both, should be applied to specified locations. When sealant is
applied, parts should be installed before sealant hardens to prevent leakage.
Oil should be applied to the moving components of parts.
Specified oil or grease should be applied at the prescribed locations (such as oil seals)
before reassembly.
GI-6

ADJUSTMENT
·Use suitable gauges and/or testers when making
adjustment.
RUBBER PARTS AND TUBING
·Prevent gasoline or oil from getting on rubber
parts or tubing.
HOSE CLAMPS
·When reinstalling, position the hose clamp in the
original location on the hose and squeeze the clamp
lightly with large pliers to ensure a good fit.
VISE
·When using a vise, put protective plates in the jaws of the vise to prevent damage to parts.
GI-7

ELECTRICAL SYSTEM
ELECTRICAL PARTS
Battery cable
·Before disconnecting connector or removing
electrical parts, disconnect the negative battery
cable.
Wiring Harness
·To remove the wiring harness from the clip in the
engine room, pry up the hook of the clip using a
flathead screwdriver.
CONNECTORS
Disconnecting connectors
·When disconnecting connector, grasp the
connectors, not the wires.
·Connectors can be disconnected by pressing or
pulling the lock lever as shown.
GI-8

Locking connector
·when locking connectors, listen for a click
indicating they are securely locked.
Inspection
·When a tester is used to inspect for continuity or
measuring voltage, insert the tester probe from
the wiring harness side.
·Inspect the terminals of waterproof connectors
from the connector side since they cannot be
accessed from the wiring harness side.
Caution
·To prevent damage to the terminal, wrap
a thin wire around the tester probe before
inserting into terminal
Terminals
Inspection
·Pull lightly on individual wires to verify that they
are secured in the terminal.
GI-9

Replacement
·Use the appropriate tools to remove a terminal as
shown. When installing a terminal, be sure to
insert it until it locks securely.
·Insert a thin piece of metal from the terminal side
of the connector and with the terminal locking tab
pressed down, pull the terminal out from the
connector.
Sensors, Switches, and Relays
·Handle sensors, switches, and relays carefully.
Do not drop them or strike them against other
objects.
Wiring Harness
Wiring color codes
·Two-color wires are indicated by a two-color code symbol.
·The first letter indicates the base color of the wire and the second the color of the stripe.
CODE COLOR CODE COLOR
V Green R Red
H Gray Z Purple
A Blue B White
N Black G Yellow
M Brown
Fuse
Replacement
·When replacing a fuse, be sure to replace it with
one of the same capacity. If a fuse fails again, the
circuit probably has a short and the wiring should
be inspected.
·Be sure the negative battery terminal is
disconnected before replacing a main fuse.
·When replacing a pullout fuse, use the fuse
puller.
BLAC
K
N
/R
M/G
GI-10

ELECTRICAL TROUBLESHOOTING TOOLS
Jumper wire
·A jumper wire is used to create a temporary
circuit. Connect the jumper wire between the
terminals of a circuit to bypass a switch.
Caution
·Do not connect a jumper wire from the
power source line to a body ground. This
wiring harnesses or electronic
components.
Voltmeter
·The DC voltmeter is used to measure circuit
voltage. A voltmeter with a range of 15V or more
is used by connecting the positive (+) probe (red
lead wire) to the point where voltage will be
measured and the negative (-) probe (black lead
wire) to a body ground.
Ohmmeter
·The ohmmeter is used to measure the resistance
between two points in a circuit and to inspect for
continuity and short circuits.
Caution
·Do not connect the ohmmeter to any
circuit where voltage is applied. This will
GI-11
damage the ohmmeter.

TOWING
TOWING
·Proper lifting and towing are necessary to prevent damage to the vehicle. Government and
local laws must be followed.
·A towed vehicle should have its front wheels off the ground. If excessive damage or other
conditions prevent this, use wheel dollies.
·When towing with the rear wheels on the ground, release the parking brake.
Caution
·Do not two the vehicle backward with
driving wheels on the ground. This may
cause internal damage to the transaxle.
Caution
·Do not tow with sling-type equipment.
This could damage your vehicle. Use
wheel-lift or flatbed equipment.
Caution
·Do not use the hook loops under the
front and rear for towing. They are
designed ONLY for tying down the
vehicle when it is being transported.
TOWING HOOKS
Caution
·The towing hooks should be used only in an emergency(to get the vehicle out of a
ditch or a snow bank, for example).
·when using the towing hooks, always pull the cable or chain in a straight direction
with respect to the hook. Apply no sideways force.
GI-12

FRONT
REAR
GI-13

IDENTIFICATION NUMBER LOCATIONS
VEHICLE IDENTIFICATION NUMBER (VIN)
The VIN of Chery A series vehicle is available at two places of the engine compartment. The
specific position are illustrated in the following pictures:
·VIN on Wiper Groove
·VIN on the right foot of front glass
DESCRIPTION OF VIN
LVV: International identity code of manufacturer
D: Brand of the Vehicle
A: Type of Vehicle Chassis
1: Type of Transmission
1: Type of Engine
A: Constrain System
7: Check Digit
5: Manufacture Year
D: Assembly Factory Code
023437: Production Serial Number
1. LVV is the code of vehicles manufactured by Chery Automobile Co., Ltd.
2. The fourth digit of VIN code stands for the brand of the vehicle. The brand “Chery” is
represented by letter “D”.
GI-14

3. The fifth digit of VIN code stands for the type of chassis of the body. The letter A stands
for the chassis of three-box, five-door, and 4X2 type; B for two-box, five-door, and 4X2
type; C for three-box, four-door, two-lid, and 4X2 type; and D for two-box, five-door, and
4X4 type.
4. The sixth digit of VIN code stands for the type of transmission. 1 stands for manual
transmission and 2 for automatic.
5. The seventh digit of VIN code stands for the type of engine. 1 stands for the electronic
fuel injection gasoline engine of 1.5L~2.0L (excluding 2.0L) series; 2 for below 1.5L
(excluding 1.5L), and 4 for 2.0L~2.5L (excluding 2.5L).
6. The eighth digit of VIN code stands for the Constrain System. A stands for manual safety
belt, and B for manual safety belt and airbag in the front row.
7. The ninth digit of VIN code is the check digit. It is to check accuracy of VIN record, and
is made out through computation after confirming the other sixteen digits of VIN.
8. The tenth digit of VIN code stands for the manufacture year according to the following
table.
YEAR CODE
YEAR CODE YEAR CODE YEAR CODE
1999 X 2002 2 2005 5 2008 8
2000 Y 2003 3 2006 6 2009 9
2001 Z 2004 4 2007 7 2010 A
9. The eleventh digit of VIN code stands for the assembly factory. The “Chery Automobile
Co., Ltd” is represented by the letter “D”.
10. The twelfth to the seventeenth digits of VIN code stand for production serial number.
ENGINE IDENTIFICATION NUMBER
GI-15

PRE-DELIVERY INSPECTION
PRE-DELIVERY INSPECTION
PRE-DELIVERY INSPECTION TABLE
Setting and checking of clock
Shut down engine
Alarming lamp of “not shut down lamps”
Shut down all the lamps
Self-lock function of steering wheel
Adjusting of hand-brake
Adjusting of steering wheel angle
Sun visor
Center lock and remote control(alarming sound)
Indoor lamp
Reading lamp
Front & rear safety belt
Angle of seat back and adjusting of seats
Open of trunk lid (rear door)
Trunk lamp
Open of fuel filling cover and fuel grade
Close of trunk lid and its locking
Open all the four doors
Manual windows
Rear door children lock
Fill lube for lock & hinge
Close doors and inspect the assembly
Lift car
Wear or broken of pipes for chassis, engine, brake and fuel
Tightening and bolts of suspension system
M/T oil level
Lower car
Confirm all the torques for tire nuts
Label of tire pressure
Tire pressure (including spare tire)
Tool and jack
Driving test
Driving performance
Noise from interior, suspension and brake system
Brake system and hand-brake
Automatic return of steering wheel
Vibration and its position of steering wheel
A/T gear shift (up and down)
Reading and canceling of odometer
Final inspection
Cooling fan
Idle speed/emission
Leaking of fuel, engine oil, coolant and exhaust gas
Performance of hot startup
Check ABS performance with ABS tester
Final preparation
Clean the inside and outside of car
Check if water leakin
g
into the car includin
g
trun
k
Appearance and interior
Defects of appearance and interior
Paint, galvanized components and interior trim
Carrying items, tools, spare tire, operation manual for jack an
d
keys
Remove anti-vibration cover for tires and body protective film
Engine
Lock and hinge of engine hood
Poles of battery
Electrolyte level
Main ground
Main fuse and spare parts
Oil level of engine
Coolant level and water quality
Power steering oil level
A/T oil level
Glass washing liquid level
Degree of tightness of timing belt (power steering, generator an
d
compressor)
Throttle control cable(A/T control cable) Close the engine hood
Operation and Control
Height and free distance of clutch pedal
Height and free distance of brake pedal
Acceleration pedal
Inspect the indoor fuse and spare parts
Turn ignition switch to position
Radio debug
Radio/Cassette/CD and antenna
Turn ignition switch to position
Inspection of all the alarming lamps, defects of dynamo,
hand-brake, oil pressure, brake, A/T gear display, ABS, SRS
AT startup protector
Start engine
The operation of battery and dynamo as well as the displays o
f
various alarming lamps
Idle speed
Operation of front washer
The operation of front wiper
Turn signal light
Side light and license plate light
Head lamp and high beam light (high beam indicator)
Switch of fog light
Brake light and backup light
Instrument light and light adjusting switch
Horn
Cigar lighter
Operation of sun roof
Fog-remover of rear windscreen and indicator
Performance of air condition under each gear (refrigeration an
d
amount of blast)
Cycle switch
Power rear view mirror
GI-16

SCHEDULE MAINTENANCE
SCHEDULE MAINTENANCE TABLE
Mileage Km
Items
5000 15000 30000
Light, warning flasher, horn: check performance
Wiper and washing system: check performance, add washer fluid if necessary
Check clutch free pedal travel, adjust it if necessary
Cooling system: check antifreeze level, replace if necessary
Oil: Replace
Oil filter: Replace
Engine: check leakages (oil, antifreeze, fuel, A/C system)
Engine: adjust valve clearance (only applied on SQR 7160 sedan)
Battery: check electrolyte solution level, refill distilled water if necessary
Timing belt: check belt tension and wear, adjust or replace if necessary.
Engine hood hinge and lock: lubricate
Door hinge and door stopper: lubricate
Spark plug: check and replace if necessary
Air filter: clean shell, clean filter element and replace it if necessary.
Ignition timing: check
Fuel filter: replace
Exhaust system: check if leak and damage
Wedge belt: check tension, adjust or replace as necessary
Driver: check if leak or damage
Constant velocity joint dust boot: check if damaged
Steering tie rod joint: check clearance and if dust boot damaged
Steering universal joint assembly boot: check if misplaced or damaged
Power steering system: check if power steering oil level, steering gear & rack
clearance improper
Brake system: visually check if leak or damage and brake fluid level
Hand brake: check the travel, adjust if necessary
Brake lining: check its thickness
Under-body protective cover: check if damaged
Seat belt: check if damaged
Toe-in value and camber angle: measure, adjust if necessary
Ball pin: check the clearance
GI-17

Mileage Km
Items
5000 15000 30000
Engine oil sump bolt: check if loose, tighten if necessary
Control arm rubber boot: check if damaged
Braking hose: check if aged or damaged
Braking pipe: check if damaged, eroded or leaky connection
Fuel system connections: check if aged, damaged, abnormal loosening or rubbing
Tire (including spare tire): check tires veins depth, adjust tire pressure, check
wheel bolt tightening torque.
Tires exchange
Chassis and body connecting bolts: check if loose, tighten if necessary
Wheel: check if loose
Rear wheel hub bearing: check clearance and lubricating condition
CO content at idle: measure and adjust if necessary
Road test: check if all mechanism operates normally.
Note:
For manual transmission, replace gear oil in transmission case every year or 30,000 km. Replace brake fluid
every 2 years or 50,000 km.
When driving mileage reaches 5,000 km, perform 5,000 km maintenance item.
When driving mileage reaches 10,000 km or 6 months after last service, perform 5,000 km
maintenance item.
When driving mileage reaches 15,000 km or 6 months after last service, perform 15,000 km
maintenance item.
When driving mileage reaches 20,000 km or 6 months after last service, perform 5,000 km
maintenance item.
When driving mileage reaches 25,000 km or 6 months after last service, perform 5,000 km
maintenance item.
When driving mileage reaches 30,000 km or 6 months after last service, perform 30,000 km
maintenance item.
When driving mileage reaches 35,000 km or 6 months after last service, perform 5,000 km
GI-18
/