
Dell™ C7765dn/Dell™ C5765dn
Security Function Supplementary Guide
Regulatory Model: C7765dn/C5765dn

Information in this document is subject to change without notice.
© 2014 Dell Inc. All rights reserved.
This publication could include technical inaccuracies or typographical errors. Changes are periodically made to the information
herein; these changes will be incorporated in later editions. Improvements or changes in the products or the programs described
may be made at any time.
For Dell technical support and downloads, visit dell.com/support or contact Dell's ProSupport Help Desk for assistance by calling
1-866-516-3115, or by e-mailing imaging_Solutions_Support_CA[email protected].
Reproduction of these materials in any manner whatsoever without the written permission of Dell Inc. is strictly forbidden.
Trademarks used in this text: Dell and the DELL logo are trademarks of Dell Inc.; Microsoft, Windows, and Windows Server are
either trademarks or registered trademarks of Microsoft Corporation in the United States and/or other countries; RSA and BSAFE
are either registered trademarks or trademarks of EMC Corporation in the United States and/or other countries.
XML Paper Specification (XPS): This product may incorporate intellectual property owned by Microsoft Corporation. The terms
and conditions upon which Microsoft is licensing such intellectual property may be found at http://go.microsoft.com/fwlink/
?LinkId=52369.
Nuance
TM
OCR © 1994-2014 Nuance Communications. All Rights Reserved.
Other trademarks and trade names may be used in this document to refer to either the entities claiming the marks and names or
their products. Dell Inc. disclaims any proprietary interest in trademarks and trade names other than its own.
The printer software uses some of the codes defined by the Independent JPEG Group.
SD Logo is a trademark of SD-3C, LLC.
As for RSA BSAFE
This printer includes RSA
®
BSAFE
®
Cryptographic software from EMC Corporation.
____________________
UNITED STATES GOVERNMENT RESTRICTED RIGHTS
This software and documentation are provided with RESTRICTED RIGHTS. Use, duplication or disclosure by the Government is
subject to restrictions as set forth in subparagraph (c)(1)(ii) of the Rights in Technical Data and Computer Software clause at DFARS
252.227-7013 and in applicable FAR provisions: Dell Inc., One Dell Way, Round Rock, Texas, 78682, USA.
September 2014 Rev. A00

Table of Contents
3
Table of Contents
Table of Contents.....................................................................................................................3
Before Using the Security Features.......................................................................................5
Preface...................................................................................................................................5
Security Features .................................................................................................................6
Settings for the Secure Operation ...................................................................................6
For Optimized Performance of Security Features........................................................7
Confirm the Machine ROM Version and the System Clock .......................................9
Settings for the Secure Operation 1
(Initial Settings Procedures Using Control Panel) ........................................................... 11
Authentication for entering System Administration mode....................................... 11
Set Use Passcode Entry for Control Panel Login........................................................ 11
Set Overwrite Hard Disk................................................................................................... 11
Set Data Encryption ..........................................................................................................12
Set Authentication.............................................................................................................12
Set Private Print..................................................................................................................13
Set Store & Send Link........................................................................................................13
Set Direct Fax......................................................................................................................14
Set Self Test ........................................................................................................................14
Set Software Download ...................................................................................................14
Settings for the Secure Operation 2
(Initial Settings Procedures Using Dell Printer Configuration Web Tool) ...................15
Preparations for settings on the Dell Printer Configuration Web Tool..................15
Change the System Administrator’s Passcode............................................................15
Set Maximum Login Attempts.........................................................................................15
Set Access Control............................................................................................................15
Set User Passcode Minimum Length ............................................................................16
Set SMB................................................................................................................................16
Set WebDAV........................................................................................................................16
Set IPP ..................................................................................................................................17
Set SSL/TLS ......................................................................................................................... 17
Set Service Representative Restricted Operation ....................................................... 17
Set Audit Log ......................................................................................................................18
Configuring Machine Certificates ..................................................................................18
Set IPSec..............................................................................................................................18
Set SNMPv3.........................................................................................................................19
Set S/MIME......................................................................................................................... 20
Set WSD (Scan)...................................................................................................................21
Set LDAP Server .................................................................................................................21
Set Kerberos Server...........................................................................................................21
Settings for the Secure Operation 3 (Regular Review by Audit Log) .......................... 22
Import the Audit Log........................................................................................................ 22
User Authentication .............................................................................................................. 24
Appendix.................................................................................................................................. 25

4

Before Using the Security Features
5
Before Using the Security Features
This section describes the security features and items to be confirmed.
Preface
This guide describes the setup procedures related to security.
This guide is mainly intended for the manager and system administrator of the
organization where the machine is installed.
This guide also describes useful information for general users about the operations
related to security features.
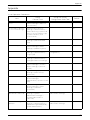
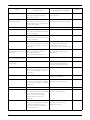
For other product information, refer to the following documents:
Note • The hash values of the PDF files are described in the Security Target disclosed at the Dell
(http://www.dell.com/support/home/us/en/04/Products/) and JISEC
(http://www.ipa.go.jp/security/jisec/jisec_e/) websites. Please check that the hash values
of the respective manuals are correct.
• The Manual Part# may be updated when the manual content is updated.
The security features of the Dell C7765dn Color Multifunction Printer are supported
by the following ROM versions.
• Controller ROM: Ver. 2.205.5
•IOT ROM: Ver. 41.1.0
•ADF ROM: Ver. 12.5.0
The security features of the Dell C5765dn Color Laser Multifunction Printer are
supported by the following ROM versions.
• Controller ROM: Ver. 2.205.1
•IOT ROM: Ver. 3.0.2
• ADF ROM: Ver. 11.1.0
• Fax ROM: Ver. 100.19.0
Important • The machine has obtained IT security certification for Common Criteria EAL3. This certifies
that the target of evaluation has been evaluated based on the certain evaluation criteria
and methods, and that it conforms to the security assurance requirements. Your ROM and
guidance may not be the certified version because they may have been updated along
with machine improvements.
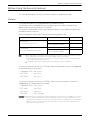
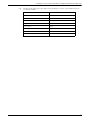
Model Guide Manual Part#
Dell C7765dn
Color Multifunction Printer
User’s Guide KB3206EN0-5
Smart Card Reader Installation
and Configuration Guide
KE3037EN0-3
Dell C5765dn
Color Laser Multifunction Printer
User’s Guide KB3211EN0-4
Smart Card Reader Installation
and Configuration Guide
KE3038EN0-2

6
Security Features
Dell C7765dn and C5765dn have the following security features:
• Hard Disk Data Overwrite
• Hard Disk Data Encryption
• User Authentication
• System Administrator's Security Management
• Customer Engineer Operation Restriction
• Security Audit Log
• Internal Network Data Protection
•Self Test
•FAX Flow Security
Settings for the Secure Operation
For the effective use of the security features, the System Administrator (Machine
Administrator) must configure settings by referring to the following sections.
• Settings for the Secure Operation 1 (Initial Settings Procedures Using Control Panel)
(P.11)
• Settings for the Secure Operation 2 (Initial Settings Procedures Using Dell Printer
Configuration Web Tool) (P.15)
• Settings for the Secure Operation 3 (Regular Review by Audit Log) (P.22)
Below is the list of setting items and their values that need to be set.
• Passcode Entry for Control Panel Login (For Dell C7765dn)/
Passcode Entry from Control Panel (For Dell C5765dn)
Set to [On].
• Overwrite Hard Disk
Set to [1 Overwrite] or [3 Overwrites].
• Data Encryption
Set to [On], and then enter an encryption key of 12 characters.
• Authentication
Set to [Login to Local Accounts] or [Login to Remote Accounts].
•Private Print
Set to [According to Print Accounting] or [Save as Private Charge Print Job].
• Store & Send Link
Set to disabled.
•Direct Fax
Set to [Disabled] when remote authentication is used.
•Self Test
Set to [On].
•Software Download
Set to [Disabled].
• System Administrator Passcode
Change the default passcode to another passcode of 9 or more characters.

Before Using the Security Features
7
• Maximum Login Attempts
Set to [5] times.
•Access Control
Set to [Locked] for [Device Access] and [Lock All] for [Service Access].
• User Passcode Minimum Length
Set to [9] characters.
•SMB
Set to disabled for [NetBEUI].
•WebDAV
Set to disabled (when remote authentication is used).
•IPP
Set to enabled.
• SSL/TLS
Set to enabled.
• Service Representative Restricted Operation
Set to [Enabled], and enter a passcode of 9 or more characters.
•Audit Log
Set to enabled.
•IPSec
Set to enabled.
•SNMP v1/v2c
Set to enabled.
•SNMP v3
Set to enabled.
•S/MIME
Set to enabled.
•WSD (Scan)
Set to disabled.
•LDAP Server
Set the LDAP Server information.
• Kerberos Server
Set the Kerberos Server information.
Important • Security will not be assured if the above settings are not properly configured.
• The Fax Flow Security feature requires no special setting.
• When you set Data Encryption to [On], enter an encryption key of 12 characters.
For Optimized Performance of Security Features
The management organization needs to follow the instructions below:
• Assign appropriate personnel as machine and system administrators, provide
training, and ensure proper oversight.
• The manager and system administrators need to train users about the TOE
operation and precautions according to the policies of their organization and the
product guidance.
• The machine needs to be placed in a secure or monitored area where the machine
is protected from unmanaged physical access.

8
• If the machine is on the internal network that connects to external networks,
configure the network properly to block any unauthorized external access.
• Set passcode and encryption key according to the following rules.
- Do not use an easily guessable passcode.
- A passcode needs to contain both numeric and alphabetic characters.
• Administrators need to set the account policies on the remote authentication
server as follows.
- Set password policy to 9 or more characters.
- Set account lockout policy to 5 times.
• Users need to set a user ID and a passcode in [Accounting Configuration] via the
printer driver.
• For secure operation, all of the remote trusted IT products that communicate with
the machine must implement the communication protocol in accordance with
industry standard practice with respect to RFC/other standard compliance (SSL/
TLS, IPSec, SNMP v3, S/MIME) and must work as advertised.
SSL/TLS
For the SSL client (Web browser) and the SSL server that communicate with the
machine, select a data encryption suite from the following:
• SSL_RSA_WITH_RC4_128_SHA
• SSL_RSA_WITH_3DES_EDE_CBC_SHA
• TLS_RSA_WITH_AES_128_CBC_SHA
• TLS_RSA_WITH_AES_256_CBC_SHA
• TLS_RSA_WITH_AES_128_CBC_SHA256
• TLS_RSA_WITH_AES_256_CBC_SHA256
(The recommended browser is Microsoft
®
Internet Explorer
®
6/7/8/9)
S/MIME
For the machine and E-mail clients, select an Encryption Method/Message Digest
Algorithm from the following:
• 3Key Triple-DES/168bit, AES/128bit, AES/192bit, AES/256bit
• SHA1, SHA256
IPSec
For the IPSec host that communicates with the machine, select an Encryption
Method/ Message Digest Algorithm from the following:
•AES(128bit)/SHA1
•3Key Triple-DES(168bit)/SHA1
SNMP v3
The encryption method of SNMPv3 is DES/56bit or AES 128bit. Set [Message Digest
Algorithm] to [SHA1].

Before Using the Security Features
9
Confirm the Machine ROM Version and the System Clock
Before making initial settings, the System Administrator (Machine Administrator)
needs to check the machine ROM version and system clock.
To check from the Control Panel
1
Press the <Machine Status> button on the control panel.
2
Select [Software Version] on the [Machine Information] screen.
You can identify the software versions of the components of the machine on the
screen.
To check from the Print Report
1
Press the <Machine Status> button on the control panel.
2
Select [Print Reports] on the [Machine Information] screen.
3
Select [Printer Reports].
4
Select [Configuration Report].
5
Press the <Start> button on the control panel.
To check the System Clock
1
Press the <Log In/Out> button on the control panel.
2
Enter the System Administrator's ID and the passcode if prompted.
3
Select [Enter].
4
Select [Tools].
5
Select [System Settings].
6
Select [Common Service Settings].
7
Select [Machine Clock/Timers].
If you need to change the time and date, follow the remaining steps:
8
Select the required option.
9
Select [Change Settings].
10
Change the required setting.
Important
• While you are using Dell Printer Configuration Web Tool, do not access other web
sites, and do not use other applications.
• When you change [Authentication Type] or prior to disposing the machine, initialize
the hard disk by resetting [Data Encryption] and changing [encryption key].
• For preventing SSL vulnerability, set the machine address in the proxy exclusion list of
browser.
With this setting, you can prevent man-in-the-middle attack because the machine
will communicate directly with the remote browser bypassing the proxy server.

10
11
Select [Save].
12
To exit the [Tools] screen, select [Close] twice.

Settings for the Secure Operation 1 (Initial Settings Procedures Using Control Panel)
11
Settings for the Secure Operation 1
(Initial Settings Procedures Using Control Panel)
This section describes the initial settings related to security features, and how to set
them on the machine's control panel.
Authentication for entering System Administration mode
To change or customize the system settings, enter the System Administration mode.
1
Press the <Log In/Out> button on the control panel.
2
Enter the System Administrator’s ID with the displayed keypad.
3
Select [Next].
4
Enter the System Administrator’s passcode.
5
Select [Enter].
6
Select [Tools].
Set Use Passcode Entry for Control Panel Login
Follow the procedure below to require a passcode to use the machine.
1
Select [Authentication/Security Settings] on the [Tools] screen.
2
Select [Authentication].
3
Select [Passcode Policy].
4
For C7765dn: Select [Passcode Entry for Control Panel Login].
For C5765dn: Select [Passcode Entry from Control Panel].
5
Select [Change Settings].
6
Select [On].
7
Select [Save].
8
To exit the [Tools] screen, select [Close] twice.
Set Overwrite Hard Disk
Follow the procedure below to change the hard disk overwite setting. You can select
whether to overwrite once or three times.
1
Select [Authentication/Security Settings] on the [Tools] screen.
2
Select [Overwrite Hard Disk].
3
Select [Number of Overwrites].
4
Select [1 Overwrite] or [3 Overwrites].
5
Select [Save].

12
Set Data Encryption
Follow the procedure below to encrypt data recorded on the machine’s hard disk.
1
Select [System Settings] on the [Tools] screen.
2
Select [Common Service Settings].
3
Select [Other Settings].
4
On the [Other Settings] screen, select [Data Encryption].
5
Select [Change Settings].
6
Select [On].
7
Select [New Encryption Key].
8
Enter a new 12 character encryption key, and then select [Save].
9
Select [Re-enter Encryption Key].
10
Enter the same passcode, and then select [Save].
11
Select [Save].
12
Select [Yes] to make the change.
13
Select [Yes] to reboot.
Set Authentication
Follow the procedure below to configure the authentication settings.
1
Select [Authentication/Security Settings] on the [Tools] screen.
2
Select [Authentication].
3
Select [Login Type].
4
Select [Login to Local Accounts] or [Login to Remote Accounts].
5
Select [Save].
When [Login to Remote Accounts] is selected in step 4, proceed to steps 6 to 12.
6
Select [System Settings] on the [Tools] screen.
7
Select [Connectivity & Network Setup].
8
Select [Remote Authentication/Directory Service].
9
Select [Authentication System Setup].
10
Select [Authentication System].
11
Select [Change Settings].
12
Select [LDAP], [Kerberos(Windows 2000)], or [Kerberos(Solaris)].
13
Select [Save].
14
To exit the [Remote Authentication/Directory Service] screen, select [Close] twice.

Settings for the Secure Operation 1 (Initial Settings Procedures Using Control Panel)
13
Set Private Print
Follow the procedure below to configure the Private Print settings.
1
Select [Authentication/Security Settings] on the [Tools] screen.
2
Select [Authentication].
3
Select [Charge/Private Print Settings].
4
Select [Receive Control].
5
Select [Change Settings].
When [Login to Local Accounts] is selected
1) Select [According to Print Accounting].
2) Select [Save as Private Charge Print Job] for [Job Login Success].
3) Select [Delete Job] for [Job Login Failure].
4) Select [Delete Job] for [Job without User ID].
When [Login to Remote Accounts] is selected
1) Select [Save As Private Charge Print Job].
6
Select [Save].
7
To exit the [Charge/Private Print Settings] screen, select [Close].
Set Store & Send Link
For the secure operation of the machine, follow the procedure below to set [Store &
Send Link] to [Disabled].
1
Select [System Settings] on the [Tools] screen.
2
Select [Common Service Settings].
3
Select [Screen/Button Settings].
4
Select [Home].
5
Select [Change Settings].
6
Select [Store & Send Link].
7
Select [(Not Assigned)].
8
Select [Save] twice.
9
To exit the [Screen/Button Settings] screen, select [Close].

14
Set Direct Fax
When remote authentication is used, follow the procedure below to set [Direct Fax]
to [Disabled].
1
Select [System Settings] on the [Tools] screen.
2
Select [Fax Service Settings].
3
Select [Fax Control].
4
Select [Direct Fax].
5
Select [Change Settings].
6
Select [Disabled].
7
Select [Save].
8
To exit the [Fax Control] screen, select [Close].
Set Self Test
Follow the procedure below to configure the Self Test settings.
1
Select [System Settings] on the [Tools] screen.
2
Select [Common Service Settings].
3
Select [Maintenance].
4
Select [Power on Self Test].
5
Select [On].
6
Select [Save].
7
To exit the [Maintenance] screen, select [Close].
Set Software Download
For the secure operation of the machine, follow the procedure below to set [Software
Download] to [Disabled].
1
Select [System Settings] on the [Tools] screen.
2
Select [Common Service Settings].
3
Select [Other Settings].
4
Select [Software Download].
5
Select [Change Settings].
6
Select [Disabled].
7
Select [Save].
8
To exit the [Tools] screen, select [Close] twice.
9
Select [Reboot now] on the confirmation screen.

Settings for the Secure Operation 2 (Initial Settings Procedures Using Dell Printer Configuration Web Tool)
15
Settings for the Secure Operation 2
(Initial Settings Procedures Using Dell Printer Configuration Web Tool)
This section describes the initial settings related to security features, and how to set
them on Dell Printer Configuration Web Tool.
Preparations for settings on the Dell Printer Configuration Web Tool
To use Dell Printer Configuration Web Tool, the administrator will need a computer
with TCP/IP support and a browser that satisfies "SSL/TLS" (P.8) conditions.
1
Open your Web browser, enter the machine's TCP/IP address in the Address or
Location field, and press the <Enter> key.
2
Enter the System Administrator's ID and the passcode if prompted.
3
Display the [Properties] screen by clicking the [Properties] tab.
Change the System Administrator’s Passcode
1
Click [Security] on the [Properties] screen.
2
Click [System Administrator Settings].
3
Enter the System Administrator's ID in the [Administrator's Login ID] box.
4
Enter a new System Administrator's passcode of 9 or more characters in the
[Administrator's Passcode] box.
5
Enter the new System Administrator's passcode in the [Retype Administrator's
Passcode] box.
6
Click [Apply].
Set Maximum Login Attempts
Follow the procedure below to specify maximum login attempts.
1
Click [Security] on the [Properties] screen.
2
Click [System Administrator Settings].
3
Enter the System Administrator's ID in the [Administrator's Login ID] box.
4
Enter [5] in the [Maximum Login Attempts] box.
5
Click [Apply].
Set Access Control
Follow the procedure below to restrict access to the machine.
1
Click [Security] on the [Properties] screen.
2
Click [Authentication Configuration].

16
3
Click [Next].
4
Click [Configure] for [Device Access].
5
Select [Locked] for [Device Access].
6
Click [Apply].
7
Click [Authentication Configuration].
8
Click [Next].
9
Click [Configure] for [Service Access].
10
Click [Lock All].
11
Click [Apply].
12
Click [Reboot Machine].
Set User Passcode Minimum Length
Follow the procedure below to specify the minimum number of digits allowed for a
passcode.
This feature is only applicable to Local Authentication mode.
1
Click [Security] on the [Properties] screen.
2
Click [User Details Setup].
3
Set [9] for [Minimum Passcode Length].
4
Click [Apply].
5
Click [Reboot Machine].
Set SMB
For the secure operation of the machine, follow the procedure below to set [NetBEUI]
to [Disabled].
1
Click [Connectivity] on the [Properties] screen.
2
Click [Port Settings].
3
Uncheck the [NetBEUI] box for [SMB].
4
Click [Apply].
Set WebDAV
When remote authentication is used, follow the procedure below to set [WebDAV] to
[Disabled].
1
Click [Connectivity] on the [Properties] screen.
2
Click [Port Settings].
3
Uncheck the [Enabled] box for [WebDAV].

Settings for the Secure Operation 2 (Initial Settings Procedures Using Dell Printer Configuration Web Tool)
17
4
Click [Apply].
Set IPP
Follow the procedure below to configure the IPP settings.
1
Click [Connectivity] on the [Properties] screen.
2
Click [Port Settings].
3
Check the [Enabled] box for [IPP].
4
Click [Apply].
Set SSL/TLS
Dell Configuration Web Tool requires SSL/TLS communication between a network-
connected computer and the machine.
1
Click [Security] on the [Properties] screen.
2
Click [Machine Digital Certificate Management].
3
Click [Create New Certificate].
Note • If [Create New Self Signed Certificate] is displayed, click it and go to step 5.
4
Select [Self-Signed Certificate] and click [Continue].
5
Set [Public Key Size] as necessary.
6
Set [Issuer] as necessary.
7
Click [Apply].
8
Click [SSL/TLS Settings].
9
Select the [Enabled] check box for [HTTP - SSL / TLS Communication] and [LDAP -
SSL / TLS Communication].
10
Click [Apply].
11
Click [Reboot Machine].
Note • For secure operation, select [Enabled] check box for [Verify Remote Server Certificate] and
import the CA certificate according to the same procedure as "Configuring Machine
Certificates" (P.18). If SMTP server has SSL/TLS function and if you want to use secure e-
mail, configure [SMTP-SSL/TLS Communication].
Set Service Representative Restricted Operation
Follow the procedure below to restrict the operation of service representatives.
1
Click [Security] on the [Properties] screen.
2
Click [Service Representative Restricted Operation].
3
Check the [Enabled] box for [Restricted Operation].
4
Enter a passcode in the [Maintenance Passcode] box.
5
Enter the passcode in the [Retype Maintenance Passcode] box.

18
6
Click [Apply].
Set Audit Log
Follow the procedure below to configure the Audit Log settings.
1
Click [Security] on the [Properties] screen.
2
Click [Audit Log].
3
Check the [Enabled] box for [Audit Log].
4
Click [Apply].
Configuring Machine Certificates
Import the Certificates for SSL, IPSec, S/MIME.
1
Click [Security] on the [Properties] screen.
2
Click [Machine Digital Certificate Management].
3
Click [Upload Signed Certificate].
4
Enter a file name for the file you want to import, or select the file to be imported by
clicking [Browse].
5
Enter [Password], and enter [Retype Password].
6
Click [Import].
Set IPSec
Before setting [Digital Signature] for [IKE Authentication Method], import an IPSec
certificate according to the same procedure as "Configuring Machine Certificates"
(P.18).
1
Click [Security] on the [Properties] screen.
2
Configure the [Preshared Key] settings or [Digital Signature] settings using the
following procedures.
To use Preshared Key
1) Click [IPSec].
2) Check the [Enabled] box for [Protocol].
3) Select [Preshared Key] for [IKE Authentication Method].
This is used to ensure secure communication between the machine and a client
computer or server.
4) Enter a Pre-Shared Key in the [Shared Key] and [Verify Shared Key] boxes.
Make sure the IPSec address is correct.
To use Digital Signature
1) Click [Certificate Management].
2) Select [IPSec] for [Certificate Purpose].
3) Click [Display the list], and check a desirable Certificate.

Settings for the Secure Operation 2 (Initial Settings Procedures Using Dell Printer Configuration Web Tool)
19
4) Click [Certificate Details].
5) Click [Use this certificate].
6) Click [IPSec] under [Security].
7) Check the [Enabled] box for [Protocol].
8) Select [Digital Signature] for [IKE Authentication Method].
Make sure the IPSec address is correct.
Set IPSec Address
1
Enter the IP Address in the [Specify Destination IPv4 Address] box on the [IPSec]
screen.
2
Enter the IP Address in the [Specify Destination Ipv6 Address] box.
3
Select [Enabled] or [Disabled] from the [Communicate with Non-IPSec Device] drop-
down list.
4
Click [Apply].
5
Click [Reboot Machine].
Set SNMPv3
Follow the procedure below to configure the SNMPv3 (Simple Network Management
Protocol, version 3) settings.
1
Click [Connectivity] on the [Properties] screen.
2
Click [Protocols].
3
Click [SNMP Configuration].
4
Check the [Enable SNMP v3 Protocol] box.
5
Uncheck the [Enable SNMP v1/v2c Protocols] box.
6
Click [Apply].
7
Click [SNMP Configuration].
8
Click [Edit SNMP v3 Properties] and check [Account Enabled] for [Administrator
Account].
9
Enter a new Authentication Password (minimum 8 characters).
10
Enter the Confirm Authentication Password.
11
Enter a new Privacy Password (minimum 8 characters).
12
Enter the Confirm Privacy Password.
13
Check [Account Enabled] for [Print Drivers/Remote Clients Account].
14
Click [Apply].
Note • Be sure to change Authentication Password and Privacy Password from the default
password.
• When using SNMP v3, use the IPSec protocol simultaneously. Set the IP address of the
clients for SNMP v3 according to the procedures in "Set IPSec Address" (P.19), and enter
the IP Address in the [Specify Destination IPv4 Address] or [Specify Destination IPv6
Address] box.

20
• Since the machine cannot communicate by SNMP v1/v2c, you need to uncheck [SNMP
status Enabled] for the port setting on the client's printer driver.
Set S/MIME
Enable the S/MIME communication to use the e-mail encryption and digital signature
features.
To use E-mail with this machine, the E-mail function needs to be enabled and
configured as described in the User’s Guide's "18 E-mail Environment Settings".
Before making the S/MIME setting, import an S/MIME certificate according to the
same procedure as "Configuring Machine Certificates" (P.18).
1
Click [Configuration Overview] on the [Properties] screen.
2
Click [Settings] for [E-mail].
3
Click [Configure] for [E-mail Settings], and enter the machine's E-mail address in the
[From Address] box.
4
Click [Apply].
5
Click [Security] on the [Properties] screen.
6
Click [Certificate Management].
7
Select [S/MIME] for [Certificate Purpose].
8
Click [Display the list], and check a desirable certificate.
9
Click [Certificate Details].
10
Click [Use this certificate].
11
Click [SSL/TLS Settings].
12
Check the [Enabled] box for [S/MIME Communication].
13
Click [Apply].
14
Click [Reboot Machine].
15
After the machine is restarted, refresh the browser and click the [Properties] tab.
16
Click [Security].
17
Click [S/MIME Settings].
18
Uncheck the [Enabled] check box for [Receive Untrusted E-mail].
19
Select [Always add signature] for [Signature].
20
Uncheck the [Enabled] check box for [Receive Untrusted Internet Fax].
21
Select [Always add signature] for [Signature].
22
Click [Apply].
Page is loading ...
Page is loading ...
Page is loading ...
Page is loading ...
Page is loading ...
Page is loading ...
Page is loading ...
-
 1
1
-
 2
2
-
 3
3
-
 4
4
-
 5
5
-
 6
6
-
 7
7
-
 8
8
-
 9
9
-
 10
10
-
 11
11
-
 12
12
-
 13
13
-
 14
14
-
 15
15
-
 16
16
-
 17
17
-
 18
18
-
 19
19
-
 20
20
-
 21
21
-
 22
22
-
 23
23
-
 24
24
-
 25
25
-
 26
26
-
 27
27


Dell C5765DN MFP Color Laser Printer Owner's manual
- Type
- Owner's manual
- This manual is also suitable for
Ask a question and I''ll find the answer in the document
Finding information in a document is now easier with AI
Related papers
-
Dell C7765DN MFP Color Laser Printer User guide
-
-
Dell C5765DN MFP Color Laser Printer Owner's manual
-
-
-
-
-
-
Other documents
-
Copystar CS 4003i Operating instructions
-
Xerox Versant 80 Administration Guide
-
Xerox Versant 180 Administration Guide
-
Xerox Versant 2100 Administration Guide
-
Xerox Color C75 Administration Guide
-
Xerox Color J75 Administration Guide
-
Xerox Versant 3100 Administration Guide
-
Xerox D136 and D136 Administration Guide
-
-
Xerox Color 550/560/570 Administration Guide