Need help?
Call 010 798 89 99 or visit
Coolblue.nl/en/
customer-service
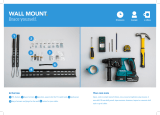
Prior to drilling:
Use the pipe locator to check
if there aren’t any pipes or
cables behind the wall.
Suitable surface area:
Solid brick
Solid concrete
BBRWM4875
Coolblue isn’t liable for any damage, accidents,
or arguments with boy/girlfriends as a result of
incorrect installation. Not sure if you can do this
on your own? Ask a skilled installation expert
for advice.
CHECKLIST.
You’re 50% there.
Level and attach the wall mount to
the wall with screws and use the
rings (W-C)
in between.
Level and attach the adapter to the
wall mount.
Attach the frame to the TV with
screws. Place washer (M-I)
or
spacer (M-J or M-K)
in between.
Lift the TV with 2 people and attach
it to the adapter.
Tighten the screws on the bottom
of the mount to firmly secure the
television in place.
Slide the 2 separate parts
into
the adapter. Use the small screws
to secure them in place with the hex
key.
Draw an X on the wall where the
middle of the TV should align.
Place the template
on the wall
and draw the drill holes using the
spirit level (M-L)
.
Place your TV on a blanket and
place the TV frames
on your
TV as pictured. Look in bags M-A
through M-H
for the screw that
fits your TV. You only need 1 set of
screws.
PLACE THE FRAMES
1. INSTALL THE
FRAMES
2. MARK DOWN THE
WALL
3.
HANG WALL
MOUNT
6. HANG
TELEVISION
7.
INSTALL ADAPTER
5.
Tilt the mount to the desired angle
and secure it in place with the hex
key.
Done! Pat yourself on the back, turn
on the TV, and bask in the glory of
your accomplishment.
Drill with precision by first using the
5mm drill, and then the 10mm drill.
Drill as deep as the screws
(W-A)
are in length. Hammer
the plugs (W-B)
into the drill
holes.
DRILL
4.
TILT
8.