11
Long&Short
Probe
15Days
Long
Standby
3 Basic Training Methods
1~16
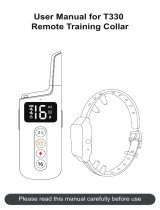
Components
1. Buckle
2. Slider Buckle
3. Adjustable Strap
4. Power ON&OFF
/ Pairing Key
5. USB Charging
6. E-Shock Probe
7. LED Indicater
8. Strap Fixing Screw
9. Test Contact
10. Test Light
11. Probe Mount
Output
Level
See Easily
Day&Night
Water
Proof
BEEP Training:
one-key execution, no level setting. The
intensity of the BEEP is fixed and cannot be
changed. Beep
E-Shock Training:
one-key execution, 16-level setting. The E-
Shock intensity is subject to the current
display. The E-Shock does not support
uninterrupted execution. Long press is
invalid. You must press it every time.
E-Shock
Vibration Training:
one-key execution, no level setting. The
intensity of the vibration is fixed and cannot
be changed. Vibration
* The shorter E-Shock probe has been assembled on the collar.
Maximum
Circumference
8
4
5 7
Learn about Your
Collar
Main Features Introduction
Introduction of Components Features
Learn about Your
Collar
Learn about Your
Collar
What's
in The Box
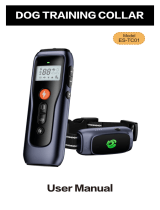
1. Training Remote
2. Training Receiver (Collar)
3. Allen Key
4. Test Unit & Probe Driver
5. Long and Short E-Shock Probes
6. Probe Protective Cover
7. USB Charging Cable
8. User Manual
Features for Dogs
Features for Person
The design concept of
t h i s p r o d u c t i s t o
cultivate good habits of
pets, not punitive. Do
not overuse this product
on pets.
Please Read The User Manual Carefully
Before Use and Keep It in A Safe Place!
Contents
Please remove the collar before playing
with the dog.
This is the safety alert symbol. It is used to alert
you to potential personal injury hazards. Obey
all safety messages that follow this symbol to
avoid possible injury or death.
WARNING indicates a hazardous situation
which, if not avoided, could result in death or
serious injury.
CAUTION, used with the safety alert symbol,
indicates a hazardous situation which, if not
avoided, could result in minor or moderate
injury.
CAUTION, without the safety alert symbol, is
used to address practices not related to
personal injury.
NOTICE is used to address practices not
related to personal injury.
PROHIBITED indicates that the operation is
prohibited .
USER MANUAL
RE MOT E DOG
TR AINING CO L LAR
It is forbidden to be used on aggressive
dogs. A aggressive dog may cause
serious injury or even death to the owner
or others. If you are not sure whether this
product is suitable for your dog, please
consult a professional dog trainer.
Children are prohibited from playing with
this product. Keep collar away from
children.
Please make sure your dog is healthy
before using the product. If you are
unsure about this, please consult your
veterinarian.
When the collar is turned on, the human
body should not directly touch the E-Shock
contact of the product.
If rash or sore is found at the contact location
of E-Shoct, please stop using this product
until the skin recovers.
The collar cannot be worn for a long time.
Please wear the collar when you just need
training. Collar wearing time should not
exceed 12 hours per day, and please adjust
the wearing position every 1-2 hours.
This product is suitable for dogs over
weighing more than 8 pounds and the age
of 6 months.
It is forbidden to use this receiver collar as
a matching collar for pet leashes.
The long hair around the dog's throat can
be properly shortened, but it is not
recommended to be completely shaved.
It is important to check the E-Shock
contact area of the dog's neck every day
for Rashes&Sores. otherwise, due to your
negligence, it may cause severe pressure
sores on the dog’s neck.
1
2
3
Explanation of Attention Words
and Symbols Used in This Guide
Important Safety
Information
Safety Instructions for This
Product
Important Safety
Information
Safety Instructions for
This Product
Important Safety
Information
Important Safety Information
What's in The Box
Learn about Your Trainer
How Does The Trainer Work
How to Wear
Troubleshooting
Terms of Use &
Limitation of Liability
FAQ
Q
A
How to Operate
Certification Statements
Designed and Manufactured in China
Specifications
Please
Page Right
6
Learn about Your
Collar
E-Shock
Level
E-Shock
Vibration
Beep
E-Shock Level Setting
One Control Three
9
Main Features Introduction
Learn about Your
Collar
1 to 3 Verify
Dog
Lock
Keyboard
One-lick
Training
Rubber
for Skin
Verify Dog Key
This remote has 3 signal channels, matched
with 3 receivers respectively. So it can realize
the function of one remote to control three
receivers.that is, you can train three dogs at
the same time.
How Does The
Product Work?
In daily use, when you forget the corresponding
relationship between the dog and the channel
(receiver), you can verify the relationship
between the dog and the channel by pressing
the key.V
Tips: In the 1-pair package, the receiver and controller are
already paired on dog channel 1 by default.
1. Operate The Receiver: In the shutdown
state, press and hold the power button for 5
seconds to enter the pairing state, with the
red and green lights flashing alternately. At
this time, release button and the receiver is
waiting for the pairing signal.
2. Operate The Remote: First select the
desired remote control dog channel, after the
receiver is ready for pairing, press and hold
the remote control key for 3 seconds, the V
remote control will transmit a pairing signal.
3. Automatic Pairing: When the receiver
receives the pairing signal, the red and green
lights stop flashing alternately, and 3 beeps
s o u n d, i n d i c a t i n g t h a t t h e p ai r i n g i s
successful. At the same time, the remote
control channel number will also flash for 3
second s, indicat ing t hat t he pairing i s
successful.
4. Change The Channel: If you want to
change the receiver's channel, please repeat
the above operation.
Power On: Press and hold the
power button for 2 seconds to power
Power Off: Press and hold the power button
for 2 seconds to shut down. There will be
vibration + two short BEEPs.
remote control enters the default setting state
(the channel is 1 and the E-Shock is 0) or the
state when it was turned off last time.
Power Off: Press and hold the power button
for 2 seconds to shut down.
Dog Selection: Press the dog selection
button to cycle among 1-2-3 channels.
BEEP Training: Press the BEEP button, the
receiver emits 2 beeps. At the same time, the
remote beep icon flashes. Long press the
beep button to execute the instruction without
interruption.
Vibration Training: Press the vibration
button, the receiver starts to vibrate. At the
same time, the remote vibration icon flashes.
Long press the vibration button to execute the
instruction without interruption.
E-Shock Training: Press the E-Shock button
and the receiver will release the electric
shock. At the same time, the E-Shock icon
flashes. Intensity 0 means the E-Shock is off.
The E-Shock does not support uninterrupted
execution. Long press is invalid. You must
press it every time.
Lock The Keyboard: Push the lock button
down to lock the keyboard, and push the lock
button up to unlock the keyboard. When the
keyboard is locked, the lock symbol on the
display is lit, and all keys are inoperable. At
this time, if you press any button, the remote
control lock symbol will flash to indicate.
Keyboard Lock Key
You can use the keyboard lock key to lock the
keyboard to prevent misuse.
Verify Dog: V Select a channel, press the
key, the channel number on the screen
flashes, and the corresponding receiver also
emits white light. In this way, the relationship
between the channel, the receiver, and the
dog can be recognized again. This function
can also locate the dog's position within the
line of sight at night.
on. With a long BEEP sound + green light on.
Power On: Press and hold the power
button for 2 seconds to power on, and
at the same time all icons will be
di s p l a yed o n t h e sc r e e n fo r 2
seconds. After powered on, the
Standby Mode: When the receiver is in
standby mode, the green light flashes twice
every 5 seconds.
Standby Mode: If there is no operation for 20
seconds, the remote control will automatically
turn off the screen display and enter the
power saving state.
Standby Mode: In the standby mode, you
can directly press the training button to
execute the training task, so that the user
can quickly execute the training intent.
Power Reminder : When the power
is lower than 15%, the 4 power
lights will flash together, and the
product will be shut down after 15
seconds.
USB charging method.
During charging, training commands cannot
be executed.
Supports off state charging.
Animation prompt
when charging, stop
after fully charged.
The red light flashes
when charging, and
the green light is
always on when fully
charged.
Ultra Long
Distance
Introduction of Components
2 Pair
Lock
Keyboard
Battery
Indicator
Dog
Channels
10
Main Features Introduction
Learn about Your
Collar
Training Receiver
Training Remote
How to Train
TC-021/TC-022/TC-023
2 Pair
Components Name
TC-021/TC-022/TC-023
1 2 3
4
56 7 8 9 10
11
26
27
25
12 13 14 15 16
2928
1718 19 20 21 22
24
For the best waterproof effect of receiver,
please make sure that the USB rubber plug
is fully plugged.
Principle of Working
USB
Charging
Smart
Saving
Smart
Control Test
Unit
If the product is abnormal during use, you can do the following:
Check Collar Wearing
Improper fit of the electronic collar is one of the
leading reasons for problems in the training process.
Make sure the collar is tight enough and the device
is in the correct.
Test Product
Turn off and on again after
fully charged, and check if the
product is working properly
and do the necessary tests.
Contact Dealer
For more
questions, please
contact your local
or online dealer.
Q
A
The company declares under its own responsibility that this
product complies with the basic requirements of CE (2014/
30/EU) and RoHS (2011/65/EU). Without the approval of our
company or the distributor, unauthorized changes or modifications
to the equipment may violate the CE regulations, may cause the
user to lose the right to operate the equipment, and invalidate the
warranty.
Recycling Information&Battery Disposal
Please observe the regulations for electronic and electrical devices
to be disposed of in the respective country. In some countries or
regionsthis device must be recycled. If this device is no longer
required, it must not be disposed of with normal municipal waste.
Separate collection of spent batteries is required in many regions;
check the regulations in your area before discarding spent
batteries. For more recycling information, please refer to local
regulations.
This device complies with Part 15 of the FCC Rules. Operation is
subject to the following two conditions:
(1) This device may not cause harmful interference, and
(2) This device must accept any interference received, including
interference that may cause undesired operation.
Warning: Changes or modifications not expressly approved by
the party responsible for compliance could void the user's
authority to operate the equipment.
Note: This equipment has been tested and found to comply with
the limits for a Class B digital device, pursuant to Part 15 of the
FCC Rules. These limits are designed to provide reasonable
protection against harmful interference in a residential installation.
This equipment generates uses and can radiate radio frequency
energy and, if not installed and used in accordance with the
instructions, may cause harmful interference to radio
communications.
However, there is no guarantee that interference will not occur in a
particular installation. If this equipment does cause harmful
interference to radio or television reception, which can be
determined by turning the equipment off and on, the user is
encouraged to try to correct the interference by one or more of the
following measures:
• Reorient or relocate the receiving antenna.
• Increase the separation between the equipment and receiver.
• Connect the equipment into an outlet on a circuit different
from that to which the receiver is connected.
• Consult the dealer or an experienced radio/TV technician for help.
28
25
26
Frequently Asked Questions
The Way to Solve The Problem
29
Certification
Statements
Certification
Statements
Troubleshooting
FAQ 27
Terms of Use &
Limitation of Liability
Your use of this product means that you accept all terms,
conditions and statements in this manual.
1. Terms of Use
The manufacturer reserves the right to change the terms,
conditions and notices related to this product.
2. Correct Use
This product is designed for pets that need training.
Proper use includes reviewing the entire User Manual included
with the product and any specific "Caution" statements.
3. Prohibition of illegal or Prohibited Use
This product is only suitable for pets. This training device is not
intended to harm or provoke pets. Using this product not in
accordance with the instruction manual may violate local laws.
4. Scope of Responsibility
The manufacturer is not responsible for any related damages,
direct, indirect, punitive, non-major, and other indirect losses
caused by incorrect use or abuse of this product. The buyer
bears all risks and responsibilities of using this product.
5. Modification of Terms and Conditions
Terms & Limitation
21
How to Wear
Assemble The Receiver
Select Probes Mount Probes&
Unmount Probes
Trap Assembly
Distinguish the outer surface and
inner surface of the strap.
17
How to Wear
Pairing Operation
13
Basic Operation
How to Operate
It’s means the unit
can be dropped into
a body of water up
to a meter deep for
half an hour, and it is
dust-proof.This is
the static test result
in the laboratory.
Waterproof-IP67
Waterproof Capabiliy
The remote control is not
waterproof. Please avoid
contact with water .
Power ON & OFF
12
How to Operate
Training Operation
14
How to Operate
15
Basic Operation
How to Operate
Training Operation
Other Operations
16
How to Operate
Battery Indicator
Battery Charging
Charging & Battery
By pressing the button, 3 channels can be
selected cyclically.
18
How to Wear
19
How to Wear
22
23
20
How to Wear How to Wear
In an open outdoor environment, this product can reach an effective
remote control distance of 500 meters(1640ft). If there is a building
obscuring the signal, according to the complexity of the actual
situation, the effective distance will be shortened accordingly.
sing this remote dog training collar you can easily improve the
Ucommunication with you and your dog. At the push of a
button, the remote sends a signal to your dog’s collar. With
three training options - BEEP, Vibration, and E-Shock — you can
ensure that you have a well-trained dog within the longest distance
you can reach.
The receiver has IP67
waterproof level.
When the dog is playing or swimming in the
water for a long time, please remove the
collar.
BEEP!
Insert the end of the strap into the
strap slot.
Install buckle and slider buckle on the
strap.
Measure the length of the strap
required and the exact position of the
receiver, and then tighten the strap
fixing screws with allen key.
Replace The Probes
Select Covers Directly Put
on The Probe
Basic Operation
Basic Operation
Environment and Signal Strength
Applicable Dog Range for
Wearing
The silicone protective cover can be
applied to the probes to protect the
dog's skin from shock or irritation.
Comfort Wearing
Risk of Skin
Damage.
See page 26
Skin Healthy
Keep
Probes Clean
Check Daily for
Rash&Sore
Don’t Wear
More than 12H
Timely
Adjustment
Skin Contact
Just Fine
Moderately
Tight
Collar
Tight Enough
Vocal Cord
Position
Key Points for Working Fine
Wearing Points
Silicone Cover
Protect Skin
Adjust the position of the device to
the position of the dog's front throat.
Adjust the tightness of the strap to
the best condition and make sure
that the probes touch the skin.
Wear the collar around the dog's neck
in a personally comfortable way.
Insert the extra strap into the slider
buckle. Prepare for wearing.
Ad j u s t t h e b u c k le p osit i o n an d
determine the length of the strap.
Place the slider buckle and device in
the position shown in the figure.
The dog's neck circumference ranges from 8in
to 25in(20cm~60cm). Please set up the collar
before wearing for the dog.
Wearing Steps
Wearing Steps
A:
Q:
A:
Q:
Is the static stimulation safe for my pet?
While the stimulation is unpleasant, it is harmless to your pet.
Once my pet is trained and has been obeying my
commands, will he have to continue to wear the training
collar?
FAQ
A:
Q: Why doesn't the pet respond when operating the remote
control?
There may be two reasons. First, beep and vibration are not
enough to stimulate the pet ; second, the collar is loose, and the
webbing needs to be tightened to make the contacts touch the
skin.
Probably not. They may need to wear the training collar from
time to time for reinforcement.
24
How to Training
Find the Best Stimulation Level
for Your Pet
The Remote Trainer has 1 tone, 1 vibration and 16 E-Shock levels.
This allows you to choose the E-Shock level that is best for your
pet. We recommend training with tone and vibration, or the lower
levels of E-Shock when needed. In most cases E-Shock levels 1–7
will be adequate for your training needs. Once you have placed the
training collar on your pet, it is time to find the “recognition level”.
The “recognition level” is the stimulation level that your dog begins
to notice. It should not make your pet uncomfortable.
A:
Q: Why do many similar products cause a more serious sores
on the dog’s neck?
This phenomenon is not caused by E-Shock current, but a kind
of " ". The reason is that wearing the collar for pressure necrosis
a long time or even using the receiver collar as a matching
collar, causes the receiver probes to compress or wear the skin
for a long time, eventually leading to a severe sores .Please
follow the wearing time requirements of the instructions
and other related warnings.
Other Precautions for Useing
About “Collar Sores”
Tips
The milliamps generated from the receiver of training collars
simply cannot generate enough heat necessary to do tissue damage.
The real problem comes from inappropriate wear of the collar receiver.
Pressure necrosis, or what many in the industry call "collar sores", can
happen if the receiver is not on properly. They also occur if the collar is
kept on the dog for too long of a period of time.
There are two reasons: Please 1. Improper fit; 2. Improper wear time.
pay attention to your dog's neck when you begin using a training collar.
A few times throughout the day take a peek and see how the skin looks.
Make sure the fit is correct and notice if there is the beginning signs of
redness. If so, move the receiver to the opposite side of the neck or take
the collar off for a bit to increase airflow and circulation to the skin.
Product name :Dog training collar
Product model : TC-021/TC-022/TC-023
Material: ABS plastic, nylon, stainless steel
Battery capacity: remote control 450 mAh; receiver 300mAh
Charging voltage: DC5V/1A
Charging time: 1-1.5 hours
Charging port: Micro USB
Wireless power: 100mW (20DBm)
Remote control frequency: 433M FSK
Operating temperature: 32-104, <95%RH
Standby time: 20 days for remote control; 10 days for receiver.
Receiver sensitivity: -126DBm
Product size: remote control 119mm*47mm*18mm; receiver
70mm*38mm*43mm
Scope of application: all kinds of dogs
Red LED
Green LED
White LED
OUTER
INNER
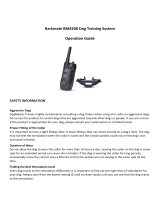
7. Dog Channel Switch
8. LED Display
9. Adjust E-Shock Level
10. Verify Dog
11. USB Charging
12. Hand Strap
1. Lock Keyboard Key
2. Power ON&OFF
3. Hand Strap Hole
4. E-Shock Key
5. Beep Key
6. Vibration Key
The E-Shock intensity is divided into 16
levels. Press and keys to adjust the + -
intensity of E-Shock. The factory default E-
Shock intensity is 0, that is, there is no E-
Shock function. The E-Shock intensity can
be adjusted at any time in the standby state.
Power On
Power Off
Flashes Twice
Power On
Power Off
Standby
Mode
5 seconds
Features Test before Wearing
Test Whether The Features Are Normal
1. Turn on the remote control and receiver.
3. If you want to increase the number of
receivers and buy a second and third receiver
independently, you need to pair the newly
purchased receiver with the remote control
first. After the new receiver is successfully
paired, repeat the above operation for feature
test.
BEEP!
How to Training
Some Suggestions on How to
Train Pets
If you’re attempting to teach your dog a behavior, make sure your
dog understands what you want before introducing E-Shock
stimulation. You can do this using your dog’s favorite treats.
When Training Begins: You can begin basic obedience training
without the training collar as soon as you bring your puppy home.
Stopping Unwanted Behavior: The level of stimulation should be
enough to interrupt your dog and give you the ability to redirect your
dog’s attention to another behavior. It’s best if the behavior you
redirect your dog to is “incompatible” with the unwanted behavior.
NOTE: Using praise or treats immediately after the correct response
is great for encouraging your dog to repeat the desired behavior.
Collar Conditioning: You don’t want your dog to only associate
wearing the training collar with being corrected. While your dog is
wearing the collar, make sure to spend ample time playing and
letting your dog be a dog.
Timing: For static training to work properly, timing is very important.
You should apply the static stimulation immediately (within 2
seconds) of an undesirable behavior. This will help your dog make
the association between the undesirable behavior and the static
stimulation. If your dog seems nervous, scared or confused after
applying a static stimulation, stop using the stimulation and make
sure your dog has learned an appropriate behavior that will remove
the static stimulation and/or earn him a reward.
Training Tips
For more training techniques, please refer to professional
books or consult a pet trainer.
Important: Always start at the lowest level and work your way up.
Follow the steps below to find your pet's recognition level:
1. Choose level 1, and press E-Shock button continuously for 1 to 2
seconds. A slight change in your pet's behavior, such as looking
around in curiosity, scratching at his collar, or flicking his ears,
indicates the Recognition Level that is best for him.
2. If your pet shows no reaction, repeat this several times before
moving to high E-Shock level.
3. Choose level 2 and press E-Shock button continuously for 1 to 2
seconds.
4. If your pet shows no reaction, repeat this level several times
before moving up to the next level.
5. Move up through the E-Shock levels until your pet reliably
responds to the shock.
6. If your pet continues to show no response at Level 16, check the
fit of the training collar. See “page 19”. You might also want to test it
on your hand at a lower level to ensure the collar is working.
Training Tips
23
Adjust The E-Shock Intensity: In all states
except the keyboard is locked, you can
directly press the or button at any time to + -
increase or decrease the intensity of the
electric shock. At the same time, the E-
Shock symbol will flash. Always start at the
lowest level and work your way up.
2. Select channel 1, press the beep button, the
receiver emits a training BEEP, indicating that
the beep feature is normal;
Press the vibration button, and the receiver
vibrates, indicating that the vibration feature is
normal;
The E-Shock feature needs to be tested on the
test board. As shown in the figure, assemble
the test board to the shock head to ensure full
contact. Press the E-Shock button and the test
light will light up, indicating that the E-Shock
feature is normal.
Press the & button to adjust the E-Shock + -
level. The brightness of the test light is
different for different levels, indicating that the
level feature is normal.
Power Reminder : When the power
is lower than 15%, the red light
quickly, and the receiver will automatically
shut down after 10 seconds.
flashes