Page is loading ...

1 of 11
ISSUED: 01-16-13 SHEET #: 125-9398-1 01-16-13
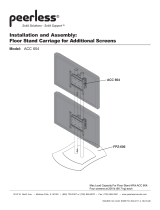
Installation and Assembly:
Universal 2x2 Video Wall Stand for 40" - 46" Flat Panel Displays
Model: DS-VWS546-2X2
Display must be at least 36” wide and 20.75” high
Width of the display + width of the mounting hole pattern < 1733 mm
Height of the display + height of the mounting hole pattern < 1136 mm
COMPATIBILITY FORMULA

2 of 11
ISSUED: 01-16-13 SHEET #: 125-9398-1 01-16-13
Table of Contents
PARTS LIST ....................................................................................................................................................................... 3,4
WALL PLATE ASSEMBLY ......................................................................................................................................................5
BASE PLATE ASSEMBLY ......................................................................................................................................................6
BRACKET ASSEMBLY ...........................................................................................................................................................6
DISPLAY BRACKET ASSEMBLY ...........................................................................................................................................7
ATTACHING BRACKETS TO DISPLAY .................................................................................................................................8
SECURING BRACKETS TO WALL PLATES ....................................................................................................................8-11
NOTE: Read entire instruction sheet before you start installation and assembly.
Tools Needed for Assembly
• PHILLIPS SCREW DRIVER
• 4MM ALLEN WRENCH (SUPPLIED)
• DonotbegintoinstallyourPeerlessproductuntilyouhavereadandunderstoodtheinstructionsandwarnings
containedinthisInstallationSheet.Ifyouhaveanyquestionsregardinganyoftheinstructionsorwarnings,forUS
customerspleasecallPeerlesscustomercareat1-800-865-2112,forallinternationalcustomers,pleasecontact
your local distributor.
• Thisproductshouldonlybeinstalledbysomeoneofgoodmechanicalaptitude,hasexperiencewithbasicbuilding
construction, and fully understands these instructions.
• Alwaysuseanassistantormechanicalliftingequipmenttosafelyliftandpositionequipment.
• Tightenscrewsrmly,butdonotovertighten.Overtighteningcandamagetheitems,greatlyreducingtheirholding
power.
• Thisproductisintendedforindooruseonly.Useofthisproductoutdoorscouldleadtoproductfailureandpersonal
injury.
WARNING

3 of 11
ISSUED: 01-16-13 SHEET #: 125-9398-1 01-16-13
Parts List
PartDescription Quantity Part Number
A
clamp 4 145-1734
B
FPZ-600base 2 201-1037
C
FPZ-600maintube 4 580 -1159
D
fenderwasher 12 540-1008
E
M6x40mmphillipsscrew 12 520-1584
F
setscrew 8 520-9566
G
bumperstrip 2 570-1030
H
securitywrench 1 560-9646
I
wallplate 2 145 -1342
J
left bracket 1 145-1345
K
rightbracket 1 145-1344
L
hook on bracket 4 145-1356
M
topbracket 4 145 -1347
N
bottom bracket 4 145-1348
O
M6x12mmphillipsscrew 16 520 -1128
P
M8x15mmphillipsscrew 16 520-9257
Q
nylonshoulderwasher 16 590-2233
R
M5x10mmsocketpinType-Fscrew 8 520 -116 4
S
M5x12mmphillipsscrew 40 520-1027
T
cable tie 8 5 60 - 9711
U
meshsleeve 4 600-1014
V
#10lockwasher 8 540-1035
W
#10atwasher 8 540-9400
X
measureplate 1 145 -1349
Y
M6x16mmphillipsscrew 16 520 -9274
Beforebeginning,makesureyouhaveallpartsshownbelow

4 of 11
ISSUED: 01-16-13 SHEET #: 125-9398-1 01-16-13
A
E
F
I
J K
L
M
N
O
P
Q
R S
T
U X
Y
V W
G H
B C
D

5 of 11
ISSUED: 01-16-13 SHEET #: 125-9398-1 01-16-13
1
Attach two wall plates (I) together using left and
right connection brackets (J and K) with eight
M5x12mmphillipsscrews(S),#10atwasher(W),
#10lockwasher(V)asshownbelow.
WALL PLATE ASSEMBLY
S
W
V
J
J
I
I
I
K

6 of 11
ISSUED: 01-16-13 SHEET #: 125-9398-1 01-16-13
2.1
2.2
3
AttachFPZ-600maintubes(C)toFPZ-600base(B)
usingeightsetscrews(F).
SecurevideowallmountassemblytoFPZ-600main
tubes (C)toclamps(A)usingtwelveM6x40mm
phillipsscrews(E)withfenderwashers(D).
BASE PLATE ASSEMBLY OPTIONAL: LEVELLING BASE USING
BUMPER STRIP
BRACKET ASSEMBLY
B
E
D
A
C
F
C
I
G
B
Forsomesituations,bumperstrip(G)mayberequired
tokeepbase(B)level.cutbumperstripintoveequal
piecesandadhereonepiecetoeachcornerandone
piecetocenterofbottomsideofbase.
Note:Thebumperstrippiecesmayalsobeusedin
otherlocationstoproperlylevelstands.

7 of 11
ISSUED: 01-16-13 SHEET #: 125-9398-1 01-16-13
44.73"
(1136mm)
40.41"
(1026mm)
Note:DetermineDisplaybeingusedandselect
appropriatebracketassemblylengthbasedondimension
"Y".
FasteneightM5x12mmphillipsscrews(S) into each
hook on bracket (L)leaving1/8"ofexposedthread
asshownbelow.Repeatstepforeachhookonbracket.
Hookonethebottomadapterbracket(N) onto the
exposedthreadsonthehookonbracket(L)asshown
below.Hookonethetopadapterbracket(M) onto the
exposedthreadsonthehookonbracket(L)asshown
below.
NOTE:Donottightenthescrewsonthehookon
bracket (L).
5
L
M
N
M
M
N
N
4
DISPLAY BRACKET ASSEMBLY
L
L
OR
1/8"
S
Y-RANGE
BACK OF DISPLAYS

8 of 11
ISSUED: 01-16-13 SHEET #: 125-9398-1 01-16-13
Attachtopandbottomadapterbrackets(M and N)tobackofdisplaysusingeightM6x12mmphillipsscrews(O)with
nylonshoulderwasher(Q);eightM8x15mmphillipsscrews(P);oreightM6x16mmphillipsscrews(Y)asshownbelow.
NOTE:Makesurethatnylonshoulderwasher(Q)ispositionedasshow.
6
ATTACHING BRACKETS TO DISPLAYS
SECURING BRACKETS TO WALL PLATES
DISPLAY
USED WITH M6 X
12mmPHILLIPS
SCREWS (O)
ONLY
O,P, or Y
Q
O,P, or Y
M
or
N
M or N
Q
Detach hook on bracket (L)fromtopandbottomadapterbrackets(M and N)asshownbelow.
7
N
M

9 of 11
ISSUED: 01-16-13 SHEET #: 125-9398-1 01-16-13
Attachtwohookonbrackets(L)ontowallplateas
shown.DeterminescreenVESAmountingpattern
andusemeasureplate(X)tospacehookon
bracketasshowbelow.
Repeatstepwithremaininghookonbrackets(L).
8
L
L
I
I
X
MEASURE PLATE DETAIL
23.62"
(600mm)
19.69"
(500mm)
3.94"
(100mm)
7.87"
(200mm)
11.81"
(300mm)
15.75"
(400mm)
ALIGN
HOLES
Hookbottomadapterbrackets(N)ontoexposed
threads on hook on bracket (L)asshownbelow.
Repeatstepwithseconddisplay.
Positiondisplaystogethersotheysitush.
9
MAIN TUBES
AND BASES NOT
ILLUSTRATED
MAIN TUBES
AND BASES NOT
ILLUSTRATED

10 of 11
ISSUED: 01-16-13 SHEET #: 125-9398-1 01-16-13
L
L
M
Hookonetopadapterbracket(M)ontoexposed
threads on hook on bracket (L)asshownbelow.
Repeatstepwithseconddisplay.
10
M
R
Securetopadapterbrackets(M) to hook on
brackets (L)usingfourM5x10mmsocketpin
type-Fscrews(R)asshownbelow.
11
L
MAIN TUBES
AND BASES NOT
ILLUSTRATED
MAIN TUBES
AND BASES NOT
ILLUSTRATED

11 of 11
ISSUED: 01-16-13 SHEET #: 125-9398-1 01-16-13
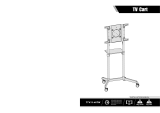
L
PRE-INSTALLED
SECURITY SCREW
Oncedisplaysareindesiredposition,secure
usingfoursecurityscrewslocatedonbottom
of hook on brackets (L).
12
©2013,PeerlessIndustries,Inc.Allrightsreserved.
Allotherbrandandproductnamesaretrademarksorregisteredtrademarksoftheirrespectiveowners.
Peerless Industries, Inc.
2300WhiteOakCircle
Aurora,Il60502
www.peerless-av.com
COMPLETE DS-VWS546-2X2
MAIN TUBES
AND BASES NOT
ILLUSTRATED
/