Page is loading ...

SY-KT880 DRAGON 2
Motherboard
****************************************************
AMD Athlon & Duron Processors Supported
VIA KT880 AGP/PCI Motherboard
200/266/333/400 MHz Front Side Bus supported
ATX Form Factor
****************************************************
User's Manual

SOYO
™
SY-KT880 DRAGON 2
ii
Copyright © 2004 by SOYO Computer Inc.
Trademarks:
SOYO is a registered trademark of SOYO Computer Inc. All trademarks are
properties of their owners.
Product Rights:
All names of the product and corporate mentioned in this publication are used for
identification purposes only. The registered trademarks and copyrights belong to
their respective companies.
Copyright Notice:
All rights reserved. This manual has been copyrighted by SOYO Computer Inc. No
part of this manual may be reproduced, transmitted, transcribed, translated into any
other language, or stored in a retrieval system, in any form or by any means, such as
by electronic, mechanical, magnetic, optical, chemical, manual or otherwise,
without permission in writing from SOYO Computer Inc.
Disclaimer:
SOYO Computer Inc. makes no representations or warranties regarding the contents
of this manual. We reserve the right to amend the manual or revise the specifications
of the product described in it from time to time without obligation to notify any
person of such revision or amend. The information contained in this manual is
provided to our customers for general use. Customers should be aware that the
personal computer field is subject to many patents. All of our customers should
ensure that their use of our products does not infringe upon any patents. It is the
policy of SOYO Computer Inc. to respect the valid patent rights of third parties and
not to infringe upon or to cause others to infringe upon such rights.
Disclaimer:
Please be advised that some SOYO motherboards are designed with overclocking
features and may allow users to run the components beyond manufacturer's
recommended specifications. Overclocking beyond manufacturer's specifications is
not recommended nor endorsed by SOYO, Inc. and will void your manufacturer's
warranty. Overclocking beyond manufacturer's specifications is not encouraged and
should be assumed at the user's own risk. Unsafe overclocking can damage the user's
system or cause serious personal injury. If the user is unsure or in doubt about
overclocking, please seek professional advise. SOYO, Inc. is not responsible for any
direct or indirect damage resulting from overclocking.
Restricted Rights Legend:
Use, duplication, or disclosure by the Government is subject to restrictions set forth
in subparagraph (c)(1)(ii) of the Rights in Technical Data and Computer Software
clause at 252.277-7013.
About This Guide:
This Quick Start Guide can help system manufacturers and end users in setting up
and installing the Motherboard. Information in this guide has been carefully checked
for reliability; however, to the correctness of the contents there is no guarantee given.
The information in this document is subject to amend without notice.
For further information, please visit our Web Site on the Internet. The address is
"http://www.soyo.com.tw".
Edition: April 2004
Version P1.0
KT880 DRAGON 2 SERIES
FC
C
Tested To Comply
With FCC Standards
FOR HOME OR OFFICE USE
POST CONSUMER
RECYCLED PAPER
100%

Table of Contents
SY-KT880 DRAGON 2
iii
Table of Contents
CHAPTER 1 MOTHERBOARD DESCRIPTION ................................1
1-1
INTRODUCTION.......................................................................1
1-2 UNPACKING THE MOTHERBOARD .....................................1
1-3
KEY FEATURES........................................................................3
1-4 HANDLING THE MOTHERBOARD .......................................4
1-5 ELECTROSTATIC DISCHARGE PRECAUTIONS..................5
1-6 SY-KT880 DRAGON 2 MOTHERBOARD LAYOUT.....................6
1-7 SY-KT880 DRAGON 2 MOTHERBOARD COMPONENTS...7
CHAPTER 2 HARDWARE INSTALLATION.....................................14
2-1 PREPARATIONS......................................................................14
2-2 INSTALLATION GUIDE .........................................................15
Step 1 Install the CPU.......................................................................14
Step 2 Install Memory Module ..........................................................22
Step 3 Install Expansion Card...........................................................23
A. IDE Device Installation (HDD, CD-ROM)...................................25
B. Floppy Drive Installation..............................................................26
C. Front Panel Connections..............................................................28
D. Back Panel Connections...............................................................30
E. Other Connections ........................................................................35
F. ATX12V Power Supply ..................................................................41
G. CMOS Clear (JP5) .......................................................................43
Step 5 Power On................................................................................43
2-3 QUICK BIOS SETUP...............................................................44
CHAPTER 3 BIOS SETUP UTILITY ..................................................46
3-1 SOYO COMBO FEATURE......................................................49
3-2 STANDARD BIOS FEATURES...............................................56
3-3
ADVANCED BIOS FEATURES ..............................................57
3-4 PCI/PNP RESOURCE MANAGEMENT.................................70
3-5
PC HEALTH STATUS..............................................................72

Table of Contents
SY-KT880 DRAGON 2
iv
3-6
BOOT CONFIGURATION SETUP .........................................74
3-7 BIOS SECURITY FEATURES.................................................77
3-8 EXIT .........................................................................................77
CHAPTER 4 VIA 8237 SERIAL ATA DRIVER INSTALLATION....79
CHAPTER 5 ALI M5281 IDE3/4 DRIVER INSTALLATION...........82
CHAPTER 6 ALI M5281 SATA3/4 DRIVER INSTALLATION ........85
CHAPTER 7 DRIVERS INSTALLATION ..........................................88
CHAPTER 8 USB 2.0 DRIVER INSTALLATION..............................96
APPENDIX A ALI M5281 .......................................................................97
APPENDIX B TROUBLESHOOTING.................................................106
APPENDIX C CONTACT INFORMATION ........................................ 113

Motherboard Description
SY-KT880 DRAGON 2
1
Chapter 1
MOTHERBOARD DESCRIPTION
1-1 INTRODUCTION
The SY-KT880 DRAGON 2 AGP/PCI motherboard is a high performance
Socket A, ATX form-factor system board. The SY-KT880 DRAGON 2
uses VIA Chipset technology and supports AMD Socket class processors.
This motherboard is fully compatible with industry standards and adds
many technical enhancements.
1-2 UNPACKING THE MOTHERBOARD
When unpacking the motherboard, check for the following items:
The SY-KT880 DRAGON 2 AGP/PCI motherboard
The user manual
The Installation and Bonus Pack CD-ROM
Four Serial ATA Cables
Two IDE Device ATA 66/100/133 Flat Cable
One Floppy Disk Drive Flat Cable
One Heat Sink Compound

Motherboard Description
SY-KT880 DRAGON 2
2
One COM port/Printer port Bracket
One Back Panel
Warning:
Do not unpack the motherboard from its anti-static
packaging until you are ready to install it.
Like most electronic equipment, your motherboard may be damaged by
electrostatic discharge. To avoid permanent damage to components ground
yourself while working by using a grounding strap. Otherwise, ground
yourself frequently by touching the unpainted portion of the computer
chassis to drain the static charges.
Handle the motherboard carefully, holding it by the edges.
You are now ready to start the installation.

Motherboard Description
SY-KT880 DRAGON 2
3
1-3 KEY FEATURES
CPU
Supports AMD 462 pins Socket A processors:
Athlon XP (Palomino/Thoroughbred/Barton)
(200/266/333/400 MHz FSB)
Duron/Morgan
Chipset
VIA KT880/ 8237 Chipset
Memory
Supports PC2100, PC2700 and PC3200 DDR
(non-registered and ECC) memory modules.
AGP
1x AGP Pro master 4x/8x slot (1.5v only)
PCI
5x 32-bit bus master PCI slots
I/O
ITE IT8705F (GX) Super I/O controller supporting:
Floppy disk controller
Parallel port (SPP, EPP and ECP compliant)
IrDA compatible infrared port
PS/2 Keyboard and mouse
Hardware monitor for monitoring temperatures,
voltages and fan speeds in the system.
Storage
VIA VT8237 Integrated Parallel ATA controller
supporting up to 4x UDMA 33/66/100/133
Parallel ATA devices.
VIA VT8237 Integrated Serial ATA controller
(SATA1/2) supporting up to 2x UDMA 150 hard
disks in normal or RAID 0,1 mode.
ALi M5281 Integrated Parallel ATA controller
(IDE3/4) supporting up to 4x UDMA
33/66/100/133 Parallel ATA devices. Support
RAID 0, 1, 0+1 mode.
ALi M5281 Integrated Serial ATA controller
(SATA3/4) supporting up to 2x UDMA 150 hard
disks in normal or RAID 0, 1 mode.
USB 2.0
8x USB 2.0 compliant ports (4 on rear IO panel, 4 pin
headers.)
IEEE 1394
Onboard VIA VT6307 IEEE1394 Firewire controller
with 2x pin header

Motherboard Description
SY-KT880 DRAGON 2
4
Sound
AC97 C-Media CMI9780 8 Channel CODEC
Network
Onboard VIA VT6122 100Base-T and
1000BASE-T(Gigabit) Ethernet controller, supporting
Wake-On-Lan (WOL).
BIOS
Power Failure resume function to allow the system
to turn on or off after a power failure, which is
indispensable for server systems.
Wake On Ring and Power On by Alarm to allow
your system to wake up from suspend or power on
through the modem or RTC alarm.
Multiple boot, allowing your system to boot from
for example CD-ROM
1-4 HANDLING THE MOTHERBOARD
To avoid damage to your motherboard, please follow these simple rules
while unpacking:
Before handling the motherboard, ground yourself by grasping an
unpainted portion of the system's metal chassis.
Remove the motherboard from its anti-static packaging. Hold the
motherboard by the edges and avoid touching its components.
Check the motherboard for damage. If any chip appears loose, press
carefully to set it firmly in its socket.
Warning: Do not apply power if the motherboard appears
damaged. If there is damage to the board, contact your dealer
immediately.

Motherboard Description
SY-KT880 DRAGON 2
5
1-5 ELECTROSTATIC DISCHARGE PRECAUTIONS
Be sure to ground yourself before handling the motherboard or other system
components. Electrostatic discharge can easily damage the components.
Note that you must take special precautions when handling the motherboard
in dry or air-conditioned environment.
To protect your equipment from electrostatic discharge, take the following
precautions:
Do not remove the anti-static packaging until you are ready to install.
Ground yourself before removing any system component from its
protective anti-static packaging. (To ground yourself, grasp the expansion
slot covers or other unpainted portions of the computer chassis).
Frequently ground yourself while working or use a grounding strap.
Handle the motherboard by its edges and avoid touching its
components.

Motherboard Description
SY-KT880 DRAGON 2
6
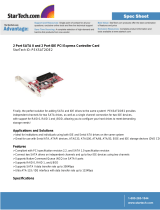
1-6 SY-KT880 DRAGON 2 MOTHERBOARD LAYOUT
Back Panel SY-KT880 DRAGON 2 Platform

Motherboard Description
SY-KT880 DRAGON 2
7
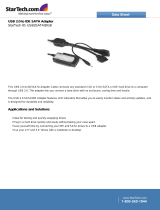
1-7 SY-KT880 DRAGON 2 MOTHERBOARD
COMPONENTS

Motherboard Description
SY-KT880 DRAGON 2
8
A
CPU Cooling Fan (CPUFAN3) connector
With these connectors you can attach the CPU fan or fans to your
motherboard. They supply power and (in the case of CPUFAN1)
allow you to monitor the speed of the FAN via the SOYO
Hardware Monitor software or via CMOS setup. For more details
on the lay-out of these connectors, check the
CPU Cooling FAN
(CPUFAN1, CPUFAN2, CPUFAN3)
paragraph on page 36.
B
Front panel I/O Connector (J30)
This connector allows you to extend your earphone, microphone,
Line-in connector to your front panel. Check the Front panel I/O
Connector (J30) paragraph on page 39 for a lay-out of this header.
C
ATX Power Supply connector
This connector is to connect the ATX connector of your ATX 12V
compliant power supply to the motherboard. For more details on
this connector, please check the F. ATX12V Power Supply
paragraph on page 41.
D
+12V Power Connector
This is where the Power Supply's +12V ATX connector goes. For a
lay-out of this connector please check the F. ATX12V Po wer
Supply paragraph on page 41.
E
VIA KT880 North Bridge
The advanced FastStream64 DDR400 Memory Controller on the
VIA KT880 interweaves with the 400MHz Front Side Bus to
provide a perfectly balanced subsystem, greatly reducing data
latency and enabling searing performance from the latest AMD
Athlon™ XP processors. In addition, the KT880 supports the very
latest I/O technologies including AGP8X, deriving maximum
performance from the most powerful graphics processors.
F
Socket 462 (Socket A) connector
This is the Zif (Zero Insertion Force) socket for your AMD
Athlon®, Athlon XP®, Duron® or Morgan® CPU. For more
information on how to install your CPU, check the CPU Mount
Procedure paragraph on page 17.

Motherboard Description
SY-KT880 DRAGON 2
9
G
ABR (Anti Burn Regulator) Jumper
SOYO's ABR (Anti Burn Regulator) is specially designed
hardware circuits that works hand in hand with the CPU’s internal
sensor in monitoring the temperature of the CPU and prevent it
from overheating. This jumper enables or disables this function.
For more information, please check the
ABR (Anti Burn
Regulator) paragraph on page 21.
H
CPU Cooling Fan (CPUFAN1, 2) connectors
With these connectors you can attach the CPU fan or fans to your
motherboard. They supply power and (in the case of CPUFAN1)
allow you to monitor the speed of the FAN via the SOYO
Hardware Monitor software or via CMOS setup. For more details
on the lay-out of these connectors, check the CPU Cooling FAN
(CPUFAN1, CPUFAN2, CPUFAN3) paragraph on page 36.
I
DDR DIMM Banks
These 4, 184 pin memory slots are to install your system memory
in. They support up to 4 GB of memory. For more details check the
Step 2 Install Memory Module paragraph on page 22.
J
Bus Mastering EIDE/ATAPI Ports
These connectors are to attach your IDE devices to. Each
connector can support up to 2 IDE devices, 1 master and 1 slave.
Please check the
A. IDE Device Installation (HDD, CD-ROM)
paragraph on page 25 for more details.
K
VIA VT8237 South Bridge
Featuring the first ever integrated combined Serial ATA/RAID
controller, the VT8237 is the most advanced South Bridge
available on the market today. With its integrated dual channel
native Serial ATA/RAID controller supplying 150MB/s of
bandwidth per port and support for RAID 0 & RAID 1, the
VT8237 delivers the highest disk data transfer rates for maximum
system performance and provides the most advanced fault tolerant
solution for optimum data integrity. The VT8237 also features
support for up to four Parallel ATA-133 devices, extending
flexibility to the system integrator by allowing for mainstream or
value configurations leveraging the existing technology standard.
Additional features on the VIA VT8237 South Bridge include
support for up to eight USB 2.0 ports, and integrated PCI support.

Motherboard Description
SY-KT880 DRAGON 2
10
L
3V Lithium Battery
This battery supplies power to the CMOS RAM. As long as the
battery supplies enough power, the contents of your CMOS RAM
will be valid. CMOS RAM contents are configured by CMOS
setup, and can be cleared by JP5. For more details on this check the
G. CM O S C l ea r ( J P 5 ) paragraph on page 43.
M
Onboard buzzer
This buzzer gives off system beeps.
N
Chassis Cooling Fan (CHAFAN1, 3)
This connector is to connect your chassis fan to your motherboard.
This motherboard supports up to 3 chassis fans. It allows you to
monitor the speed of CHAFAN1 in CMOS setup or by using the
SOYO Hardware Monitor software. Please check the Chassis
Cooling Fan (CHAFAN1,CHAFAN2, CHAFAN3) paragraph on
page 37 for more details.
O
CMOS Clear Jumper (JP5)
This jumper allows you to clear your CMOS RAM contents in
order to reset your system configuration. For more details on this
check the
G. CMOS Clear (JP5)
paragraph on page 43.
P
Floppy disk connector
This motherboard supports one floppy drive. For more details,
please check the
B. Floppy Drive Installation
paragraph on page
27.
Q
IDE RAID Ports
This IDE port (IDE 3, 4) can be used as normal IDE port or in a
RAID configuration and are controlled by ALi M5281 chip.
ATAPI devices will not work on these ports. For more details,
please check the A. IDE Device Installation (HDD, CD-ROM)
paragraph on page 25.
R
5V Stand-By Indicator LED
The power supply will always supply a 5V standby voltage to your
motherboard so that it can power on via for example Wake On Lan
technology. This LED shows that your power supply is supplying
this standby voltage to your motherboard.
S
J25 Front panel connections header
This header contains the connections to the front panel on the case.
For more details, please check the C. Front Panel Connections
paragraph on page 28.

Motherboard Description
SY-KT880 DRAGON 2
11
T
ALi M5281 Serial ATA/IDE RAID chip
The M5281 provides personal computer systems with PCI device
solution of the highest integration: It includes two Serial-ATA Host
controllers (SATA3/4) for supporting a total of 2 ports, two fully
Parallel-ATA Host controller (IDE3/4) for supporting two single
channel.
U
IEEE1394 Firewire connector
These connectors allow you to attach IEEE 1394 connectors or
devices to the motherboard. The lay-out can be found in the
IEEE
1394 (Firewire) Connector (FW1/FW2) paragraph on page 40.
V
SATA Connectors
These connectors allow you to attach one UDMA 150 hard disk to
each connector. SATA1/2 are controlled by VIA VT8237 chip, and
SATA 3/4 are controlled by the ALi M5281 chip, and SATA1~4 all
can support RAID 0 and 1. For more information on these
connectors check the A. IDE Device Installation (HDD,
CD-ROM) paragraph on page 25.
W
VIA VT6307 IEEE 1394 Firewire controller
The VIA Fire II VT6307 provides direct connectivity between the
PCI and 1394 serial buses. With three ports, the VIA Fire II
VT6307 is designed to provide scalability and manageability in
IEEE 1394 network solutions for home networking and multiple
PC access to a single internet connection. Each individual port
detects connected device types and automatically configures data
speeds to either 100, 200 or 400 Mbps, speeds well suited to
multi-streaming I/O requirements. A programmable PCI power
management mode (specification 1.1) shuts down power to
unconnected ports while the sleep function maximizes power
efficiency of connected ports.
X
USB 2.0 connectors
These connectors support 2 USB 2.0 ports per connector. For
details on the lay-out, please check the
Universal Serial Bus
(USB1/USB2/USB3/USB4, USB20_1/USB20_2) paragraph on
page33.
Y
COM Port
Z
LPT Port

Motherboard Description
SY-KT880 DRAGON 2
12
AA
Flash BIOS
This chip contains the system BIOS firmware, and is software
upgradable. It's size is 2Mbit. For updates of your Flash BIOS,
please go to http://www.soyousa.com. For details on how to setup
your BIOS, please go to the Quick BIOS Setup chapter on page
44.
AB
ITE IT8705F Super I/O Chip
IT8705F is a LPC Interface based highly integrated Super I/O.
IT8705F provides the most commonly used legacy Super I/O
functionality plus the latest Environment Control initiatives, such
as Hardware Monitor, Fan Speed Controller and ITE’s
“SmartGuardian” function. The device’s LPC interface complies
with Intel “LPC Interface Specification Rev. 1.0” (Sept. 29, 1997).
IT8705F meets the “Microsoft
PC98/99/2001 System Design
Guide” requirements and is ACPI compliant.
AC
Serial Infrared (IrDA) device header
This header allows you to connect an IrDA receiver to the
motherboard. You can find the lay-out in the Standard Infrared
(SIRCON) paragraph on page 35.
AD
CDIN CDROM Audio In connectors
This connector is to attach your analog audio output channel from
your CDROM or DVD drive to your motherboard. Please check
for more details on page 38 in the CD Line-in/AUXIN
(CDIN1,AUXIN1)
paragraph.
AE
AUXIN CDROM Audio In connectors
This connector allows you to attach a second CDROM analog
audio out output to your motherboard. Please check for more
details on page 38 in the CD Line-in/AUXIN (CDIN1,AUXIN1)
paragraph.
AF
AC97 C-Media CMI9780 8 Channel CODEC
AG
32 bit PCI slots
These are the motherboard's 3.3v busmastering PCI slots,
compliant to PCI specification v2.2. Please check the Step 3
Install Expansion Card paragraph on page 23 for more details.

Motherboard Description
SY-KT880 DRAGON 2
13
AH
VIA VT6122 LAN Chip
Onboard VIA VT6122 100Base-T and 1000BASE-T(Gigabit)
Ethernet controller, supporting Wake-On-Lan (WOL).
AI
Chassis Cooling Fan (CHAFAN2)
This connector is to connect your chassis fan to your motherboard.
This motherboard supports up to 3 chassis fans. It allows you to
monitor the speed of CHAFAN2 in CMOS setup or by using the
SOYO Hardware Monitor software. Please check the Chassis
Cooling Fan (CHAFAN1,CHAFAN2, CHAFAN3) paragraph on
page 37 for more details.
AJ
AGP Pro Slot
This is the AGP expansion slot for your video card. Note that it can
only work with 1.5v AGP cards. For more information, check the
Step 3 Install Expansion Card paragraph on page 23.
AK
Back panel connectors
These connectors allow you to attach the external devices to the
back of your PC. Please check the Back Panel Connections
paragraph on page 30 for more details.

Hardware Installation
SY-KT880 DRAGON 2
14
Chapter 2
HARDWARE INSTALLATION
Congratulations on owning a-
SY-KT880 DRAGON 2
. You are about to
install and connect your new motherboard.
Note: Do not unpack the motherboard from its protective
anti-static packaging until you have made the following
preparations.
2-1 PREPARATIONS
Gather and prepare all the following hardware equipment to complete the
installation successfully:
1. Socket A processor with built-in CPU cooling fan (boxed type)
2. DDR RAM module (s)
3. Computer case and chassis with adequate power supply unit
4. Monitor
5. PS/2 Keyboard
6. Pointing Device (PS/2 mouse)
7. Speaker(s) (optional)
8. Disk Drives: HDD, CD-ROM, Floppy drive…
9. External Peripherals: Printer, Plotter, and Modem (optional)
10. Internal Peripherals: Modem and LAN cards (optional)

Hardware Installation
SY-KT880 DRAGON 2
15
2-2 INSTALLATION GUIDE
We will now begin the installation process. Please follow the step-by-step
procedure designed to lead you to a complete and correct installation.
Step 1- Install the Central Processing Unit (CPU)
Step 2
- Install memory modules
Step 3
- Install expansion cards
Step 4- Connect cables, case wires, and power supply
Step 5- Power on and enter BIOS setup
Step 6
- Install supporting software tools. See Chapter 4 for more info.
Warning:
Turn off the power to the motherboard, system chassis,
and peripheral devices before performing any work on the
motherboard or system.
BEGIN THE INSTALLATION
Step 1 Install the CPU
CPU Mount Procedure:
To mount the AMD
®
K7 Athlon XP or Duron
TM
processor that you have purchased separately, follow these instructions.
1. Lift the socket handle up to a vertical position.

Hardware Installation
SY-KT880 DRAGON 2
16
2. Align the blunt edge of the CPU with the matching pinhole distinctive
edge on the socket.
3. Seat the processor in the socket completely and without forcing.
4. Then close the socket handle to secure the CPU in place.
Remember to connect the CPU Cooling Fan to the
appropriate power connector on the motherboard. The fan is a
key component that will ensure system stability. It prevents
overheating, therefore prolonging the life of your CPU.
/