Brother PT-P900W User manual

Type
User manual

This manual is also suitable for

Operation manuals
1. User’s Guide (this guide)
This provides details on basic operating procedures for the barcode scanner and solutions for problems.
2. User’s Menu Book
This provides details on the setting menus for the barcode scanner.
Check that no problems occur when the default settings are used.
The User’s Menu Book can be downloaded from the Brother Solutions Center website
(support.brother.com
). It is not included with the barcode scanner. Software for the latest
printers can be downloaded, and FAQs and troubleshooting information are also available
from the Brother Solutions Center.
Editing and publishing notices
Brother Industries, Ltd. reserves the right to modify, without notice, materials and
specifications published in this document.
In addition, we assume no responsibility for damages (including consequential damages)
resulting from the use of published materials, including typographical errors or any other
error included in the publications.
The screens may differ from those shown in this document, depending on the printer or
operating system of the computer being used.
The contents of this document are subject to change without notice.
The contents of this document may not be duplicated or reproduced, partially or in full,
without permission.
Every effort has been made to ensure that the content of this document is accurate.
However, any questionable or erroneous information that is found should be reported.
We assume no responsibility for claims from third parties or for profit losses or damages
resulting from the use of labels created using this barcode scanner or from lost or corrupted
data due to malfunctions or repairs to this barcode scanner.
Trademarks
The Brother logo is a registered trademark of Brother Industries, Ltd.
Windows is a registered trademark of Microsoft Corporation in the United States and other
countries.
Mac OS is a registered trademark of Apple Inc. in the United States and other countries.
All other software and product names mentioned are trademarks or registered trademarks of
their respective companies.
The barcode scanner may malfunction if it is left near a device, such as a television or radio.
Do not use the barcode scanner near any device that can cause electromagnetic interference.
Do not plug in or unplug the USB connector while the LED light is being emitted.
Otherwise, a malfunction may occur.
The barcode scanner may not be able to scan barcodes if it is used near a magnet
or in a location exposed to flashing light, such as a CRT.
Do not use or store the barcode scanner in an extremely dusty location or in a location
exposed to direct sunlight, high humidity, or extremely low or high temperatures, such
as near a furnace or heater. The operating temperature and humidity should comply
with the operating conditions of the connected Brother label printer.
To maintain optimum scanning performance, regularly clean the scanner lens.
Wipe the outside of the barcode scanner with a slightly dampened soft cloth.
Do not wash with water at a high pressure.
If needed, use a small amount (1 drop) of household detergent, and wring out the
cloth well before wiping.
In addition, do not use detergent that contains an abrasive cleanser.
The barcode scanner can be connected to a device other than a Brother label printer
(TD-2120N, TD-2130N, PT-9800PCN, or RJ-3150); however, connections made to
devices other than a label printer are the sole responsibility of the user. Brother accepts
responsibility only for connections made with Brother label printers.
1
Supported symbologies
UPC-A, UPC-E, EAN-13, EAN-8, Code 39, NW-7 (Codabar), Industrial 2 of 5, Interleaved 2 of 5,
Code 93, Code 128, GS1-128, GS1 DataBar Omnidirectional, GS1 DataBar Limited, and GS1
DataBar Expanded
Printer models that can be connected with the PA-BR-001 (using the USB port of the printer):
TD- and RJ-series printers and P-touch label printers equipped with a USB host interface
Main factory settings
General settings US keyboard, no prefix or suffix
EAN-13/8 settings CD (check digit) transferred
Interleaved 2 of 5 (ITF) settings CD (check digit) transferred
Code 39 settings ST/SP (start/stop code) transferred: None
NW-7 (Codabar) settings ST/SP (start/stop code) transferred: ABCD/ABCD
Note: When using database data for EAN-13/8 or ITF barcodes to print with the barcode
template printing (BTP) function, create data that includes a check digit.
In addition, the barcode data must be at the beginning (first column) of the database.
Important safety instructions
To prevent property damage or injuries to the machine users or other people, be sure to
observe the precautions indicated with the various symbols.
The meanings for those symbols are described below.
WARNING
Indicates a potentially hazardous situation which, if the product is
handled without following the warnings and instructions, could
result in death or serious injuries.
CAUTION
Indicates a potentially hazardous situation which, if not avoided, may
result in minor or moderate injuries, damage to property, or loss of
product functionality.
The following symbols are used throughout this document.
Indicates a danger that requires special attention.
Indicates an action that must not be performed.
Indicates an action that must be performed.
WARNING
Observe the following, otherwise a fire, damage, electric shock or suffocation may result.
DO NOT try to disassemble or alter the barcode scanner.
For servicing, adjustments, or repairs contact your Brother dealer. (The
warranty does not cover repairs for damage resulting from disassembly or
alterations performed by the user.)
DO NOT drop, step on, or subject the machine to strong impacts.
DO NOT spill drinks (such as coffee or juice) or water (such as from a flower
vase) on the barcode scanner.
DO NOT use the barcode scanner if foreign objects have been allowed to enter it.
If the barcode scanner is damaged or liquid (such as water) or foreign objects
have entered the barcode scanner, immediately disconnect it from the label
printer, and then contact your Brother dealer.
DO NOT touch the barcode scanner during a severe thunderstorm, otherwise
an electric shock may occur.
If an unusual odor or heat is produced while the barcode scanner is being used
or stored or if you notice anything unusual, such as discoloration or
deformation, immediately stop using the barcode scanner, and disconnect it
from the label printer.
CAUTION
DO NOT look directly at the LED light emitted from the scanner lens.
Otherwise, your eyes may suffer injuries.
If the barcode scanner will not be used for a long period of time, disconnect it
from the label printer.
When connecting the barcode scanner to or disconnecting it from the label
printer, hold the USB connector.
Never pull on the cable.
Thank you for purchasing the PA-BR-001 barcode scanner.
The PA-BR-001 (hereafter referred to as “the barcode scanner”) is a compact and
lightweight long-range CCD barcode scanner.
Connect the barcode scanner to a Brother label printer equipped with a USB host
interface to use the barcode template printing (BTP) function to print barcodes.
Before using this barcode scanner, be sure to read this User’s Guide for information
on its correct operation.
Afterward, keep this manual in a safe place for future reference.
Printed in Japan
LBF299001
PA-BR-001 User’s Guide
Operating Precautions
Federal Communications Commission (FCC) Declaration of Conformity (For USA Only)
Responsible Party: Brother Mobile Solutions
11030 Circle Point Road, Suite 100
Westminster, CO 80020, U.S.A.
TEL: (303) 460-1600
Product Name: Barcode Scanner
Model Number: PA-BR-001
This device complies with Part 15 of the FCC Rules. Operation is subject to the following two
conditions: (1) this device may not cause harmful interference, and (2) this device must accept
any interference received, including interference that may cause undesired operation.
This equipment has been tested and found to comply with the limits for a Class B digital device,
pursuant to Part 15 of the FCC Rules. These limits are designed to provide reasonable protection
against harmful interference in a residential installation. This equipment generates, uses and can
radiate radio frequency energy and, if not installed and used in accordance with the instructions, may
cause harmful interference to radio communications. However, there is no guarantee that
interference will not occur in a particular installation. If this equipment does cause harmful interference
to radio or television reception, which can be determined by turning the equipment off and on, the user
is encouraged to try to correct the interference by one or more of the following measures:
Reorient or relocate the receiving antenna.
Increase the separation between the equipment and receiver.
Connect the equipment to an outlet on a circuit different from that to which the receiver is connected.
Consult the dealer or an experienced radio/TV technician for help.
This transmitter must not be co-located or operated in conjunction with any other antenna or transmitter.
Important
The enclosed interface cable should be used to ensure compliance with the limits for a
Class B digital device.
A shielded interface cable should be used to ensure compliance with the limits for a Class B digital device.
Changes or modifications not expressly approved by Brother Industries, Ltd. could void the
user’s authority to operate the equipment.
Product Specifications
Electrical specifications
Input supply voltage 4.5 to 5.5 V (USB)
Interface USB (HID)
Optical specifications
Light source Red LED (wavelength:
624 nm)
Scanning method CCD (1,500 pixels)
Scan rate Maximum 300
scans/second
Scan depth 20 to 220 mm
(at 0.25 mm resolution)
Scan width 110 mm
Minimum PCS 0.3
Minimum resolution 0.1 mm
Environmental specifications
Operating temperature 0 to 50 °C
Storage temperature -20 to 60 °C
Physical specifications
Weight Approximately 115 g
(including cables)
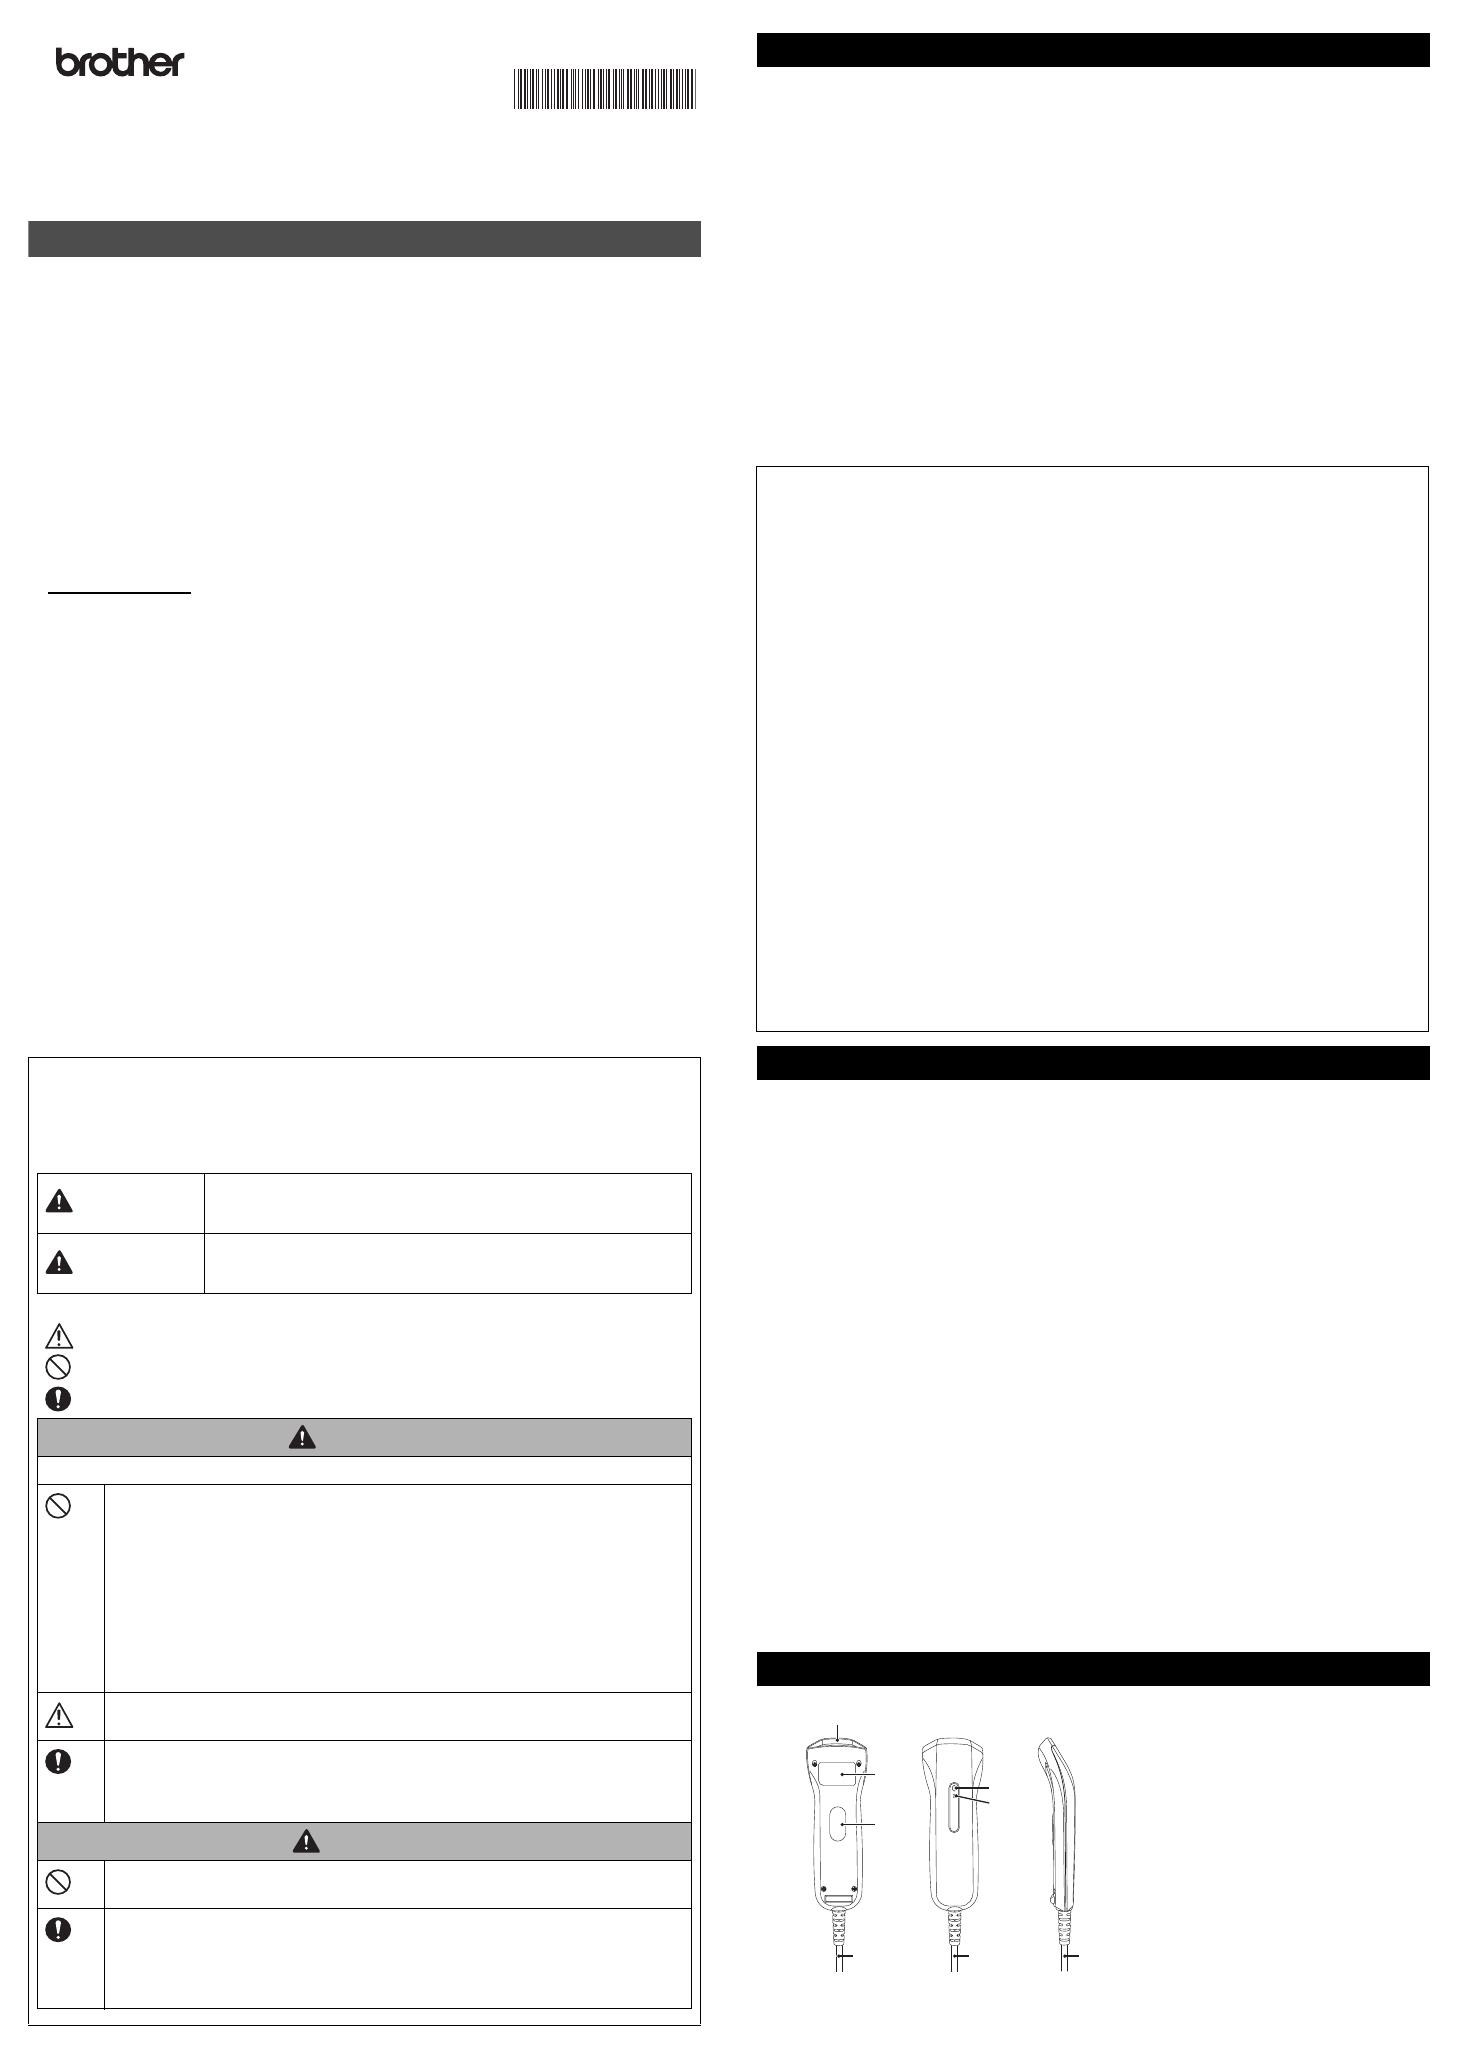
Parts and Their Functions
1 Scanner lens
Barcodes are scanned through the
scanner lens.
Never obstruct this lens.
2 Trigger button
Start barcode scanner operations
by pressing the trigger button.
3 LED indicator
4 Buzzer
5 Cable/connector
6 Rating labe
555
3
6
2
4
1
The following three types of printing are possible with the barcode template printing (BTP) function.
Function 1: Standard template printing
Operating procedures
Create label layout Transfer label layout to label printer Scan specified barcode with
barcode scanner Print label
Steps
1. Create the label template.
Start P-touch Editor, and then create the layout for the label to be printed.
Click [File]-[Save As], and then save the file with the desired name.
You can use preset template printing with label layouts that contain (1) text data, (2)
barcodes, or (3) text and barcode data.
2.
Connect the label printer to the computer with a USB cable, and then transfer the label layout.
1. Click [File]-[Transfer Template] to start Transfer Manager.
2. Click [
Transfer
] to transfer the template to the label printer.
3. Connect the barcode scanner.
Plug the barcode scanner into the USB port of the label printer.
4. Print the label.
Prepare the “List of Barcodes for Specifying Settings” in this manual, or use the label printer
to print the barcodes for specifying settings.
1. With the barcode scanner, scan the “P-touch template command (Initialize + Begin
specifying settings)” barcode.
P-touch template command (Initialize + Begin specifying settings)
The default settings of the label printer are specified with the P-touch template
command.
2. Start printing by scanning the barcode for the template number setting (^TS###) and the
begin printing command (^FF).
Example: To print the template (key number 2) created in step 1, scan the “Preset
template 2” barcode below.
Preset template number
The template created in step 1 is printed.
For this example, the label will be printed.
Function 2: Advanced template printing
Operating procedures
Create barcode label Transfer label layout to label printer Scan barcode label to be
copied Print label
Steps
1. Create the label template (barcode).
1. Start P-touch Editor.
2. Click [Insert]-[Bar Code] to display the Bar Code Properties dialog box, and then
specify the settings.
3. Click [File]-[Save As], and then save the file with the desired name.
The barcode will be printed with the protocol previously specified in the template.
(If the created template contains text, the label will be copied with the text.)
Specify a label length according to the maximum number of digits in the barcodes
to be used.
2. Connect the label printer to the computer with a USB cable, and then transfer the label
layout.
1. Click [File]-[Transfer Template] to start Transfer Manager.
2. Click [
Transfer
] to transfer the template to the label printer.
3. Connect the barcode scanner.
Plug the barcode scanner into the USB port of the label printer.
1. Select the template number.
Example: For key number 3
Select template
2. Scan the barcode to be printed (copied).
Example: Product barcode (EAN-13)
3. Start printing by scanning the "Begin printing" barcode (^FF).
We recommend printing a label with the "Begin printing" barcode (^FF) in advance so
that it will be ready when needed.
Begin printing
Function 3: Database lookup printing
Operating procedures
Create label layout linked to database Transfer label layout to label printer Scan
specified barcode with barcode scanner Print label
As an example, the label layout will be created with a product barcode (1), product name (2),
cost (3), and unit (4).
Sample label:
You can print the corresponding label when you scan the product barcode.
First, prepare the key barcodes (product barcodes) used in step 4-2.
Steps
1. Create the data linked with a database (Microsoft Excel or other software).
1. In Excel or some other software, create the database (table).
To create the sample label
1 Data for the barcode (product code) = Key barcode
When creating an EAN-13/8 or ITF barcode, be sure to create data that includes a check digit
(CD).
2 Product name
3 Cost
4 Units: Fixed data, not linked to the database
Select the text in the created label, right-click it, and then click [Properties].
Select the “Text Cannot Be Edited” and “Prevent Movement or Resizing With the
Mouse or the Arrow Keys” check boxes.
To include fixed text data when copying the barcode, be sure to specify these settings.
Scanning Barcodes
Plug the barcode scanner into the USB port of the label printer, and then turn on the
label printer.
Scanning
1
Aim the scanner lens of the barcode scanner
at the barcode.
2
Press the trigger button to scan the barcode.
The buzzer sounds and the LED indicator
(blue) lights up when scanning is finished.
Note 1: The width of the barcode with
additional margins must fit within
the width of the light beam.
Note 2: If the barcode scanner is too close
to the barcode, it may not be able
to scan. While holding down the
trigger button, slowly move the
barcode scanner away from the
barcode until the buzzer sounds
and the LED indicator (blue) lights
up to indicate that scanning was
completed successfully.
Barcode Template Printing (BTP) Function
When the barcode scanner is connected to
a Brother label printer, labels and barcodes
can be printed by scanning barcodes
without connecting to a computer.
Note: The barcode template printing (BTP)
function is compatible only with the
Windows operating system.
Since the Mac operating system
does not support template transfer, it
cannot be used.
Function 1:
Standard template printing
Download frequently used templates or images and simply scan a
barcode to select which one to print.
Function 2:
Advanced template printing
Download a template and scan a barcode to print a copy or insert the
scanned data into a different looking label.
Function 3:
Database lookup printing
Download a database linked to a template and scan a barcode to find a
record to insert into the template and print it out.
Print sample:
Select the label layout from the list, and then
right-click it to display a menu.
Click [Key Assign] to select a key number.
This number is the label template number that
will be used when printing.
For this example, select [2] as the key
number.
The key number can be set between 1
and 99.
STAT
US
㻮㼕㼘㼘㻌㻭㼚㼐㼑㼞㼟㼛㼚
Bill Anderson
Print sample (EAN-13):
Select the label layout from the list, and then
right-click it to display a menu.
Click [Key Assign] to select a key number.
This number is the label template number that
will be used when printing.
2
4
3
1
2. Start P-touch Editor, connect to the database, and then create the linked data.
Click [
File
]-[
Database
]-[
Connect
], and then specify the location of the original database to
connect to it.
Note: For more information on linking to a database, see the manual for the label
printer.
Click [File]-[Save As], and then save the file with the desired name.
In addition to Excel databases, you can use .mdb, .csv, and .txt files as databases.
Save the P-touch Editor data (.lbx) and database data in the same folder.
If the titles of columns (field names) are in the first row of the database, you can use those
titles when linking. You can also specify field names in the Open Database dialog box.
Specify the barcode data in the first column of the database.
When creating an EAN-13/8 or ITF barcode, be sure to create data that includes a check
digit (CD).
2. Make sure the label printer is connected to the computer with a USB cable, and then
transfer the data linked with the database to the label printer.
1. Click [File]-[Transfer Template] to start Transfer Manager.
2. Click [Transfer] to transfer the data linked with the database to the label printer.
3. Connect the barcode scanner.
Plug the barcode scanner into the USB port of the label printer.
4. Print the label.
1. Scan the "Select template" and "Number input" barcodes to select the template number.
Example: To select template (key number) 4, specify “^TS004”.
Select template
2. Scan the barcode to be printed from the database transferred together with the template.
Example: Barcode “4977766670029”
3. Scan the "Delimiter" barcode (HT [horizontal tab]).
Delimiter
4. Start printing by scanning the "Begin printing" barcode (^FF).
Begin printing
For this example, the label with the product name “coffee” and cost “2.98” in the
same row as barcode data “4977766670029” will be printed.
Advanced operations: Numbering (Serialized number) printing
Numbering (Serialized number) printing
Automatically increment a text or barcode in any downloaded template while printing.
Operating procedures
Create text label Transfer label layout to label printer Scan specified barcode with
barcode scanner Print label
Steps
1. Create the text label.
1. Start P-touch Editor.
2. Type in the text.
3. Click and drag the pointer to highlight the Data field.
4. Right-click the numbers, and then click [Numbering].
Up to nine Data fields can be specified.
A maximum of 15 characters can be specified for a Data field.
2. Make sure the label printer is connected to the computer with a USB cable, and then
transfer the label layout to the label printer.
1. Click [File]-[Transfer Template] to start Transfer Manager.
2. Click [Transfer] to transfer the label layout to the label printer.
3. Connect the barcode scanner.
Plug the barcode scanner into the USB port of the label printer.
4. Print the label.
1. Scan the "Select template" and "Number input" barcodes to select the template number.
Example: To select template (key number) 5, specify “^TS005”.
2. Scan the “Numbering printing” barcode (^NN).
3. After scanning the "Numbering printing" barcode, scan the “Number input” barcodes for
the three digits of the number of copies to be printed.
Example: For 5 copies
4. Start printing by scanning the "Begin printing" barcode (^FF).
For this example, labels with the numbers 1234567890 to 1234567894 will be printed.
The Data field will increase by one with each label that is printed.
The count will be stored in the label printer, even if it is turned off.
To reset the count to the original number, scan the “Initialize template data” barcode, shown
below.
Numbering (Serialized number) printing for a barcode label
Operating procedures
Create barcode label Transfer label layout to label printer Print label
Steps
1. Create the barcode label.
1. Start P-touch Editor.
2. Click [Insert]-[Bar Code] to display the Bar Code Properties dialog box, and then
specify the settings.
This example is for a CODE 128 barcode.
3. Click and drag the pointer to highlight the Data field.
4. Click [Numbering], and then click [OK].
Up to nine Data fields can be specified.
A maximum of 15 characters can be specified for a Data field.
Select the label layout from the list, and then
right-click it to display a menu.
Click [Key Assign] to select a key number.
This number is the label template number that
will be used when printing.
Print sample:
Sample label:
Select the label layout from the list, and then
right-click it to display a menu.
Click [Key Assign] to select a key number.
This number is the label template number that
will be used when printing.
Select template Number input
•00 •5
•00 •5
Sample
label:
^NN
^ID
2. Transfer the label layout to the label printer.
1. Click [File]-[Transfer Template] to start Transfer Manager.
2. Click [Transfer] to transfer the label layout to the label printer.
3. Connect the barcode scanner.
Plug the barcode scanner into the USB port of the label printer.
4. Print the label.
1. Scan the "Select template" and "Number input" barcodes to select the template number.
Example: To select template (key number) 6, specify “^TS006”.
2. Scan the "Numbering printing" barcode (^NN).
3. Scan the "Number input" barcodes for the three digits of the number of copies to be
printed.
Example: For 5 copies
4. Start printing by scanning the "Begin printing" barcode (^FF).
For this example, the labels to will be printed.
The Data field will increase by one with each label that is printed.
The count will be stored in the label printer, even if it is turned off.
To reset the count to the original number, scan the “Initialize template data” barcode, shown
below.
Supplementary information: Using the P-touch Template Settings tool
Download the software from the Brother Solutions Center website (support.brother.com) to
change the settings for the label printer.
1. Click [Downloads], and then select your product and operating system.
2. Download “Printer Setting Tool” under “Utilities”.
3. Start Printer Setting Tool, specify the appropriate settings in [P-touch Template Settings],
and then click [Set].
Note: For PT-9800PCN, download “P-touch Template Tools” under “Utilities”, run P-touch
Template Settings.exe, and then specify the settings for the label printer.
As a default setting for label printers, printing begins when you scan the "Begin printing"
barcode (^FF) using the barcode scanner.
If you selected "Received Data Size" and specified the number of bytes, printing begins
automatically after you scan barcodes with the specified number of bytes.
Note: In area (A) in the above example, the setting has been changed to 10 bytes.
Initializing the barcode scanner
Settings specified when connected to the label printer
P-touch template command (Initialize + Begin specifying settings)
1. Function barcodes
After scanning the barcodes for “Select template”, “Number of copies", and “Numbering printing”, enter
a three-digit number to specify the template number, number of copies to be printed, and the number
of Numbering copies.
2. Number input
Using suffixes
1.
Adding the "Begin printing" barcode (^FF) as a suffix
When you copy a barcode with the "Begin printing" barcode (^FF) added as a suffix, the
label printer will immediately start printing when the barcode to be copied is scanned.
The template number cannot be changed. Use this feature only when copying a barcode with the default
template number.
Printing begins at the same time that a single barcode is scanned. When printing templates by scanning
multiple barcodes, remove the suffix.
2. Adding “HT” (tab) added as a suffix
By adding “HT” (tab) as a suffix, you can skip scanning the "Delimiter" barcode (HT) when
scanning barcodes for database lookup printing.
If you cannot resolve the barcode scanner problem, contact your Brother dealer.
Select the label layout from the list, and then
right-click it to display a menu.
Click [Key Assign] to select a key number.
This number is the label template number that
will be used when printing.
Select template Number input
•00 •6
•00 •5
^NN
1234567890
1234567894
^ID
A
List of Barcodes for Specifying Settings
The barcode scanner can be reset to the
factory settings.
Scan the barcodes in order from the top:
ZZ BAP ZZ.
Perform this operation with the barcode
scanner connected to the USB port of
the computer, not the label printer.
Begin specifying
settings
Initialize
Finish specifying
settings
Select template Delimiter Begin printing
Number of copies Numbering printing
Initialize template data
•1 •2 •3
•4 •5 •6
•7 •8 •9
•0 •00
“^FF” added as a suffix Suffix removed
→→→
Begin (SET) Suffix setting Adding “HT” (tab)
Finish (END)
Troubleshooting
Problem Possible causes/solutions
The barcode
scanner does not
turn on. (The LED
indicator does not
light up.)
Is the label printer turned on?
Is the USB connector firmly inserted?
Is the cable damaged?
Check if the barcode scanner turns on after connecting it to a computer.
Note: When the barcode scanner is turned on, the buzzer sounds and the LED
indicator lights up. The LED indicator goes off when the buzzer stops.
The barcode scanner
does not operate.
Check if the trigger button is pressed.
Make sure the barcode scanner is connected to a compatible interface.
Barcodes cannot
be scanned.
Clean the scanner lens.
Are the barcodes to be scanned damaged?
Check if other barcodes can be scanned.
Does the width of the barcodes to be scanned extend past the width of
the emitted LED light beam?
Try changing the scanning angle of the barcode scanner.
Check if the barcode can be scanned by slowly moving the barcode
scanner away from it.
^NN
  • Page 1 1
  • Page 2 2
  • Page 3 3
  • Page 4 4

Brother PT-P900W User manual

Type
User manual
This manual is also suitable for

Ask a question and I''ll find the answer in the document

Finding information in a document is now easier with AI