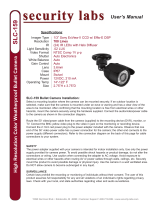
Owner’s Manual
12” B/W Quad Observation System
Model SLM424 System / Model SLM422 Monitor
Customer Support 1-800-774-0284 www.security-labs.com
Security Labs Limited Warranty
Security Labs, Inc. warrants that if a Security Labs product proves to be defective in material
or workmanship under normal usage, Security Labs will provide, without charge to the
consumer, parts and/or labor necessary to remedy the defect for the period of ONE YEAR
from the date of purchase. The warranty period commences on the date that the product is
purchased by the consumer. Any implied warranty is also limited to the duration above.
THIS WARRANTY DOES NOT COVER THE FOLLOWING: FLUCTUATIONS IN THE
POWER SOURCE OR LIGHTNING-RELATED DAMAGE; ATTACHED OR UNATTACHED
ACCESSORIES; COSMETIC PARTS SUCH AS KNOBS AND ACCESS DOORS; CABINET
DAMAGE, INCLUDING DAMAGE IN TRANSIT; ACCIDENTAL DAMAGE; MISUSE; ABUSE;
UNAUTHORIZED PARTS USAGE OR REPAIRS; RECEPTION PROBLEMS DUE TO
INADEQUATE SIGNAL; UNAUTHORIZED INTERNAL CONTROL OF ADJUSTMENTS;
INSTALLATION; ADJUSTMENT OF CONSUMER CONTROLS, OR ANY OTHER USE OF
THE PRODUCT OTHER THAN THAT SPECIFICALLY PRESCRIBED IN THE OWNER'S
MANUAL. THIS WARRANTY APPLIES TO PRODUCTS SOLD AS NEW AND NOT
REMANUFACTURED OR B-STOCK PRODUCTS.
SECURITY LABS, INC. DOES NOT ASSUME LIABILITY FOR ANY VIOLATION OF PRIVACY
FROM ILLEGAL AUDIO OR VIDEO MONITORING OR RECORDINGS MADE FROM THIS
DEVICE. THE USER/OWNER ASSUMES FULL LIABILITY FOR ANY AND ALL
RECORDINGS MADE FROM THIS DEVICE IN A SECURITY OR SURVEILLANCE
OPERATION OR IN ANY OTHER USE. SECURITY LABS IS NOT RESPONSIBLE FOR
RECORDINGS THAT VIOLATE LAWS OR THAT MAY PROVE OFFENSIVE OR TEND TO
INCRIMINATE ANOTHER INDIVIDUAL. LOCAL, STATE, AND FEDERAL LAWS MUST BE
OBSERVED REGARDING ALL RECORDINGS AND SURVEILLANCE MONITORING.
CHECK WITH YOUR GOVERNMENTAL AGENCY FOR COMPLIANCE REQUIREMENTS.
To obtain warranty service, the consumer must provide the product along with evidence that
will positively identify the date that the product was purchased from an authorized Security
Labs product representative, dealer, retailer, or distributor. Prior to shipment, a RETURN
AUTHORIZATION must be obtained from SECURITY LABS; this will assist us in more
efficient service on your unit, and possibly avoid shipment if the adjustment can be made over
the phone. If shipment is made, the cost for postage, insurance and shipping of the product is
the responsibility of the owner.
SECURITY LABS' OBLIGATION UNDER THIS WARRANTY SHALL BE TO REPLACE SUCH
PARTS AND PROVIDE LABOR AS STATED. SECURITY LABS WILL NOT BE LIABLE FOR
ANY LOSSES OR INCONVENIENCES, DIRECT OR INDIRECT, OR CONSEQUENTIAL
PROPERTY DAMAGES.
To obtain a return authorization number, contact customer service at:
SECURITY LABS, INC.
15540 HERRIMAN BLVD. NOBLESVILLE, IN 46060 USA
CUSTOMER SERVICE: 1-800-774-0284
ONLINE: www.security-labs.com

Problem Correction
Troubleshooting
No power
Picture is dark or washed out
Picture appears scrambled or
characters are missing
Confirm power cord is connected
to monitor and both the front and
back panel power switches are on
Adjust brightness and contrast
controls on the monitor’s front
panel
Unplug monitor from the wall
outlet for five seconds to reset the
system
13
Monitor must be used indoors and never exposed to moisture.
Place monitor in a well ventilated environment that is free from
vibration and the possibility of any impact.
Use caution when mounting cameras on walls or ceilings. Always
confirm where existing utilities (electrical wires, gas pipes, etc.) are
located before installation.
Potentially lethal high voltage exists inside this device. Do not
remove the case or alter the power cord on the monitor.
Observe all local, state, and federal codes and standards
when installing and using this product.

12
1
Features & specifications
MONITOR FEATURES
12” B/W monitor w/ built in quad processor
Quad, PIP, and auto sequence viewing functions
Four channel (DIN) camera inputs
Auto alarm function from camera (PIR sensor)
Four terminal alarm trigger inputs
Two terminal alarm trigger output (Relay N.O. & N.C.)
DVR/VCR audio video jacks for loop monitoring
Audible alarm function, on screen display of alarmed camera(s)
Display modes: QUAD, FULL, PIP1, PIP2, PIP Sequence, Auto Sequence
ZOOM and FREEZE functions
Built in real time clock for on screen time & date
Two way audio intercom to each camera
CRT standby function
MONITOR SPECIFICATIONS
Power source: 120VAC, 60HZ
Power consumption: MAX 65W (with 4 cameras)
CRT: 12” B/W
Resoltuion: >800 lines
Shipping weight: 31 lbs
Video output: 1VP-P, 75 ohms
CAMERA SPECIFICATIONS/FEATURES
Weatherproof case with swivel mount
1/3” B/W CCD sensor
Auto electronic shutter
Built in PIR (passive infrared) motion detection
Built in microphone & speaker for two way audio
Built in IR illumination for night vision
IR: (10) LEDS
PIR coverage angle:110 degrees (H), 30 degrees (V)
Power consumption: 3.5 watts
System setup (cont.)System setup (cont.)
ERASE: MODE EXIT:SET
3. DISPLAY MODE
4. AUTO ADJUST
5. ALARM HISTORY
6. EXIT
3. DISPLAY MODE
4. AUTO ADJUST
5. ALARM HISTORY
6. EXIT
to change.
the change and return to the main menu.
review the history
to erase the alarm history record
to return to the main menu
to return to the main menu

2
11
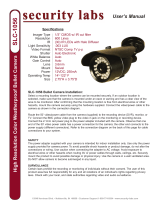
Camera & adapter diagrams
SLA30 Universal Camera Adapter
Supplied with your system are (2)
SLA30 camera adapters. These adapters
allow the use of any composite video device
(an alternate camera) with the monitor.
Connect the video from the camera to the
YELLOW plug on the adapter. Connect
the audio (if available) to the WHITE plug
on the adapter. Connect the adapter DIN
plug to one of the unused camera inputs
on the back of the monitor. Cameras
connected using the SLA30 adapter will
not have two way audio or motion
detection capability.
SLA30 adapters
VIDEO
(yellow plug)
AUDIO
(white plug)
DIN PLUG
TO MONITOR
System setup (cont.)System setup (cont.)
1. CAMERA TITLE
2. TIME/DATE
3. DISPLAY MODE
4. AUTO ADJUST
5. ALARM HISTORY
6. EXIT
to change.
the change and return to the main menu.
DISPLAY ADJUST
DATE/TIME: US
CHANNEL NAME: ON
BOUNDARY: GRAY
ALARM SOUND: OFF
INPUT SYSTEM: EIA
ALARM TIME LENGTH: 10 SECONDS
VIDEO LOSS: OFF
NOTE: WHEN THIS SYSTEM IS USED IN THE US OR MEXICO,
ALWAYS LEAVE THE INPUT SYSTEM SETTING TO “EIA”
DIN plug wring diagram

10
3
System setup (cont.)System setup (cont.)
3. DISPLAY MODE
4. AUTO ADJUST
5. ALARM HISTORY
6. EXIT
change the setting
the change and return to the main menu.
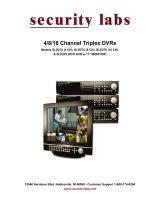
Video/Audio inputs for a DVR/VCR
Video/Audio outputs for a DVR/VCR
UL & FCC listings, Model # label
Standby power switch
ALARM INPUT and OUTPUT TERMINAL (#6 in FIG-4)
An accessory alarm input is provided for each camera (C1, C2, C3, C4)
on the alarm terminal strip on the monitor’s back panel. These inputs
require a normally open relay as an input triggering device, such as a
PIR, door switch, sonic detector, etc. The monitor’s ALARM SENSOR
must be on for alarm inputs C1-C4 to activate. When activated, C1-C4
will cause the monitor to go to full screen for the associated camera.
Cameras provided with this unit (with built in PIR motion detection) have these
connections automatically when connected to the monitor through the DIN jacks.
ALARM OUTPUT
An alarm output has been provided to trigger an external device such as
a DVR/VCR to activate. When the monitor’s alarm sensor is on, an alarm
condition will activate the ALARM OUTPUTS. Normally open, common,
and normally closed contacts are provided.

4
3. DISPLAY MODE
4. AUTO ADJUST
5. ALARM HISTORY
6. EXIT
* Connect up to four cameras to the DIN camera input jacks
* Use SLA30 adapters to connect other video cameras to the DIN jacks (see page 2)
* Connect DVR/VCR audio & video to the monitor for recording & playback
QUESTIONS? Call our customer support line at 1-800-774-0284
to select the item to change
9
to change
specific title characters for changing
change the character
the change and return to the main menu
3. DISPLAY MODE
4. AUTO ADJUST
5. ALARM HISTORY
6. EXIT
FACTORY DEFAULT RESTORATION
The monitor can be reset to factory default settings at any time. Any user settings will
be lost in this process. To restore factory default settings, turn the main power
switch on the BACK of the monitor off and hold in on the SETUP button on the front panel.
Turn the main power switch on while holding SETUP. After the monitor powers on,
release the setup button.
TO ENTER THE SETUP MENUS
AUDIO
IN/OUT
TO
DVR/VCR

5
8
Sequence PIP mode.
IMPORTANT: The alarm sensor function is disabled in PIP Sequence Mode
for PIP Sequence mode:
-
-
-
-
supplying power,
to select
cameras
Full screen mode is now active (FIG-8)
Quad mode is now active
to return to QUAD mode
will
TWO-WAY INTERCOM FUNCTION
to
One camera full screen mode is now active
and speak into the microphone (to the left of the talk button)
to listen to the camera audio
14. PIR ALARM FUNCTION
1) Press the SENSOR button on the front of the monitor. A red LED will indicate
when the sensor is active. With the sensor active, motion in front of the camera will
alarm the monitor. The camera with motion activity will automatically appear full
screen on the monitor. An “A” will be displayed on the monitor screen to indicate the
camera with an alarm condition. If more than one camera has motion activity at the
same time, the monitor will enter QUAD mode. All alarmed cameras will display an
“A” on screen. An optional alarm sound can be heard when motion is detected.
The user can activate the alarm sound in the setup menu under DISPLAY MODE -
ALARM SOUND and change the length of the audible alarm under ALARM
LENGTH. See page 11 for adjusting the alarm sound and alarm length.
15. STANDBY FUNCTION / STANDBY SWITCH
1) The standby switch turns the CRT (monitor tube) off while all other monitor
functions remain active. This function saves energy and extends CRT life (when
direct monitoring is not required). If the PIR ALARM SENSOR is active and motion is
detected, the CRT will activate and display an image during the alarm duration. At
the end of the alarm, the CRT will turn off. To turn the monitor off completely, use the
main power switch on the monitor’s back panel.
System operation
System operation (cont.)
will blink,
to select the desired main picture channel
is blinking, then press
to select the desired sub-picture channel(s)
to save and exit
to view the camera full screen

6 7
System operation (cont.)
System operation (cont.)
will display (FIG 11)
to
to zoom the area by 2X
to exit the zoom function
“F1234” will display on the
to freeze
number in “F1234”
will blink.
to exit the freeze
number of “F1234” will blink (FIG-13)
to exit the freeze
. See page 12 for selecting channels and dwell time.
to return to QUAD mode.
11. AUTO VIDEO LOSS DETECTION IN ANY DISPLAY MODE
To alert the system when a camera is disconnected, destroyed, or the signal
line is interrupted, the VIDEO LOSS function can be activated under the
DISPLAY ADJUST menu (see page 11). When video is lost on any camera,
the corresponding number will flash in the “L1234” indicator at the top of the
screen. If the alarm sound is also active, it will sound at the moment the
video signal is lost (FIG-14). The default setting for this function is OFF.
DVR/VCR monitoring and playback:
to enter the DVR/VCR mode.
12.
The lower left corner of the screen will display “VCR”. The audio and
video signal from any connected recorder will be visible for playback
or live monitoring.
ZOOM and FREEZE functions are available in the VCR mode. The VCR mode
should be activated after a recorder is connected and prior to recording to ascertain
that cable connections to and from the recorder and monitor are correct. The recorder
will receive the signal displayed on the monitor for recording. The VCR mode can
be active or inactive during recording, but must be active to playback a DVR or VCR
recording. If the ALARM SENSOR is active and the monitor receives an alarm from
one or more cameras, the monitor will leave the VCR mode automatically during the
alarm and will return to the VCR mode at the end of the alarm. See page 4 for
DVR/VCR connection diagrams.
AUDIO RECORDING: In the QUAD mode, audio from channel one is automatically
selected and sent to the recorder. In full screen mode, the active camera audio is
recorded.
Audio recording is prohibited by law in some areas. Check with local, state,
and federal authorities for current laws.
DVR/VCR monitoring and playback:
top left of the screen (FIG-12).
:
/