Page is loading ...

1 of 1 Workrite Ergonomics | (800) 959–9675 www.workriteergo.com
A Positive Tilt Lockout Block
Qty: 1
Part Included
Tools RequiredRequired
Assembly & Installation Instructions:
Positive Tilt Lockout Kit, 3170-P2NPT
No tools are required to install the Positive Tilt Lockout KitPinnacle 2 Arm
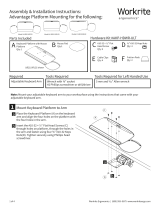
Remove the Adjustment Knob From the Pinnacle 2 Arm
Unscrew the Adjustment Knob from the Pinnacle
2 Arm. Take care not to lose the spring contained
within.
Remove Installed Wedge Block
Slide the installed wedge block and spring o the
carriage bolt. It may be necessary to tilt the arm
back to remove the block.
Reserve spring for next step.
Insert the Positive Tilt Lockout Block
While holding the opposite wedge block in place,
slide the Positive Tilt Lockout Block (A) onto the
carriage bolt. The nose of the block should fit
into the slot on the arm.
Replace spring.
Re-attach the Knob
While holding the opposite wedge block in place,
screw the adjustment knob onto the carriage
bolt.
1500081 Rev B
A
1
2
3
4
Pinnacle 2 Arm
Slot
Opposite side
wedge block
Carriage bolt
Nose
Note: Be sure both blocks are
aligned with the le and right slots.
Adjustment Knob
Spring
/