72 INCH WOOD TABLE WORKBENCH
Model
76633 - Butcher Block
WARNING
indicates a hazardous situation which,
if not
could avoided, result in serious injury or death.
CAUTION is used to indicate a hazardous situation which, if not
avoided, may result in minor injury, moderate injury, or property
damage.
WARNING
CAUTION: Read and follow all Safety Rules and Operating
• DO NOT stand on this product. You may fall or cause product
to tip.
• DO NOT mount this product on a truck bed or any other moving
object. This may cause personal injury or product damage.
• Appropriately secure this product before moving with a forklift.
• DO NOT tow with power equipment. The product may tip,
which may cause personal injury or product damage.
• Periodically the surfaces should be cleaned with a mild
detergent and water.
• Grease and oil can be removed with most standard cleaning
• Auto wax will preserve the luster finish of the workbench metal
parts. Apply the wax as to a car. The wax will also help protect
the metal parts against scratches.
• Use appropriate safety equipment when using power
and hand tools. Failure to do so may cause personal
injury or product damage.
• Obtain the aid of an assistant to assemble and move this unit.
Failure to do so may cause personal injury or product damage.
• DO NOT alter this product in any manner. This may cause per-
sonal injury or product damage.
• Unit must be located on a level surface. The product may be-
come unstable and tip if stored or moved on an un-level surface,
which may cause personal injury or product damage.
SAFETY
MAINTENANCE
OPERATOR’S MANUAL
• Weight of bench: 104.7 lbs.
• The maximum combined weight of bench and loaded table must
not exceed 1500 lbs.
F1984
LOCATING MODEL # INFORMATION
Model numbers and other information required for service parts is
located on a label on the inner side of the leg panel.
CALL 1-888-331-4569 FOR SERVICE PARTS. Refer to Parts
section of this manual for drawing and listing of Workbench parts.
Sears Brands Management Corporation, Hoffman Estates, IL 60179 U.S.A.
Used under license
* Product you purchased may vary from picture shown
REPLACEMENT PARTS
WARRANTY
CAPACITIES
UNPACKING INSTRUCTIONS
1. After opening shipping box, remove protective cardboard from
top of wood table and place cardboard on floor.
2. With the aid of an assistant, remove wood table and lay topside
down on cardboard to protect wood from scratching.
NOTE: Before laying down, determine the front side of the table.
Front side has the Craftsman logo engraved into the right corner.
3. Remove the remainder of workbench parts from shipping box.
Check parts and hardware against the PARTS and HARDWARE
lists on the next page. If parts or hardware are missing return
workbench to place of purchase for exchange.
CRAFTSMAN LIMITED WARRANTY
FOR ONE YEAR from the date of sale this product is warranted
against defects in material or workmanship.
WITH PROOF OF SALE a defective product will be replaced free
of charge.
For warranty coverage details to obtain free replacement, visit the
web page: www.craftsman.com/warranty
This warranty is void if this product is ever used while providing
commercial services or if rented to another person.
This warranty gives you specific legal rights, and you may also
have other rights which vary from state to state.
Sears Brands Management Corporation, Hoffman Estates,
IL 60179

A. Workbench Wood Table
B. Crossbar
A
B
B
G
F
E
C
I
D
H
C. Left Leg Panel
D. Right Leg Panel
E. Back Rail
F. Power Strip
G. Power Strip Cover
H. Cord Holder
I. Bottle Opener
PARTS
2
TOOLS REQUIRED:
Phillips Head Screwdriver
HARDWARE INCLUDED:
HARDWARE
HARDWARE INCLUDED:
M4x12 Screw (Qty: 2)
M6x12 Screw (Qty: 52)
Screw Leveler (Qty: 4)
NOTE : This equipment has been tested and found to
comply with the limits for a Class B digital device,
pursuant to Part 15 of the FCC Rules. These limits are
designed to provide reasonable protection against
harmful interference in a residential installation. This
equipment generates, uses and can radiate radio
frequency energy and, if not installed and used in
accordance with the instructions, may cause harmful
interference to radio communications.However, there
is no guarantee that interference will not occur in
a particular installation.
If this equipment does cause harmful interference to
radio or television reception, which can be determined
by turning the equipment off and on, the user is
encouraged to try to correct the interference by one or
more of the following measures:
□ Reorient or relocate the receiving antenna.
□ Increase the separation between the equipment and
receiver.
□ Connect the equipment into an outlet on a circuit
different from that to which the receiver is connected.
□ Consult the dealer or an experienced radio/TV
technician for help.
NOTE : This device complies with Part 15 of the FCC
Rules. Operation is subject to the following two
conditions: (1) this device may not cause harmful
interference, and (2) this device must accept any
interference received, including interference that may
cause undesired operation.
NOTE: 16 of these screws are
preattached to the Leg Panels.
NOTE: Levelers are preassembled to
Leg Panels.

Attach Crossbars (B) to Front and Back of Table and to Left
and Right Leg Panels:
• Align the pre-drilled holes in Table with holes in Crossbar
• Partially tighten (6) M6x12 screws through each Crossbar
length.
length into Table.
• Align Crossbar end holes with holes in Left and Right Legs.
• On each end of Crossbar, partially tighten (3) M6x12
screws through Crossbar holes into Leg holes as shown in
figure below.
Note: The Crossbar end flanges must be attached so that
they are on the outside of the Leg Panels.
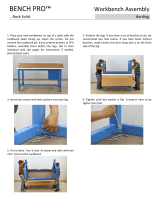
Attach the Left and Right Leg Panels (C, D) to the
underside of the Workbench Table:
• Align the pre-drilled holes in Table with holes in top of
Legs.
• Partially tighten (5) M6x12 screws through each Leg into
Table as shown in the figure below. Tighten screws so
that Legs do not fall, but can be shifted for Crossbar
attachment.
Workbench
Back
A
C
Workbench
Front
D
ASSEMBLY
• Determine the front and back of table. Front has Craftsman
logo engraved in right corner. Leg Panels must be attached
to table with Back Rail attachment holes to the back of table.
• If not already done, place the table topside down onto
protective cardboard piece.
Items Needed:
Left Leg Panel (Qty: 1)
Workbench Wood Table (Qty: 1)
Right Leg Panel (Qty: 1)
M6x12 Screw (Qty: 10)
Items Needed:
Underside of Workbench Table
3
Left Leg Panel
(has Pegboard Holes)
Right Leg Panel
(has Power Strip
Opening)
B
B
Crossbar (Qty: 2)
M6x12 Screw (Qty: 24)
Table Front - Craftsman Logo Engraved on Top Side Right Corner
Table Back

I
7
Items Needed:
Bottle Opener (Qty:1)
M4x12 Screw (Qty: 2)
• Align the holes in Bottle Opener with Bottle Opener
attachment holes on left side of Crossbar.
• Tighten (2) M6x12 screws through Bottle Opener holes
into Crossbar holes as shown in figure below.
Note: The Left Leg Panel has pegboard holes through
which hooks can be attached for hanging hand tools, work
lights and similar items.
E
G
F
Items Needed:
Power Strip
M6x12 Screw (Qty: 6)
Power Strip Cover
• Insert the Power Strip (F) into the Power Strip Cover (G).
• Align the Power Strip Cover holes with the perimeter
holes of the opening for the Power Strip on the inside
of the Right Leg Panel.
• Tighten (6) M6x12 screws through Power Strip Cover
holes into Leg Panel holes as shown in the figure below.
Note:
• The power strip has receptacle holes for four 3-pronged
plugs. It also has two USB ports for charging electronic
devices.
• Once power strip is plugged in, push toggle switch to
RESET position for power strip operation.
E
Items Needed:
Back Rail
M6x12 Screw (Qty: 8)
IMPORTANT: Before attaching Back Rail, adjust height of
Leg Panels to the planned Workbench location. See
Workbench Height Adjustment section on next page.
Attach Back Rail (E) to back of Left and Right Leg Panels:
• Align Back Rail end holes with holes in back of Left and
Right Legs.
• Tighten (4) M6x12 screws through Back Rail end holes
into Leg holes as shown in figure below.
Note: The Back Rail end flanges must be attached so that
they are on the outside of the Leg Panels.
• Once the Back Rail is attached, go back and fully tighten
all screws that were partially tightened up to this point in
the assembly process.
4
H
6
Items Needed:
Cord Holder
M6x12 Screw (Qty: 2)
• With the aid of an assistant, set the the workbench in
upright position.
• Align the holes in Cord Holder with Cord Holder
attachment holes on outside of Right Leg Panel.
• Tighten (2) M6x12 screws through Cord Holder holes
into Right Leg Panel holes as shown in figure below.

5
OPERATION
Leveling Foot Adjustment
• Adjust leveling position by turning the foot nut left to raise
and right to lower the foot.
Workbench Height Adjustment
The Leg Panels are preset for a total workbench height of 36 inches (not including leveling feet).
The Panels can be adjusted to alter the workbench height from 31 inches to 43 inches.
• Completely unscrew the (8) M6x12 Screws from each Leg Panel as shown in figure below.
• Raise or lower the leg bottoms to the same position in the leg channels on each Leg Panel.
• Insert and securely tighten the previously removed screws.
Raise
Lower
Leg bottom
Leg channel
Foot Nut

Product questions or problems?
1-888-331-4569
Customer Care Hot Line
Get answers to questions, troubleshoot problems,
order parts, or schedule repair service.
Para respuestas a preguntas o problemas, y ordenar piezas o pedir
servicio para la reparación de su equipo.
To help us help you, register your product at www.craftsman.com/registration
Para poderte ayudar mejor, registra tu producto en www.craftsman.com/registration
Join the Craftsman Club today!
www.craftsman.com/signup
offers, project sharing, expert
advice, and SHOP YOUR WAY REWARDS!
proyectos nuevos, consejos de expertos y nuestro programa de puntos SHOP YOUR
WAY REWARDS!
® Registered Trademark / TM Trademark of KCD IP, LLC in the United States, or Sears Brands, LLC in other countries
® Marca Registrada / TM Marca de Fábrica de KCD IP, LLC en Estados Unidos, o Sears Brands, LLC in otros países
/