Page is loading ...

91-003365-002
US
Parent’s Guide

2
2
INTRODUCTION
Thank you for purchasing Kidizoom
®
Action Cam 180 by VTech
®
!
Capture photos and videos of all your adventures. Built with you in
mind, the Kidizoom
®
Action Cam 180 can go anywhere you go with
included mounts and a waterproof case. This kid-tough camera has a
color screen and 180 degree rotatable camera.
DISCLAIMER:
Adult supervision is recommended when the camera is being used by
a child during activities involving bicycles, scooters, skateboards or any
other sports equipment.
We do not advise performing any stunts, tricks or any dangerous
activities when using the camera.
When using the camera on a bicycle, scooter, skateboard, or any other
sports equipment, obey all rules of the road, signals and signs and stay
away from trafc or groups of people.
Mount the camera in a position where your child will not be tempted to
play with it while riding. Using the Kidizoom
®
Action Cam 180 during
physical play and movement is at the user’s own risk.
VTech
®
claims no responsibility for any misuse or failure to follow these
guidelines.
INCLUDED IN THIS PACKAGE
Kidizoom
®
Action Cam 180
Waterproof
Case
Bicycle Mount
Mounting
Attachment
Adhesive Flat
Mount
Double-Sided
Adhesive Tape
Strips
Micro-USB
Cable
Wrist Strap
• One parent's guide

3
WARNING: All packing materials such as tape, plastic sheets,
packaging locks, removable tags, cable ties and
packaging screws are not part of this toy, and should
be discarded for your child’s safety.
ATTENTION: Pour la sécurité de votre enfant, débarrassez-vous
de tous les produits d’emballage tels que rubans
adhésifs, feuilles de plastique, attaches, étiquettes et
vis d’emballage. Ils ne font pas partie du jouet.
The battery in this product must not be disposed of with household
waste. This battery is recyclable, please follow your local recycling
regulations.
Note:
Please keep this parent's guide as it contains important information.

4
4
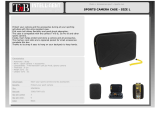
Rotatable
Camera Lens
Video Button
Memory
Card Slot
Home/On/Off
Button
D-Pad
Camera Button
OK Button
Strap Hook
Micro-USB Port
Delete Button
LED Indication Light
Master Power Switch
Microphone
Tripod Screw Hole
Note: The speaker is located on the back of Kidizoom
®
Action Cam 180
PRODUCT LAyOUT AND bUTTONS
Camera Button
Press this button to switch to Camera Mode or to take a photo while in
Camera Mode.
Video Button
Press this button to switch to Video Mode or to start/stop recording
videos while in Video Mode.
Home/On/Off Button
Press this button to turn the camera ON. Hold the button down for
approximately 2 seconds to turn it OFF.
While the camera is on, press this button to go to the Home Menu or to
go back to the previous menu.
OK Button
Press this button to conrm a selection.
Tip: The OK Button can also be used to take photos when in Photo
Mode, or to start/stop recording while in Video Mode.

5
Delete Button
Press this button to delete the selected le or cancel the current effect
selected in Camera Mode or Video Mode.
D-Pad
Press these buttons to navigate the menu screens.
Memory Card Slot
Insert a microSD card here for memory expansion.
Micro-USB Port
Connect to a computer with the included Micro-USB Cable to transfer
les and to charge the Kidizoom
®
Action Cam 180.
Note: Keep the rubber cover over the Micro-USB Port and Memory
Card Slot tightly closed when they are not in use.
PRODUCT SPECIFICATION
Display
1.8" color LCD
Photo Resolution
640 X 480 (0.3 MP)
Language
Multilingual (US English, UK English, Deutsch,
Español, Français, Nederlands)
Video Resolution
640 X 480 (available when using memory card
only, and does not support video
effects)
320 X 240 (default resolution)
160 X 120
Focus Range
1.5 feet - ∞
Internal Memory
128 MB built-in memory (shared with program
data, actual memory available for user storage
will be less)
File Format
Photos: Standard Baseline JPEG
Movies: AVI (Motion JPEG)
Memory Card
Format and
Capacity
microSD / microSDHC card Class 6 or above
(not included) with capacity from 1 GB to 32 GB
recommended
Connectivity
Micro-USB 2.0 cable (included) for connection
to a computer

6
6
Batteries
Rechargeable Li-ion Polymer battery
(battery is not replaceable)
Optimum
Operating
and Charging
Temperature
32°F - 104°F (0°C - 40°C)
STORAGE CAPACITy FOR REFERENCE
Set to
160 X 120
(Minutes)
Set to
320 X 240
(Minutes)
Set to
640 X 480
(Minutes)
Internal Memory 600 6 2.5 N/A
Memory
Card
2 GB 17,400 160 65 15
4 GB 34,800 320 130 30
8 GB 69,600 640 260 60
16 GB 139,200 1280 520 120
32 GB 278,400 2,560 1,040 240
Note: The above amounts are approximations, the actual capacity
depends on the shooting environment. The video length limit per le is
30 minutes, or a le size no larger than 2 GB.
GETTING STARTED
When you use Kidizoom
®
Action Cam 180 for the rst time, you will
need to switch the Master Power Switch (located on the underside of
the camera) to the ON position
. You may need a small tool such as
a paper clip to move the switch to the on position
. When the master
power switch is set to the OFF position
, the unit will not function and
the battery will not charge. Only move the switch to the OFF position
when the Kidizoom
®
Action Cam 180 will not be used for an extended
period of time.
0.3 MP
Photos

7
bATTERy RECHARGING
Note: Adult operation required.
To charge the Kidizoom
®
Action Cam 180, the camera needs to be
connected to a computer with the included Micro-USB Cable. To do so
correctly, please follow these steps:
• Make sure that the Master Power Switch is set to the ON position
before charging.
• Pull up the rubber cover of the Micro-USB Port on the side of the
camera.
• Insert the Micro-USB Cable (small end) into the Micro-USB Port on
the camera.
• Insert the large end of the Micro-USB Cable into a USB port on your
computer. A USB port is usually marked with this symbol:
• Once the connection is successful, you will see the battery recharging
symbol
appear on the camera screen.
• Check the charging progress regularly throughout recharging.
• When the battery is fully charged, a message will display on the
screen for a while before the screen automatically turns off. You may
then disconnect your fully charged camera from the computer.
Note: It will take approximately 3 hours to fully charge the battery. The
actual charging time depends on the charging current, the remaining
charge on the battery prior to recharging, and the ambient temperature.
The optimum ambient temperature is 32°F - 104°F (0°C to 40°C). If
your camera needs a much longer time to fully charge the battery, try a
different USB charger.
bATTERy LIFE
Like with other electronic devices, more frequent usage means the
battery will drain more quickly. Some activities are more demanding on
the battery, such as taking photos and videos. For continuous photo or
video taking, the battery will last for approximately 2.5 hours. With typical
usage, the battery will last about a day. The remaining battery capacity
will appear in the top right corner of the screen. When the battery level is
low, it is recommended to recharge the battery before further use. When
the battery level is too low, the camera will not turn on until it is charged.
GETTING STARTED

8
8
AUTOMATIC SHUT OFF
To preserve battery life, the Kidizoom
®
Action Cam 180 will
automatically turn off after a short period of time when no buttons are
pressed. When recording videos or using the time-lapse photo function,
the camera will not automatically turn off until the process is complete.
The preview screen can also be set to automatically turn off after a short
period of time from within the Settings Menu to help save power. Please
refer to the Settings section in this manual for details.
bATTERy MAINTENANCE
Charge the battery regularly to keep it operating at optimum performance,
even when the camera isn’t regularly in use. For example, charge the
camera at least once every six months. Move the Master Power Switch
to the ON position before recharging the battery. Move the Master
Power Switch to the OFF position if the camera will not be in use for an
extended period of time.
bATTERy NOTICE
Misuse of batteries can lead to them bursting, causing a re or chemical
burns. Please read the below precautions:
• Do not disassemble.
• Do not crush and do not expose the battery to any shock or force such
as hammering, dropping or stepping on it.
• Do not short circuit.
• Do not expose to high temperatures or place near a heat source. Do
not leave in direct sunlight for any length of time.
• Do not dispose of in a re.
• Do not handle damaged or leaking batteries.
• Keep the battery out of the reach of children.
• Keep the battery dry.
• Examine the battery charging cord periodically for conditions that may
result in the risk of re, electric shock, or injury to persons such as
damage to the output cord, housing, or other parts. In the event of
such conditions, the battery charging cord should not be used until
properly repaired or replaced.
• If you nd that the time between charges is considerably shortened
with no change in usage, the battery could be nearing the end of its
life. Please dispose of the used battery as described in this manual.
The battery life varies from battery to battery depending on storage,
operating conditions and environment.
bATTERy NOTICE

9
MEMORy CARD INSTALLATION
Kidizoom
®
Action Cam 180 supports the below memory card types for
storage expansion:
• microSD
• microSDHC
• Make sure the camera is turned OFF.
• Locate the Memory Card Slot on the side of the camera.
• Pull up the rubber cover.
• Insert the memory card (not included) as illustrated below. Once the
memory card is inserted, turn the camera on and it will automatically
detect the card and set it as the default storage.
• To remove the memory card from the slot, make sure the camera is
turned OFF, pull up the rubber cover, and push the card once.
The microSD and microSDHC Logos are trademarks of SD-3C, LCC.
Note: If a memory card is inserted, data stored in internal memory
cannot be accessed from the camera until the memory card is removed.
To prevent accidental data loss, make sure you back up all important
data from your memory card before using it.
TO bEGIN USING
KIDIzOOM
®
ACTION CAM 180
Make sure that the Master Power Switch is set to the ON position
and that the battery is fully charged before using the camera.
Note: It is not necessary to move the Master Power Switch to the OFF
position
when used daily, otherwise the date and time will need to
be reset when switching the camera on again.
MEMORy CARD INSTALLATION

10
Press the Home/On/Off Button to turn the Kidizoom
®
Action Cam 180
on. When turning the camera on for the rst time, you will need to select
the language. Press up or down on the D-Pad to select your desired
language and press the OK Button to conrm.
Next, you will need to set the date and time. Use the D-Pad to select
the correct day, month, year, hour and minute. Press the OK Button to
conrm.
If you wish to change the language or date and time later, you can do so
from the Settings Menu.
QUICK OPERATION GUIDE
Take Photos
Press the Camera Button to go to Camera Mode. In Camera Mode,
press the OK Button or the Camera Button to take a photo. Press left
or right on the D-Pad to select different photo effects.
Record Videos
Press the Video Button to enter Video Mode. In Video Mode, press the
OK Button or the Video Button to start or stop recording. Press left or
right on the D-Pad to select different themes and effects.
Home Menu
From the Home Menu, you can access all the
activities on the Kidizoom
®
Action Cam 180. Press
the Home Button to display the Home Menu, then
press left or right on the D-Pad to select an activity,
and press the OK Button to conrm.
There are six activities in the Home Menu:
Camera Videos Playback
Games
Special
Videos
Settings
View Photos or Videos
Select the Playback icon in the Home Menu to view your photos and
videos. The latest photo or video will be displayed on screen rst. Press
up or down on the D-Pad to view the next or previous le. To delete the

11
current le, press the Delete Button to display the Delete Menu and
select to conrm. To delete all les, press down on the D-Pad when
in the Delete Menu and select to continue, and then follow the
instructions on screen to conrm.
Turn Off the Kidizoom
®
Action Cam 180
To turn your camera off, hold down the Home/On/Off Button for 2
seconds. The camera will also automatically turn off after a short period
of time without input.
CONNECTING TO A COMPUTER
You can connect Kidizoom
®
Action Cam 180 to a PC or Mac computer
using the Micro-USB Cable. To transfer les between the camera and
computer, follow these steps:
• Pull up the rubber cover of the Micro-USB Port on the side of your
camera.
• Insert the Micro-USB Cable (small end) into the Micro-USB Port of
the camera.
• Insert the larger end of the cable into a USB port on your computer. A
USB port is usually marked with this symbol:
• Two removable drives called VTech 5070 and VT SYSTEM will
appear on your computer. VTech 5070 is for storage of your data;
VT SYSTEM is for storage of system data and cannot be accessed. If
there is a memory card in the camera, the removable drive will show
the content on the memory card only.
Note: Once the camera is connected to your computer, do not disconnect
it while les are transferring. Only when your camera completes
transferring les should you eject it from your computer. Once ejected,
you can then physically disconnect the camera from your computer.
To Avoid Potential Damage to Your Kidizoom
®
Action Cam 180:
• When the Micro-USB Cable is not connected to the camera, ensure
that the rubber cover is fully covering the Micro-USB Port on the
camera and closed securely.
To Backup Photos or Videos Taken with Kidizoom
®
Action Cam 180:
• Locate and open the 100VTECH folder within the DCIM folder on the
removable drive VTech 5070.
• Copy and paste the photo and/or video les to a location on your
computer.
QUICK OPERATION GUIDE

12
To Transfer Photos or Videos to Kidizoom
®
Action Cam 180:
• First, select the photo or video les you would like to upload from your
computer.
• Locate and open the DOWNLOAD folder on the removable drive
VTech 5070, and drag and drop the photo or video les into the
PHOTO or VIDEO subfolders.
Note: Do not transfer photo or video les created by other cameras onto
Kidizoom
®
Action Cam 180, as these les may not be compatible.
SySTEM REQUIREMENTS FOR COMPUTER
CONNECTION
Microsoft
®
, Windows Vista
®
, Windows
®
7, Windows
®
8 or Windows
®
10
Operating System or a Macintosh Computer with macOS version 10.6,
10.7, 10.8, 10.9, 10.10. 10.11 or 10.12.
Microsoft
®
, Windows
®
and their logos are trademarks of the Microsoft
Corporation in the United States and other countries. Macintosh and
Mac logos are trademarks of Apple Inc. in the United States and other
countries. All other trademarks are the property of their respective
owners.
ACTIVITIES
Camera
Press the Camera Button or select the Camera icon from the Home
Menu to enter Camera Mode.
Photo Mode
• While holding the camera steady, press the
Camera Button or OK Button to take a picture.
• Press left or right on the D-Pad to cycle through
photo themes and effects.
• You can take a group of merged photos by
selecting a photo collage effect. Press left or right
on the D-Pad to nd your desired photo collage effect, and then press
the Camera Button or OK Button to take your pictures. If you want
to reuse the last frame, just press the Delete Button.
• You can also take ve or 10 photos quickly in one shutter press when
you choose X5 or X10 photo burst mode. You can access photo burst
mode by cycling left or right on the D-Pad.
• To view photos you have taken, press down on the D-Pad once as a
short cut.
CONNECTING TO A COMPUTER

13
• Press up on the D-Pad to access Camera Settings. From here, you
can enable or disable time-lapse and self-timer modes. Press the OK
Button to conrm any changes.
Self-Timer
• Press up on the D-Pad to access Camera Settings. From here, you
can enable or disable the self-timer. Press the OK Button to conrm
any changes.
• When the self-timer is enabled, there will be an eight second
countdown before a photo is taken.
Time-Lapse
• Press up on the D-Pad to access the Camera Settings. From here,
you can enable or disable time-lapse mode. Press left or right on the
D-Pad to select the length of time between photos. Press the OK
Button to conrm any changes.
• Once the time-lapse function is set, a Countdown icon
will appear
on the screen. Press the OK Button or Camera Button to start the
time-lapse photo recording. The rst photo will be taken immediately,
then the Countdown icon
will count down to the next photo.
Press the OK Button or Camera Button to stop recording, otherwise
recording will continue until the maximum number of time-lapse photos
is reached or battery is empty.
Note: VTech
®
recommends setting the screen to auto-off when
the camera is mounted for sports, such as on a bicycle, scooter or
skateboard. Please refer to the Settings section of this manual to enable
the camera screen auto-off function.
Video Mode
Press the Video Button or select the Video icon from the Home
Menu to enter Video Mode.
• Press the Video Button or the OK Button to start
recording. Press either button once again to stop
recording. A Play icon
will appear after the
recording is done, press the OK Button to watch
the video you just recorded. While the video is
playing, press the OK Button or Video Button to
skip the video and return to the preview screen.
• Press left or right on the D-Pad to cycle through different video themes
and effects.
• To view videos you have captured, press down on the D-Pad once to
enter Playback mode.

14
• Press up on the D-Pad to access Video Settings. From here, you can
change the video resolution and enable or disable the self-timer. Press
the OK Button to conrm any changes.
Video Resolution
Press up on the D-Pad to access the Video Resolution Settings
Menu. There are three video resolutions to choose from, press left or
right on the D-Pad to select a resolution and press the OK Button to
conrm.
• 160X120: This is the smallest video resolution size. Selecting this
allows you to record and save the most videos.
• 320X240: The video quality is better, but will take up more memory so
a smaller number of videos can be saved.
• 640X480: Best video quality, but the video le size will be even larger
and overall recording time is reduced. This resolution is only
available when using a memory card. Video themes and
effects are not supported at this resolution.
Self-Timer
• Press up on the D-Pad to access the Video Settings. From here, you
can enable or disable the self-timer. Press the OK Button to conrm
any changes.
• When self-timer is enabled, there will be an eight second countdown
before recording starts.
Playback
Select the Playback icon on the Home Menu to view your photos
and videos or press down on the D-Pad while in Camera Mode or Video
Mode.
• The latest photo or video you have taken will appear rst. Press up or
down on the D-Pad to cycle through your photos and videos.
• When a video or time-lapse photo is selected, press the OK Button
to play it.
• When a photo is selected, press the OK Button to see a closer view
of the photo. You can then use the D-Pad to pan across the photo.
Press the OK Button to zoom back out.
• Press the Delete Button to display the Delete Menu. Use the D-Pad
to select a photo or video to delete and then press the OK Button to
conrm.
• While watching a video le, press left or right on the D-Pad to rewind
or fast forward. Press the OK Button to pause or resume playback.
ACTIVITIES

15
Special Videos
Select the Special Video icon from the Home Menu to take stop-
motion, fast-motion, or slow-motion videos. Press left or right on the
D-Pad to select the mode you want to use and press the OK Button to
conrm.
Stop-Motion Video
Use this mode to take a sequence of photos within a set amount of time,
then turn those photos into a stop-motion video with fun background
music.
• After entering this mode, select a time interval between photos being
taken. Press left or right on the D-Pad to select a time interval, then
press the OK Button to conrm your selection.
• The camera will take photos automatically during the capture period.
Press the OK Button to start and stop capturing, or capturing will stop
automatically when the maximum number of photos is reached.
• Once capturing is complete, you then have the option to add
background music. Press left or right on the D-Pad to select between
songs, then press the OK Button to conrm and save your stop-
motion video.
• Once the le is saved, you can view it immediately, or you can view it
later from Playback mode.
Note:
• Videos created using the stop-motion video function are recorded at
320 X 240 resolution.
• Please check that there is enough free memory for this mode, as the
camera will stop recording if the memory gets too low.
Fast-Motion Video & Slow-Motion Video
In this mode you can record a video in fast- or slow-motion. Videos
captured in these modes will play back at a fast or slow speed.
After entering Fast-Motion Video Mode or Slow-Motion Video Mode, press
the OK Button to start recording, and then press the button again to stop
recording and save. The process of saving the video may take some time.
Note:
• Videos created with the fast-motion or slow-motion video modes are
recorded at 320 X 240 resolution.
• You can record up to 1 minute of fast-motion or slow-motion video per
le, and it will save as a different nal length whether it was recorded
as fast- or slow-motion video.

16
• Please check that there is enough free memory for this mode, as the
camera will stop recording if the memory gets too low.
Games
There are three built-in games on the Kidizoom
®
Action Cam 180. From the Games Menu, press left
or right on the D-Pad to select a game, and press the
OK Button to play it.
Snorkeling Fun
The ocean is a deep and mysterious place, perfect for an adventurous
treasure hunt! It’s time to dive deep into the ocean to explore and nd
the treasures within!
Control: The diver will constantly oat upwards toward the top of the
screen. Press the OK Button (or down on the D-Pad) to make the diver
swim down. Try to collect as many coins as you can without hitting any
obstacles.
Unicycle Challenge
It’s time for a unicycle challenge Try your best to
avoid all of the obstacles and collect as many stars
as you can! Jump and duck to stay safe.
Control: Press the OK Button (or up on the D-Pad)
to make the rider jump and press down on the D-Pad
to make the rider duck down.
Forest Quest
In the forest there are many mysterious creatures.
At the beginning of each round, you will be shown a
creature. Look through the binoculars to nd it.
Control: Once the correct creature is in the center of
the frame, press the OK Button. Make sure you nd
the correct one to gain points!
Settings
Select the Settings icon from the Home Menu to enter settings.
From here, use the D-Pad to make selections and press the OK Button
to conrm changes. Press the Home/On/Off Button to exit settings.
You can adjust the following items:
Volume: Increase or decrease the system volume.
Brightness: Increase or decrease the LCD brightness.

17
Memory: See the status of the internal memory or an external memory
card. You can also choose to format the memory or perform a factory
reset of the Kidizoom
®
Action Cam 180. Select an option and follow the
instructions on screen to complete the process.
Note:
• Formatting the memory will erase all of the data stored, including all
photos and videos.
• Factory Reset will also reset all system settings to factory defaults.
• If a memory card is inserted, the data stored in the internal memory
cannot be seen until the memory card is ejected.
• When the memory is getting full, or when the le indexes have been
used up, you should back up all Kidizoom
®
Action Cam 180 les to
your computer and then delete all of the les on the camera
Indoor Light Frequency
When travelling, use this option to set the AC power frequency according
to the region you are in. If this is not set correctly, you may see some
ickering on the screen and on the photos and videos you take when in
an indoor environment.
Note: Please leave your Kidizoom
®
Action Cam 180 set to the default
value unless you are travelling.
Quick Review After Taking Photo
Enable or disable the quick photo review screen after taking a photo in
Camera Mode.
Camera Screen Auto Off
Enable or disable the camera screen auto-off function. If this is turned
on, the screen will automatically turn off after a set amount of time when
in Camera Mode or Video Mode.
Note: For safety, VTech
®
highly recommends setting the screen to auto
off when the camera is mounted for sports, such as on a bicycle, scooter
or skateboard.
Date & Time
From this menu, press up or down on the D-Pad to scroll and select the
current day, month, year, hour and minute, as well as the date and time
format. Press left or right on the D-Pad to skip to the previous or next item.
Language
This setting allows you to change the system language on the camera.

18
CARE & MAINTENANCE
• Keep the rubber covers over the micro-USB port and memory card slot
tightly closed when they're not in use in order to prevent dust or water from
getting in.
• Keep the camera clean by wiping it with a slightly damp cloth.
• Keep the camera out of direct sunlight and away from direct heat sources.
• Do not drop the camera on a hard surface, expose it to moisture, or
immerse it in water.
• Do not use any sharp or pointed objects to stab any parts of the waterproof
case, or the waterproof performance may be affected.
WARNING
A very small percentage of the public, due to an existing condition, may
experience epileptic seizures or a momentary loss of consciousness
when viewing certain types of ashing colors or patterns.
While Kidizoom
®
Action Cam 180 does not contribute to any
additional risks, we do recommend that parents supervise their
children while they play games. If your child experiences dizziness,
altered vision, disorientation, or convulsions, discontinue use
immediately and consult your doctor.
Please note that focusing on the screen at close range or handling
a Kidizoom
®
Action Cam 180 as a game controller for a prolonged
period of time may cause fatigue or discomfort. We recommend that
children take a 15 minute break for every hour of play.
TROUbLESHOOTING
Check this section if you experience difculty operating the Kidizoom
®
Action Cam 180.
Possible cause Correction
Camera is not
working
1. Turn the Master Power Switch OFF for 30
seconds.
2. Turn the Master Power Switch ON again
and then press the Home Button to turn the
camera on. The Kidizoom
®
Action Cam 180
should now function normally.
3. If the camera still does not work, recharge the
battery and repeat steps 1 and 2.

19
Screen is not
working correctly
1. Turn the Master Power Switch OFF for 30
seconds.
2. Turn the Master Power Switch ON again
and then press the Home Button to turn the
camera on. The Kidizoom
®
Action Cam 180
screen should now function normally.
Images taken are
not clear
1. Make sure the lighting conditions of the
shooting environment are good.
2. Check to see if the camera lens is clean. If you
nd some dust or dirt on it, follow the steps
to clean the lens in the Care & Maintenance
section of this manual.
Sometimes the
recorded video is
not smooth
Check your memory card’s performance, it is
recommended to use a microSD / microSDHC
card Class 6 or above. Using a memory card
with lower performance may slow down writing
data on the card and thus affect the video
quality.
Cannot connect
the camera to a
computer
1. Check the connections on the micro-USB
cable between the camera and the computer,
and review the Connecting to a Computer
section of this manual.
2. Turn the Master Power Switch OFF for 30
seconds. Then turn the Master Power Switch
ON and reconnect the camera to the computer.
Cannot save les
Check if the memory card is full. If there is no
memory card inserted, then check the internal
memory status. This can be reviewed from the
Settings Menu.
Cannot view
video or photo
les loaded from
a computer
Check if the les are in the correct directory on the
camera. While connected to a computer, photos
should be put in the DOWNLOAD\PHOTO
folder, and video les should be put in the
DOWNLOAD\VIDEO folder. For further details
and instructions, please review the Connecting
to a Computer section of this manual.

20
Memory card not
detected
1. Check if the memory card is correctly inserted.
2. Check to see if the memory card is the supported
type. The camera only supports microSD or
microSDHC cards Class 6 or above.
3. Check to see if the le system of your memory
card is FAT or FAT32. Kidizoom
®
Action
Cam 180 does not support NTFS or exFAT
le systems. You should back up all important
data from your memory card and format it in
either the FAT or FAT32 le systems before
using it with your Kidizoom
®
Action Cam 180.
BATTERY DISPOSAL
How to Take Out the Battery for Disposal
CAUTION: These steps must be carried out with care by an adult.
Wearing protective gloves is recommended in case any battery leakage
has occurred.
1. Ensure the Master Power Switch is set to the OFF
position.
2. Remove the plate covering the back of the Kidizoom
®
Action Cam
180. A tool may be required to remove it. We recommended rst trying
to remove the plate from the top corner.
3. Remove the below buttons from the Kidizoom
®
Action Cam 180.
/