Page is loading ...

WindChaser Products: Developers of Fans, Heaters,
Air-Treatment Products, Portable Air-Conditioners and
Portable Ice Makers
INSTRUCTION MANUAL
MODEL ICM15, ICM15S
PLEASE READ BEFORE USE AND SAVE
Portable
WindChaser Products, Inc.
4130 Del Rey Avenue • Marina del Rey, CA 90292
Phone: 310-827-8615 Fax: 310-827-8566
Toll Free: 1-800-405-2943
www.windchaserproducts.com
WindChaser Products, Inc. 2004©
IceMaker
IceMaker

Thank you for choosing WindChaser
®
Products. Please read all
instructions before assembly and use. Please empty all items from carton
and save carton for future use. If you have any questions or require
assistance, please contact WindChaser customer service at:
www.windchaserproducts.com or 1-800-405-2943.

8
CONTENTS
MODEL ICM15,
ICM15S
Before Initial Use 2
Parts Diagram 3
Operating Instructions 3
Maintenance Instructions 5
Troubleshooting 6
Limited Warranty 7
Portable
IceMaker

7
Attach your purchase receipt here
PLEASE KEEP YOUR RECIEPT.
YOUR RECIEPT IS YOUR PROOF OF
PURCHASE AND IS NECESSARY FOR
WARRANTY SERVICE.
Read this Entire Instruction Manual Before Use.
For your reference:
Serial No. Date of Purchase
Name and Address of Dealer
BEFORE INITIAL USE
2
LIMITED WARRANTY
WindChaser Products, Inc.
4130 Del Rey Avenue, Marina del Rey, CA 90292
Phone: 310-827-8615 Fax: 310-827-8566
Toll Free: 1-800-405-2943
www.windchaserproducts.com
One (1) Year Limited Warranty Terms and Conditions
This warranty applies to repair or replacement if a product is found to be
defective in material or workmanship. This warranty does not apply to any
damage resulting from commercial, abusive and/or unreasonable use or
supplemental damage. Defects as a result of normal wear and tear will not
be considered manufacturing defects under this warranty. Read the
instruction manual before attempting to use this product. WindChaser
Products, Inc. is not liable for incidental or consequential damages of any
nature. Any implied warranty of merchantability or fitness for a particular
purpose on this product is limited in duration to the duration of this warranty.
Some states do not allow the exclusion or limitation of incidental or
consequential damages or limitations on how long an implied warranty
lasts, so the above limitations or exclusions may not apply to you. This
warranty gives you specific legal rights, and you also may have other rights
which vary from state to state. This warranty applies only to the original
purchaser of this product. WindChaser Products, Inc. will repair or replace
this product if it is found to be defective in material and/or workmanship.
Defective product should be returned to the place of purchase in
accordance with store policy. Thereafter, while within the warranty period,
any defective product should be returned to WindChaser Products, Inc. This
warranty does not cover damage resulting from unauthorized attempts to
repair or from any use not in accordance with its manual. Return defective
product to WindChaser Products, Inc., 4130 Del Rey Avenue, Marina del
Rey, CA 90292, Attn: Customer Service, freight prepaid with proof of
purchase and $15 for handling, return packing and shipping charges.
Include proof of purchase, name, address, and daytime phone number.
Due to minor changes in design or otherwise, the product you buy may
sometimes differ slightly from illustration.
This warranty is valid only in the United States and Canada.
BEFORE RETURNING DEFECTIVE PRODUCT,
CONTACT CUSTOMER SERVICE BY
E-MAIL ([email protected])
OR PHONE.

The power indicator light is on.
The compressor makes a
buzzing noise when on.
Water shortage indicator light is
lit.
Ice full indicator light is on.
There is no indicator light on the
board.
Both water low and ice full
indicator lights are on.
Water Low light is on when the
tank is filled with water
The ice cubes are fusing
together
Water is not freezing during
normal ice making cycle.
The Voltage is lower than
required. This unit requires a
minimum of 100 volts.
1. There is no water or the
water level is too low.
2. The strainer is blocked
There is too much ice.
The fuse is blown.
The water box cannot tilt
1. Using distilled, reverse
osmosis, or other very
pure water.
2. Air pocket may be
preventing the water
from contacting the
level sensor.
1. Ice making time is too long.
2. The water temperature in the
inner liner is too low.
1. Refrigerant leaks.
2. There is a block in the
refrigerating system.
Stop the ice maker.
Make sure the voltage is 100
and restart.
1. Fill water and restart (press
stop button first then press
the start button).
2. Clean the strainer.
Set the unit to the smallest
ice cube option.
Replace the fuse.
Water box is blocked by ice
cubes. (1) Take out the cubes.
If not, (2) Turn the water box by
hand slightly and restart. If both
solutions are not successful,
please contact WindChaser
Customer Service
(see warranty).
1. Add a pinch of salt to water
so that (a) the sensor detects
the water, or (b) use less
pure water.
2. Force some water through the
hole at the bottom right of the
water tank to push water to
the sensor
1. Stop the machine and reset
the ice making time. Start
the machine after the ice
block melts
2. Replace the water in the inner
liner. The suggested water
temperature is 44.6ºF-77ºF
(7ºC-25ºC)
Contact WindChaser Customer
Service.
6 3
OPERATING INSTRUCTIONS
Pre-Operating Instructions
1. The incline angle of the cabinet should not be over 45º during transportation. Do not
turn the ice maker upside-down. Doing so could cause the compressor or refrigerating
system to operate incorrectly.
2. The ice maker should be placed on a level and solid surface and away from any heat
source and corrosive gas. If the feet of the ice maker are not at a level setting, turn
each foot clockwise to raise the foot or counter-clockwise to lower the foot. Continue
this with all feet until the unit is stable. At least six inches of clearance should be left
around the ice maker to ensure proper ventilation.
3. Before using the ice maker for the first time, wait about 12 hours after positioning it in a
proper place.
4. Clean the inside of the ice maker thoroughly. Wipe the inner liner, ice collecting board,
water box, ice pusher and evaporator rods.
Grounding Instructions
This product must be grounded. If it should malfunction or breakdown,
grounding provides a path of least resistance for electric current to reduce the
risk of electric shock. This product is equipped with a cord having an
equipment grounding conductor and a grounding plug. The plug must be
plugged into an appropriate outlet that is properly installed and grounded in
accordance with all local codes and ordinances.
Avoid the use of an extension cord because the extension cord may overheat and
cause a risk of fire. However, if you have to use an extension cord, the cord shall be
No. 16 AWG minimum size and rated no less than 1800W.
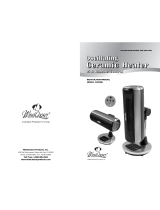
Parts Diagram
PARTS DIAGRAMTROUBLESHOOTING
Problem Possible Causes Solution
1. Inner Liner
2. Water Storage Tank
3. Ice Collecting Tray
4. Ice Storage Basket
5. Ice Pusher
6. Water Box
7. Evaporator Rods
8. Water Inlet Tube
9. Water Drainage Plug
10. Compressor
11. Water Pump
12. Lid
13. Control Panel
14. Foot
15. Strainer
16. Temperature Sensor

MODEL ICM15
54
Operating Instructions
1. Open the lid and fill the water storage tank with drinkable (tap, purified or
bottled) water. Make sure that the water level is not over the bottom of the ice
collecting basket. The unit usually makes frosted ice cubes. For clear ice:
(a) use water containing little or no minerals such as distilled, reverse
osmosis or other very pure water; and (b) add a pinch of salt to the water so
that the water is detected by the sensor. This amount of salt will not affect
the taste of the ice.
2. Plug the unit into a grounded outlet panel. Push the “start” button on control
panel to start the machine. Press the “Select” button to select the desired
cube size. The first 3 minutes after starting is used by the machine for self-
inspection. After that, normal ice making cycle begins.
3. The ice cube making procedures are as follows:
a) Water is pumped into the water box from the water storage tank,
which may take up to 40 seconds.
b) The ice cube making cycle begins when the evaporator rods are
dipped into the water box to start making ice.
c) It will take approximately 6 to 10 minutes for the ice making cycle
depending upon the cube size selected. After the cycle is finished,
the water box will tilt forward and the remaining water will flow back
to the water storage tank through the water leakage grooves and the
evaporator rods release the ice cubes.
d) Approximately 30 seconds later, the water box will tilt backward and
the ice pusher will push the ice into the ice storage basket. After the
waterbox flips back to its level position, the next ice making cycle
will begin.
4. Check the water level during the water filling procedure. If there is no water
from the pump, the icemaker will know that there is no water in the water box
and it will stop operation. The Water Low indicator light will illuminate. Fill the
water storage tank with water and press the stop button, then press the start
button after the Water Low indicator light goes out. The ice maker will start to
make ice again.
5. When the maximum capacity of the ice cubes are collected the ice will touch
the temperature sensor, the ice maker will stop operating and the Ice Full
light will illuminate. When the ice is below the sensor and the temperature of
the sensor rises to about 50ºF (10ºC) the icemaker will restart itself.
6. If the ice full indicator light and water low indicator light are both on at the
same time, please check and remove any ice cubes blocking the water box.
If there is no ice blocking, please turn the water box slightly by hand. 3-5
minutes later, restart the machine. If there is no ice blocking and there is no
change after turning the box slightly, the ice maker may need repair. Please
contact WindChaser Customer Service (see warranty section).
Ice Making Capacity: 29 lbs.
(13.15 kg) /day 2.3 Amps
Ice Storage Capacity: 2.5 lbs. (1.2 kg)
Electric Shock Protection Class: I
Power Input: 150W
Refrigerant: R134a/95g (3.35 oz)
Foaming Agent: 141b
Dimensions (L X D X H)
14.18 X 15.67 X 16.93
(in.)
360 X 398 X 430
(mm)
Specifications
MAINTENANCE INSTRUCTIONS
1. To ensure the cleanliness of the ice cubes, the water in the water storage tank must be
replaced every 24 hours.
2. The strainer (located at the bottom right of the water storage tank) needs
to be cleaned regularly so that impurities in the water do not go into the water
pump and affect the normal operation of the machine. The strainer may be
cleaned with a small, flexible bottle brush.
3. Unscrew the drainage plug to drain the remaining water in the tank when the ice maker
will not be used for an extended period of time.
4.Please clean the ice maker regularly. When cleaning, disconnect the power and remove
the ice cubes. Use a mild cleaning detergent diluted in water with a soft towel or sponge
to clean the inside and outside surface of the unit. Do not spray any liquids on the unit.
Avoid using strong cleaning solutions to clean the unit such as acids and gasoline.
5. When plugging or unplugging the unit, pull on the plug head and not the wire.
6. If the power cord is damaged, please contact WindChaser Customer Service. (See
Warranty)
7. There are three sizes of ice cubes available. The larger the ice cube size
selected, the more time is needed to make ice. When the ambient
temperature is low (lower than 59º F) the small or medium ice cubes are
suggested to prevent cubes from fusing together.
8. When removing ice cubes and reinstalling the basket, push the basket
downward to its original position to ensure the temperature sensor is above
the basket so as to ensure that the machine operates properly.
9. If the compressor stops for any reason such as water shortage, too much ice,
power off, etc., don’t restart it right away. Please wait at least 3 minutes
before restarting the machine.
Control Panel
/