Page is loading ...

USER GUIDE
Aleratec
RoboJet Disc Autoloader™
Part No. 360104EU

www.aleratec.com
Copyright/Model Identification
The content of this manual is for informational purposes only and is subject
to change without notice.
This manual is copyright with all rights reserved. Under copyright laws, this
manual and the software described within may not be copied, except in the
normal use of the product(s) described within or to make a backup copy.
Copyright© 2012
Aleratec, Inc.
9851 Owensmouth Avenue
Chatsworth, CA 91311 U.S.A.
Aleratec
®
is a registered trademark and
RoboJet Disc Autoloader™ is a
trademark of Aleratec, Inc.
Check out Aleratec Online!
• Blog.Aleratec.com
• Facebook.com/Aleratec
• Twitter.com/Aleratec
• YouTube.com/Aleratec
Please record the following information to help expedite any warranty
claim:
Model No. _____________________ Serial No. _____________________
Date Purchased ________________________________________________
Place of Purchase ______________________________________________

www.aleratec.com
Radio/TV Interference Statement
The equipment described in this guide emits radio frequency energy. If it
is not installed in accordance with the manufacturer’s instructions, it may
cause interference with radio or television reception.
This equipment has been tested and found to comply with the limits for a
Class B digital device, pursuant to Part 15 of the FCC Rules. These limits
are designed to provide reasonable protection against harmful interference
in a residential installation.
This equipment generates, uses, and can radiate radio frequency energy.
If not installed and used in accordance with the instruction manual, this
equipment may cause harmful interference to radio communications.
However, there is no guarantee that interference will not occur in a
particular installation. If this equipment does cause harmful interference to
radio or television reception, which can be veried by turning the equipment
off and on, the user is encouraged to try to correct the interference by one or
more of the following measures:
• Reorient or relocate the receiving antenna.
• Increase the separation between the equipment and the receiver.
• Connect the equipment to an electrical outlet on a circuit that is different from
the circuit to which the receiver is connected.
• Consult your dealer or an experienced radio/TV technician for help.
This equipment has been certied to comply with the limits for a Class B
computing device, pursuant to FCC Rules. In order to maintain compliance
with FCC regulations, shielded cables must be used with this equipment.
Operation with non-approved equipment or unshielded cables is likely to
result in interference to radio and TV reception. The user is cautioned that
changes and/or modications made to this equipment, without the approval
of manufacturer, could void the user’s authority to operate this equipment.

www.aleratec.com

www.aleratec.com
Table of Contents
Introduction .......................................................................................1
Product Features ..................................................................................... 1
Included Items ........................................................................................1
Key Items ................................................................................................2
Precautions .......................................................................................3
Location ..................................................................................................3
Printer Requirements .............................................................................. 4
Installation .........................................................................................5
Unpacking the Unit .................................................................................5
Printer Installation ..................................................................................5
Minimum Hardware and Software Requirements ..................................6
Operation ................................................................................................ 6
Transportation .........................................................................................6
Installing Aleratec’s RoboJet Disc Autoloader Software ........................7
Setup Autoloader ....................................................................................9
Using the RoboJet Disc Autoloader .......................................13
Powering on the Printer ........................................................................ 13
Getting to know the Aleratec Autoloader application ...........................16
Using the Aleratec RoboJet Disc Autoloader Application ....................18
Troubleshooting .............................................................................20
Specifications .................................................................................24
Technical Support ..........................................................................26
Service and Support .......................................................................27
Technical Support FAX Back Form ...............................................30

www.aleratec.com

www.aleratec.com
1
Introduction
Thank you for purchasing the Aleratec RoboJet Disc Autoloader. Please
read this User Guide thoroughly before using this product.
Product Features
The Aleratec RoboJet Disc Autoloader is a fully automatic disc loading system
for compatible printers. Features include:
▪ Up to 100 disc capacity
▪ Autoloader lets you add more blanks and remove nished discs
while the system is printing
▪ Simple, reliable and fast disc feed system
▪ Easy installation
Included Items
A. USB2.0 Hub
B. USB cable
C. Disc Bin, 50 and 100 Disc Capacity
D. Power Adapter cable
E. Disc Bin, 100-Disc Capacity
F. Disc Bin, 50-Disc Capacity
G. 2 Autoloader Disc Trays (one is
already in the Autoloader unit)
E
D
F
C
A
B
G

www.aleratec.com
2
Introduction
Key Items on the RoboJet Disc Autoloader
A. Disc Holder Post Slots
B. Disc Load Mechanism
C. Disc Bin Holder
D. Autoloader Disc Tray
E. Printer Mode Switch
F. USB Port
G. Power Port
C
F
G
B
E
A
D

www.aleratec.com
3
1. Choose a flat, level surface for the printer and Autoloader near a
table edge. (This is important because the disc bin will hang over
the table edge once installed)
2. Allow adequate clearance for moving parts.
3. Do not place near heat sources such as radiators or air ducts, or
in a place subject to direct sunlight, excessive dust, mechanical
vibration or shock.
4. Good care will help assure maximum product life. Improper
operating environment and misuse may void the warranty.
Precautions
Before installing your RoboJet Disc Autoloader, please read the following.
Location
Avoid placing the RoboJet Disc Autoloader in a location subject to:
• High humidity
• High temperature
• Excessive dust
• Mechanical vibration
• Direct sunlight
• Electromagnetic radiation

www.aleratec.com
4
Printer Requirements
The RoboJet Disc Autoloader is designed to work specically with the Epson
Artisan 50 inkjet printer (not included), although it can also be made to work with
certain other models of Epson inkjet printers which support disc printing. Below
is a list of other compatible Epson printer models.
DesignedforEpsonArtisan50
Can also work with Epson models:
Asia: R290, T50
America: R280
Europe: R285, P50
Japan: E301, E302
Precautions

www.aleratec.com
5
Installation
Unpacking the Unit
Set the components on at level surface that will hold the RoboJet Disc
Autoloader and your PC. Next, carefully remove the packing material that
contains the above items. Then place all shipping materials back into the shipping
carton for future use.
Note: It is important to keep the original shipping container and packaging.
In the event you misplace your packaging and need to ship the RoboJet Disc
Autoloader, you must first contact the service department to purchase a new
shipping container for a small fee.
Check for all the components and proceed to the next step.
Printer Installation
IntallPrinter:
Follow the instructions that came with your compatible printer product and install
the printer. Connect the printer to your computer using the included hub.* Make
sure all required supporting software and drivers are installed successfully and
working properly.
Note: The printer and Autoloader must both be connected to your PC using
the included hub in order for the Autoloader software to work properly.
USB2.0 Hub

www.aleratec.com
6
Installation
Minimum Hardware and Software Requirements
It is recommended that you operate your new RoboJet Disc Autoloader with PC
systems that exceed the minimum hardware requirements to ensure smooth and
efcient operation.
Pentium III 1GHz, 1GB DRAM (2GB DRAM recommended)
Windows 7, XP, Vista, 2000 SP4
Available USB2.0 port
Operation
Do not move the RoboJet Disc Autoloader during operation. This may cause it to
malfunction during operations.
Avoid exposing the RoboJet Disc Autoloader to sudden changes in temperature
as condensation may form inside. Operating the RoboJet Disc Autoloader
immediately after a sudden increase in temperature may result in damage.
Transportation
Keep the original packing materials for future moving or shipping of the
RoboJet Disc Autoloader.

www.aleratec.com
7
Installation
Installing Aleratec’s RoboJet Disc Autoloader Software
1. When you place the installation CD into your computer’s drive, the
installation screen should appear.
If you do not see this, it means that autorun feature of Windows is disabled
and you have to start this program manually. In order to do it you have to go
to “My Computer” (Windows XP) or “Computer” (Windows Vista/7), right
click on the CD/DVD drive that you are using, select “Explore/Open” and
double click on AUTORUN.exe. If your PC does not have an optical drive
that can read CDs, contact Aleratec support with your purchase information.
2. Install the Prolic Driver.
3. Install the .NET Framework
4. Click RoboJet Disc Autoloader on the installation menu to begin the
installation process. If a “User Account Control” message pops up on
your screen, please click “Yes” to proceed.

www.aleratec.com
8
Installation
Installing Aleratec’s RoboJet Disc Autoloader Software
5. The setup wizard will guide you through several steps screens to
congure the installation. Choose a “Typical” setup and continue on
until the installation is complete.
6. Once the installation has been completed successfully, you will see
shortcuts for the “Aleratec RoboJet Disc Autoloader” application on
your desktop.

www.aleratec.com
9
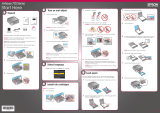
1. Make sure that the printer is OFF when setting up the Autoloader.
Open manual feed door on printer
Set Up Autoloader
Installation
2. Remove printer “paper feed” tray

www.aleratec.com
10
3. Insert Autoloader into printer “disc tray” slots at a 45 degree angle
45˚
4. Lay Autoloader down on table
Installation

www.aleratec.com
11
6. Attach Disc bin
5. Insert Disc holder posts
Installation

www.aleratec.com
12
7. Attach power cord and plug into power outlet
8. Attach included USB cord into included USB2.0 hub and attach hub to
the computer. Both the printer and Autoloader must be connected to your
PC using the included USB2.0 hub in order for the Autoloader software to
work properly.
Installation
USB2.0 Hub
Note: Make sure the RoboJet software/driver installation is complete before
connecting the Autoloader to the computer.

www.aleratec.com
13
Using the RoboJet Disc Autoloader
Powering on the Printer
The design of the Epson printer does not allow for it to power on properly.
with a disc tray attached. Because of this, the RoboJet Disc Autoloader is
designed with a physical “Printer Mode Switch” that can be used to simulate the
absence of the disc tray. Whenever the printer is powered on, the Printer Mode
Switch must be in the paper mode which is indicated by a paper icon indicating
the switch position. Once the printer has initialized and shows a steady green
light on its power button, then the Printer Mode Switch can be pushed forward
to the disc icon position, which signals the printer that discs are to be printed.
1. Move Printer Mode Switch to paper position.
Disc Position
Paper Position
Printer Mode Switch

www.aleratec.com
14
Using the RoboJet Disc Autoloader
Powering on the Printer
2. Power on the printer.
3. Wait for printer to initialize and show a steady green indicator on its
power button.
/